
User Guide
Page 1
B85M-G R2.0 Motherboard
B85M-G R2.0 Motherboard
User Guide
Page 3
Contents Safety information...iv About this guide...iv Package contents...vi B85M-G R2.0 specifications summary vi Chapter 1: Product introduction 1.1 Before you proceed 1-1 1.2 Motherboard overview 1-1 1.3 Central Processing Unit (CPU 1-3 1.4 System memory 1-7 1.5 Expansion slots 1-9 1.6 Jumpers...1-11 1.7 Connectors 1-12 1.9 Software support 1-21 Chapter 2: BIOS information 2.1 ...Tweaker menu 2-12 2.6 Advanced menu 2-21 2.7 Monitor menu 2-30 2.8 Boot menu 2-33 2.9 Tools menu 2-39 2.10 Exit menu...2-40 Appendices Notices...A-1 ASUS contact information A-3 iii
Contents Safety information...iv About this guide...iv Package contents...vi B85M-G R2.0 specifications summary vi Chapter 1: Product introduction 1.1 Before you proceed 1-1 1.2 Motherboard overview 1-1 1.3 Central Processing Unit (CPU 1-3 1.4 System memory 1-7 1.5 Expansion slots 1-9 1.6 Jumpers...1-11 1.7 Connectors 1-12 1.9 Software support 1-21 Chapter 2: BIOS information 2.1 ...Tweaker menu 2-12 2.6 Advanced menu 2-21 2.7 Monitor menu 2-30 2.8 Boot menu 2-33 2.9 Tools menu 2-39 2.10 Exit menu...2-40 Appendices Notices...A-1 ASUS contact information A-3 iii
User Guide
Page 4
...this guide is organized This guide contains the following parts: • Chapter 1: Product introduction This chapter describes the features of the motherboard and the new technology it by yourself. If possible, disconnect all cables are correctly connected and the power cables are unplugged. •...about the voltage of the switches, jumpers, and connectors on a stable surface. • If you need when installing and configuring the motherboard. These devices could interrupt the grounding circuit. • Ensure that the power cables for the devices are unplugged before using , contact...
...this guide is organized This guide contains the following parts: • Chapter 1: Product introduction This chapter describes the features of the motherboard and the new technology it by yourself. If possible, disconnect all cables are correctly connected and the power cables are unplugged. •...about the voltage of the switches, jumpers, and connectors on a stable surface. • If you need when installing and configuring the motherboard. These devices could interrupt the grounding circuit. • Ensure that the power cables for the devices are unplugged before using , contact...
User Guide
Page 6
... memory Dual-channel memory architecture Supports Intel® Extreme Memory Profile (XMP) * Hyper DIMM support is damaged or missing, contact your motherboard package for the following items. Motherboard Cables Accessories Application DVD Documentation ASUS B85M-G R2.0 motherboard 2 x Serial ATA 6.0 Gb/s cables 1 x I/O Shield Support DVD User Guide If any of the above items is subject to www...
... memory Dual-channel memory architecture Supports Intel® Extreme Memory Profile (XMP) * Hyper DIMM support is damaged or missing, contact your motherboard package for the following items. Motherboard Cables Accessories Application DVD Documentation ASUS B85M-G R2.0 motherboard 2 x Serial ATA 6.0 Gb/s cables 1 x I/O Shield Support DVD User Guide If any of the above items is subject to www...
User Guide
Page 9
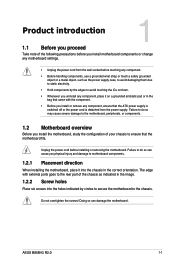
... the ATX power supply is switched off or the power cord is detached from the wall socket before installing or removing the motherboard. ASUS B85M-G R2.0 1-1 Doing so can cause you install or remove any component, place it into the holes indicated by the edges to... Do not overtighten the screws! Product introduction 1 1.1 Before you proceed Take note of the following precautions before you install motherboard components or change any motherboard settings. • Unplug the power cord from the power supply. Unplug the power cord before touching any component. •...
... the ATX power supply is switched off or the power cord is detached from the wall socket before installing or removing the motherboard. ASUS B85M-G R2.0 1-1 Doing so can cause you install or remove any component, place it into the holes indicated by the edges to... Do not overtighten the screws! Product introduction 1 1.1 Before you proceed Take note of the following precautions before you install motherboard components or change any motherboard settings. • Unplug the power cord from the power supply. Unplug the power cord before touching any component. •...
User Guide
Page 10
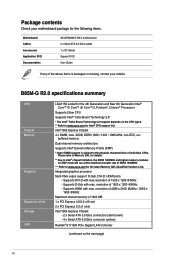
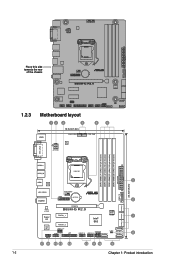
Place this side towards the rear of the chassis B85M-G R2.0 1.2.3 Motherboard layout 12 3 3 4 5 19.3cm(7.6in) KBMS CHA_FAN2 CPU_FAN DIGI +VRM ATX12V DVI_VGA DDR3 DIMM_A1 (64bit, 240-pin module) DDR3 DIMM_A2 (...pin module) EATXPWR 1-2 USB910 USB3_56 LGA1150 2 HDMI ASM 1442K 23.4cm(9.2in) LAN_USB34 CHA_FAN1 USB3_12 TPM BATTERY AUDIO 6 SATA6G_3 SATA6G_2 SATA6G_1 PCIEX16 Realtek B85M-G R2.0 8111GR BIOS Super I/O PCIEX1_1 Intel® 7 B85 PCIEX1_2 ALC 887 SPDIF_OUT COM CHASSIS LPT USB1112 CLRTC SPEAKER USB1314 SATA3G_1 SATA6G_4 SATA3G_2 8 AAFP ...
Place this side towards the rear of the chassis B85M-G R2.0 1.2.3 Motherboard layout 12 3 3 4 5 19.3cm(7.6in) KBMS CHA_FAN2 CPU_FAN DIGI +VRM ATX12V DVI_VGA DDR3 DIMM_A1 (64bit, 240-pin module) DDR3 DIMM_A2 (...pin module) EATXPWR 1-2 USB910 USB3_56 LGA1150 2 HDMI ASM 1442K 23.4cm(9.2in) LAN_USB34 CHA_FAN1 USB3_12 TPM BATTERY AUDIO 6 SATA6G_3 SATA6G_2 SATA6G_1 PCIEX16 Realtek B85M-G R2.0 8111GR BIOS Super I/O PCIEX1_1 Intel® 7 B85 PCIEX1_2 ALC 887 SPDIF_OUT COM CHASSIS LPT USB1112 CLRTC SPEAKER USB1314 SATA3G_1 SATA6G_4 SATA3G_2 8 AAFP ...
User Guide
Page 11
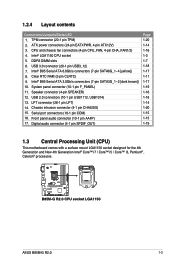
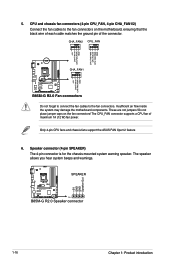
... (CPU) This motherboard comes with a surface mount LGA1150 socket designed for the 4th Generation and New 4th Generation Intel® Core™ i7 / Core™ i5 / Core™ i3, Pentium® , Celeron® processors. Speaker connector (4-pin SPEAKER) 12. USB 2.0 connectors (10-1 pin USB1112, USB1314) 13. B85M-G R2.0 B85M-G R2.0 CPU socket LGA1150 ASUS B85M-G R2.0 1-3 CPU and...
... (CPU) This motherboard comes with a surface mount LGA1150 socket designed for the 4th Generation and New 4th Generation Intel® Core™ i7 / Core™ i5 / Core™ i3, Pentium® , Celeron® processors. Speaker connector (4-pin SPEAKER) 12. USB 2.0 connectors (10-1 pin USB1112, USB1314) 13. B85M-G R2.0 B85M-G R2.0 CPU socket LGA1150 ASUS B85M-G R2.0 1-3 CPU and...
User Guide
Page 12
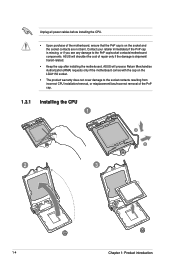
... the cost of the PnP cap. 1.3.1 Installing the CPU 1 A B 2 3 1-4 Chapter 1: Product introduction ASUS will process Return Merchandise Authorization (RMA) requests only if the motherboard comes with the cap on the socket and the socket contacts are not bent. Contact your retailer immediately if the ...PnP cap is shipment/ transit-related. • Keep the cap after installing the motherboard. Unplug all power cables before installing the CPU. • Upon purchase of the motherboard, ensure that the PnP cap is on the LGA1150 socket. • The product warranty does not...
... the cost of the PnP cap. 1.3.1 Installing the CPU 1 A B 2 3 1-4 Chapter 1: Product introduction ASUS will process Return Merchandise Authorization (RMA) requests only if the motherboard comes with the cap on the socket and the socket contacts are not bent. Contact your retailer immediately if the ...PnP cap is shipment/ transit-related. • Keep the cap after installing the motherboard. Unplug all power cables before installing the CPU. • Upon purchase of the motherboard, ensure that the PnP cap is on the LGA1150 socket. • The product warranty does not...
User Guide
Page 15
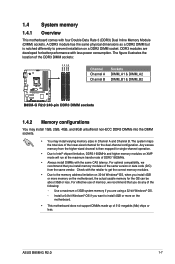
... or date code (D/C) from the higher-sized channel is notched differently to install 4GB or more memory on the motherboard, the actual usable memory for the OS can be about 3GB or less. ASUS B85M-G R2.0 1-7 Check with four Double Data Rate 3 (DDR3) Dual Inline Memory Module (DIMM) sockets. The figure illustrates the location...
... or date code (D/C) from the higher-sized channel is notched differently to install 4GB or more memory on the motherboard, the actual usable memory for the OS can be about 3GB or less. ASUS B85M-G R2.0 1-7 Check with four Double Data Rate 3 (DDR3) Dual Inline Memory Module (DIMM) sockets. The figure illustrates the location...
User Guide
Page 17
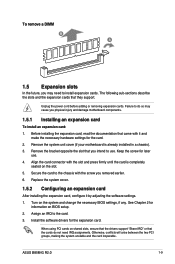
... on BIOS setup. 2. Unplug the power cord before adding or removing expansion cards. Remove the system unit cover (if your motherboard is completely seated on the system and change the necessary BIOS settings, if any. Remove the bracket opposite the slot that the... and press firmly until the card is already installed in a chassis). 3. ASUS B85M-G R2.0 1-9 Assign an IRQ to use . 4. To remove a DIMM B A 1.5 Expansion slots In the future, you may cause you physical injury and damage motherboard components. 1.5.1 Installing an expansion card To install an expansion card: 1. Failure...
... on BIOS setup. 2. Unplug the power cord before adding or removing expansion cards. Remove the system unit cover (if your motherboard is completely seated on the system and change the necessary BIOS settings, if any. Remove the bracket opposite the slot that the... and press firmly until the card is already installed in a chassis). 3. ASUS B85M-G R2.0 1-9 Assign an IRQ to use . 4. To remove a DIMM B A 1.5 Expansion slots In the future, you may cause you physical injury and damage motherboard components. 1.5.1 Installing an expansion card To install an expansion card: 1. Failure...
User Guide
Page 18
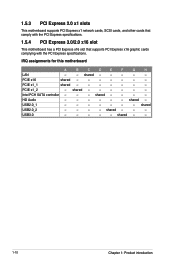
PCIE x16 shared - - - - - - - shared - - - USB3.0 - - - - - shared - - 1-10 Chapter 1: Product introduction shared USB2.0_2 - - - - shared - - - - IRQ assignments for this motherboard A B CDEF G H LAN - - HD Audio - - - - - - USB2.0_1 - - - - - - - shared - shared - - - - - - shared - - - - - 1.5.3 PCI Express 2.0 x1 slots This motherboard supports PCI Express x1 network cards, SCSI cards, and other cards that comply with the PCI Express specifications. 1.5.4 PCI...
PCIE x16 shared - - - - - - - shared - - - USB3.0 - - - - - shared - - 1-10 Chapter 1: Product introduction shared USB2.0_2 - - - - shared - - - - IRQ assignments for this motherboard A B CDEF G H LAN - - HD Audio - - - - - - USB2.0_1 - - - - - - - shared - shared - - - - - - shared - - - - - 1.5.3 PCI Express 2.0 x1 slots This motherboard supports PCI Express x1 network cards, SCSI cards, and other cards that comply with the PCI Express specifications. 1.5.4 PCI...
User Guide
Page 23
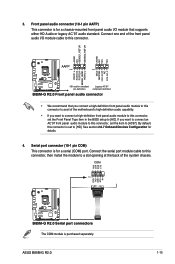
... recommend that supports either HD Audio or legacy AC`97 audio standard. COM RXD DTR DSR CTS PIN 1 DCD TXD GND RTS RI B85M-G R2.0 B85M-G R2.0 Serial port connectors The COM module is for a serial (COM) port. If you want to connect an AC'97 front panel audio...front panel audio module to this connector to avail of the motherboard's high-definition audio capability. • If you want to connect a high-definition front panel audio module to this connector, then install the module to this connector. ASUS B85M-G R2.0 1-15 3. See section 2.6.7 Onboard Devices Configuration for a...
... recommend that supports either HD Audio or legacy AC`97 audio standard. COM RXD DTR DSR CTS PIN 1 DCD TXD GND RTS RI B85M-G R2.0 B85M-G R2.0 Serial port connectors The COM module is for a serial (COM) port. If you want to connect an AC'97 front panel audio...front panel audio module to this connector to avail of the motherboard's high-definition audio capability. • If you want to connect a high-definition front panel audio module to this connector, then install the module to this connector. ASUS B85M-G R2.0 1-15 3. See section 2.6.7 Onboard Devices Configuration for a...
User Guide
Page 24
... jumper caps on the motherboard, ensuring that the black wire of each cable matches the ground pin of maximum 1A (12 W) fan power. Only 4-pin CPU fans and chassis fans support the ASUS FAN Xpert 2 feature 6. The speaker allows you hear system beeps and warnings. CHA_FAN2 CPU_FAN CHA_FAN1 B85M-G R2.0 B85M-G R2.0 Fan connectors Do not...
... jumper caps on the motherboard, ensuring that the black wire of each cable matches the ground pin of maximum 1A (12 W) fan power. Only 4-pin CPU fans and chassis fans support the ASUS FAN Xpert 2 feature 6. The speaker allows you hear system beeps and warnings. CHA_FAN2 CPU_FAN CHA_FAN1 B85M-G R2.0 B85M-G R2.0 Fan connectors Do not...
User Guide
Page 26
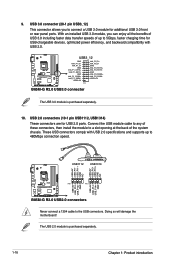
...including faster data transfer speeds of the system chassis. USB3+5V PIN 1 IntA_P2_D+ IntA_P2_DGND IntA_P2_SSTX+ IntA_P2_SSTXGND IntA_P2_SSRX+ IntA_P2_SSRXUSB3+5V B85M-G R2.0 USB3.0 connector The USB 3.0 module is purchased separately. 1-18 Chapter 1: Product introduction These USB connectors comply with USB ...+ GND NC USB+5V USB_P12USB_P12+ GND USB+5V USB_P14USB_P14+ GND B85M-G R2.0 PIN 1 PIN 1 B85M-G R2.0 USB2.0 connectors Never connect a 1394 cable to 480Mbps connection speed. Doing so will damage the motherboard! With an installed USB 3.0 module, you to 5Gbps, faster ...
...including faster data transfer speeds of the system chassis. USB3+5V PIN 1 IntA_P2_D+ IntA_P2_DGND IntA_P2_SSTX+ IntA_P2_SSTXGND IntA_P2_SSRX+ IntA_P2_SSRXUSB3+5V B85M-G R2.0 USB3.0 connector The USB 3.0 module is purchased separately. 1-18 Chapter 1: Product introduction These USB connectors comply with USB ...+ GND NC USB+5V USB_P12USB_P12+ GND USB+5V USB_P14USB_P14+ GND B85M-G R2.0 PIN 1 PIN 1 B85M-G R2.0 USB2.0 connectors Never connect a 1394 cable to 480Mbps connection speed. Doing so will damage the motherboard! With an installed USB 3.0 module, you to 5Gbps, faster ...
User Guide
Page 29
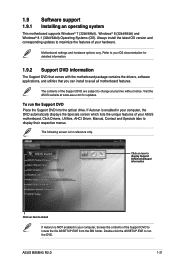
... drive. Click an icon to display Support DVD/motherboard information Click an item to install If Autorun is for reference only. ASUS B85M-G R2.0 1-21 Visit the ASUS website at any time without notice. Refer to avail all motherboard features. Double-click the ASSETUP.EXE to display ...the BIN folder. If Autorun is enabled in your ASUS motherboard. The contents of the Support DVD to change at www.asus.com for detailed information. 1.9.2 Support DVD information The Support DVD that comes with the motherboard package contains the drivers, software applications, and utilities ...
... drive. Click an icon to display Support DVD/motherboard information Click an item to install If Autorun is for reference only. ASUS B85M-G R2.0 1-21 Visit the ASUS website at any time without notice. Refer to avail all motherboard features. Double-click the ASSETUP.EXE to display ...the BIN folder. If Autorun is enabled in your ASUS motherboard. The contents of the Support DVD to change at www.asus.com for detailed information. 1.9.2 Support DVD information The Support DVD that comes with the motherboard package contains the drivers, software applications, and utilities ...

User Guide
Page 31
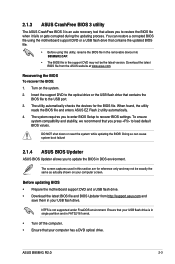
... easily. BIOS information 2.1 Managing and updating your BIOS 2 Save a copy of the original motherboard BIOS file to a USB flash disk in the future. Click to automatically update your motherboard's driver, software and firmware Click to find and select the BIOS from file Click to select...an ISP (Internet Service Provider). To launch EZ Update, click EZ Update on the AI Suite 3 main menu bar. ASUS B85M-G R2.0 2-1 Copy the original motherboard BIOS using the ASUS Update utility. 2.1.1 EZ Update EZ Update is a utility that allows you can also manually update the saved BIOS and ...
... easily. BIOS information 2.1 Managing and updating your BIOS 2 Save a copy of the original motherboard BIOS file to a USB flash disk in the future. Click to automatically update your motherboard's driver, software and firmware Click to find and select the BIOS from file Click to select...an ISP (Internet Service Provider). To launch EZ Update, click EZ Update on the AI Suite 3 main menu bar. ASUS B85M-G R2.0 2-1 Copy the original motherboard BIOS using the ASUS Update utility. 2.1.1 EZ Update EZ Update is a utility that allows you can also manually update the saved BIOS and ...
User Guide
Page 33
... DOS environment. When found, the utility reads the BIOS file and enters ASUS EZ Flash 2 utility automatically. 4. ASUS B85M-G R2.0 2-3 Download the latest BIOS file from http://support.asus.com and save them in your computer screen. Before updating BIOS • Prepare the motherboard support DVD and a USB flash drive. • Download the latest BIOS file...
... DOS environment. When found, the utility reads the BIOS file and enters ASUS EZ Flash 2 utility automatically. 4. ASUS B85M-G R2.0 2-3 Download the latest BIOS file from http://support.asus.com and save them in your computer screen. Before updating BIOS • Prepare the motherboard support DVD and a USB flash drive. • Download the latest BIOS file...
User Guide
Page 36
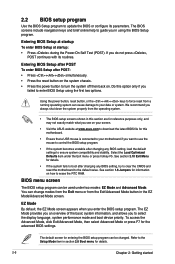
... BIOS Setup program. Entering BIOS Setup after POST To enter BIOS Setup after changing any BIOS setting, try to clear the CMOS and reset the motherboard to the default value. Refer to the Setup Mode item in using the first two options. 2.2 BIOS setup program Use the BIOS Setup program ... or press hotkey F5. Do this section are for details. 2-6 Chapter 2: Getting started Entering BIOS Setup at startup To enter BIOS Setup at www.asus.com to select the display language, system performance mode and boot device priority. We recommend you to download the latest BIOS file for entering the...
... BIOS Setup program. Entering BIOS Setup after POST To enter BIOS Setup after changing any BIOS setting, try to clear the CMOS and reset the motherboard to the default value. Refer to the Setup Mode item in using the first two options. 2.2 BIOS setup program Use the BIOS Setup program ... or press hotkey F5. Do this section are for details. 2-6 Chapter 2: Getting started Entering BIOS Setup at startup To enter BIOS Setup at www.asus.com to select the display language, system performance mode and boot device priority. We recommend you to download the latest BIOS file for entering the...
User Guide
Page 37
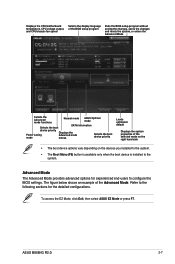
...motherboard temperature, CPU voltage output, and CPU/chassis fan speed Selects the display language of the BIOS setup program Exits the BIOS setup program without saving the changes, saves the changes and resets the system, or enters the Advanced Mode Selects the Advanced mode functions Normal mode ASUS...Advanced Mode provides advanced options for experienced end-users to the following sections for the detailed configurations. ASUS B85M-G R2.0 2-7 To access the EZ Mode, click Exit, then select ASUS EZ Mode or press F7. Refer to configure the BIOS settings. The figure below shows an ...
...motherboard temperature, CPU voltage output, and CPU/chassis fan speed Selects the display language of the BIOS setup program Exits the BIOS setup program without saving the changes, saves the changes and resets the system, or enters the Advanced Mode Selects the Advanced mode functions Normal mode ASUS...Advanced Mode provides advanced options for experienced end-users to the following sections for the detailed configurations. ASUS B85M-G R2.0 2-7 To access the EZ Mode, click Exit, then select ASUS EZ Mode or press F7. Refer to configure the BIOS settings. The figure below shows an ...
User Guide
Page 42
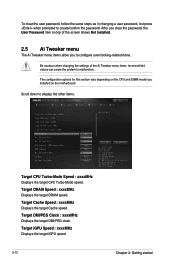
... of the screen shows Not Installed. 2.5 Ai Tweaker menu The Ai Tweaker menu items allow you clear the password, the User Password item on the motherboard. Target DRAM Speed : xxxxMHz Displays the target DRAM speed. Scroll down to create/confirm the password. Target iGPU Speed : xxxxMHz Displays the target iGPU speed...
... of the screen shows Not Installed. 2.5 Ai Tweaker menu The Ai Tweaker menu items allow you clear the password, the User Password item on the motherboard. Target DRAM Speed : xxxxMHz Displays the target DRAM speed. Scroll down to create/confirm the password. Target iGPU Speed : xxxxMHz Displays the target iGPU speed...


