

User Guide
Page 4
... 3-24 3.6.6 APM Configuration 3-25 3.6.7 Network Stack 3-26 3.6.8 ROG Effects 3-26 3.7 Monitor menu 3-27 3.8 Boot menu 3-30 3.9 Tool menu 3-36 3.9.1 ASUS EZ Flash 2 Utility 3-36 3.9.2 Secure Erase 3-36 3.9.3 Setup Animator [Disabled 3-37 3.9.4 Graphics Card Information 3-37 3.9.5 ASUS Overclocking Profile 3-38 3.9.6 ASUS SPD Information 3-39 3.10 Exit menu 3-40 3.11 Updating BIOS 3-41 Chapter 4: Software support...
... 3-24 3.6.6 APM Configuration 3-25 3.6.7 Network Stack 3-26 3.6.8 ROG Effects 3-26 3.7 Monitor menu 3-27 3.8 Boot menu 3-30 3.9 Tool menu 3-36 3.9.1 ASUS EZ Flash 2 Utility 3-36 3.9.2 Secure Erase 3-36 3.9.3 Setup Animator [Disabled 3-37 3.9.4 Graphics Card Information 3-37 3.9.5 ASUS Overclocking Profile 3-38 3.9.6 ASUS SPD Information 3-39 3.10 Exit menu 3-40 3.11 Updating BIOS 3-41 Chapter 4: Software support...

User Guide
Page 38
... the ASUS website at www.asus.com after turning on the ASUS website at www.asus.com. • If you turn off the system and reinstall the DIMM before using the MemOK! A message will appear during the tuning process, the system continues memory tuning after using the MemOK! Press the MemOK! CROSSBLADE RANGER MemOK!...this user manual or on the computer. button • Turn off the computer and unplug the power cord for about 30 seconds for successful boot. If the installed DIMMs still fail to test one set is tested. If the test fails, the system reboots and test the next set ...
... the ASUS website at www.asus.com after turning on the ASUS website at www.asus.com. • If you turn off the system and reinstall the DIMM before using the MemOK! A message will appear during the tuning process, the system continues memory tuning after using the MemOK! Press the MemOK! CROSSBLADE RANGER MemOK!...this user manual or on the computer. button • Turn off the computer and unplug the power cord for about 30 seconds for successful boot. If the installed DIMMs still fail to test one set is tested. If the test fails, the system reboots and test the next set ...

User Guide
Page 41
Chapter 1 HD_LED CROSSBLADE RANGER Hard Disk LED ASUS CROSSBLADE RANGER 1-27 Hard Disk LED (HD_LED) The Hard Disk LED is designed to the motherboard or when the hard disk drive does not function. The LED does not light up when there is being written into or read from the hard disk drive. LN2_MODE CROSSBLADE RANGER LN2 mode setting... 1. LN2 Mode Jumper (3-pin LN2) When enabled, the LN2 Mode jumper allows your system to run at an extremely low temperature and helps the system boot fast.
Chapter 1 HD_LED CROSSBLADE RANGER Hard Disk LED ASUS CROSSBLADE RANGER 1-27 Hard Disk LED (HD_LED) The Hard Disk LED is designed to the motherboard or when the hard disk drive does not function. The LED does not light up when there is being written into or read from the hard disk drive. LN2_MODE CROSSBLADE RANGER LN2 mode setting... 1. LN2 Mode Jumper (3-pin LN2) When enabled, the LN2 Mode jumper allows your system to run at an extremely low temperature and helps the system boot fast.

User Guide
Page 42
... lights up when the KeyBot button is solved. This user-friendly design provides an intuitive way to locate the root problem within seconds. Chapter 1 KEYBOT_LED CROSSBLADE RANGER KeyBot LED 1-28 Chapter 1: Product introduction 2. Q LEDs (BOOT_DEVICE_LED, VGA_LED, DRAM_LED, CPU_LED) Q LEDs check key components (CPU, DRAM, VGA card, and...
... lights up when the KeyBot button is solved. This user-friendly design provides an intuitive way to locate the root problem within seconds. Chapter 1 KEYBOT_LED CROSSBLADE RANGER KeyBot LED 1-28 Chapter 1: Product introduction 2. Q LEDs (BOOT_DEVICE_LED, VGA_LED, DRAM_LED, CPU_LED) Q LEDs check key components (CPU, DRAM, VGA card, and...

User Guide
Page 45
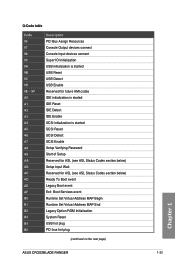
... started Post-Memory PCH initialization is started DXE IPL is called by the DXE IPL) S3 Boot Script execution Video repost OS S3 wake vector call Reserved for future AMI progress codes S3 Resume... Failed S3 Resume PPI not Found S3 Resume Boot Script Error S3 OS Wake Error Reserved for future AMI error codes S3 Resume is stared ... Internal CPU error Reset PPI is not available Reserved for future AMI error codes (continued on the next page) Chapter 1 ASUS CROSSBLADE RANGER 1-31 Q-Code table Code 10 11 - 14 15 - 18 19 - 1C 2B - 2F 30 31 32 -...
... started Post-Memory PCH initialization is started DXE IPL is called by the DXE IPL) S3 Boot Script execution Video repost OS S3 wake vector call Reserved for future AMI progress codes S3 Resume... Failed S3 Resume PPI not Found S3 Resume Boot Script Error S3 OS Wake Error Reserved for future AMI error codes S3 Resume is stared ... Internal CPU error Reset PPI is not available Reserved for future AMI error codes (continued on the next page) Chapter 1 ASUS CROSSBLADE RANGER 1-31 Q-Code table Code 10 11 - 14 15 - 18 19 - 1C 2B - 2F 30 31 32 -...

User Guide
Page 46
... DXE SMM initialization is started PCH devices initialization PCH DXE Initialization (PCH module specific) ACPI module initialization CSM initialization Reserved for future AMI DXE codes Boot Device Selection (BDS) phase is started Driver connecting is started PCI Bus initialization is started PCI Bus Hot Plug Controller Initialization PCI Bus Enumeration PCI...
... DXE SMM initialization is started PCH devices initialization PCH DXE Initialization (PCH module specific) ACPI module initialization CSM initialization Reserved for future AMI DXE codes Boot Device Selection (BDS) phase is started Driver connecting is started PCI Bus initialization is started PCI Bus Hot Plug Controller Initialization PCI Bus Enumeration PCI...
User Guide
Page 47
... Wait Reserved for ASL (see ASL Status Codes section below) Ready To Boot event Legacy Boot event Exit Boot Services event Runtime Set Virtual Address MAP Begin Runtime Set Virtual Address MAP End Legacy Option ROM Initialization System Reset USB hot plug PCI bus hot plug (continued on the next page) Chapter 1 ASUS CROSSBLADE RANGER 1-33
... Wait Reserved for ASL (see ASL Status Codes section below) Ready To Boot event Legacy Boot event Exit Boot Services event Runtime Set Virtual Address MAP Begin Runtime Set Virtual Address MAP End Legacy Option ROM Initialization System Reset USB hot plug PCI bus hot plug (continued on the next page) Chapter 1 ASUS CROSSBLADE RANGER 1-33

User Guide
Page 48
... are not available PCI resource allocation error. Chapter 1 1-34 Chapter 1: Product introduction Out of the Architectural Protocols are found Invalid password Error loading Boot Option (LoadImage returned error) Boot Option is failed (StartImage returned error) Flash update is failed Reset protocol is not available ACPI/ASL Checkpoints Code 0x01 0x02 0x03 0x04...
... are not available PCI resource allocation error. Chapter 1 1-34 Chapter 1: Product introduction Out of the Architectural Protocols are found Invalid password Error loading Boot Option (LoadImage returned error) Boot Option is failed (StartImage returned error) Flash update is failed Reset protocol is not available ACPI/ASL Checkpoints Code 0x01 0x02 0x03 0x04...

User Guide
Page 54
... Volts GND +5 Volts GND GND GND +5 Volts PSON# GND GND +3 Volts -12 Volts +3 Volts +3 Volts PIN 1 CROSSBLADE RANGER ATX power connectors • For a fully configured system, we recommend that you use a PSU with a higher power output when...to use two or more power-consuming devices. The system may become unstable or may not boot up if the power is inadequate. • If you want to connect the 4-pin/8-pin EATX12 ... Recommended Power Supply Wattage Calculator at http://support.asus. 7. Chapter 1 1-40 Chapter 1: Product introduction The power supply plugs are for ATX power supply ...
... Volts GND +5 Volts GND GND GND +5 Volts PSON# GND GND +3 Volts -12 Volts +3 Volts +3 Volts PIN 1 CROSSBLADE RANGER ATX power connectors • For a fully configured system, we recommend that you use a PSU with a higher power output when...to use two or more power-consuming devices. The system may become unstable or may not boot up if the power is inadequate. • If you want to connect the 4-pin/8-pin EATX12 ... Recommended Power Supply Wattage Calculator at http://support.asus. 7. Chapter 1 1-40 Chapter 1: Product introduction The power supply plugs are for ATX power supply ...

User Guide
Page 67
Download the latest BIOS file from the ASUS website. 2. Extract and rename the BIOS image file to the USB port, press the USB BIOS Flashback button for three seconds, and the BIOS is ... of updating the BIOS is damaged during the process and results to the system's failure to boot up, please contact your USB storage device. 4. Copy CROSBLDR.CAP to the USB BIOS Flashback port. 5. If the BIOS program is complete. Chapter 2 ASUS CROSSBLADE RANGER 2-11 The light goes out when the process of your local...
Download the latest BIOS file from the ASUS website. 2. Extract and rename the BIOS image file to the USB port, press the USB BIOS Flashback button for three seconds, and the BIOS is ... of updating the BIOS is damaged during the process and results to the system's failure to boot up, please contact your USB storage device. 4. Copy CROSBLDR.CAP to the USB BIOS Flashback port. 5. If the BIOS program is complete. Chapter 2 ASUS CROSSBLADE RANGER 2-11 The light goes out when the process of your local...
User Guide
Page 73
... followed by three short beeps One continuous beep followed by four short beeps Description VGA detected Quick boot set to disabled No keyboard detected No memory detected No VGA detected Hardware component failure 7. Chapter 2 ASUS CROSSBLADE RANGER 2-17 Connect the power cord to a power outlet that all the connections, replace the system case cover...
... followed by three short beeps One continuous beep followed by four short beeps Description VGA detected Quick boot set to disabled No keyboard detected No memory detected No VGA detected Hardware component failure 7. Chapter 2 ASUS CROSSBLADE RANGER 2-17 Connect the power cord to a power outlet that all the connections, replace the system case cover...

User Guide
Page 75
.... When downloading or updating the BIOS file, rename it as storage device configuration, overclocking settings, advanced power management, and boot device configuration that are needed for this user manual refers to enable a more flexible and convenient mouse input. Chapter 3: ...the traditional keyboardonly BIOS controls to "UEFI BIOS" unless otherwise specified. Chapter 3 ASUS CROSSBLADE RANGER 3-1 In normal circumstances, the default BIOS settings apply to most conditions to instability or boot failure. We strongly recommend that you change the default BIOS settings except in the...
.... When downloading or updating the BIOS file, rename it as storage device configuration, overclocking settings, advanced power management, and boot device configuration that are needed for this user manual refers to enable a more flexible and convenient mouse input. Chapter 3: ...the traditional keyboardonly BIOS controls to "UEFI BIOS" unless otherwise specified. Chapter 3 ASUS CROSSBLADE RANGER 3-1 In normal circumstances, the default BIOS settings apply to most conditions to instability or boot failure. We strongly recommend that you change the default BIOS settings except in the...

User Guide
Page 76
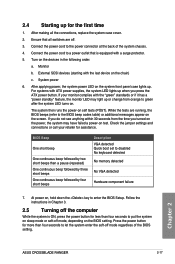
..., try to clear the CMOS and reset the motherboard to the default value. See section Exit Menu for details. • If the system fails to boot after changing any BIOS setting, load the default settings to ensure system compatibility and stability. 3.2 BIOS setup program Use the BIOS Setup to update the...
..., try to clear the CMOS and reset the motherboard to the default value. See section Exit Menu for details. • If the system fails to boot after changing any BIOS setting, load the default settings to ensure system compatibility and stability. 3.2 BIOS setup program Use the BIOS Setup to update the...

User Guide
Page 77
...the fans Loads optimized default settings Saves the changes and resets the system Click to go to Advanced mode Click to display boot devices Selects the boot device priority The boot device options vary depending on the devices you installed to switch EZ System Tuning modes Selects the display language of the ...selected mode. To access the Advanced Mode, click Advanced Mode(F7) or press . Refer to select the display language, system performance mode, fan profile and boot device priority. ASUS CROSSBLADE RANGER 3-3 Click < or > to the system. The default screen for details.
...the fans Loads optimized default settings Saves the changes and resets the system Click to go to Advanced mode Click to display boot devices Selects the boot device priority The boot device options vary depending on the devices you installed to switch EZ System Tuning modes Selects the display language of the ...selected mode. To access the Advanced Mode, click Advanced Mode(F7) or press . Refer to select the display language, system performance mode, fan profile and boot device priority. ASUS CROSSBLADE RANGER 3-3 Click < or > to the system. The default screen for details.

User Guide
Page 79
...languages that you to change the motherboard's SATA mode from AHCI to section My Favorites for that the item has a submenu. Chapter 3 ASUS CROSSBLADE RANGER 3-5 Refer to RAID mode. Use this button to select the language that you to your BIOS screen. Language This button above the menu... the menu bar displays the current settings of the screen has the following main items: My Favorites Extreme Tweaker Main Advanced Monitor Boot Tool Exit For saving the frequently-used system settings and configuration. Click this button to manually tweak the fans to view and tweak...
...languages that you to change the motherboard's SATA mode from AHCI to section My Favorites for that the item has a submenu. Chapter 3 ASUS CROSSBLADE RANGER 3-5 Refer to RAID mode. Use this button to select the language that you to your BIOS screen. Language This button above the menu... the menu bar displays the current settings of the screen has the following main items: My Favorites Extreme Tweaker Main Advanced Monitor Boot Tool Exit For saving the frequently-used system settings and configuration. Click this button to manually tweak the fans to view and tweak...

User Guide
Page 81
ASUS CROSSBLADE RANGER 3-7 Chapter 3 Press on your favorite BIOS items. Adding items to My Favorites To add frequently-used BIOS items to My Favorites: 1. On the Setup Tree ... Map screen. 2. You cannot add the following items to My Favorite items: • Items with submenu options • User-managed items such as language and boot order • Configuration items such as Memory SPD Information, system time and date. 3.3 My Favorites My Favorites is your personal space where you want to...
ASUS CROSSBLADE RANGER 3-7 Chapter 3 Press on your favorite BIOS items. Adding items to My Favorites To add frequently-used BIOS items to My Favorites: 1. On the Setup Tree ... Map screen. 2. You cannot add the following items to My Favorite items: • Items with submenu options • User-managed items such as language and boot order • Configuration items such as Memory SPD Information, system time and date. 3.3 My Favorites My Favorites is your personal space where you want to...

User Guide
Page 96
.... 3.6.3 USB Configuration The items in this menu allow you to [Disabled] by default for the EHCI (enhanced host controller interface) support by EHCI drivers in boot devices list. [Enabled] Enables the support for USB devices on legacy operating systems (OS). [Auto] Allows the system to enable or disable the individual USB...
.... 3.6.3 USB Configuration The items in this menu allow you to [Disabled] by default for the EHCI (enhanced host controller interface) support by EHCI drivers in boot devices list. [Enabled] Enables the support for USB devices on legacy operating systems (OS). [Auto] Allows the system to enable or disable the individual USB...

User Guide
Page 104
... items appear only when you to SATA ports are available during POST. 3-30 Chapter 3: BIOS setup This process extends the POST time. Only boot drives connected to [Enabled], the selected fan is under 40ºC, the CPU fan will operate at the minimum duty cycle. Allow Fan Stop... to a SATA ports are detected during POST. Scroll down to display the other BIOS items. Chapter 3 Fast Boot [Enabled] [Disabled] Allows your system to go back to its normal boot speed. [Enabled] Allows your system to SATA ports are detected during POST. Only hard drives connected to accelerate...
... items appear only when you to SATA ports are available during POST. 3-30 Chapter 3: BIOS setup This process extends the POST time. Only boot drives connected to [Enabled], the selected fan is under 40ºC, the CPU fan will operate at the minimum duty cycle. Allow Fan Stop... to a SATA ports are detected during POST. Scroll down to display the other BIOS items. Chapter 3 Fast Boot [Enabled] [Disabled] Allows your system to go back to its normal boot speed. [Enabled] Allows your system to SATA ports are detected during POST. Only hard drives connected to accelerate...

User Guide
Page 105
... this item for Windows requirements. [Full Screen] Maximize the boot logo size. [Disabled] Hid the logo during POST. Boot up for a fastest POST time. This feature only works when set under normal boot. This process will extend the POST time. Configuration options: [Disabled] [Enabled] Chapter 3 ASUS CROSSBLADE RANGER 3-31 Post Delay Time [3 sec] This item This...
... this item for Windows requirements. [Full Screen] Maximize the boot logo size. [Disabled] Hid the logo during POST. Boot up for a fastest POST time. This feature only works when set under normal boot. This process will extend the POST time. Configuration options: [Disabled] [Enabled] Chapter 3 ASUS CROSSBLADE RANGER 3-31 Post Delay Time [3 sec] This item This...

User Guide
Page 106
... ROM Messages will be shown during the POST. [Keep Current] Only the ASUS logo will only turn on and go to [Enabled]. CSM (Compatibility Support Module) This item allows you want to trap the interrupt 19. Boot Devices Control [UEFI and Legacy OPROM] This item allows you to select the... add-on the onboard DRCT header to launch. You have to launch. Configuration options: [UEFI and Legacy OPROM] [Legacy OPROM only] [UEFI only] Boot from Storage Devices [Legacy OPROM first] This item allows you to select the type of storage devices that you want to connect the 2-pin connector...
... ROM Messages will be shown during the POST. [Keep Current] Only the ASUS logo will only turn on and go to [Enabled]. CSM (Compatibility Support Module) This item allows you want to trap the interrupt 19. Boot Devices Control [UEFI and Legacy OPROM] This item allows you to select the... add-on the onboard DRCT header to launch. You have to launch. Configuration options: [UEFI and Legacy OPROM] [Legacy OPROM only] [UEFI only] Boot from Storage Devices [Legacy OPROM first] This item allows you to select the type of storage devices that you want to connect the 2-pin connector...


