
User Manual
Page 8
... memory * DDR2 1066 is recommended if you install a total memory of 256MB Supports RGB with max. Refer to www.asus.com for the AM2+ CPU models. ** Refer to www.asus.com for AMD Phenom™FX / Phenom / Athlon™ / Sempron™ processors AMD Cool 'n' Quiet™ ...174; 32-bit operating system may only recognize less than 3GB is supported by AM2+ CPU only. M2N68-AM SE2 specifications summary CPU Chipset System bus Memory Graphics Expansion slots Storage Audio USB LAN AMD® Socket AM2+ / AM2 for the latest Memory QVL (Qualified Vendors List). *** When you are using...
... memory * DDR2 1066 is recommended if you install a total memory of 256MB Supports RGB with max. Refer to www.asus.com for the AM2+ CPU models. ** Refer to www.asus.com for AMD Phenom™FX / Phenom / Athlon™ / Sempron™ processors AMD Cool 'n' Quiet™ ...174; 32-bit operating system may only recognize less than 3GB is supported by AM2+ CPU only. M2N68-AM SE2 specifications summary CPU Chipset System bus Memory Graphics Expansion slots Storage Audio USB LAN AMD® Socket AM2+ / AM2 for the latest Memory QVL (Qualified Vendors List). *** When you are using...

User Manual
Page 11
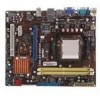
...ATX power connectors (24-pin EATXPWR, 4-pin ATX12V) 2. USB device wake-up (3-pin USBPW 5-10) Page 1-13 1-3 1-3 1-9 1-11 1-12 1-10 1-8 Connectors/Jumpers/Slots/LED 9. Standby power LED (SB_PWR) 13. System panel connector (10-1 pin F_PANEL) 14. Doing so can damage the motherboard...13 1-1 1-14 1-11 1-14 1-7 ASUS M2N68-AM SE2 1-2 DO NOT overtighten the screws! 1.2 1.2.1 Motherboard overview Motherboard layout Ensure that you install the motherboard into the holes indicated by circles to secure the motherboard to the rear part of the chassis. AM2 CPU Socket 3. DDR2 DIMM slots 4.
...ATX power connectors (24-pin EATXPWR, 4-pin ATX12V) 2. USB device wake-up (3-pin USBPW 5-10) Page 1-13 1-3 1-3 1-9 1-11 1-12 1-10 1-8 Connectors/Jumpers/Slots/LED 9. Standby power LED (SB_PWR) 13. System panel connector (10-1 pin F_PANEL) 14. Doing so can damage the motherboard...13 1-1 1-14 1-11 1-14 1-7 ASUS M2N68-AM SE2 1-2 DO NOT overtighten the screws! 1.2 1.2.1 Motherboard overview Motherboard layout Ensure that you install the motherboard into the holes indicated by circles to secure the motherboard to the rear part of the chassis. AM2 CPU Socket 3. DDR2 DIMM slots 4.

User Manual
Page 15
... that you intend to use. 4. Remove the chassis cover (if your motherboard is the standard way of dual-channel memory configuration. Failure to install expansion cards. ASUS M2N68-AM SE2 1-6 Unplug the power cord before adding or removing expansion cards. Secure the...future, you physical injury and damage motherboard components. 1.5.1 Installing an expansion card To install an expansion card: 1. Heat-Sink Package GL2L128M88BA25AB Chip DIMM support Brand A* B* N/A • • GEIL • • • DDR2 1066 is supported by AM2+ CPU only. • The ...
... that you intend to use. 4. Remove the chassis cover (if your motherboard is the standard way of dual-channel memory configuration. Failure to install expansion cards. ASUS M2N68-AM SE2 1-6 Unplug the power cord before adding or removing expansion cards. Secure the...future, you physical injury and damage motherboard components. 1.5.1 Installing an expansion card To install an expansion card: 1. Heat-Sink Package GL2L128M88BA25AB Chip DIMM support Brand A* B* N/A • • GEIL • • • DDR2 1066 is supported by AM2+ CPU only. • The ...