User Manual
Page 3
... 1-1 1.3 Special features 1-2 1.3.1 Product highlights 1-2 1.3.2 ROG Intelligent Performance & Overclocking features... 1-4 1.3.3 ROG unique features 1-7 1.3.4 ASUS special features 1-9 Chapter 2: Hardware information 2.1 Before you proceed 2-1 2.2 Motherboard overview 2-2 2.2.1 Motherboard layout 2-2 2.2.2 Layout contents 2-3...and components to build a PC system 2-40 2.3.2 CPU installation 2-41 2.3.3 CPU heatsink and fan assembly installation 2-43 2.3.4 DIMM installation 2-45 2.3.5 Motherboard installation 2-46 2.3.6 ATX Power connection 2-48 2.3.7 SATA device connection 2-49...
... 1-1 1.3 Special features 1-2 1.3.1 Product highlights 1-2 1.3.2 ROG Intelligent Performance & Overclocking features... 1-4 1.3.3 ROG unique features 1-7 1.3.4 ASUS special features 1-9 Chapter 2: Hardware information 2.1 Before you proceed 2-1 2.2 Motherboard overview 2-2 2.2.1 Motherboard layout 2-2 2.2.2 Layout contents 2-3...and components to build a PC system 2-40 2.3.2 CPU installation 2-41 2.3.3 CPU heatsink and fan assembly installation 2-43 2.3.4 DIMM installation 2-45 2.3.5 Motherboard installation 2-46 2.3.6 ATX Power connection 2-48 2.3.7 SATA device connection 2-49...
User Manual
Page 5
Contents 3.9 Exit menu 3-41 3.10 Updating BIOS 3-42 3.10.1 ASUS Update utility 3-43 3.10.2 ASUS EZ Flash Utility 3-46 3.10.3 ASUS CrashFree BIOS 3 utility 3-47 3.10.4 ASUS BIOS Updater 3-48 Chapter 4: Software support 4.1 Installing an operating system 4-1 4.2 Support DVD information 4-1 4.2.1 Running the ...4.3.8 MemTweakIt 4-15 4.3.9 ROG Connect 4-16 4.3.10 Audio configurations 4-19 4.4 RAID configurations 4-21 4.4.1 RAID definitions 4-21 4.4.2 Installing Serial ATA hard disks 4-22 4.4.3 Setting the RAID item in BIOS 4-22 4.4.4 Intel® Rapid Storage Technology Option ROM ...
Contents 3.9 Exit menu 3-41 3.10 Updating BIOS 3-42 3.10.1 ASUS Update utility 3-43 3.10.2 ASUS EZ Flash Utility 3-46 3.10.3 ASUS CrashFree BIOS 3 utility 3-47 3.10.4 ASUS BIOS Updater 3-48 Chapter 4: Software support 4.1 Installing an operating system 4-1 4.2 Support DVD information 4-1 4.2.1 Running the ...4.3.8 MemTweakIt 4-15 4.3.9 ROG Connect 4-16 4.3.10 Audio configurations 4-19 4.4 RAID configurations 4-21 4.4.1 RAID definitions 4-21 4.4.2 Installing Serial ATA hard disks 4-22 4.4.3 Setting the RAID item in BIOS 4-22 4.4.4 Intel® Rapid Storage Technology Option ROM ...
User Manual
Page 6
... 5: Multiple GPU technology support 5.1 ATI® CrossFireX™ technology 5-1 5.1.1 Requirements 5-1 5.1.2 Before you begin 5-1 5.1.3 Installing CrossFireX graphics cards 5-2 5.1.4 Installing the device drivers 5-3 5.1.5 Enabling the ATI® CrossFireX™ technology 5-3 5.2 NVIDIA® SLI™ technology 5-5 5.2.1 Requirements 5-5 5.2.2 Installing two SLI-ready graphics cards 5-5 5.2.3 Installing the device drivers 5-6 5.2.4 Enabling the NVIDIA® SLI™ technology 5-6 5.3 LucidLogix® Virtu...
... 5: Multiple GPU technology support 5.1 ATI® CrossFireX™ technology 5-1 5.1.1 Requirements 5-1 5.1.2 Before you begin 5-1 5.1.3 Installing CrossFireX graphics cards 5-2 5.1.4 Installing the device drivers 5-3 5.1.5 Enabling the ATI® CrossFireX™ technology 5-3 5.2 NVIDIA® SLI™ technology 5-5 5.2.1 Requirements 5-5 5.2.2 Installing two SLI-ready graphics cards 5-5 5.2.3 Installing the device drivers 5-6 5.2.4 Enabling the NVIDIA® SLI™ technology 5-6 5.3 LucidLogix® Virtu...

User Manual
Page 7
... of the monitor to the graphics card is encouraged to try to correct the interference by specified firmware controlled in a particular installation. vii FCC Radio Frequency (RF) Exposure Caution Statement Any changes or modifications not expressly approved by the party responsible for satisfying... could void the user's authority to operate this equipment. If this device is limited to Channels 1 through 11 in a residential installation. This equipment generates, uses and can be determined by turning the equipment off and on a circuit different from that may cause undesired...
... of the monitor to the graphics card is encouraged to try to correct the interference by specified firmware controlled in a particular installation. vii FCC Radio Frequency (RF) Exposure Caution Statement Any changes or modifications not expressly approved by the party responsible for satisfying... could void the user's authority to operate this equipment. If this device is limited to Channels 1 through 11 in a residential installation. This equipment generates, uses and can be determined by turning the equipment off and on a circuit different from that may cause undesired...

User Manual
Page 8
...directives 2004/108/EC "Electromagnetic compatibility" and 2006/95/EC "Low voltage directive". RF exposure warning This equipment must not be installed and operated in accordance with provided instructions and the antenna(s) used for devices with wireless LAN/ Bluetooth This equipment complies with ...• Essential requirements as in [Article 3] • Protection requirements for health and safety as in conjunction with antenna installation instructions and transmitter operating conditions for devices without wireless LAN/Bluetooth The shipped version of this transmitter must be...
...directives 2004/108/EC "Electromagnetic compatibility" and 2006/95/EC "Low voltage directive". RF exposure warning This equipment must not be installed and operated in accordance with provided instructions and the antenna(s) used for devices with wireless LAN/ Bluetooth This equipment complies with ...• Essential requirements as in [Article 3] • Protection requirements for health and safety as in conjunction with antenna installation instructions and transmitter operating conditions for devices without wireless LAN/Bluetooth The shipped version of this transmitter must be...

User Manual
Page 10
... an uncontrolled environment. Use of this device in conjunction with this manual to meet RF exposure requirements. This device and its transmit antenna) that is installed outdoors is cautioned that may not cause interference and • This device must not be operated indoors and away from digital apparatus set forth for...
... an uncontrolled environment. Use of this device in conjunction with this manual to meet RF exposure requirements. This device and its transmit antenna) that is installed outdoors is cautioned that may not cause interference and • This device must not be operated indoors and away from digital apparatus set forth for...
User Manual
Page 12
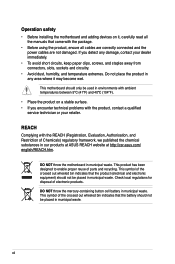
... product, ensure all the manuals that the battery should not be placed in any damage, contact your retailer. Operation safety • Before installing the motherboard and adding devices on a stable surface. • If you detect any area where it , carefully read all cables are ... crossed out wheeled bin indicates that the product (electrical and electronic equipment) should not be placed in our products at ASUS REACH website at http://csr.asus.com/ english/REACH.htm. If you encounter technical problems with the product, contact a qualified service technician or your dealer...
... product, ensure all the manuals that the battery should not be placed in any damage, contact your retailer. Operation safety • Before installing the motherboard and adding devices on a stable surface. • If you detect any area where it , carefully read all cables are ... crossed out wheeled bin indicates that the product (electrical and electronic equipment) should not be placed in our products at ASUS REACH website at http://csr.asus.com/ english/REACH.htm. If you encounter technical problems with the product, contact a qualified service technician or your dealer...
User Manual
Page 13
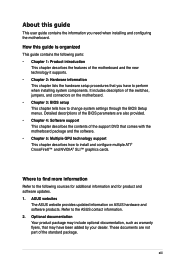
...Your product package may include optional documentation, such as warranty flyers, that may have to perform when installing system components. Where to find more information Refer to the ASUS contact information. 2. These documents are also provided. • Chapter 4: Software support This chapter describes... guide contains the information you have been added by your dealer. ASUS websites The ASUS website provides updated information on the motherboard. • Chapter 3: BIOS setup This chapter tells how to install and configure multiple ATI® CrossFireX™ and NVIDIA® ...
...Your product package may include optional documentation, such as warranty flyers, that may have to perform when installing system components. Where to find more information Refer to the ASUS contact information. 2. These documents are also provided. • Chapter 4: Software support This chapter describes... guide contains the information you have been added by your dealer. ASUS websites The ASUS website provides updated information on the motherboard. • Chapter 3: BIOS setup This chapter tells how to install and configure multiple ATI® CrossFireX™ and NVIDIA® ...

User Manual
Page 21
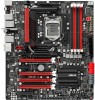
Before you for the following items. Motherboard ROG Maximus IV Extreme-Z Cables 1 x�R�O�G�C�o�nn�e�ct�ca�b�le 1 x ProbeIt cable set 1 x CrossFire Cable 1 x ...65533;it another standout in the long line of ASUS quality motherboards! ROG Maximus IV Extreme-Z 1-1 1.1 Welcome! The motherboard delivers a host of the above items is damaged or missing, contact your motherboard package for buying an ROG Maximus IV Extreme-Z motherboard! Thank you start installing the motherboard, and hardware devices on it, ...
Before you for the following items. Motherboard ROG Maximus IV Extreme-Z Cables 1 x�R�O�G�C�o�nn�e�ct�ca�b�le 1 x ProbeIt cable set 1 x CrossFire Cable 1 x ...65533;it another standout in the long line of ASUS quality motherboards! ROG Maximus IV Extreme-Z 1-1 1.1 Welcome! The motherboard delivers a host of the above items is damaged or missing, contact your motherboard package for buying an ROG Maximus IV Extreme-Z motherboard! Thank you start installing the motherboard, and hardware devices on it, ...

User Manual
Page 23
... Internet applications. PCIe 2.0 Double Speed; Power consumption also goes down by reducing unnecessary hard drive spin, an important part of Green ASUS eco-friendly computing. When you plug a video connector directly to page 2-5 for improved performance. Refer to the discrete GPU, LucidLogix&#... line between embedded graphics and discrete GPU for frequently accessed operations, speeding up hard drive/main memory interaction. ROG Maximus IV Extreme-Z 1-3 It uses an installed fast SSD (min 18.6GB available) as default. LucidLogix® Virtu™ Enjoy both onboard graphics and discrete...
... Internet applications. PCIe 2.0 Double Speed; Power consumption also goes down by reducing unnecessary hard drive spin, an important part of Green ASUS eco-friendly computing. When you plug a video connector directly to page 2-5 for improved performance. Refer to the discrete GPU, LucidLogix&#... line between embedded graphics and discrete GPU for frequently accessed operations, speeding up hard drive/main memory interaction. ROG Maximus IV Extreme-Z 1-3 It uses an installed fast SSD (min 18.6GB available) as default. LucidLogix® Virtu™ Enjoy both onboard graphics and discrete...

User Manual
Page 30
...174; Vantage Advanced Edition The Gamers' Benchmark 3DMarkVantage is a user-friendly BIOS update utility. Q-Shield Easy and Comfortable Installations The specially designed ASUS Q-Shield does without preparing an additional floppy diskette or using an OSbased flash utility. With better electric conductivity, it ... SATA on the Go The motherboard supports the next-generation hard drives based on a completely new rendering engine, developed specifically to install. Simply launch this tool and update BIOS from a USB flash disk before entering the OS. Easily backup photos, videos and ...
...174; Vantage Advanced Edition The Gamers' Benchmark 3DMarkVantage is a user-friendly BIOS update utility. Q-Shield Easy and Comfortable Installations The specially designed ASUS Q-Shield does without preparing an additional floppy diskette or using an OSbased flash utility. With better electric conductivity, it ... SATA on the Go The motherboard supports the next-generation hard drives based on a completely new rendering engine, developed specifically to install. Simply launch this tool and update BIOS from a USB flash disk before entering the OS. Easily backup photos, videos and ...

User Manual
Page 31
This chapter lists the hardware setup procedures that you have to perform when installing system components. It Chapter 2: includes description of the jumpers and connectors on the motherboard. 2 Hardware information
This chapter lists the hardware setup procedures that you have to perform when installing system components. It Chapter 2: includes description of the jumpers and connectors on the motherboard. 2 Hardware information

User Manual
Page 33
...in the bag that came with the component. • Before you install or remove any component, ensure that the ATX power supply is switched off or the power cord is detached from the power supply. ASUS Maximus IV Extreme-Z 2-1 2.1 Before you proceed Take note of the following precautions ...before you install motherboard components or change any motherboard settings. • Unplug the power cord from the wall ...
...in the bag that came with the component. • Before you install or remove any component, ensure that the ATX power supply is switched off or the power cord is detached from the power supply. ASUS Maximus IV Extreme-Z 2-1 2.1 Before you proceed Take note of the following precautions ...before you install motherboard components or change any motherboard settings. • Unplug the power cord from the wall ...
User Manual
Page 36
ASUS will process Return Merchandise Authorization (RMA) requests only if the motherboard comes with the cap on the LGA1155 socket. • The product warranty does not cover damage to the socket contacts resulting from incorrect CPU installation/removal, or misplacement/loss/ incorrect removal of the motherboard..., ensure that all power cables are not bent. Ensure that the PnP cap is missing, or if you see any damage to the PnP cap/socket contacts/motherboard components. ASUS will shoulder ...
ASUS will process Return Merchandise Authorization (RMA) requests only if the motherboard comes with the cap on the LGA1155 socket. • The product warranty does not cover damage to the socket contacts resulting from incorrect CPU installation/removal, or misplacement/loss/ incorrect removal of the motherboard..., ensure that all power cables are not bent. Ensure that the PnP cap is missing, or if you see any damage to the PnP cap/socket contacts/motherboard components. ASUS will shoulder ...

User Manual
Page 37
Recommended memory configurations ASUS Maximus IV Extreme-Z 2-5 DO NOT install a DDR or DDR2 memory module to the DDR3 slot. A DDR3 module is notched differently from a DDR or DDR2 module. 2.2.4 System memory The motherboard comes with four Double Data Rate 3 (DDR3) Dual Inline Memory Modules (DIMM) slots.
Recommended memory configurations ASUS Maximus IV Extreme-Z 2-5 DO NOT install a DDR or DDR2 memory module to the DDR3 slot. A DDR3 module is notched differently from a DDR or DDR2 module. 2.2.4 System memory The motherboard comes with four Double Data Rate 3 (DDR3) Dual Inline Memory Modules (DIMM) slots.

User Manual
Page 38
ASUS will run at http://support.microsoft.com/kb/929605/en-us. •...memory load (4 DIMMs) or overclocking condition. 2-6 Chapter 2: Hardware information Under the default state, some memory modules for overclocking may install varying memory sizes in Megabit, 8 Megabit/Mb = 1 Megabyte/MB). • The default memory operation frequency is dependent on its...memory from a memory module. For more memory on the motherboard. Use a maximum of 3GB system memory if you install 4GB or more details, refer to the Microsoft® support site at DDR3 2133/2133/2133/1866/1600 MHz frequency ...
ASUS will run at http://support.microsoft.com/kb/929605/en-us. •...memory load (4 DIMMs) or overclocking condition. 2-6 Chapter 2: Hardware information Under the default state, some memory modules for overclocking may install varying memory sizes in Megabit, 8 Megabit/Mb = 1 Megabyte/MB). • The default memory operation frequency is dependent on its...memory from a memory module. For more memory on the motherboard. Use a maximum of 3GB system memory if you install 4GB or more details, refer to the Microsoft® support site at DDR3 2133/2133/2133/1866/1600 MHz frequency ...

User Manual
Page 45
... of less than 3GB is recommended. • It is recommended to install the memory modules from the red slots for better overclocking capacity. • Due to CPU behavior, DDR3 2333/2250/2200/2000/1800 MHz memory module .../2133/1866/1600 MHz frequency as two pairs of dual-channel memory configuration. • When installing total memory of dual-channel memory configuration. 4 DIMMs: Support 4 modules inserted into both the red and gray slots as default. ASUS Maximus IV Extreme-Z 2-13 Silicon Power Silicon Power Slicon Power Slicon Power Team Team Team Team SP001GBLTU1333S01 1GB...
... of less than 3GB is recommended. • It is recommended to install the memory modules from the red slots for better overclocking capacity. • Due to CPU behavior, DDR3 2333/2250/2200/2000/1800 MHz memory module .../2133/1866/1600 MHz frequency as two pairs of dual-channel memory configuration. • When installing total memory of dual-channel memory configuration. 4 DIMMs: Support 4 modules inserted into both the red and gray slots as default. ASUS Maximus IV Extreme-Z 2-13 Silicon Power Silicon Power Slicon Power Slicon Power Team Team Team Team SP001GBLTU1333S01 1GB...

User Manual
Page 50
PCIe x16 Lane switch These slide switches allows you can use the slide switch to find out the faulty one of the installed PCIe x16 cards is optimized to enable and disable the corresponding PCIe x16 slots. When one without removing the cards. 6. LN2 Mode switch With LN2 mode activated, the ROG motherboard is out of order, you to remedy the cold-boot bug during POST at an extremely low temperature and help the system boot successfully. 2-18 Chapter 2: Hardware information 5.
PCIe x16 Lane switch These slide switches allows you can use the slide switch to find out the faulty one of the installed PCIe x16 cards is optimized to enable and disable the corresponding PCIe x16 slots. When one without removing the cards. 6. LN2 Mode switch With LN2 mode activated, the ROG motherboard is out of order, you to remedy the cold-boot bug during POST at an extremely low temperature and help the system boot successfully. 2-18 Chapter 2: Hardware information 5.

User Manual
Page 57
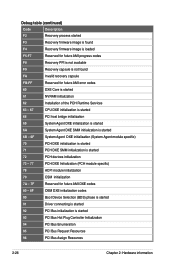
EF Reserved for ASL (see ASL Status Codes section below) 31 Memory Installed 32 - 36 CPU post-memory initialization 37 - 3A Post-Memory System Agent initialization is started 3B - 3E Post-Memory PCH initialization is started 3F - 4E ... 55 Memory not installed 56 Invalid CPU type or Speed 57 CPU mismatch 58 CPU self test failed or possible CPU cache error 59 CPU micro-code is not found or micro-code update is failed 5A Internal CPU error 5B Reset PPI is called by user (Forced recovery) ASUS Maximus IV Extreme-Z 2-25 E7...
EF Reserved for ASL (see ASL Status Codes section below) 31 Memory Installed 32 - 36 CPU post-memory initialization 37 - 3A Post-Memory System Agent initialization is started 3B - 3E Post-Memory PCH initialization is started 3F - 4E ... 55 Memory not installed 56 Invalid CPU type or Speed 57 CPU mismatch 58 CPU self test failed or possible CPU cache error 59 CPU micro-code is not found or micro-code update is failed 5A Internal CPU error 5B Reset PPI is called by user (Forced recovery) ASUS Maximus IV Extreme-Z 2-25 E7...
User Manual
Page 58
... capsule is not found FA Invalid recovery capsule FB-FF Reserved for future AMI error codes 60 DXE Core is started 61 NVRAM initialization 62 Installation of the PCH Runtime Services 63 - 67 CPU DXE initialization is started 68 PCI host bridge initialization 69 System Agent DXE initialization is started 6A...
... capsule is not found FA Invalid recovery capsule FB-FF Reserved for future AMI error codes 60 DXE Core is started 61 NVRAM initialization 62 Installation of the PCH Runtime Services 63 - 67 CPU DXE initialization is started 68 PCI host bridge initialization 69 System Agent DXE initialization is started 6A...


