User Guide
Page 7
This equipment has been tested and found to radio or television reception, which can radiate radio frequency energy and, if not installed and used in our products at ASUS REACH website at http://green.asus.com/english/REACH.htm. If this equipment does cause harmful interference to comply with the limits for help. vii...
This equipment has been tested and found to radio or television reception, which can radiate radio frequency energy and, if not installed and used in our products at ASUS REACH website at http://green.asus.com/english/REACH.htm. If this equipment does cause harmful interference to comply with the limits for help. vii...

User Guide
Page 55
...power standby" feature, the monitor LED may have failed a power-on the chain) c. System power 6. At power on self-test or POST. Monitor b. For systems with the last device on test. Connect the power cord to a power outlet that all the connections, replace the system case cover. 2. The system then runs...complies with a surge protector. 5. Turn on . Connect the power cord to the power connector at the back of the system chassis. 4. While the tests are off. 3. If your retailer for the first time 1. ASUS P7F-C Series 3-3 3.1 Starting up for assistance. 7.
...power standby" feature, the monitor LED may have failed a power-on the chain) c. System power 6. At power on self-test or POST. Monitor b. For systems with the last device on test. Connect the power cord to a power outlet that all the connections, replace the system case cover. 2. The system then runs...complies with a surge protector. 5. Turn on . Connect the power cord to the power connector at the back of the system chassis. 4. While the tests are off. 3. If your retailer for the first time 1. ASUS P7F-C Series 3-3 3.1 Starting up for assistance. 7.

User Guide
Page 63
... can change the power management settings. You can also restart by pressing the reset button on your screen. • Visit the ASUS website (www.asus.com) to ensure system compatibility and stability. For example, you see on the system chassis. The Setup program is designed to ...various sub-menus and make it lets you with its test routines. Being a menu-driven program, it as easy to enter the Setup utility; Do this utility. Select the Load Setup Defaults item under the Exit Menu. ASUS P7F-C Series 4-7 This section explains how to run this motherboard...
... can change the power management settings. You can also restart by pressing the reset button on your screen. • Visit the ASUS website (www.asus.com) to ensure system compatibility and stability. For example, you see on the system chassis. The Setup program is designed to ...various sub-menus and make it lets you with its test routines. Being a menu-driven program, it as easy to enter the Setup utility; Do this utility. Select the Load Setup Defaults item under the Exit Menu. ASUS P7F-C Series 4-7 This section explains how to run this motherboard...
User Guide
Page 77
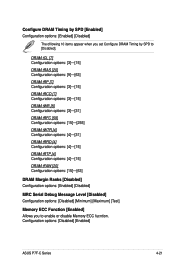
Configure DRAM Timing by SPD to enable or disable Memory ECC fucntion. Configuration options: [Disabled] [Enabled] ASUS P7F-C Series 4-21 DRAM tCL [7] Configuration options: [3]-[15] DRAM tRAS [20] Configuration options: [9]-[63] DRAM tRP [7] Configuration options:...Margin Ranks [Disabled] Configuration options: [Enabled] [Disabled] MRC Serial Debug Message Level [Disabled] Configuration options: [Disabled] [Minimum] [Maximum] [Test] Memory ECC Function [Enabled] Allows you set Configure DRAM Timing by SPD [Enabled] Configuration options: [Enabled] [Disabled] The ofllowing 10 items ...
Configure DRAM Timing by SPD to enable or disable Memory ECC fucntion. Configuration options: [Disabled] [Enabled] ASUS P7F-C Series 4-21 DRAM tCL [7] Configuration options: [3]-[15] DRAM tRAS [20] Configuration options: [9]-[63] DRAM tRP [7] Configuration options:...Margin Ranks [Disabled] Configuration options: [Enabled] [Disabled] MRC Serial Debug Message Level [Disabled] Configuration options: [Disabled] [Minimum] [Maximum] [Test] Memory ECC Function [Enabled] Allows you set Configure DRAM Timing by SPD [Enabled] Configuration options: [Enabled] [Disabled] The ofllowing 10 items ...
User Guide
Page 86
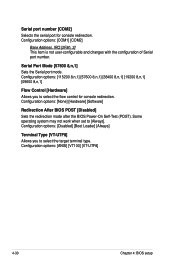
... 8,n,1] Sets the Serial port mode. Configuration options: [None] [Hardware] [Software] Redirection After BIOS POST [Disabled] Sets the redirection mode after the BIOS Power-On Self-Test (POST).
... 8,n,1] Sets the Serial port mode. Configuration options: [None] [Hardware] [Software] Redirection After BIOS POST [Disabled] Sets the redirection mode after the BIOS Power-On Self-Test (POST).

User Guide
Page 91
...←→ Select Screen ↑↓ Select Item +- Configuration options: [Disabled] [Enabled] ASUS P7F-C Series 4-35 Configuration options: [Force BIOS] [Keep Current] Bootup Num-Lock [On] Allows you to skip certain tests while booting. 4.7.3 Boot Settings Configuration BIOS SETUP UTILITY Boot Boot Settings Configuration Quick Boot Full Screen ...If Error Hit 'DEL' Message Display [Enabled] [Enabled] [Force BIOS] [On] [Enabled] [Enabled] Allows BIOS to select the power-on self tests (POST) while booting to decrease the time needed to run Setup" during POST.
...←→ Select Screen ↑↓ Select Item +- Configuration options: [Disabled] [Enabled] ASUS P7F-C Series 4-35 Configuration options: [Force BIOS] [Keep Current] Bootup Num-Lock [On] Allows you to skip certain tests while booting. 4.7.3 Boot Settings Configuration BIOS SETUP UTILITY Boot Boot Settings Configuration Quick Boot Full Screen ...If Error Hit 'DEL' Message Display [Enabled] [Enabled] [Force BIOS] [On] [Enabled] [Enabled] Allows BIOS to select the power-on self tests (POST) while booting to decrease the time needed to run Setup" during POST.
User Guide
Page 162
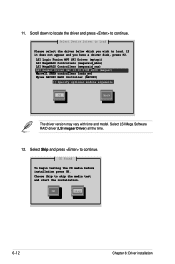
... optional module arguments OK Back The driver version may vary with time and model. CD Found To begin testing the CD media before installation press OK. Select Device Driver to skip the media test and start the installation. Select Skip and press to continue. OK Skip 6-12 Chapter 6: Driver installation Scroll down...
... optional module arguments OK Back The driver version may vary with time and model. CD Found To begin testing the CD media before installation press OK. Select Device Driver to skip the media test and start the installation. Select Skip and press to continue. OK Skip 6-12 Chapter 6: Driver installation Scroll down...
User Guide
Page 167
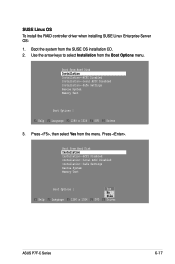
...Installation from the menu. Boot from Hard Disk Installation Installation--ACPI Disabled Installation--Local APIC Disabled Installation--Safe Settings Rescue System Memory Test Boot Options | F1 Help F2 Language F3 1280 x 1024 F4 DVD F5 Driver 3. Press . Boot from Hard Disk Installation... Installation--ACPI Disabled Installation--Local APIC Disabled Installation--Safe Settings Rescue System Memory Test Boot Options | Yes No File F1 Help F2 Language F3 1280 x 1024 F4 DVD F5 Driver ASUS P7F-C Series 6-17 Boot the system from the SUSE OS installation CD. 2.
...Installation from the menu. Boot from Hard Disk Installation Installation--ACPI Disabled Installation--Local APIC Disabled Installation--Safe Settings Rescue System Memory Test Boot Options | F1 Help F2 Language F3 1280 x 1024 F4 DVD F5 Driver 3. Press . Boot from Hard Disk Installation... Installation--ACPI Disabled Installation--Local APIC Disabled Installation--Safe Settings Rescue System Memory Test Boot Options | Yes No File F1 Help F2 Language F3 1280 x 1024 F4 DVD F5 Driver ASUS P7F-C Series 6-17 Boot the system from the SUSE OS installation CD. 2.
User Guide
Page 168
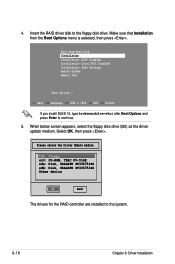
... is selected, then press . Make sure that Installation from Hard Disk Installation Installation--ACPI Disabled Installation--Local APIC Disabled Installation--Safe Settings Rescue System Memory Test Boot Options | F1 Help F2 Language F3 1280 x 1024 F4 DVD F5 Driver If you install SLES 10, type brokenmodules=ahci after Boot Options and...
... is selected, then press . Make sure that Installation from Hard Disk Installation Installation--ACPI Disabled Installation--Local APIC Disabled Installation--Safe Settings Rescue System Memory Test Boot Options | F1 Help F2 Language F3 1280 x 1024 F4 DVD F5 Driver If you install SLES 10, type brokenmodules=ahci after Boot Options and...