User Manual
Page 11
Failure to do so may cause severe damage to page ix for buying an ASUS® P8H61-M LX3 motherboard! Before you start installing the motherboard, and hardware devices on it, check the items in your retailer. 1.1 Before you proceed Take note of the ...
Failure to do so may cause severe damage to page ix for buying an ASUS® P8H61-M LX3 motherboard! Before you start installing the motherboard, and hardware devices on it, check the items in your retailer. 1.1 Before you proceed Take note of the ...
User Manual
Page 12
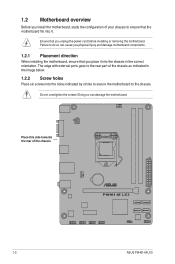
... the holes indicated by circles to secure the motherboard to the chassis. The edge with external ports goes to the rear part of the chassis P8H61-M LX3 1-2 ASUS P8H61-M LX3 Doing so can cause you physical injury and damage motherboard components. 1.2.1 Placement direction When installing the motherboard, ensure that you place it into the chassis...
... the holes indicated by circles to secure the motherboard to the chassis. The edge with external ports goes to the rear part of the chassis P8H61-M LX3 1-2 ASUS P8H61-M LX3 Doing so can cause you physical injury and damage motherboard components. 1.2.1 Placement direction When installing the motherboard, ensure that you place it into the chassis...
User Manual
Page 14
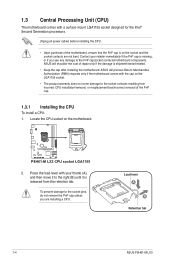
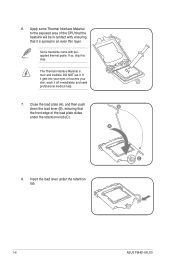
... released from incorrect CPU installation/removal, or misplacement/loss/incorrect removal of the PnP cap. 1.3.1 Installing the CPU To install a CPU: 1. Load lever A B Retention tab 1-4 ASUS P8H61-M LX3 Press the load lever with a surface mount LGA1155 socket designed for the Intel® Second Generation processors. To prevent damage to the PnP cap/socket...
... released from incorrect CPU installation/removal, or misplacement/loss/incorrect removal of the PnP cap. 1.3.1 Installing the CPU To install a CPU: 1. Load lever A B Retention tab 1-4 ASUS P8H61-M LX3 Press the load lever with a surface mount LGA1155 socket designed for the Intel® Second Generation processors. To prevent damage to the PnP cap/socket...
User Manual
Page 16
... the load lever under the retention knob (C). 6. Apply some Thermal Interface Material to the exposed area of the load plate slides under the retention tab. 1-6 ASUS P8H61-M LX3 Some heatsinks come with , ensuring that the front edge of the CPU that the heatsink will be in an even thin layer.
... the load lever under the retention knob (C). 6. Apply some Thermal Interface Material to the exposed area of the load plate slides under the retention tab. 1-6 ASUS P8H61-M LX3 Some heatsinks come with , ensuring that the front edge of the CPU that the heatsink will be in an even thin layer.
User Manual
Page 18
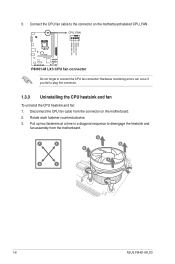
... and fan: 1. Disconnect the CPU fan cable from the motherboard. Pull up two fasteners at a time in a diagonal sequence to the connector on the motherboard. 2. 3. A B A B B A B A 1-8 ASUS P8H61-M LX3 Rotate each fastener counterclockwise. 3. Connect the CPU fan cable to disengage the heatsink and fan assembly from the connector on the motherboard labeled CPU_FAN. Hardware...
... and fan: 1. Disconnect the CPU fan cable from the motherboard. Pull up two fasteners at a time in a diagonal sequence to the connector on the motherboard. 2. 3. A B A B B A B A 1-8 ASUS P8H61-M LX3 Rotate each fastener counterclockwise. 3. Connect the CPU fan cable to disengage the heatsink and fan assembly from the connector on the motherboard labeled CPU_FAN. Hardware...
User Manual
Page 20
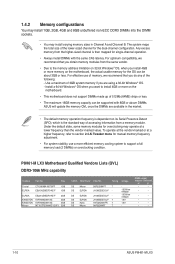
...the following: - For effective use a more on the motherboard, the actual usable memory for the dual-channel configuration. P8H61-M LX3 Motherboard Qualified Vendors Lists (QVL) DDR3-1066 MHz capability Vendors Part No. Any excess memory from the higher-sized channel...) A* B* • • • • • • • • • • • • 1-10 ASUS P8H61-M LX3 Timing Voltage SS Micron SS ELPIDA DS ELPIDA DS ELPIDA DS Hynix DS Micron 9GF22D9KPT 7 J1108EDSE-DJ-F - For optimum compatibility, we recommend that you obtain...
...the following: - For effective use a more on the motherboard, the actual usable memory for the dual-channel configuration. P8H61-M LX3 Motherboard Qualified Vendors Lists (QVL) DDR3-1066 MHz capability Vendors Part No. Any excess memory from the higher-sized channel...) A* B* • • • • • • • • • • • • 1-10 ASUS P8H61-M LX3 Timing Voltage SS Micron SS ELPIDA DS ELPIDA DS ELPIDA DS Hynix DS Micron 9GF22D9KPT 7 J1108EDSE-DJ-F - For optimum compatibility, we recommend that you obtain...
User Manual
Page 22
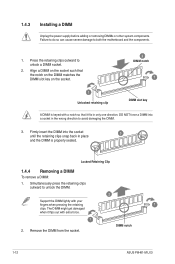
... press the retaining clips outward to avoid damaging the DIMM. 3. Failure to do so can cause severe damage to unlock a DIMM socket. 2. DIMM notch 1-12 ASUS P8H61-M LX3 Align a DIMM on the socket such that the notch on the DIMM matches the DIMM slot key on the socket. 2 DIMM notch 1 1 Unlocked retaining clip...
... press the retaining clips outward to avoid damaging the DIMM. 3. Failure to do so can cause severe damage to unlock a DIMM socket. 2. DIMM notch 1-12 ASUS P8H61-M LX3 Align a DIMM on the socket such that the notch on the DIMM matches the DIMM slot key on the socket. 2 DIMM notch 1 1 Unlocked retaining clip...
User Manual
Page 24
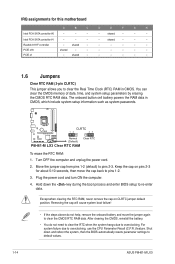
... - 1.6 Jumpers Clear RTC RAM (3-pin CLRTC) This jumper allows you to overclocking, use the CPU Parameter Recall (C.P.R.) feature. P8H61-M LX3 CLRTC 12 23 Normal (Default) Clear RTC P8H61-M LX3 Clear RTC RAM To erase the RTC RAM: 1. Plug the power cord and turn ON the computer. 4. For system failure ...setup information such as system passwords. Shut down the key during the boot process and enter BIOS setup to default values. 1-14 ASUS P8H61-M LX3 shared - - - Hold down and reboot the system, then the BIOS automatically resets parameter settings to re-enter data. Removing...
... - 1.6 Jumpers Clear RTC RAM (3-pin CLRTC) This jumper allows you to overclocking, use the CPU Parameter Recall (C.P.R.) feature. P8H61-M LX3 CLRTC 12 23 Normal (Default) Clear RTC P8H61-M LX3 Clear RTC RAM To erase the RTC RAM: 1. Plug the power cord and turn ON the computer. 4. For system failure ...setup information such as system passwords. Shut down the key during the boot process and enter BIOS setup to default values. 1-14 ASUS P8H61-M LX3 shared - - - Hold down and reboot the system, then the BIOS automatically resets parameter settings to re-enter data. Removing...

User Manual
Page 26
USB 2.0 ports 1 and 2. These two 4-pin Universal Serial Bus (USB) ports are for details. 1-16 ASUS P8H61-M LX3 If you want to connect an AC'97 front panel audio module to this connector to avail of the front panel audio I /O module that you... AGND NC NC NC AAFP PIN 1 PIN 1 MIC2 MICPWR Line out_R NC Line out_L PORT1 L PORT1 R PORT2 R SENSE_SEND PORT2 L P8H61-M LX3 HD-audio-compliant Legacy AC'97 pin definition compliant definition P8H61-M LX3 Front panel audio connector • We recommend that supports either HD Audio or legacy AC`97 audio standard. This port...
USB 2.0 ports 1 and 2. These two 4-pin Universal Serial Bus (USB) ports are for details. 1-16 ASUS P8H61-M LX3 If you want to connect an AC'97 front panel audio module to this connector to avail of the front panel audio I /O module that you... AGND NC NC NC AAFP PIN 1 PIN 1 MIC2 MICPWR Line out_R NC Line out_L PORT1 L PORT1 R PORT2 R SENSE_SEND PORT2 L P8H61-M LX3 HD-audio-compliant Legacy AC'97 pin definition compliant definition P8H61-M LX3 Front panel audio connector • We recommend that supports either HD Audio or legacy AC`97 audio standard. This port...
User Manual
Page 28
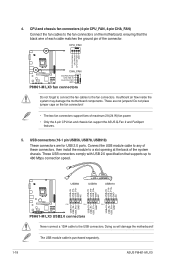
... • Only the 4-pin CPU fan and chassis fan support the ASUS Q-Fan 2 and FanXpert features. 5. These are for USB 2.0 ports. USB56 USB78 USB910 USB+5V USB_P6USB_P6+ GND NC USB+5V USB_P8USB_P8+ GND NC USB+5V USB_P10USB_P10+ GND NC P8H61-M LX3 PIN 1 PIN 1 PIN 1 USB+5V USB_P5USB_P5+ GND USB+5V ... on the fan connectors! • The two fan connectors support fans of the connector. The USB module cable is purchased separately. 1-18 ASUS P8H61-M LX3 Doing so will damage the motherboard! Insufficient air flow inside the system may damage the motherboard components. 4.
... • Only the 4-pin CPU fan and chassis fan support the ASUS Q-Fan 2 and FanXpert features. 5. These are for USB 2.0 ports. USB56 USB78 USB910 USB+5V USB_P6USB_P6+ GND NC USB+5V USB_P8USB_P8+ GND NC USB+5V USB_P10USB_P10+ GND NC P8H61-M LX3 PIN 1 PIN 1 PIN 1 USB+5V USB_P5USB_P5+ GND USB+5V ... on the fan connectors! • The two fan connectors support fans of the connector. The USB module cable is purchased separately. 1-18 ASUS P8H61-M LX3 Doing so will damage the motherboard! Insufficient air flow inside the system may damage the motherboard components. 4.
User Manual
Page 30
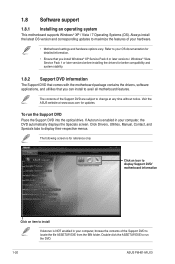
... at any time without notice. To run the DVD. 1-20 ASUS P8H61-M LX3 If Autorun is enabled in your computer, the DVD automatically displays the Specials screen. The following screen is NOT enabled in your computer, browse the ... to maximize the features of the Support DVD are subject to your hardware. • Motherboard settings and hardware options vary. Refer to change at www.asus.com for reference only. The contents of your OS documentation for detailed information. • Ensure that you install Windows® XP Service Pack 3 or later...
... at any time without notice. To run the DVD. 1-20 ASUS P8H61-M LX3 If Autorun is enabled in your computer, the DVD automatically displays the Specials screen. The following screen is NOT enabled in your computer, browse the ... to maximize the features of the Support DVD are subject to your hardware. • Motherboard settings and hardware options vary. Refer to change at www.asus.com for reference only. The contents of your OS documentation for detailed information. • Ensure that you install Windows® XP Service Pack 3 or later...
User Manual
Page 32
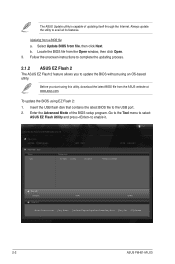
... Info MODEL: Help Info VER: DATE [Enter] Select or Load [Tab] Switch [Up/Down/PageUp/PageDown/Home/End] Move [Esc] Exit [F2] Backup 2-2 ASUS P8H61-M LX3 Updating from file, then click Next. b. Before you to update the BIOS without using an OS‑based utility. Locate the BIOS file from the... ASUS website at www.asus.com. Go to the Tool menu to select ASUS EZ Flash Utility and press to avail all its features. Follow the onscreen instructions to the USB port. 2. ...
... Info MODEL: Help Info VER: DATE [Enter] Select or Load [Tab] Switch [Up/Down/PageUp/PageDown/Home/End] Move [Esc] Exit [F2] Backup 2-2 ASUS P8H61-M LX3 Updating from file, then click Next. b. Before you to update the BIOS without using an OS‑based utility. Locate the BIOS file from the... ASUS website at www.asus.com. Go to the Tool menu to select ASUS EZ Flash Utility and press to avail all its features. Follow the onscreen instructions to the USB port. 2. ...
User Manual
Page 34
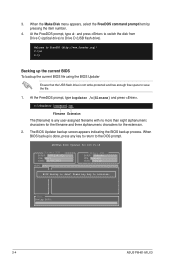
... the BIOS backup process. Welcome to save the file. 1. When BIOS backup is done, press any key to continue. Note Saving BIOS: 2-4 ASUS P8H61-M LX3 At the FreeDOS prompt, type bupdater /o[filename] and press . ASUSTek BIOS Updater for the extension. 2. When the Make Disk menu appears, select ...user-assigned filename with no more than eight alphanumeric characters for the filename and three alphanumeric characters for DOS V1.18 Current ROM BOARD: P8H61-M LX3 VER: 0301 DATE: 11/28/2011 Update ROM BOARD: Unknown VER: Unknown DATE: Unknown PATH: A:\ BIOS backup is not write-...
... the BIOS backup process. Welcome to save the file. 1. When BIOS backup is done, press any key to continue. Note Saving BIOS: 2-4 ASUS P8H61-M LX3 At the FreeDOS prompt, type bupdater /o[filename] and press . ASUSTek BIOS Updater for the extension. 2. When the Make Disk menu appears, select ...user-assigned filename with no more than eight alphanumeric characters for the filename and three alphanumeric characters for DOS V1.18 Current ROM BOARD: P8H61-M LX3 VER: 0301 DATE: 11/28/2011 Update ROM BOARD: Unknown VER: Unknown DATE: Unknown PATH: A:\ BIOS backup is not write-...

User Manual
Page 36
... that a USB mouse is connected to your motherboard if you see on how to erase the RTC RAM. 2-6 ASUS P8H61-M LX3 Entering BIOS Setup at startup To enter BIOS Setup at www.asus.com to download the latest BIOS file for this section are for information on your data or system. Select the... two options. We recommend to always shut down the system properly from a running operating system can cause damage to your screen. • Visit the ASUS website at startup: • Press during the Power-On Self Test (POST). 2.2 BIOS setup program Use the BIOS Setup program to update the BIOS...
... that a USB mouse is connected to your motherboard if you see on how to erase the RTC RAM. 2-6 ASUS P8H61-M LX3 Entering BIOS Setup at startup To enter BIOS Setup at www.asus.com to download the latest BIOS file for this section are for information on your data or system. Select the... two options. We recommend to always shut down the system properly from a running operating system can cause damage to your screen. • Visit the ASUS website at startup: • Press during the Power-On Self Test (POST). 2.2 BIOS setup program Use the BIOS Setup program to update the BIOS...

User Manual
Page 38
To access the EZ Mode, click Exit, then select ASUS EZ Mode. Copyright (C) 2011 American Megatrends, Inc. Pop-up window Scroll bar Navigation keys Menu bar The menu bar on top of the Advanced Mode. ... to configure the BIOS settings. Advanced Mode The Advanced Mode provides advanced options for special functions For selecting the exit options and loading default settings 2-8 ASUS P8H61-M LX3 Back button Menu items Menu bar Configuration fields EFI BIOS Utility - Advanced Mode General help Exit Main Back Ai Tweaker Advanced Advanced\ Onboard Devices Configuration...
To access the EZ Mode, click Exit, then select ASUS EZ Mode. Copyright (C) 2011 American Megatrends, Inc. Pop-up window Scroll bar Navigation keys Menu bar The menu bar on top of the Advanced Mode. ... to configure the BIOS settings. Advanced Mode The Advanced Mode provides advanced options for special functions For selecting the exit options and loading default settings 2-8 ASUS P8H61-M LX3 Back button Menu items Menu bar Configuration fields EFI BIOS Utility - Advanced Mode General help Exit Main Back Ai Tweaker Advanced Advanced\ Onboard Devices Configuration...
User Manual
Page 40
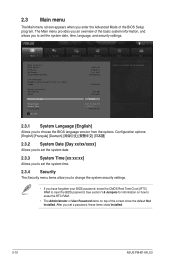
... [xx:xx:xx] Allows you to erase the RTC RAM. • The Administrator or User Password items on top of the screen show Installed. 2-10 ASUS P8H61-M LX3 See section 1.6 Jumpers for information on how to choose the BIOS language version from the options.
... [xx:xx:xx] Allows you to erase the RTC RAM. • The Administrator or User Password items on top of the screen show Installed. 2-10 ASUS P8H61-M LX3 See section 1.6 Jumpers for information on how to choose the BIOS language version from the options.

User Manual
Page 42
...system to malfunction. Configuration options: [DDR3-800MHz] [DDR3-1066MHz] [DDR3-1333MHz] Selecting a very high memory frequency may cause the system to Intel spec, ASUS H61 Series motherboard supports 1066/1333MHz DRAM (only). →←: Select Screen ↑↓: Select Item Enter: Select +/-: Change Opt. Copyright (C) 2011 American...items allow you to set the memory operating frequency. The configuration options for this happens, revert to the default setting. 2-12 ASUS P8H61-M LX3 If this section vary depending on the CPU and DIMM model you installed on the motherboard.
...system to malfunction. Configuration options: [DDR3-800MHz] [DDR3-1066MHz] [DDR3-1333MHz] Selecting a very high memory frequency may cause the system to Intel spec, ASUS H61 Series motherboard supports 1066/1333MHz DRAM (only). →←: Select Screen ↑↓: Select Item Enter: Select +/-: Change Opt. Copyright (C) 2011 American...items allow you to set the memory operating frequency. The configuration options for this happens, revert to the default setting. 2-12 ASUS P8H61-M LX3 If this section vary depending on the CPU and DIMM model you installed on the motherboard.
User Manual
Page 44
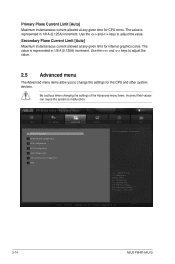
... BIOS Utility - Secondary Plane Current Limit [Auto] Maximum instantaneous current allowed at any given time for internal graphics cores. Copyright (C) 2011 American Megatrends, Inc. 2-14 ASUS P8H61-M LX3
... BIOS Utility - Secondary Plane Current Limit [Auto] Maximum instantaneous current allowed at any given time for internal graphics cores. Copyright (C) 2011 American Megatrends, Inc. 2-14 ASUS P8H61-M LX3
User Manual
Page 46
...] Allows you to disable or enable the CPU C3 report to the operating system. And the memory size for add-on Windows® XP. 2-16 ASUS P8H61-M LX3
...] Allows you to disable or enable the CPU C3 report to the operating system. And the memory size for add-on Windows® XP. 2-16 ASUS P8H61-M LX3
User Manual
Page 48
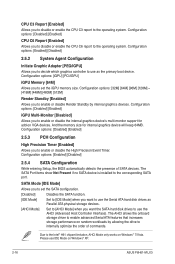
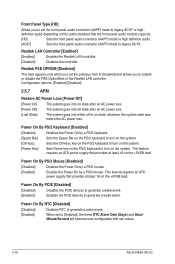
... PS/2 keyboard to turn on the +5VSB lead. Power On By RTC [Disabled] [Disabled] Disables RTC to generate a wake event. [Enabled] When set values. 2-18 ASUS P8H61-M LX3 Configuration options: [Enabled] [Disabled] 2.5.7 APM Restore AC Power Loss [Power Off] [Power On] The system goes into on state after an AC power loss. [Power...
... PS/2 keyboard to turn on the +5VSB lead. Power On By RTC [Disabled] [Disabled] Disables RTC to generate a wake event. [Enabled] When set values. 2-18 ASUS P8H61-M LX3 Configuration options: [Enabled] [Disabled] 2.5.7 APM Restore AC Power Loss [Power Off] [Power On] The system goes into on state after an AC power loss. [Power...


