User Manual
Page 6
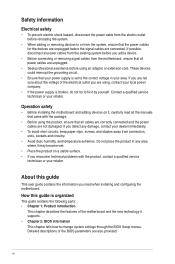
... • Chapter 1: Product introduction This chapter describes the features of the motherboard and the new technology it supports. • Chapter 2: BIOS information This chapter tells how to the correct voltage in any damage, contact your dealer immediately. • To avoid short circuits, keep...a qualified service technician or your local power company. • If the power supply is set to change system settings through the BIOS Setup menus. Safety information Electrical safety • To prevent electric shock hazard, disconnect the power cable from the electric outlet before ...
... • Chapter 1: Product introduction This chapter describes the features of the motherboard and the new technology it supports. • Chapter 2: BIOS information This chapter tells how to the correct voltage in any damage, contact your dealer immediately. • To avoid short circuits, keep...a qualified service technician or your local power company. • If the power supply is set to change system settings through the BIOS Setup menus. Safety information Electrical safety • To prevent electric shock hazard, disconnect the power cable from the electric outlet before ...
User Manual
Page 8
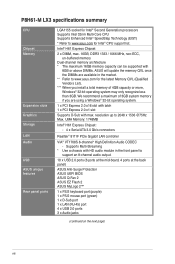
P8H61-M LX3 specifications summary CPU Chipset Memory Expansion slots Graphics Storage LAN Audio USB ASUS unique features Rear panel ports LGA1155 socket for Intel® Second Generation processors Supports Intel 32nm Multi-Core CPU Supports Enhanced Intel® SpeedStep Technology (EIST) * Refer to 2048 x 1536 @75Hz Max. resolution up to www.asus...audio output. 10 x USB 2.0 ports (6 ports at the mid-board, 4 ports at the back panel) ASUS Anti-Surge Protection ASUS UEFI BIOS ASUS Q-Fan 2 ASUS EZ Flash 2 ASUS MyLogo 2™ 1 x PS/2 keyboard port (purple) 1 x PS/2 mouse port (green) 1 x ...
P8H61-M LX3 specifications summary CPU Chipset Memory Expansion slots Graphics Storage LAN Audio USB ASUS unique features Rear panel ports LGA1155 socket for Intel® Second Generation processors Supports Intel 32nm Multi-Core CPU Supports Enhanced Intel® SpeedStep Technology (EIST) * Refer to 2048 x 1536 @75Hz Max. resolution up to www.asus...audio output. 10 x USB 2.0 ports (6 ports at the mid-board, 4 ports at the back panel) ASUS Anti-Surge Protection ASUS UEFI BIOS ASUS Q-Fan 2 ASUS EZ Flash 2 ASUS MyLogo 2™ 1 x PS/2 keyboard port (purple) 1 x PS/2 mouse port (green) 1 x ...
User Manual
Page 9
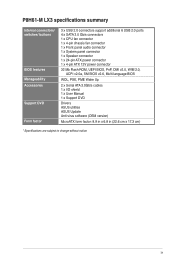
P8H61-M LX3 specifications summary Internal connectors/ switches/ buttons BIOS features Manageability Accessories Support DVD Form factor 3 x USB 2.0 connectors support additional 6 USB 2.0 ports 4 x SATA 3.0 Gb/s connectors 1 x CPU fan connector 1 x 4-pin chassis fan... x 4-pin ATX 12V power connector 32 Mb Flash ROM, UEFI BIOS, PnP, DMI v2.0, WfM 2.0, ACPI v2.0a, SM BIOS v2.6, Multi-language BIOS WOL, PXE, PME Wake Up 2 x Serial ATA 3.0Gb/s cables 1 x I/O shield 1 x User Manual 1 x Support DVD Drivers ASUS utilities ASUS Update Anti-virus software (OEM version) MicroATX form factor: 8.9 in...
P8H61-M LX3 specifications summary Internal connectors/ switches/ buttons BIOS features Manageability Accessories Support DVD Form factor 3 x USB 2.0 connectors support additional 6 USB 2.0 ports 4 x SATA 3.0 Gb/s connectors 1 x CPU fan connector 1 x 4-pin chassis fan... x 4-pin ATX 12V power connector 32 Mb Flash ROM, UEFI BIOS, PnP, DMI v2.0, WfM 2.0, ACPI v2.0a, SM BIOS v2.6, Multi-language BIOS WOL, PXE, PME Wake Up 2 x Serial ATA 3.0Gb/s cables 1 x I/O shield 1 x User Manual 1 x Support DVD Drivers ASUS utilities ASUS Update Anti-virus software (OEM version) MicroATX form factor: 8.9 in...

User Manual
Page 23
... card After installing the expansion card, configure it and make the necessary hardware settings for information on the system and change the necessary BIOS settings, if any. Turn on BIOS setup. 2. When using PCI cards on the slot. 5. Failure to do not need to the card. 3. Install the software drivers for later...
... card After installing the expansion card, configure it and make the necessary hardware settings for information on the system and change the necessary BIOS settings, if any. Turn on BIOS setup. 2. When using PCI cards on the slot. 5. Failure to do not need to the card. 3. Install the software drivers for later...
User Manual
Page 24
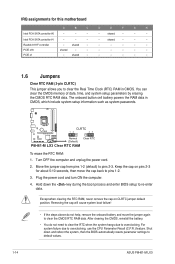
... hangs due to overclocking. Turn OFF the computer and unplug the power cord. 2. Hold down and reboot the system, then the BIOS automatically resets parameter settings to default values. 1-14 ASUS P8H61-M LX3 You can clear the CMOS memory of date, time, and system setup parameters by erasing the CMOS RTC RAM data. shared...
... hangs due to overclocking. Turn OFF the computer and unplug the power cord. 2. Hold down and reboot the system, then the BIOS automatically resets parameter settings to default values. 1-14 ASUS P8H61-M LX3 You can clear the CMOS memory of date, time, and system setup parameters by erasing the CMOS RTC RAM data. shared...

User Manual
Page 26
..., set the Front Panel Type item in the BIOS setup to [HD]. 6. Front panel audio connector (10-1 pin AAFP) This connector is set the item to a PS/2 keyboard. 1.7.2 Internal connectors 1. These two 4-pin Universal Serial Bus (USB) ports are for details. 1-16 ASUS P8H61-M LX3 AGND NC SENSE1_RETUR SENSE2_RETUR AGND NC NC NC AAFP...
..., set the Front Panel Type item in the BIOS setup to [HD]. 6. Front panel audio connector (10-1 pin AAFP) This connector is set the item to a PS/2 keyboard. 1.7.2 Internal connectors 1. These two 4-pin Universal Serial Bus (USB) ports are for details. 1-16 ASUS P8H61-M LX3 AGND NC SENSE1_RETUR SENSE2_RETUR AGND NC NC NC AAFP...
User Manual
Page 27
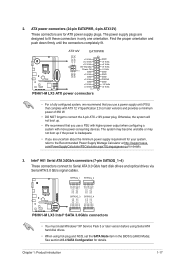
...RSATA_RXP3 RSATA_RXN3 GND RSATA_TXN3 RSATA_TXP3 GND GND RSATA_RXP4 RSATA_RXN4 GND RSATA_TXN4 RSATA_TXP4 GND P8H61-M LX3 SATA3G_3 SATA3G_4 P8H61-M LX3 Intel® SATA 3.0Gb/s connectors • You must install Windows®...SATA3G_1~4) These connectors connect to the Recommended Power Supply Wattage Calculator at http://support.asus. Find the proper orientation and push down firmly until the connectors completely fit. Otherwise...power is inadequate. • If you are designed to fit these connectors in the BIOS to connect the 4-pin ATX +12V power plug. ATX power connectors (24-pin EATXPWR...
...RSATA_RXP3 RSATA_RXN3 GND RSATA_TXN3 RSATA_TXP3 GND GND RSATA_RXP4 RSATA_RXN4 GND RSATA_TXN4 RSATA_TXP4 GND P8H61-M LX3 SATA3G_3 SATA3G_4 P8H61-M LX3 Intel® SATA 3.0Gb/s connectors • You must install Windows®...SATA3G_1~4) These connectors connect to the Recommended Power Supply Wattage Calculator at http://support.asus. Find the proper orientation and push down firmly until the connectors completely fit. Otherwise...power is inadequate. • If you are designed to fit these connectors in the BIOS to connect the 4-pin ATX +12V power plug. ATX power connectors (24-pin EATXPWR...

User Manual
Page 31
... this utility. Quit all Windows® applications before you to complete the installation. Updating the BIOS To update the BIOS: 1. The AI Suite II Quick Bar appears. 2. The ASUS Update main screen appears. From the list, select either through a network or an Internet Service Provider (...II utility. Installing ASUS Update To install ASUS Update: 1. Click the Utilities tab, then click AI Suite II. 3. Select Update BIOS from the popup menu. Select the ASUS FTP site nearest you update the BIOS using the ASUS Update utility. 2.1.1 ASUS Update utility The ASUS Update is available in...
... this utility. Quit all Windows® applications before you to complete the installation. Updating the BIOS To update the BIOS: 1. The AI Suite II Quick Bar appears. 2. The ASUS Update main screen appears. From the list, select either through a network or an Internet Service Provider (...II utility. Installing ASUS Update To install ASUS Update: 1. Click the Utilities tab, then click AI Suite II. 3. Select Update BIOS from the popup menu. Select the ASUS FTP site nearest you update the BIOS using the ASUS Update utility. 2.1.1 ASUS Update utility The ASUS Update is available in...
User Manual
Page 32
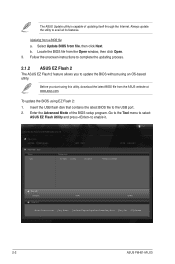
... itself through the Internet. Go to the Tool menu to select ASUS EZ Flash Utility and press to update the BIOS without using an OS‑based utility. ASUSTek EZ Flash BIOS ROM Utility V00.75 Flash Info MODEL: P8H61-M LX3 File Path: fs0:\ Drive fs0:\ VER: 0301 Folder Info 01... [Enter] Select or Load [Tab] Switch [Up/Down/PageUp/PageDown/Home/End] Move [Esc] Exit [F2] Backup 2-2 ASUS P8H61-M LX3 b. Insert the USB flash disk that contains the latest BIOS file to avail all its features. Before you to enable it. Updating from the Open window, then click Open. 3. To update...
... itself through the Internet. Go to the Tool menu to select ASUS EZ Flash Utility and press to update the BIOS without using an OS‑based utility. ASUSTek EZ Flash BIOS ROM Utility V00.75 Flash Info MODEL: P8H61-M LX3 File Path: fs0:\ Drive fs0:\ VER: 0301 Folder Info 01... [Enter] Select or Load [Tab] Switch [Up/Down/PageUp/PageDown/Home/End] Move [Esc] Exit [F2] Backup 2-2 ASUS P8H61-M LX3 b. Insert the USB flash disk that contains the latest BIOS file to avail all its features. Before you to enable it. Updating from the Open window, then click Open. 3. To update...

User Manual
Page 33
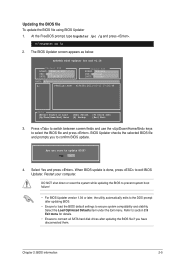
... utility also allows you to find the USB flash disk that you to boot using defaults Chapter 2: BIOS information 2-3 The succeeding utility screens are for reference only. When the ASUS Logo appears, press to the Folder Info field. 6. The actual utility screen displays may not be same...partition only. • DO NOT shut down or reset the system while updating the BIOS to prevent system boot failure! 2.1.3 ASUS BIOS Updater The ASUS BIOS Updater allows you can use as a backup when the BIOS fails or gets corrupted during the updating process. Reboot the system when the update process...
... utility also allows you to find the USB flash disk that you to boot using defaults Chapter 2: BIOS information 2-3 The succeeding utility screens are for reference only. When the ASUS Logo appears, press to the Folder Info field. 6. The actual utility screen displays may not be same...partition only. • DO NOT shut down or reset the system while updating the BIOS to prevent system boot failure! 2.1.3 ASUS BIOS Updater The ASUS BIOS Updater allows you can use as a backup when the BIOS fails or gets corrupted during the updating process. Reboot the system when the update process...
User Manual
Page 34
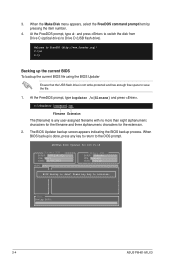
... for the filename and three alphanumeric characters for DOS V1.18 Current ROM BOARD: P8H61-M LX3 VER: 0301 DATE: 11/28/2011 Update ROM BOARD: Unknown VER: Unknown DATE: Unknown PATH: A:\ BIOS backup is not write-protected and has enough free space to save the file.... bupdater /o[filename] and press . The BIOS Updater backup screen appears indicating the BIOS backup process. At the FreeDOS prompt, type d: and press to switch the disk from Drive C (optical drive) to FreeDOS (http://www.freedos.org)! Note Saving BIOS: 2-4 ASUS P8H61-M LX3 When the Make Disk menu appears, select...
... for the filename and three alphanumeric characters for DOS V1.18 Current ROM BOARD: P8H61-M LX3 VER: 0301 DATE: 11/28/2011 Update ROM BOARD: Unknown VER: Unknown DATE: Unknown PATH: A:\ BIOS backup is not write-protected and has enough free space to save the file.... bupdater /o[filename] and press . The BIOS Updater backup screen appears indicating the BIOS backup process. At the FreeDOS prompt, type d: and press to switch the disk from Drive C (optical drive) to FreeDOS (http://www.freedos.org)! Note Saving BIOS: 2-4 ASUS P8H61-M LX3 When the Make Disk menu appears, select...
User Manual
Page 35
... disconnected them. Are you to connect all SATA hard disk drives after updating BIOS. • Ensure to load the BIOS default settings to update BIOS? Select Yes and press . Refer to section 2.9 Exit menu for DOS V1.18 Current ROM BOARD: P8H61-M LX3 VER: 0301 DATE: 11/28/2011 Update ROM BOARD: Unknown VER: Unknown...
... disconnected them. Are you to connect all SATA hard disk drives after updating BIOS. • Ensure to load the BIOS default settings to update BIOS? Select Yes and press . Refer to section 2.9 Exit menu for DOS V1.18 Current ROM BOARD: P8H61-M LX3 VER: 0301 DATE: 11/28/2011 Update ROM BOARD: Unknown VER: Unknown...

User Manual
Page 36
...CMOS and reset the motherboard to your screen. • Visit the ASUS website at startup: • Press during the Power-On Self Test (POST). See section 1.6 Jumpers for information on how to update the BIOS or configure its routines. Select the Load Optimized Defaults item under ... you do not press , POST continues with its parameters. 2.2 BIOS setup program Use the BIOS Setup program to erase the RTC RAM. 2-6 ASUS P8H61-M LX3 Entering BIOS Setup at startup To enter BIOS Setup at www.asus.com to download the latest BIOS file for this section are for details. • If the...
...CMOS and reset the motherboard to your screen. • Visit the ASUS website at startup: • Press during the Power-On Self Test (POST). See section 1.6 Jumpers for information on how to update the BIOS or configure its routines. Select the Load Optimized Defaults item under ... you do not press , POST continues with its parameters. 2.2 BIOS setup program Use the BIOS Setup program to erase the RTC RAM. 2-6 ASUS P8H61-M LX3 Entering BIOS Setup at startup To enter BIOS Setup at www.asus.com to download the latest BIOS file for this section are for details. • If the...
User Manual
Page 37
EZ Mode Friday [10/08/2010] P8H61-M LX3 BIOS Version : 0301 CPU Type : Intel(R) Core(TM) i5-2400 CPU @ 3.10GHz Total Memory : ...Mode screen appears when you to the system. The default screen for details. Selects the display language of the BIOS setup program Clicks to decide the boot priority. Boot Menu(F8) Default(F5) Selects the boot device priority...mode Loads optimized default Displays the system properties of the basic system information, and allows you enter the BIOS setup program. The EZ Mode provides you an overview of the selected mode on the right hand side...
EZ Mode Friday [10/08/2010] P8H61-M LX3 BIOS Version : 0301 CPU Type : Intel(R) Core(TM) i5-2400 CPU @ 3.10GHz Total Memory : ...Mode screen appears when you to the system. The default screen for details. Selects the display language of the BIOS setup program Clicks to decide the boot priority. Boot Menu(F8) Default(F5) Selects the boot device priority...mode Loads optimized default Displays the system properties of the basic system information, and allows you enter the BIOS setup program. The EZ Mode provides you an overview of the selected mode on the right hand side...

User Manual
Page 38
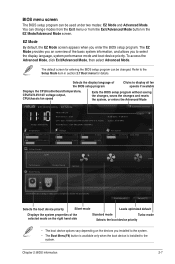
... access the EZ Mode, click Exit, then select ASUS EZ Mode. F1: General Help F2: Previous Values F5: Optimized Defaults F10: Save ESC: Exit Version 2.00.1201. Back button Menu items Menu bar Configuration fields EFI BIOS Utility - Copyright (C) 2011 American Megatrends, Inc. ... for special functions For selecting the exit options and loading default settings 2-8 ASUS P8H61-M LX3 Advanced Mode The Advanced Mode provides advanced options for the detailed configurations. Refer to configure the BIOS settings. Pop-up window Scroll bar Navigation keys Menu bar The menu bar...
... access the EZ Mode, click Exit, then select ASUS EZ Mode. F1: General Help F2: Previous Values F5: Optimized Defaults F10: Save ESC: Exit Version 2.00.1201. Back button Menu items Menu bar Configuration fields EFI BIOS Utility - Copyright (C) 2011 American Megatrends, Inc. ... for special functions For selecting the exit options and loading default settings 2-8 ASUS P8H61-M LX3 Advanced Mode The Advanced Mode provides advanced options for the detailed configurations. Refer to configure the BIOS settings. Pop-up window Scroll bar Navigation keys Menu bar The menu bar...

User Manual
Page 39
...Navigation keys At the bottom right corner of options. Menu items The highlighted item on the menu bar displays the specific items for the BIOS setup program. Press or use the USB mouse to click this button to return to display a pop-up window with the configuration options ...fields These fields show the values for that is a brief description of a menu screen when there are the navigation keys for that menu. Chapter 2: BIOS information 2-9 General help At the top right corner of the field opposite the item. You cannot select an item that item. A configurable field is user...
...Navigation keys At the bottom right corner of options. Menu items The highlighted item on the menu bar displays the specific items for the BIOS setup program. Press or use the USB mouse to click this button to return to display a pop-up window with the configuration options ...fields These fields show the values for that is a brief description of a menu screen when there are the navigation keys for that menu. Chapter 2: BIOS information 2-9 General help At the top right corner of the field opposite the item. You cannot select an item that item. A configurable field is user...
User Manual
Page 40
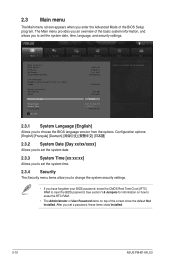
...(RTC) RAM to set a password, these items show the default Not Installed. Advanced Mode Exit Main Ai Tweaker Advanced Monitor BIOS Information BIOS Version Build Date ME Version South Bridge Stepping 0301 x64 11/28/2011 7.0.4.1197 B3 Stepping CPU Information Intel(R) Core(TM) ...on how to choose the BIOS language version from the options. See section 1.6 Jumpers for information on top of the BIOS Setup program. EFI BIOS Utility - 2.3 Main menu The Main menu screen appears when you enter the Advanced Mode of the screen show Installed. 2-10 ASUS P8H61-M LX3
...(RTC) RAM to set a password, these items show the default Not Installed. Advanced Mode Exit Main Ai Tweaker Advanced Monitor BIOS Information BIOS Version Build Date ME Version South Bridge Stepping 0301 x64 11/28/2011 7.0.4.1197 B3 Stepping CPU Information Intel(R) Core(TM) ...on how to choose the BIOS language version from the options. See section 1.6 Jumpers for information on top of the BIOS Setup program. EFI BIOS Utility - 2.3 Main menu The Main menu screen appears when you enter the Advanced Mode of the screen show Installed. 2-10 ASUS P8H61-M LX3

User Manual
Page 41
...you clear the password, the User Password item on top of the screen shows Not Installed. Select the User Password item and press . 2. Chapter 2: BIOS information 2-11 Confirm the password when prompted. From the Enter Current Password box, key in the current password, then press . 3. To clear the ...user password, follow the same steps as in the BIOS setup program. The User Password item on top of the screen shows Not Installed. Select the Administrator Password item and press . 2. Select the...
...you clear the password, the User Password item on top of the screen shows Not Installed. Select the User Password item and press . 2. Chapter 2: BIOS information 2-11 Confirm the password when prompted. From the Enter Current Password box, key in the current password, then press . 3. To clear the ...user password, follow the same steps as in the BIOS setup program. The User Password item on top of the screen shows Not Installed. Select the Administrator Password item and press . 2. Select the...

User Manual
Page 42
...2.00.1201. If this section vary depending on the CPU and DIMM model you installed on the motherboard. EFI BIOS Utility - Advanced Mode Exit Main Ai Tweaker Advanced Monitor Target DRAM Speed : xxxxMHz Memory Frequency > DRAM Timing ...: [DDR3-800MHz] [DDR3-1066MHz] [DDR3-1333MHz] Selecting a very high memory frequency may cause the system to Intel spec, ASUS H61 Series motherboard supports 1066/1333MHz DRAM (only). →←: Select Screen ↑↓: Select Item Enter: Select +/-: Change... options for this happens, revert to the default setting. 2-12 ASUS P8H61-M LX3
...2.00.1201. If this section vary depending on the CPU and DIMM model you installed on the motherboard. EFI BIOS Utility - Advanced Mode Exit Main Ai Tweaker Advanced Monitor Target DRAM Speed : xxxxMHz Memory Frequency > DRAM Timing ...: [DDR3-800MHz] [DDR3-1066MHz] [DDR3-1333MHz] Selecting a very high memory frequency may cause the system to Intel spec, ASUS H61 Series motherboard supports 1066/1333MHz DRAM (only). →←: Select Screen ↑↓: Select Item Enter: Select +/-: Change... options for this happens, revert to the default setting. 2-12 ASUS P8H61-M LX3

User Manual
Page 43
...you to become unstable! Long duration maintained [Auto] This value can be kept a time duration exceed TDP for maximum performance. Chapter 2: BIOS information 2-13 Enhanced Intel SpeedStep Technology [Enabled] Allows you to enable or disable the Enhanced Intel® SpeedStep Technology (EIST). [Disabled]...than marked frequency in specific conditions. [Disabled] Disables this menu may result in increased average consumption and decrease average heat production. ASUS board can be programmed. For Sandy Bridge, Turbo Ratio can vary from 1 to 32, which may cause the system to ...
...you to become unstable! Long duration maintained [Auto] This value can be kept a time duration exceed TDP for maximum performance. Chapter 2: BIOS information 2-13 Enhanced Intel SpeedStep Technology [Enabled] Allows you to enable or disable the Enhanced Intel® SpeedStep Technology (EIST). [Disabled]...than marked frequency in specific conditions. [Disabled] Disables this menu may result in increased average consumption and decrease average heat production. ASUS board can be programmed. For Sandy Bridge, Turbo Ratio can vary from 1 to 32, which may cause the system to ...


