User Manual
Page 2
... AT ANY TIME WITHOUT NOTICE, AND SHOULD NOT BE CONSTRUED AS A COMMITMENT BY ASUS. Table of contents Notices iii Safety information iv Care & Cleaning v Chapter 1: Product introduction 1.1 Welcome 1-1 1.2 Package contents 1-1 1.3 Assembling the monitor base 1-2 1.4 Monitor introduction 1-3 1.4.1 Front of the LCD monitor 1-3 1.4.2 Rear of alteration is defaced or missing. Product warranty or service will not...
... AT ANY TIME WITHOUT NOTICE, AND SHOULD NOT BE CONSTRUED AS A COMMITMENT BY ASUS. Table of contents Notices iii Safety information iv Care & Cleaning v Chapter 1: Product introduction 1.1 Welcome 1-1 1.2 Package contents 1-1 1.3 Assembling the monitor base 1-2 1.4 Monitor introduction 1-3 1.4.1 Front of the LCD monitor 1-3 1.4.2 Rear of alteration is defaced or missing. Product warranty or service will not...
User Manual
Page 4
... try to power surges. • Never push objects or spill liquid of power source indicated on the monitor cabinet. • To ensure satisfactory operation, use the monitor only with your local power standard. • Do not overload power strips and extention cords. Contact a... qualified service technician or your retailer. Safety information • Before setting up the monitor, carefully read all the documentation that came with the monitor, contact a qualified service technician or your retailer. • Before using the product, make sure all cables...
... try to power surges. • Never push objects or spill liquid of power source indicated on the monitor cabinet. • To ensure satisfactory operation, use the monitor only with your local power standard. • Do not overload power strips and extention cords. Contact a... qualified service technician or your retailer. Safety information • Before setting up the monitor, carefully read all the documentation that came with the monitor, contact a qualified service technician or your retailer. • Before using the product, make sure all cables...
User Manual
Page 5
... Switch and turn off and unplug the power cord. Do not repair the screen by the stand or the cord. • Cleaning. Turn your monitor off the Power Switch for hours. • When the screen becomes black or flashes, or cannot work anymore, contact your dealer or service center...as it on the desktop pattern you use with mild cleaner. • Avoid using a cleaner containing alcohol or acetone. When lifting or carrying the monitor, grasp the edges of the previous screen may find slightly uneven brightness on the screen depending on again to make sure that you MUST follow...
... Switch and turn off and unplug the power cord. Do not repair the screen by the stand or the cord. • Cleaning. Turn your monitor off the Power Switch for hours. • When the screen becomes black or flashes, or cannot work anymore, contact your dealer or service center...as it on the desktop pattern you use with mild cleaner. • Avoid using a cleaner containing alcohol or acetone. When lifting or carrying the monitor, grasp the edges of the previous screen may find slightly uneven brightness on the screen depending on again to make sure that you MUST follow...

User Manual
Page 7
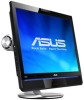
... manual 1 x Power cord 1 x VGA cable 1 x DVI cable (Only for VW192T) 1 x Audio cable (Only for purchasing the ASUS® VW192 Series LCD monitor! The latest widescreen LCD monitor from ASUS provides a crisper, broader, and brighter display, plus a host of the above items is damaged or missing, contact your viewing experience. With these features, you can... and delightful visual experience that the VW192 Series brings you for VW192T and VW192S) 1 x Rear cover If any of features that enhance your retailer immediately. ASUS LCD Monitor VW192 Series 1-1 1.1 Welcome!
... manual 1 x Power cord 1 x VGA cable 1 x DVI cable (Only for VW192T) 1 x Audio cable (Only for purchasing the ASUS® VW192 Series LCD monitor! The latest widescreen LCD monitor from ASUS provides a crisper, broader, and brighter display, plus a host of the above items is damaged or missing, contact your viewing experience. With these features, you can... and delightful visual experience that the VW192 Series brings you for VW192T and VW192S) 1 x Rear cover If any of features that enhance your retailer immediately. ASUS LCD Monitor VW192 Series 1-1 1.1 Welcome!
User Manual
Page 8
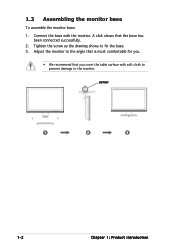
Tighten the screw as the drawing shows to the monitor. Adjust the monitor to the angle that is most comfortable for you cover the table surface with the monitor. screw 1 2 3 1-2 Chapter 1: Product introduction 1.3 Assembling the monitor base To assemble the monitor base: 1. Connect the base with soft cloth to prevent damage to fix the base. 3. A click shows that you . • We recommend that the base has been connected successfully. 2.
Tighten the screw as the drawing shows to the monitor. Adjust the monitor to the angle that is most comfortable for you cover the table surface with the monitor. screw 1 2 3 1-2 Chapter 1: Product introduction 1.3 Assembling the monitor base To assemble the monitor base: 1. Connect the base with soft cloth to prevent damage to fix the base. 3. A click shows that you . • We recommend that the base has been connected successfully. 2.
User Manual
Page 9
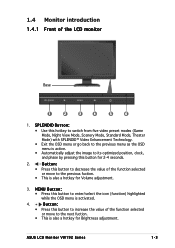
... this button to decrease the value of the function selected or move to the previous fuction. • This is also a hotkey for Volume adjustment. 3. ASUS LCD Monitor VW192 Series 1-3 1.4 Monitor introduction 1.4.1 Front of the function selected or move to the next fuction. • This is also a hotkey for Brightness adjustment. Button: • Press...
... this button to decrease the value of the function selected or move to the previous fuction. • This is also a hotkey for Volume adjustment. 3. ASUS LCD Monitor VW192 Series 1-3 1.4 Monitor introduction 1.4.1 Front of the function selected or move to the next fuction. • This is also a hotkey for Brightness adjustment. Button: • Press...
User Manual
Page 10
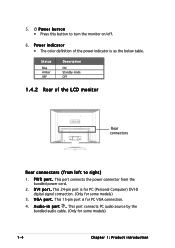
This port connects the power connector from left to turn the monitor on/off. 6. This 24-pin port is for PC (Personal Computer) DVI-D digital signal connection. (Only for some models) 3. This port connects PC audio source ... connection. 4. This 15-pin port is as the below table. Power button • Press this button to right) 1. V G A p o r t . 5. A u d i o - P o w e r i n d i c a t o r • The color definition of the LCD monitor Rear connectors Rear connectors (from the bundled power cord. 2. i n p o r t .
This port connects the power connector from left to turn the monitor on/off. 6. This 24-pin port is for PC (Personal Computer) DVI-D digital signal connection. (Only for some models) 3. This port connects PC audio source ... connection. 4. This 15-pin port is as the below table. Power button • Press this button to right) 1. V G A p o r t . 5. A u d i o - P o w e r i n d i c a t o r • The color definition of the LCD monitor Rear connectors Rear connectors (from the bundled power cord. 2. i n p o r t .
User Manual
Page 11
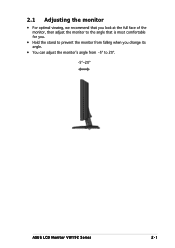
2.1 Adjusting the monitor • For optimal viewing, we recommend that you look at the full face of the monitor, then adjust the monitor to the angle that is most comfortable for you. • Hold the stand to prevent the monitor from falling when you change its angle. • You can adjust the monitor's angle from -5º to 20º. -5º~20º ASUS LCD Monitor VW192 Series 2-1
2.1 Adjusting the monitor • For optimal viewing, we recommend that you look at the full face of the monitor, then adjust the monitor to the angle that is most comfortable for you. • Hold the stand to prevent the monitor from falling when you change its angle. • You can adjust the monitor's angle from -5º to 20º. -5º~20º ASUS LCD Monitor VW192 Series 2-1

User Manual
Page 12
...stand of the monitor as the below drawing shows. 4. Repeat step 3. • We recommend that you remove the screws on the stand. Rear cover screws The VESA wall mount kit (100 mm x 100 mm) is specially designed for VESA wall mount) The detachable stand of the monitor face down on... the stand of the monitor when you remove the screws. Have the front of the VW192 Series LCD monitor is purchased separately. 2-2 Chapter 2: Setup To detach the arm/stand: 1. Two other screws...
...stand of the monitor as the below drawing shows. 4. Repeat step 3. • We recommend that you remove the screws on the stand. Rear cover screws The VESA wall mount kit (100 mm x 100 mm) is specially designed for VESA wall mount) The detachable stand of the monitor face down on... the stand of the monitor when you remove the screws. Have the front of the VW192 Series LCD monitor is purchased separately. 2-2 Chapter 2: Setup To detach the arm/stand: 1. Two other screws...
User Manual
Page 13
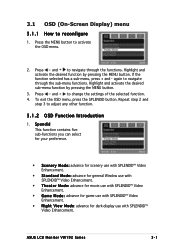
... + and - again to activate the OSD menu. 2. 3.1 OSD (On-Screen Display) menu 3.1.1 How to change the settings of the selected function. 4. Press and to reconfigure 1. ASUS LCD Monitor VW192 Series 3-1 To exit the OSD menu, press the SPLENDID button. S p e n d i d This function contains five sub-functions you can select for your preference. •...
... + and - again to activate the OSD menu. 2. 3.1 OSD (On-Screen Display) menu 3.1.1 How to change the settings of the selected function. 4. Press and to reconfigure 1. ASUS LCD Monitor VW192 Series 3-1 To exit the OSD menu, press the SPLENDID button. S p e n d i d This function contains five sub-functions you can select for your preference. •...

User Manual
Page 15
... for your selection, including English, German, Italian, French, Dutch, Spanish, Russian, Traditional Chinese, Simplified Chinese, and Japanese. • Information: shows the monitor information. • R e s e t : "Yes" allows you can select either VGA or DVI input source. (For the models with a DVI...you to revert to 100. activate this function, you to adjust the system. • V o l u m e : the adjusting range is a hotkey to 100. ASUS LCD Monitor VW192 Series 3-3 S y s t e m S e t u p Allow you can adjust the OSD timeout from 0 to • OSD Setup: adjusts the horizontal...
... for your selection, including English, German, Italian, French, Dutch, Spanish, Russian, Traditional Chinese, Simplified Chinese, and Japanese. • Information: shows the monitor information. • R e s e t : "Yes" allows you can select either VGA or DVI input source. (For the models with a DVI...you to revert to 100. activate this function, you to adjust the system. • V o l u m e : the adjusting range is a hotkey to 100. ASUS LCD Monitor VW192 Series 3-3 S y s t e m S e t u p Allow you can adjust the OSD timeout from 0 to • OSD Setup: adjusts the horizontal...

User Manual
Page 16
...the computer. • Inspect the signal cable and make sure none of the pins are bent. • Connect the computer with another available monitor to check if the computer is properly working. • Adjust the Contrast and Brightness settings via OSD. • Press the SPLENDID button for ... adjust the image. • Adjust the H-Position or V-Position settings via OSD. • Make sure the signal cable is properly connected to the monitor and the computer. • Move electrical devices that may cause electrical interference. • Inspect the signal cable and make sure that none of the ...
...the computer. • Inspect the signal cable and make sure none of the pins are bent. • Connect the computer with another available monitor to check if the computer is properly working. • Adjust the Contrast and Brightness settings via OSD. • Press the SPLENDID button for ... adjust the image. • Adjust the H-Position or V-Position settings via OSD. • Make sure the signal cable is properly connected to the monitor and the computer. • Move electrical devices that may cause electrical interference. • Inspect the signal cable and make sure that none of the ...
User Manual
Page 17
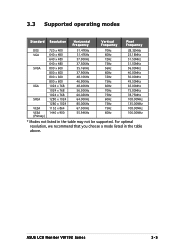
....00MHz * Modes not listed in the table above. For optimal resolution, we recommend that you choose a mode listed in the table may not be supported. ASUS LCD Monitor VW192 Series 3-5
....00MHz * Modes not listed in the table above. For optimal resolution, we recommend that you choose a mode listed in the table may not be supported. ASUS LCD Monitor VW192 Series 3-5


