
Users Manual English
Page 1
Motherboard PRIME H410M-D
Motherboard PRIME H410M-D
Users Manual English
Page 2
...Products and corporate names appearing in obtaining the full corresponding source code we can coordinate the terms and cost of ASUSTeK COMPUTER INC. ("ASUS"). Legal Compliance Dept. 1F., No.15, Lide Rd., Beitou Dist., Taipei City 112 Taiwan In your contact details so that is ...registered trademarks or copyrights of their respective companies, and are included in any form or by any means, except documentation kept by ASUS; ASUS ASSUMES NO RESPONSIBILITY OR LIABILITY FOR ANY ERRORS OR INACCURACIES THAT MAY APPEAR IN THIS MANUAL, INCLUDING THE PRODUCTS AND SOFTWARE DESCRIBED IN...
...Products and corporate names appearing in obtaining the full corresponding source code we can coordinate the terms and cost of ASUSTeK COMPUTER INC. ("ASUS"). Legal Compliance Dept. 1F., No.15, Lide Rd., Beitou Dist., Taipei City 112 Taiwan In your contact details so that is ...registered trademarks or copyrights of their respective companies, and are included in any form or by any means, except documentation kept by ASUS; ASUS ASSUMES NO RESPONSIBILITY OR LIABILITY FOR ANY ERRORS OR INACCURACIES THAT MAY APPEAR IN THIS MANUAL, INCLUDING THE PRODUCTS AND SOFTWARE DESCRIBED IN...

Users Manual English
Page 3
Contents Safety information...iv About this guide...v Package contents...vi PRIME H410M-D specifications summary vi Chapter 1 Product introduction 1.1 Before you proceed 1-1 1.2 Motherboard overview 1-1 1.3 Central Processing Unit (CPU 1-7 1.4 System memory 1-8 Chapter 2 BIOS information 2.1 Knowing BIOS 2-1 2.2 BIOS setup program 2-2 2.3 ASUS EZ Flash 3 2-3 2.4 ASUS CrashFree BIOS 3 2-4 Appendix Notices...A-1 ASUS contact information A-6 iii
Contents Safety information...iv About this guide...v Package contents...vi PRIME H410M-D specifications summary vi Chapter 1 Product introduction 1.1 Before you proceed 1-1 1.2 Motherboard overview 1-1 1.3 Central Processing Unit (CPU 1-7 1.4 System memory 1-8 Chapter 2 BIOS information 2.1 Knowing BIOS 2-1 2.2 BIOS setup program 2-2 2.3 ASUS EZ Flash 3 2-3 2.4 ASUS CrashFree BIOS 3 2-4 Appendix Notices...A-1 ASUS contact information A-6 iii
Users Manual English
Page 4
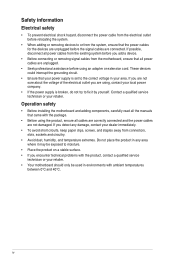
Safety information Electrical safety • To prevent electrical shock hazard, disconnect the power cable from the electrical outlet before relocating the system. • When adding or removing devices to or from the system, ensure that all cables are correctly connected and the power cables are not damaged. These devices could interrupt the grounding circuit. • Ensure that came with the package. • Before using the product, ensure all power cables are unplugged. • Seek professional assistance before the signal cables are connected. If you encounter technical problems...
Safety information Electrical safety • To prevent electrical shock hazard, disconnect the power cable from the electrical outlet before relocating the system. • When adding or removing devices to or from the system, ensure that all cables are correctly connected and the power cables are not damaged. These devices could interrupt the grounding circuit. • Ensure that came with the package. • Before using the product, ensure all power cables are unplugged. • Seek professional assistance before the signal cables are connected. If you encounter technical problems...
Users Manual English
Page 5
... v Conventions used throughout this guide To ensure that you complete a task. NOTE: Tips and additional information to the ASUS contact information. 2. ASUS website The ASUS website provides updated information on the motherboard. • Chapter 2: BIOS information This chapter tells how to complete a task.... Refer to help you perform certain tasks properly, take note of the switches, jumpers, and connectors on ASUS hardware and software products. Optional documentation Your product package may have been added by your dealer. IMPORTANT: Instructions that may...
... v Conventions used throughout this guide To ensure that you complete a task. NOTE: Tips and additional information to the ASUS contact information. 2. ASUS website The ASUS website provides updated information on the motherboard. • Chapter 2: BIOS information This chapter tells how to complete a task.... Refer to help you perform certain tasks properly, take note of the switches, jumpers, and connectors on ASUS hardware and software products. Optional documentation Your product package may have been added by your dealer. IMPORTANT: Instructions that may...

Users Manual English
Page 6
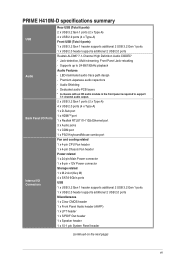
...the Memory QVL (Qualified Vendors Lists). 1 x D-Sub 1 x HDMITM * Graphics specifications may vary between CPU types. PRIME H410M-D specifications summary CPU Chipset Memory Graphics Expansion Slots Storage Ethernet Intel® Socket LGA1200 for 10th Gen Intel® Core&#...CPU Supports Intel® Turbo Boost Technology 2.0 and Intel® Turbo Boost Max Technology 3.0** * Refer to www.asus.com for the following items. Motherboard Cables Miscellaneous Application DVD Documentation 1 x PRIME H410M-D motherboard 2 x SATA 6Gb/s cables 1 x I/O Shield 1 x M.2 Anchor 1 x Support DVD 1 x...
...the Memory QVL (Qualified Vendors Lists). 1 x D-Sub 1 x HDMITM * Graphics specifications may vary between CPU types. PRIME H410M-D specifications summary CPU Chipset Memory Graphics Expansion Slots Storage Ethernet Intel® Socket LGA1200 for 10th Gen Intel® Core&#...CPU Supports Intel® Turbo Boost Technology 2.0 and Intel® Turbo Boost Max Technology 3.0** * Refer to www.asus.com for the following items. Motherboard Cables Miscellaneous Application DVD Documentation 1 x PRIME H410M-D motherboard 2 x SATA 6Gb/s cables 1 x I/O Shield 1 x M.2 Anchor 1 x Support DVD 1 x...
Users Manual English
Page 7
Jack-detection, Multi-streaming, Front Panel Jack-retasking - PRIME H410M-D specifications summary USB Audio Back Panel I/O Ports Internal I/O Connectors Rear USB (Total 6 ports) 2 x USB 3.2 Gen 1 ports (2 x Type-A) 4 x USB 2.0 ports (4 x Type-A) Front USB (Total 4 ports) 1 x USB 3.2 ...
Jack-detection, Multi-streaming, Front Panel Jack-retasking - PRIME H410M-D specifications summary USB Audio Back Panel I/O Ports Internal I/O Connectors Rear USB (Total 6 ports) 2 x USB 3.2 Gen 1 ports (2 x Type-A) 4 x USB 2.0 ports (4 x Type-A) Front USB (Total 4 ports) 1 x USB 3.2 ...
Users Manual English
Page 8
...3 - EZ update AI Charger Norton Anti-virus software (Free Trial for 60 days) WinRAR UEFI BIOS ASUS EZ DIY - ASUS UEFI BIOS EZ Mode 128 Mb Flash ROM, UEFI AMI BIOS WOL by PME, PXE Operating System Form... are subject to change without notice. Performance And Power Saving Utility EPU Digi+ VRM Fan Xpert - ASUS EZ Flash 3 - ASUS LANGuard - ASUS CrashFree BIOS 3 - viii ASUS Q-Slot ASUS Thermal Solution - ASUS Stainless-Steel Back I/O ASUS Q-Design - ASUS Overvoltage Protection - PRIME H410M-D specifications summary Special Features Software Features BIOS Manageability...
...3 - EZ update AI Charger Norton Anti-virus software (Free Trial for 60 days) WinRAR UEFI BIOS ASUS EZ DIY - ASUS UEFI BIOS EZ Mode 128 Mb Flash ROM, UEFI AMI BIOS WOL by PME, PXE Operating System Form... are subject to change without notice. Performance And Power Saving Utility EPU Digi+ VRM Fan Xpert - ASUS EZ Flash 3 - ASUS LANGuard - ASUS CrashFree BIOS 3 - viii ASUS Q-Slot ASUS Thermal Solution - ASUS Stainless-Steel Back I/O ASUS Q-Design - ASUS Overvoltage Protection - PRIME H410M-D specifications summary Special Features Software Features BIOS Manageability...

Users Manual English
Page 9
... the motherboard, peripherals, or components. Failure to do so may cause severe damage to do so can cause you physical injury and damage motherboard components. ASUS PRIME H410M-D 1-1 Motherboard overview KBMS_USB56 HDMI 56 14 2 20.1cm(7.9in) EATX12V CPU_FAN DIGI +VRM DDR4 DIMM_B1* (64bit, 288-pin module) DDR4 DIMM_A1* (64bit,288-pin module...
... the motherboard, peripherals, or components. Failure to do so may cause severe damage to do so can cause you physical injury and damage motherboard components. ASUS PRIME H410M-D 1-1 Motherboard overview KBMS_USB56 HDMI 56 14 2 20.1cm(7.9in) EATX12V CPU_FAN DIGI +VRM DDR4 DIMM_B1* (64bit, 288-pin module) DDR4 DIMM_A1* (64bit,288-pin module...
Users Manual English
Page 10
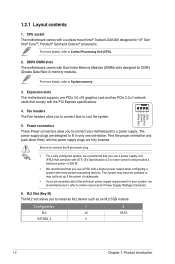
1.2.1 Layout contents 1. CPU socket The motherboard comes with Dual Inline Memory Modules (DIMM) slots designed for Power Supply Wattage Calculator. 6. Find the proper orientation and push down firmly until the power supply plugs are designed to online resources for DDR4 (Double Data Rate 4) memory modules. Configuration 1 M.2 x2 SATA6G_2 V 2 SATA - 1-2 Chapter 1: Product introduction For more power-consuming devices. Power connectors These Power connectors allow you to refer to fit in only one PCIe 3.0 x16 graphics card and two PCIe 3.0 x1 network cards that you to...
1.2.1 Layout contents 1. CPU socket The motherboard comes with Dual Inline Memory Modules (DIMM) slots designed for Power Supply Wattage Calculator. 6. Find the proper orientation and push down firmly until the power supply plugs are designed to online resources for DDR4 (Double Data Rate 4) memory modules. Configuration 1 M.2 x2 SATA6G_2 V 2 SATA - 1-2 Chapter 1: Product introduction For more power-consuming devices. Power connectors These Power connectors allow you to refer to fit in only one PCIe 3.0 x16 graphics card and two PCIe 3.0 x1 network cards that you to...
Users Manual English
Page 11
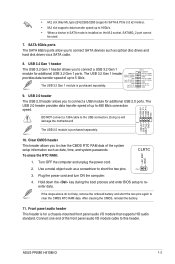
...+ PIN 1 USB3+5V IntA_P1_SSRXIntA_P1_SSRX+ GND IntA_P1_SSTXIntA_P1_SSTX+ GND IntA_P1_DIntA_P1_D+ GND USB+5V USB_P1USB_P1+ GND NC 9. Doing so will damage the motherboard! USB+5V USB_P2USB_P12+ GND 10. ASUS PRIME H410M-D 1-3 To erase the RTC RAM: CLRTC +3V_BAT GND 1. • M.2 slot (Key M), type 2242/2260/2280 (supports SATA & PCIe 3.0 x2 modes). • M.2 slot supports data transfer...
...+ PIN 1 USB3+5V IntA_P1_SSRXIntA_P1_SSRX+ GND IntA_P1_SSTXIntA_P1_SSTX+ GND IntA_P1_DIntA_P1_D+ GND USB+5V USB_P1USB_P1+ GND NC 9. Doing so will damage the motherboard! USB+5V USB_P2USB_P12+ GND 10. ASUS PRIME H410M-D 1-3 To erase the RTC RAM: CLRTC +3V_BAT GND 1. • M.2 slot (Key M), type 2242/2260/2280 (supports SATA & PCIe 3.0 x2 modes). • M.2 slot supports data transfer...
Users Manual English
Page 12
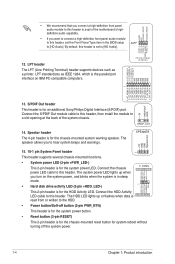
Connect the chassis F_PANEL +PWR_LED- The system power LED lights up or flashes when data is for the HDD Activity LED. Connect the HDD Activity LED cable to this header, set to this header. AGND NC SENSE1_RETUR SENSE2_RETUR • We recommend that you connect a high-definition front panel audio module to this header to avail of the system chassis. +5V SPDIFOUT GND SPDIF_OUT 14. PORT1 L PORT1 R PORT2 R SENSE_SEND PORT2 L 12. PIN 1 O_LPT_XAFD#_R O_LPT_ERROR#_R O_LPT_XINIT#_R O_LPT_XSLIN#_R GND GND GND GND GND GND GND GND HD-audio-compliant pin definition O_LPT_XSTB#_R...
Connect the chassis F_PANEL +PWR_LED- The system power LED lights up or flashes when data is for the HDD Activity LED. Connect the HDD Activity LED cable to this header, set to this header. AGND NC SENSE1_RETUR SENSE2_RETUR • We recommend that you connect a high-definition front panel audio module to this header to avail of the system chassis. +5V SPDIFOUT GND SPDIF_OUT 14. PORT1 L PORT1 R PORT2 R SENSE_SEND PORT2 L 12. PIN 1 O_LPT_XAFD#_R O_LPT_ERROR#_R O_LPT_XINIT#_R O_LPT_XSLIN#_R GND GND GND GND GND GND GND GND HD-audio-compliant pin definition O_LPT_XSTB#_R...
Users Manual English
Page 13
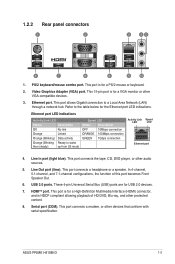
... port (lime). In 4-channel, 5.1-channel, and 7.1-channel configurations, the function of HD DVD, Blu-ray, and other devices that conform with serial specification. USB 2.0 ports. ASUS PRIME H410M-D 1-5 This port allows Gigabit connection to wake then steady) up from S5 mode Speed LED Status Description OFF 10Mbps connection ORANGE 100Mbps connection GREEN 1Gbps...
... port (lime). In 4-channel, 5.1-channel, and 7.1-channel configurations, the function of HD DVD, Blu-ray, and other devices that conform with serial specification. USB 2.0 ports. ASUS PRIME H410M-D 1-5 This port allows Gigabit connection to wake then steady) up from S5 mode Speed LED Status Description OFF 10Mbps connection ORANGE 100Mbps connection GREEN 1Gbps...
Users Manual English
Page 14
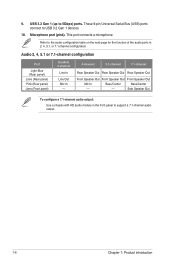
Audio 2, 4, 5.1 or 7.1-channel configuration Port Light Blue (Rear panel) Lime (Rear panel) Pink (Rear panel) Lime (Front panel) Headset 2-channel Line In Line Out Mic In - 4-channel 5.1-channel 7.1-channel Rear Speaker Out Rear Speaker Out Rear Speaker Out Front Speaker Out Front Speaker Out Front Speaker Out Mic In Bass/Center Bass/Center - - This port connects a microphone. Microphone port (pink). These 9-pin Universal Serial Bus (USB) ports connect to 5Gbps) ports. USB 3.2 Gen 1 (up to USB 3.2 Gen 1 devices. 10. Refer to the audio configuration table on the next...
Audio 2, 4, 5.1 or 7.1-channel configuration Port Light Blue (Rear panel) Lime (Rear panel) Pink (Rear panel) Lime (Front panel) Headset 2-channel Line In Line Out Mic In - 4-channel 5.1-channel 7.1-channel Rear Speaker Out Rear Speaker Out Rear Speaker Out Front Speaker Out Front Speaker Out Front Speaker Out Mic In Bass/Center Bass/Center - - This port connects a microphone. Microphone port (pink). These 9-pin Universal Serial Bus (USB) ports connect to 5Gbps) ports. USB 3.2 Gen 1 (up to USB 3.2 Gen 1 devices. 10. Refer to the audio configuration table on the next...
Users Manual English
Page 15
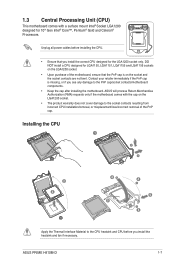
... the motherboard comes with a surface mount Intel® Socket LGA1200 designed for 10th Gen Intel® Core™, Pentium® Gold and Celeron® Processors. ASUS PRIME H410M-D 1-7 Contact your retailer immediately if the PnP cap is on the socket and the socket contacts are not bent. Installing the CPU 1 A B 2 3 4A D5 4 C 5 B 4 Apply...
... the motherboard comes with a surface mount Intel® Socket LGA1200 designed for 10th Gen Intel® Core™, Pentium® Gold and Celeron® Processors. ASUS PRIME H410M-D 1-7 Contact your retailer immediately if the PnP cap is on the socket and the socket contacts are not bent. Installing the CPU 1 A B 2 3 4A D5 4 C 5 B 4 Apply...
Users Manual English
Page 16
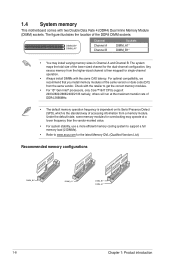
... than the vendor-marked value. • For system stability, use a more efficient memory cooling system to support a full memory load (2 DIMMs). • Refer to www.asus.com for single-channel operation. • Always install DIMMs with two Double Data Rate 4 (DDR4) Dual Inline Memory Module (DIMM) sockets. Any excess memory from...
... than the vendor-marked value. • For system stability, use a more efficient memory cooling system to support a full memory load (2 DIMMs). • Refer to www.asus.com for single-channel operation. • Always install DIMMs with two Double Data Rate 4 (DDR4) Dual Inline Memory Module (DIMM) sockets. Any excess memory from...

Users Manual English
Page 17
Installing a DIMM 1 To remove a DIMM A B 2 A A B ASUS PRIME H410M-D 1-9
Installing a DIMM 1 To remove a DIMM A B 2 A A B ASUS PRIME H410M-D 1-9
Users Manual English
Page 18
1-10 Chapter 1: Product introduction
1-10 Chapter 1: Product introduction

Users Manual English
Page 19
...; When downloading or updating the BIOS file, rename it as PH410MD.CAP for this user manual refers to ensure optimal performance. ASUS PRIME H410M-D 2-1 In normal circumstances, the default BIOS settings apply to most conditions to "UEFI BIOS" unless otherwise specified. We strongly ... motherboard. • BIOS settings and options may result to instability or boot failure. BIOS information 2 2.1 Knowing BIOS The new ASUS UEFI BIOS is a Unified Extensible Interface that complies with UEFI architecture, offering a user-friendly interface that goes beyond the traditional keyboardonly...
...; When downloading or updating the BIOS file, rename it as PH410MD.CAP for this user manual refers to ensure optimal performance. ASUS PRIME H410M-D 2-1 In normal circumstances, the default BIOS settings apply to most conditions to "UEFI BIOS" unless otherwise specified. We strongly ... motherboard. • BIOS settings and options may result to instability or boot failure. BIOS information 2 2.1 Knowing BIOS The new ASUS UEFI BIOS is a Unified Extensible Interface that complies with UEFI architecture, offering a user-friendly interface that goes beyond the traditional keyboardonly...
Users Manual English
Page 20
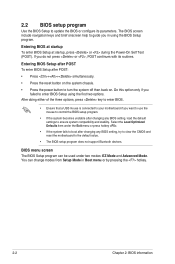
Entering BIOS Setup after POST To enter BIOS Setup after changing any BIOS setting, try to clear the CMOS and reset the motherboard to the default value. • The BIOS setup program does not support Bluetooth devices. BIOS menu screen The BIOS Setup program can change modes from Setup Mode in using the first two options. Entering BIOS at startup To enter BIOS Setup at startup, press or during the Power-On Self Test (POST). If you want to use the mouse to control the BIOS setup program. • If the system becomes unstable after POST: • Press ++ simultaneously. &#...
Entering BIOS Setup after POST To enter BIOS Setup after changing any BIOS setting, try to clear the CMOS and reset the motherboard to the default value. • The BIOS setup program does not support Bluetooth devices. BIOS menu screen The BIOS Setup program can change modes from Setup Mode in using the first two options. Entering BIOS at startup To enter BIOS Setup at startup, press or during the Power-On Self Test (POST). If you want to use the mouse to control the BIOS setup program. • If the system becomes unstable after POST: • Press ++ simultaneously. &#...
