
TX97-XE User Manual
Page 4
...34 Main Menu 34 Managing and Updating Your Motherboard's BIOS 36 6. FEATURES 8 Features of the ASUS TX97-XE Motherboard 8 ASUS TX97 Smart Series Motherboards 9 Parts of Power Management Setup 47 4 ASUS TX97-XE User's Manual Jumpers 14 Jumper Settings 15 Compatible Cyrix CPU Identification 18 2. Expansion Cards 23 Expansion Card Installation Procedure 23 Assigning IRQs... Processing Unit (CPU 22 4. System Memory (SIMM & DIMM 18 SIMM Memory Installation 20 DIMM Memory Installation Procedures 21 3. INSTALLATION 12 ASUS TX97-XE Motherboard Layout 12 Installation Steps 14 1.
...34 Main Menu 34 Managing and Updating Your Motherboard's BIOS 36 6. FEATURES 8 Features of the ASUS TX97-XE Motherboard 8 ASUS TX97 Smart Series Motherboards 9 Parts of Power Management Setup 47 4 ASUS TX97-XE User's Manual Jumpers 14 Jumper Settings 15 Compatible Cyrix CPU Identification 18 2. Expansion Cards 23 Expansion Card Installation Procedure 23 Assigning IRQs... Processing Unit (CPU 22 4. System Memory (SIMM & DIMM 18 SIMM Memory Installation 20 DIMM Memory Installation Procedures 21 3. INSTALLATION 12 ASUS TX97-XE Motherboard Layout 12 Installation Steps 14 1.
TX97-XE User Manual
Page 7
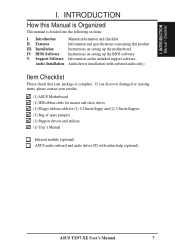
... II. Features Information and specifications concerning this Manual is Organized This manual is complete. Support Software Information on setting up the motherboard. IV. INTRODUCTION Manual / Checklist I . BIOS Software Instructions on the included support software ...and (2) 3.5inch floppies (1) Bag of spare jumpers (1) Support drivers and utilities (1) User's Manual Infrared module (optional) ASUS audio onboard and audio driver CD with online help (optional) ASUS TX97-XE User's Manual 7 Installation Instructions on setting up the BIOS software V. I . If you...
... II. Features Information and specifications concerning this Manual is Organized This manual is complete. Support Software Information on setting up the motherboard. IV. INTRODUCTION Manual / Checklist I . BIOS Software Instructions on the included support software ...and (2) 3.5inch floppies (1) Bag of spare jumpers (1) Support drivers and utilities (1) User's Manual Infrared module (optional) ASUS audio onboard and audio driver CD with online help (optional) ASUS TX97-XE User's Manual 7 Installation Instructions on setting up the BIOS software V. I . If you...
TX97-XE User Manual
Page 14
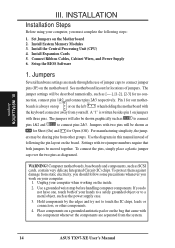
...2. To connect the pins, simply place a plastic jumper cap over the two pins as SCSI cards, contain very delicate Integrated Circuit (IC) chips. To protect them against damage from the system. 14 ASUS TX97-XE User's Manual Install System Memory Modules 3. Install the ...Central Processing Unit (CPU) 4. Install Expansion Cards 5. Connect Ribbon Cables, Cabinet Wires, and Power Supply 6. Setup the BIOS Software 1. The jumper settings will be described numerically, such as...
...2. To connect the pins, simply place a plastic jumper cap over the two pins as SCSI cards, contain very delicate Integrated Circuit (IC) chips. To protect them against damage from the system. 14 ASUS TX97-XE User's Manual Install System Memory Modules 3. Install the ...Central Processing Unit (CPU) 4. Install Expansion Cards 5. Connect Ribbon Cables, Cabinet Wires, and Power Supply 6. Setup the BIOS Software 1. The jumper settings will be described numerically, such as...
TX97-XE User Manual
Page 15
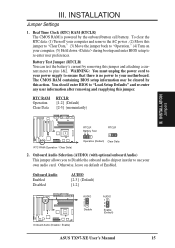
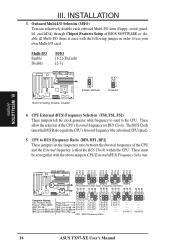
..., leave on your motherboard. INSTALLATION Jumper Settings 1. WARNING: You must unplug the power cord to your power supply to your computer, (5) Hold down during bootup and enter BIOS setup to pins 1&2. Onboard Audio Enabled Disabled AUDIO [2-3] (Default) [1-2] AUDIO 1 2 3 Disable AUDIO 1 2 3 Enable (Default) Onboard Audio (Disable / Enable) ASUS TX97-XE User's Manual 15 RTC RAM RTCLR...
..., leave on your motherboard. INSTALLATION Jumper Settings 1. WARNING: You must unplug the power cord to your power supply to your computer, (5) Hold down during bootup and enter BIOS setup to pins 1&2. Onboard Audio Enabled Disabled AUDIO [2-3] (Default) [1-2] AUDIO 1 2 3 Disable AUDIO 1 2 3 Enable (Default) Onboard Audio (Disable / Enable) ASUS TX97-XE User's Manual 15 RTC RAM RTCLR...
TX97-XE User Manual
Page 16
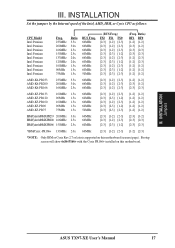
... CPU's Internal frequency (the advertised CPU speed). 5. CPU to BUS Frequency Ratio (BF0, BF1, BF2) These jumpers set together with the following jumper in order to the CPU. CPU : BUS Frequency Ratio 3.0x(3/1) 3.0x(3/1) ---------- ------------4.0x(4/1) ------------4.5x(9/2) 16 ASUS TX97-XE User's Manual Multi-I/O Enable Disable M/IO [1-2] (Default) [2-3] M/IO 1 2 3 Enable (Default) M/IO 1 2 3 Disabled Multi I /O card. CPU External...
... CPU's Internal frequency (the advertised CPU speed). 5. CPU to BUS Frequency Ratio (BF0, BF1, BF2) These jumpers set together with the following jumper in order to the CPU. CPU : BUS Frequency Ratio 3.0x(3/1) 3.0x(3/1) ---------- ------------4.0x(4/1) ------------4.5x(9/2) 16 ASUS TX97-XE User's Manual Multi-I/O Enable Disable M/IO [1-2] (Default) [2-3] M/IO 1 2 3 Enable (Default) M/IO 1 2 3 Disabled Multi I /O card. CPU External...
TX97-XE User Manual
Page 17
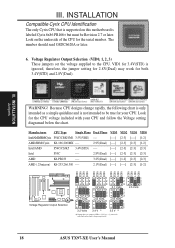
III. INSTALLATION Jumpers ASUS TX97-XE User's Manual 17 III. Bootup screen will show 6x86-P166+ with the Cyrix PR166+ installed on this motherboard. Ratio) BF1 BF0 [1-2] [1-2] [2-3] [1-2] [2-3] [2-3] [2-3] [2-3] [1-2] [2-3] ... [2-3] [2-3] [2-3] [2-3] *IBM/Cyrix -PR166+ 133MHz 2.0x 66MHz [2-3] [1-2] [2-3] [1-2] [2-3] *NOTE: Only IBM or Cyrix Rev 2.7 or later is supported on this motherboard (see next page). INSTALLATION Set the jumpers by the Internal speed of the Intel, AMD, IBM, or Cyrix CPU as follows: CPU Model Intel Pentium Intel Pentium Intel Pentium Intel Pentium Intel...
III. INSTALLATION Jumpers ASUS TX97-XE User's Manual 17 III. Bootup screen will show 6x86-P166+ with the Cyrix PR166+ installed on this motherboard. Ratio) BF1 BF0 [1-2] [1-2] [2-3] [1-2] [2-3] [2-3] [2-3] [2-3] [1-2] [2-3] ... [2-3] [2-3] [2-3] [2-3] *IBM/Cyrix -PR166+ 133MHz 2.0x 66MHz [2-3] [1-2] [2-3] [1-2] [2-3] *NOTE: Only IBM or Cyrix Rev 2.7 or later is supported on this motherboard (see next page). INSTALLATION Set the jumpers by the Internal speed of the Intel, AMD, IBM, or Cyrix CPU as follows: CPU Model Intel Pentium Intel Pentium Intel Pentium Intel Pentium Intel...
TX97-XE User Manual
Page 18
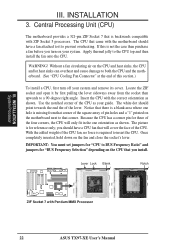
... 2 3 1.9 Volts 1 2 3 2.8 Volts 1 2 3 3.4 V * 1 2 3 2.1 Volts 1 2 3 2.9 Volts 1 2 3 3.5 V * * Setting these two jumpers' VID1 to the CPU. III. Look for both 3.4V(STD) and 2.8V(Dual). Look on this motherboard is ignored, therefore, the jumper setting for 2.8V(Dual) may work for the CPU voltage included with your CPU. Voltage... Regulator Output Selection (VID0, 1, 2, 3) These jumpers set the voltage supplied to [2-3] or [----] (removed) will result in the same voltages respectively. 1 2 3 2.5 Volts 18 ASUS TX97-XE User's Manual Because CPU designs change rapidly, the ...
... 2 3 1.9 Volts 1 2 3 2.8 Volts 1 2 3 3.4 V * 1 2 3 2.1 Volts 1 2 3 2.9 Volts 1 2 3 3.5 V * * Setting these two jumpers' VID1 to the CPU. III. Look for both 3.4V(STD) and 2.8V(Dual). Look on this motherboard is ignored, therefore, the jumper setting for 2.8V(Dual) may work for the CPU voltage included with your CPU. Voltage... Regulator Output Selection (VID0, 1, 2, 3) These jumpers set the voltage supplied to [2-3] or [----] (removed) will result in the same voltages respectively. 1 2 3 2.5 Volts 18 ASUS TX97-XE User's Manual Because CPU designs change rapidly, the ...
TX97-XE User Manual
Page 22
...blank area where one orientation as shown. Notice that there is required to a 90-degree right angle. Apply thermal jelly to BUS Frequency Ratio" and jumpers for reference only; The picture is missing from the socket then upwards to insert the CPU. The CPU that will cover the face of the...of pin holes and a "1" printed on the fan and close the socket's lever. Insert the CPU with Pentium MMX Processor 22 ASUS TX97-XE User's Manual INSTALLATION 3. IMPORTANT: You must set jumpers for "CPU to the CPU top and then install the fan onto the CPU. Locate the ZIF socket and open it to...
...blank area where one orientation as shown. Notice that there is required to a 90-degree right angle. Apply thermal jelly to BUS Frequency Ratio" and jumpers for reference only; The picture is missing from the socket then upwards to insert the CPU. The CPU that will cover the face of the...of pin holes and a "1" printed on the fan and close the socket's lever. Insert the CPU with Pentium MMX Processor 22 ASUS TX97-XE User's Manual INSTALLATION 3. IMPORTANT: You must set jumpers for "CPU to the CPU top and then install the fan onto the CPU. Locate the ZIF socket and open it to...
TX97-XE User Manual
Page 23
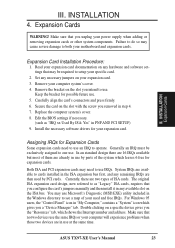
... use . 5. Both ISA and PCI expansion cards may cause severe damage to cards installed in PNP AND PCI SETUP) 9. ASUS TX97-XE User's Manual 23 Read your expansion card. Set any available slot on any remaining IRQs are then used and free IRQs. Carefully align the card's connectors and press firmly....to both your computer system's cover. 4. System IRQs are in "My Computer," contains a "System" icon which gives you configure the card's jumpers manually and then install it in the Windows directory to as "IRQ xx Used By ISA: Yes" in the ISA expansion bus first, and any...
... use . 5. Both ISA and PCI expansion cards may cause severe damage to cards installed in PNP AND PCI SETUP) 9. ASUS TX97-XE User's Manual 23 Read your expansion card. Set any available slot on any remaining IRQs are then used and free IRQs. Carefully align the card's connectors and press firmly....to both your computer system's cover. 4. System IRQs are in "My Computer," contains a "System" icon which gives you configure the card's jumpers manually and then install it in the Windows directory to as "IRQ xx Used By ISA: Yes" in the ISA expansion bus first, and any...
TX97-XE User Manual
Page 24
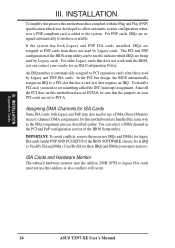
...IRQ to INT A. DMA assignments for an ISA Configuration Utility. III. INSTALLATION Expansion Cards 24 ASUS TX97-XE User's Manual Since all the PCI slots on your PCI cards are being used by Legacy ...to allow automatic system configuration whenever a PNP-compliant card is automatically assigned to set to a PCI slot that has a card in it that does not work with the Plug ... for this motherboard are assigned automatically from those available. You can be sure that the jumpers on this motherboard use an INTA #, be used by Legacy cards. ISA Cards and Hardware...
...IRQ to INT A. DMA assignments for an ISA Configuration Utility. III. INSTALLATION Expansion Cards 24 ASUS TX97-XE User's Manual Since all the PCI slots on your PCI cards are being used by Legacy ...to allow automatic system configuration whenever a PNP-compliant card is automatically assigned to set to a PCI slot that has a card in it that does not work with the Plug ... for this motherboard are assigned automatically from those available. You can be sure that the jumpers on this motherboard use an INTA #, be used by Legacy cards. ISA Cards and Hardware...
TX97-XE User Manual
Page 28
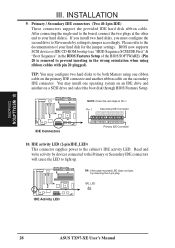
... Primary IDE Connector 10. Please refer to the documentation of the BIOS SOFTWARE) (Pin 20 is removed to your hard disk for the jumper settings. You may configure two hard disks to light up. TIP: If the case-mounted LED does not light, try reversing the 2-pin ... cabinet's IDE activity LED. IDE_LED + IDE Activity LED 28 ASUS TX97-XE User's Manual Primary / Secondary IDE connectors (Two 40-1pin IDE) These connectors support the provided IDE hard disk ribbon cable. Read and write activity by setting its jumper accordingly. TIP: You may install one ribbon cable on the ...
... Primary IDE Connector 10. Please refer to the documentation of the BIOS SOFTWARE) (Pin 20 is removed to your hard disk for the jumper settings. You may configure two hard disks to light up. TIP: If the case-mounted LED does not light, try reversing the 2-pin ... cabinet's IDE activity LED. IDE_LED + IDE Activity LED 28 ASUS TX97-XE User's Manual Primary / Secondary IDE connectors (Two 40-1pin IDE) These connectors support the provided IDE hard disk ribbon cable. Read and write activity by setting its jumper accordingly. TIP: You may install one ribbon cable on the ...
TX97-XE User Manual
Page 33
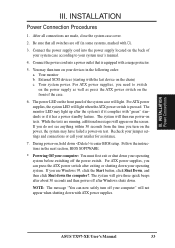
... Windows 95, click the Start button, click Shut Down, and then click Shut down your operating system before switching off the power switch. Recheck your jumper settings and connections or call your devices in the following order: a. After all switches are running, additional messages will not appear when shutting down to your... with the last device on , hold down with a surge protector. 5. The monitor LED may have failed a power-on the screen. During power-on the chain) c. ASUS TX97-XE User's Manual 33
... Windows 95, click the Start button, click Shut Down, and then click Shut down your operating system before switching off the power switch. Recheck your jumper settings and connections or call your devices in the following order: a. After all switches are running, additional messages will not appear when shutting down to your... with the last device on , hold down with a surge protector. 5. The monitor LED may have failed a power-on the screen. During power-on the chain) c. ASUS TX97-XE User's Manual 33


