
User Guide
Page 4
... information 3-6 3.4 Software information 3-6 Chapter 4: Motherboard Info 4.1 Introduction 4-2 4.2 Motherboard layout 4-2 4.3 Jumpers 4-3 4.4 Connectors 4-6 Chapter 5: BIOS Information 5.1 Managing and updating your BIOS 5-2 5.1.1 Creating a bootable floppy disk 5-2 5.1.2 ASUS EZ Flash utility 5-3 5.1.3 AFUDOS utility 5-4 5.1.4 ASUS CrashFree BIOS 2 utility 5-6 5.1.5 ASUS Update utility 5-8 5.2 BIOS setup program 5-11 5.2.1 BIOS menu screen 5-12 5.2.2 Menu bar 5-12 5.2.3 Navigation keys 5-12 5.2.4 Menu items 5-13 5.2.5 Sub-menu items 5-13...
... information 3-6 3.4 Software information 3-6 Chapter 4: Motherboard Info 4.1 Introduction 4-2 4.2 Motherboard layout 4-2 4.3 Jumpers 4-3 4.4 Connectors 4-6 Chapter 5: BIOS Information 5.1 Managing and updating your BIOS 5-2 5.1.1 Creating a bootable floppy disk 5-2 5.1.2 ASUS EZ Flash utility 5-3 5.1.3 AFUDOS utility 5-4 5.1.4 ASUS CrashFree BIOS 2 utility 5-6 5.1.5 ASUS Update utility 5-8 5.2 BIOS setup program 5-11 5.2.1 BIOS menu screen 5-12 5.2.2 Menu bar 5-12 5.2.3 Navigation keys 5-12 5.2.4 Menu items 5-13 5.2.5 Sub-menu items 5-13...
User Guide
Page 8
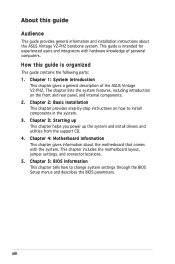
... includes the motherboard layout, jumper settings, and connector locations. 5. Chapter 4: Motherboard information This chapter gives information about the ASUS Vintage V2-PH2 barebone system. viii This guide is organized This guide contains the following parts: 1. Chapter 5: BIOS information This chapter tells how to install components in the system. 3. Chapter 3: Starting up This chapter helps you...
... includes the motherboard layout, jumper settings, and connector locations. 5. Chapter 4: Motherboard information This chapter gives information about the ASUS Vintage V2-PH2 barebone system. viii This guide is organized This guide contains the following parts: 1. Chapter 5: BIOS information This chapter tells how to install components in the system. 3. Chapter 3: Starting up This chapter helps you...
User Guide
Page 17
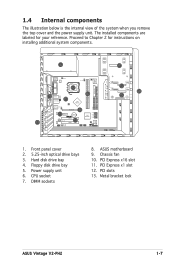
... PCI2 USB78 ULI M1575 SATA4 SATA3 SATA2 SATA1 USB56 CLRTC CHASSIS USBPW56 USBPW78 4M BIOS LPC PANEL PRI_IDE SEC_IDE Super I/O FLOPPY 2 3 1 4 1. Floppy disk drive bay 5. ASUS motherboard 9. Proceed to Chapter 2 for your reference. DIMM sockets 8. Metal bracket lock ASUS Vintage V2-PH2 1-7 Front panel cover 2. 5.25-inch optical drive bays 3. PCI slots 13. Power supply unit...
... PCI2 USB78 ULI M1575 SATA4 SATA3 SATA2 SATA1 USB56 CLRTC CHASSIS USBPW56 USBPW78 4M BIOS LPC PANEL PRI_IDE SEC_IDE Super I/O FLOPPY 2 3 1 4 1. Floppy disk drive bay 5. ASUS motherboard 9. Proceed to Chapter 2 for your reference. DIMM sockets 8. Metal bracket lock ASUS Vintage V2-PH2 1-7 Front panel cover 2. 5.25-inch optical drive bays 3. PCI slots 13. Power supply unit...
User Guide
Page 30
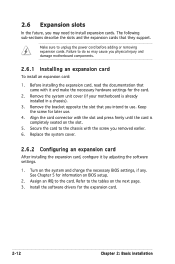
Remove the system unit cover (if your motherboard is completely seated on BIOS setup. 2. Keep the screw for information on the slot. 5. See Chapter 5 for later use . Install the software drivers for the card. 2. Align the card connector ... slot that they support. 2.6 Expansion slots In the future, you intend to use . 4. Make sure to the tables on the system and change the necessary BIOS settings, if any. Assign an IRQ to the card.
Remove the system unit cover (if your motherboard is completely seated on BIOS setup. 2. Keep the screw for information on the slot. 5. See Chapter 5 for later use . Install the software drivers for the card. 2. Align the card connector ... slot that they support. 2.6 Expansion slots In the future, you intend to use . 4. Make sure to the tables on the system and change the necessary BIOS settings, if any. Assign an IRQ to the card.

User Guide
Page 32
... the PCI Express specifications. Before using a PCI VGA card, make sure to set the Boot Graphics Adapter Priority to PCI/IGD in the BIOS. The figure shows a network card installed on the PCI Express x1 slot. 2.6.4 PCI slots The PCI slots support cards such as a LAN card, SCSI...
... the PCI Express specifications. Before using a PCI VGA card, make sure to set the Boot Graphics Adapter Priority to PCI/IGD in the BIOS. The figure shows a network card installed on the PCI Express x1 slot. 2.6.4 PCI slots The PCI slots support cards such as a LAN card, SCSI...

User Guide
Page 44
... in healthy operating condition. See page 5-8 for detailed information. ASUS Screen Saver Installs the ASUS screen saver. 3-4 Chapter 3: Starting up ASUS InstAll-Installation Wizard for Utilities Installs the ASUS InstAll-Installation Wizard Utilities. ADOBE Acrobat Reader V7.0 Installs the ...Adobe® Acrobat® Reader V7.0 that the motherboard supports. 3.3.2 Utilities menu The Utilities menu shows the applications and other software that allows you to update the motherboard BIOS...
... in healthy operating condition. See page 5-8 for detailed information. ASUS Screen Saver Installs the ASUS screen saver. 3-4 Chapter 3: Starting up ASUS InstAll-Installation Wizard for Utilities Installs the ASUS InstAll-Installation Wizard Utilities. ADOBE Acrobat Reader V7.0 Installs the ...Adobe® Acrobat® Reader V7.0 that the motherboard supports. 3.3.2 Utilities menu The Utilities menu shows the applications and other software that allows you to update the motherboard BIOS...

User Guide
Page 54
... AAFP CD SB_PWR CR2032 3V Lithium Cell CMOS Power ® PCI1 PCI2 ULI M1575 SATA4 SATA3 SATA2 SATA1 USB78 USB56 CLRTC CHASSIS USBPW56 USBPW78 4M BIOS LPC PANEL PRI_IDE SEC_IDE 21.8cm (8.6in) 4-2 Chapter 4: Motherboard info 4.1 Introduction The Vintage V2-PH2 barebone system comes with an ASUS motherboard.
... AAFP CD SB_PWR CR2032 3V Lithium Cell CMOS Power ® PCI1 PCI2 ULI M1575 SATA4 SATA3 SATA2 SATA1 USB78 USB56 CLRTC CHASSIS USBPW56 USBPW78 4M BIOS LPC PANEL PRI_IDE SEC_IDE 21.8cm (8.6in) 4-2 Chapter 4: Motherboard info 4.1 Introduction The Vintage V2-PH2 barebone system comes with an ASUS motherboard.
User Guide
Page 55
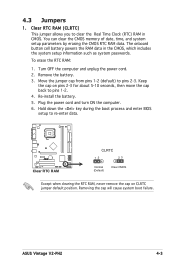
... key during the boot process and enter BIOS setup to re-enter data. ® Clear RTC RAM CLRTC 12 23 Normal (Default) Clear CMOS Except when clearing the RTC RAM, never remove the cap on pins 2-3 for about 5-10 seconds, then move the cap back to pins 1-2. 4. ASUS Vintage V2-PH2 4-3 Turn OFF the computer and unplug...
... key during the boot process and enter BIOS setup to re-enter data. ® Clear RTC RAM CLRTC 12 23 Normal (Default) Clear CMOS Except when clearing the RTC RAM, never remove the cap on pins 2-3 for about 5-10 seconds, then move the cap back to pins 1-2. 4. ASUS Vintage V2-PH2 4-3 Turn OFF the computer and unplug...
User Guide
Page 57
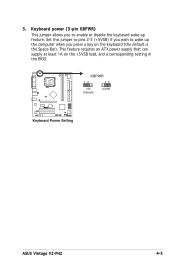
KBPWR 12 23 +5V (Default) +5VSB ® Keyboard Power Setting ASUS Vintage V2-PH2 4-5 This feature requires an ATX power supply that can supply at least 1A on the keyboard (the default is the Space Bar). Keyboard power (3-pin KBPWR) This jumper allows you press a key on the +5VSB lead, and a corresponding setting in the BIOS. Set this jumper to pins 2-3 (+5VSB) if you wish to enable or disable the keyboard wake-up the computer when you to wake up feature. 3.
KBPWR 12 23 +5V (Default) +5VSB ® Keyboard Power Setting ASUS Vintage V2-PH2 4-5 This feature requires an ATX power supply that can supply at least 1A on the keyboard (the default is the Space Bar). Keyboard power (3-pin KBPWR) This jumper allows you press a key on the +5VSB lead, and a corresponding setting in the BIOS. Set this jumper to pins 2-3 (+5VSB) if you wish to enable or disable the keyboard wake-up the computer when you to wake up feature. 3.
User Guide
Page 64
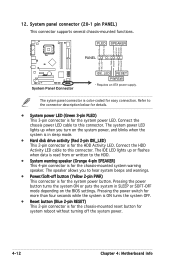
... supply. Refer to the HDD. • System warning speaker (Orange 4-pin SPEAKER) This 4-pin connector is in SLEEP or SOFT-OFF mode depending on the BIOS settings. The speaker allows you turn on the system power, and blinks when the system is for the chassis-mounted system warning speaker. Pressing the...
... supply. Refer to the HDD. • System warning speaker (Orange 4-pin SPEAKER) This 4-pin connector is in SLEEP or SOFT-OFF mode depending on the BIOS settings. The speaker allows you turn on the system power, and blinks when the system is for the chassis-mounted system warning speaker. Pressing the...

User Guide
Page 65
Chapter 5 This chapter tells how to change system settings through the BIOS Setup menus and describes the BIOS parameters. BIOS setup ASUS Vintage V2-PH2 1
Chapter 5 This chapter tells how to change system settings through the BIOS Setup menus and describes the BIOS parameters. BIOS setup ASUS Vintage V2-PH2 1

User Guide
Page 66
... of boot disks for details on these utilities. c. e. c. d. b. Insert a formatted, high density 1.44 MB floppy disk into the drive. ASUS Update (Updates the BIOS in Windows® environment.) Refer to the floppy disk drive. Click Start from the format options fi...eld, then click Start. Select the 3 1/2 Floppy Drive icon. ASUS CrashFree BIOS 2 (Updates the BIOS using a bootable floppy disk.) 2. DOS environment a. Click File from the menu, then select Format. Windows® 2000 ...
... of boot disks for details on these utilities. c. e. c. d. b. Insert a formatted, high density 1.44 MB floppy disk into the drive. ASUS Update (Updates the BIOS in Windows® environment.) Refer to the floppy disk drive. Click Start from the format options fi...eld, then click Start. Select the 3 1/2 Floppy Drive icon. ASUS CrashFree BIOS 2 (Updates the BIOS using a bootable floppy disk.) 2. DOS environment a. Click File from the menu, then select Format. Windows® 2000 ...
User Guide
Page 67
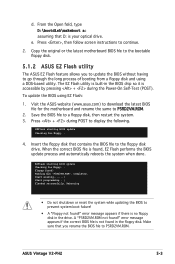
... appears if there is not found in the floppy disk. ASUS Vintage V2-PH2 5-3 Visit the ASUS website (www.asus.com) to download the latest BIOS file for floppy... error message appears if the correct BIOS file is no floppy disk in the BIOS chip so it is accessible by pressing + during POST to...
... appears if there is not found in the floppy disk. ASUS Vintage V2-PH2 5-3 Visit the ASUS website (www.asus.com) to download the latest BIOS file for floppy... error message appears if the correct BIOS file is no floppy disk in the BIOS chip so it is accessible by pressing + during POST to...
User Guide
Page 68
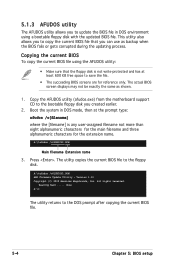
...le. A:\>afudos /oOLDBIOS1.ROM AMI Firmware Update Utility - Version 1.10 Copyright (C) 2002 American Megatrends, Inc. This utility also allows you to copy the current BIOS file that the floppy disk is not write-protected and has at the prompt type: afudos /o[filename] where the [filename] is ... that you can use as shown. 1. A:\>afudos /oOLDBIOS1.ROM Main filename Extension name 3. Press . 5.1.3 AFUDOS utility The AFUDOS utility allows you to update the BIOS file in DOS mode, then at least 600 KB free space to save the file. • The succeeding...
...le. A:\>afudos /oOLDBIOS1.ROM AMI Firmware Update Utility - Version 1.10 Copyright (C) 2002 American Megatrends, Inc. This utility also allows you to copy the current BIOS file that the floppy disk is not write-protected and has at the prompt type: afudos /o[filename] where the [filename] is ... that you can use as shown. 1. A:\>afudos /oOLDBIOS1.ROM Main filename Extension name 3. Press . 5.1.3 AFUDOS utility The AFUDOS utility allows you to update the BIOS file in DOS mode, then at least 600 KB free space to save the file. • The succeeding...

User Guide
Page 69
...the AFUDOS utility (afudos.exe) from the hard disk drive. The utility verifies the file and starts updating the BIOS. Version 1.10 Copyright (C) 2002 American Megatrends, Inc. Reading file ..... Boot the system in DOS mode, then at the... Erasing flash .... All rights reserved. Write the BIOS filename on the bootable floppy disk. A:\>afudos /iP5RD2VM.ROM AMI Firmware Update Utility - done A:\> ASUS Vintage V2-PH2 5-5 Visit the ASUS website (www.asus.com) and download the latest BIOS file for the motherboard. A:\>afudos /iP5RD2VM.ROM ...
...the AFUDOS utility (afudos.exe) from the hard disk drive. The utility verifies the file and starts updating the BIOS. Version 1.10 Copyright (C) 2002 American Megatrends, Inc. Reading file ..... Boot the system in DOS mode, then at the... Erasing flash .... All rights reserved. Write the BIOS filename on the bootable floppy disk. A:\>afudos /iP5RD2VM.ROM AMI Firmware Update Utility - done A:\> ASUS Vintage V2-PH2 5-5 Visit the ASUS website (www.asus.com) and download the latest BIOS file for the motherboard. A:\>afudos /iP5RD2VM.ROM ...
User Guide
Page 70
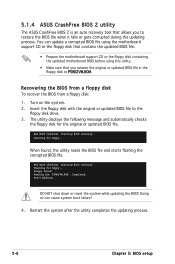
... system while updating the BIOS! Checking for the original or updated BIOS file. Recovering the BIOS from a floppy disk To recover the BIOS from a floppy disk: 1. Start flashing... Completed. Checking for floppy... You can cause system boot failure! 4. Turn on the system. 2. 5.1.4 ASUS CrashFree BIOS 2 utility The ASUS CrashFree BIOS 2 is an auto recovery...
... system while updating the BIOS! Checking for the original or updated BIOS file. Recovering the BIOS from a floppy disk To recover the BIOS from a floppy disk: 1. Start flashing... Completed. Checking for floppy... You can cause system boot failure! 4. Turn on the system. 2. 5.1.4 ASUS CrashFree BIOS 2 utility The ASUS CrashFree BIOS 2 is an auto recovery...

User Guide
Page 71
...... Checking for floppy... Restart the system after the utility completes the updating process. ASUS Vintage V2-PH2 5-7 Recovering the BIOS from the support CD To recover the BIOS from the floppy disk drive, then turn on the system. 2. Bad BIOS checksum. CD-ROM found , the utility automatically checks the optical drive for this motherboard. Completed...
...... Checking for floppy... Restart the system after the utility completes the updating process. ASUS Vintage V2-PH2 5-7 Recovering the BIOS from the support CD To recover the BIOS from the floppy disk drive, then turn on the system. 2. Bad BIOS checksum. CD-ROM found , the utility automatically checks the optical drive for this motherboard. Completed...

User Guide
Page 72
... before you to: • Save the current BIOS file • Download the latest BIOS file from the Internet • Update the BIOS from an updated BIOS file • Update the BIOS directly from the Internet, and • View the BIOS version information. 5.1.5 ASUS Update utility The ASUS Update is a utility that allows you to manage...
... before you to: • Save the current BIOS file • Download the latest BIOS file from the Internet • Update the BIOS from an updated BIOS file • Update the BIOS directly from the Internet, and • View the BIOS version information. 5.1.5 ASUS Update utility The ASUS Update is a utility that allows you to manage...
User Guide
Page 73
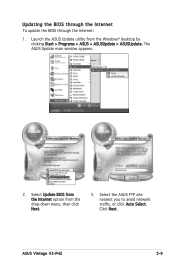
Select Update BIOS from the Internet option from the Windows® desktop by clicking Start > Programs > ASUS > ASUSUpdate > ASUSUpdate. The ASUS Update main window appears. 2. Select the ASUS FTP site nearest you to avoid network traffic, or click Auto Select. Launch the ASUS Update utility from the drop-down menu, then click Next. 3. ASUS Vintage V2-PH2 5-9 Click Next. Updating the BIOS through the Internet To update the BIOS through the Internet: 1.
Select Update BIOS from the Internet option from the Windows® desktop by clicking Start > Programs > ASUS > ASUSUpdate > ASUSUpdate. The ASUS Update main window appears. 2. Select the ASUS FTP site nearest you to avoid network traffic, or click Auto Select. Launch the ASUS Update utility from the drop-down menu, then click Next. 3. ASUS Vintage V2-PH2 5-9 Click Next. Updating the BIOS through the Internet To update the BIOS through the Internet: 1.
User Guide
Page 74
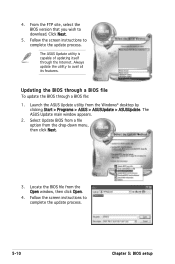
... the screen instructions to avail all its features. The ASUS Update utility is capable of updating itself through a BIOS file: 1. The ASUS Update main window appears. 2. Locate the BIOS file from the Windows® desktop by clicking Start > Programs > ASUS > ASUSUpdate > ASUSUpdate. Select Update BIOS from a file option from the drop-down menu...
... the screen instructions to avail all its features. The ASUS Update utility is capable of updating itself through a BIOS file: 1. The ASUS Update main window appears. 2. Locate the BIOS file from the Windows® desktop by clicking Start > Programs > ASUS > ASUSUpdate > ASUSUpdate. Select Update BIOS from a file option from the drop-down menu...


