
User Guide
Page 3
... 1-2 1.3.2 Back view 1-3 1.3.3 QuickFit Function 1-4 Chapter 2: Setup 2.1 Assembling the monitor base 2-1 2.2 Adjusting the monitor 2-1 2.3 Detaching the arm/base (for VESA wall mount 2-2 2.4 Connecting the cables 2-3 2.5 Turning on the monitor 2-3 Chapter 3: General instructions 3.1 OSD (On-Screen Display) menu 3-1 3.1.1 How to reconfigure 3-1 3.1.2 OSD function introduction 3-1 3.2 Specifications summary (VW22AT 3-4 Specifications summary (VW22AN 3-5 Specifications summary (VW22AS 3-6 Specifications summary (VW22AD...
... 1-2 1.3.2 Back view 1-3 1.3.3 QuickFit Function 1-4 Chapter 2: Setup 2.1 Assembling the monitor base 2-1 2.2 Adjusting the monitor 2-1 2.3 Detaching the arm/base (for VESA wall mount 2-2 2.4 Connecting the cables 2-3 2.5 Turning on the monitor 2-3 Chapter 3: General instructions 3.1 OSD (On-Screen Display) menu 3-1 3.1.1 How to reconfigure 3-1 3.1.2 OSD function introduction 3-1 3.2 Specifications summary (VW22AT 3-4 Specifications summary (VW22AN 3-5 Specifications summary (VW22AS 3-6 Specifications summary (VW22AD...
User Guide
Page 4
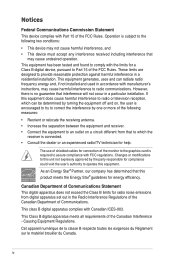
... harmful interference in a residential installation. The use of shielded cables for connection of the Canadian Interference - This Class B digital apparatus meets all requirements of the monitor to the graphics card is required to assure compliance with FCC regulations. Cet appareil numérique de la classe B respecte toutes les exigences du...
... harmful interference in a residential installation. The use of shielded cables for connection of the Canadian Interference - This Class B digital apparatus meets all requirements of the monitor to the graphics card is required to assure compliance with FCC regulations. Cet appareil numérique de la classe B respecte toutes les exigences du...
User Guide
Page 5
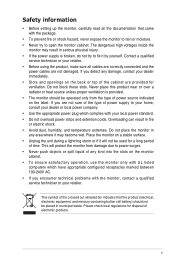
... for ventilation. Never place this product near or over a radiator or heat source unless proper ventilation is broken, do not try to open the monitor cabinet. This will not be operated only from damage due to fix it by yourself. If you encounter technical problems with the package. •... To prevent fire or shock hazard, never expose the monitor to rain or moisture. • Never try to power surges. • Never push objects or spill liquid of any kind into the slots on ...
... for ventilation. Never place this product near or over a radiator or heat source unless proper ventilation is broken, do not try to open the monitor cabinet. This will not be operated only from damage due to fix it by yourself. If you encounter technical problems with the package. •... To prevent fire or shock hazard, never expose the monitor to rain or moisture. • Never try to power surges. • Never push objects or spill liquid of any kind into the slots on ...
User Guide
Page 6
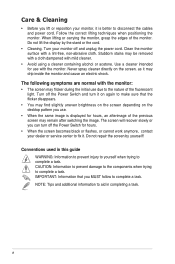
...turn off and unplug the power cord. vi Do not lift the display by yourself! Clean the monitor surface with mild cleaner. • Avoid using a cleaner containing alcohol or acetone. Turn your monitor off the Power Switch for hours. • When the screen becomes black or flashes, or cannot...: Information to prevent injury to yourself when trying to aid in completing a task. Use a cleaner intended for hours, an afterimage of the monitor. The screen will recover slowly or you can turn it on again to fix it. CAUTION: Information to prevent damage to the components when ...
...turn off and unplug the power cord. vi Do not lift the display by yourself! Clean the monitor surface with mild cleaner. • Avoid using a cleaner containing alcohol or acetone. Turn your monitor off the Power Switch for hours. • When the screen becomes black or flashes, or cannot...: Information to prevent injury to yourself when trying to aid in completing a task. Use a cleaner intended for hours, an afterimage of the monitor. The screen will recover slowly or you can turn it on again to fix it. CAUTION: Information to prevent damage to the components when ...
User Guide
Page 9
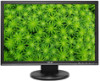
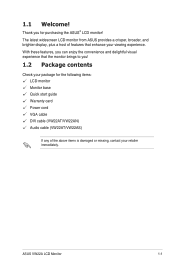
... enhance your viewing experience. ASUS VW22A LCD Monitor 1-1 The latest widescreen LCD monitor from ASUS provides a crisper, broader, and brighter display, plus a host of features that the monitor brings to you for the following items: LCD monitor Monitor base Quick start guide Warranty card Power cord VGA cable DVI cable (VW22AT/VW22AN) Audio cable (VW22AT/VW22AS) If any of...
... enhance your viewing experience. ASUS VW22A LCD Monitor 1-1 The latest widescreen LCD monitor from ASUS provides a crisper, broader, and brighter display, plus a host of features that the monitor brings to you for the following items: LCD monitor Monitor base Quick start guide Warranty card Power cord VGA cable DVI cable (VW22AT/VW22AN) Audio cable (VW22AT/VW22AS) If any of...
User Guide
Page 10
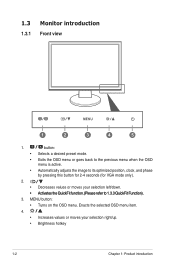
... by pressing this button for 2-4 seconds (for VGA mode only). 2. • Decreases values or moves your selection right/up. • Brightness hotkey 1-2 Chapter 1: Product introduction 1.3 Monitor introduction 1.3.1 Front view 1 2 3 4 5 1.
... by pressing this button for 2-4 seconds (for VGA mode only). 2. • Decreases values or moves your selection right/up. • Brightness hotkey 1-2 Chapter 1: Product introduction 1.3 Monitor introduction 1.3.1 Front view 1 2 3 4 5 1.
User Guide
Page 11
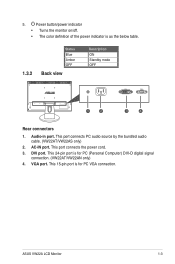
AC-IN port. VGA port. 5. DVI port. ASUS VW22A LCD Monitor 1-3 Audio-in port. This port connects PC audio source by the bundled audio cable. (VW22AT/VW22AS only) 2. This 24-pin port is for PC VGA connection. This port connects the power cord. 3. This 15-pin port is... 1.3.2 Status Blue Amber OFF Back view Description ON Standby mode OFF DVI VGA 4 Rear connectors 1. Power button/power indicator • Turns the monitor on/off. • The color definition of the power indicator is for PC (Personal Computer) DVI-D digital signal connection. (VW22AT/VW22AN only) 4.
AC-IN port. VGA port. 5. DVI port. ASUS VW22A LCD Monitor 1-3 Audio-in port. This port connects PC audio source by the bundled audio cable. (VW22AT/VW22AS only) 2. This 24-pin port is for PC VGA connection. This port connects the power cord. 3. This 15-pin port is... 1.3.2 Status Blue Amber OFF Back view Description ON Standby mode OFF DVI VGA 4 Rear connectors 1. Power button/power indicator • Turns the monitor on/off. • The color definition of the power indicator is for PC (Personal Computer) DVI-D digital signal connection. (VW22AT/VW22AN only) 4.
User Guide
Page 13
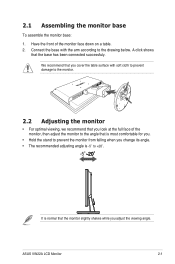
... that you adjust the viewing angle. 2.1 Assembling the monitor base To assemble the monitor base: 1. ASUS VW22A LCD Monitor 2-1 Connect the base with soft cloth to prevent damage to the monitor. 2.2 Adjusting the monitor • For optimal viewing, we recommend that you look at the full face of the monitor face down on a table. 2. A click shows that...
... that you adjust the viewing angle. 2.1 Assembling the monitor base To assemble the monitor base: 1. ASUS VW22A LCD Monitor 2-1 Connect the base with soft cloth to prevent damage to the monitor. 2.2 Adjusting the monitor • For optimal viewing, we recommend that you look at the full face of the monitor face down on a table. 2. A click shows that...

User Guide
Page 14
... down on the arm (Figure 1), then slide out the arm/base to detach it from the monitor (Figure 2). Rubbers in the four screw holes (Figure 1). 3. 2.3 Detaching the arm/base (for VESA wall mount. Remove the rubbers in the screw holes Two screws ... 2 We recommend that you cover the table surface with soft cloth to prevent damage to remove the two screws on a table. 2. Use a screwdriver to the monitor. 2-2 Chapter 2: Setup To detach the arm/base: 1.
... down on the arm (Figure 1), then slide out the arm/base to detach it from the monitor (Figure 2). Rubbers in the four screw holes (Figure 1). 3. 2.3 Detaching the arm/base (for VESA wall mount. Remove the rubbers in the screw holes Two screws ... 2 We recommend that you cover the table surface with soft cloth to prevent damage to remove the two screws on a table. 2. Use a screwdriver to the monitor. 2-2 Chapter 2: Setup To detach the arm/base: 1.

User Guide
Page 15
... the other end to the computer's audio-out port. • To connect the power cord: connect one end of the power cord securely to the monitor's AC input, the other end to a power outlet. • To connect the VGA/DVI cable: a. When these cables are connected, you can choose... hook. Connect the cables as the following instructions: • To connect the audio cable: connect one end of the audio cable to the monitor's Audio-in port, the other end of the power button. 2.4 Connecting the cables 1. ASUS VW22A LCD Monitor 2-3 The power indicator lights up in the OSD menu. 2.
... the other end to the computer's audio-out port. • To connect the power cord: connect one end of the power cord securely to the monitor's AC input, the other end to a power outlet. • To connect the VGA/DVI cable: a. When these cables are connected, you can choose... hook. Connect the cables as the following instructions: • To connect the audio cable: connect one end of the audio cable to the monitor's Audio-in port, the other end of the power button. 2.4 Connecting the cables 1. ASUS VW22A LCD Monitor 2-3 The power indicator lights up in the OSD menu. 2.
User Guide
Page 17
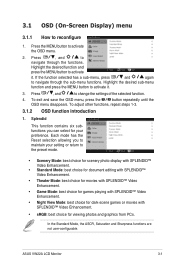
... the selected function. 4. Press , and to activate it . 3. To exit and save the OSD menu, press the button repeatedly until the OSD menu disappears. ASUS VW22A LCD Monitor 3-1 Highlight the desired sub-menu function and press the MENU button to reconfigure 1. To adjust other functions, repeat steps 1-3. 3.1.2 OSD function introduction 1. Press , and...
... the selected function. 4. Press , and to activate it . 3. To exit and save the OSD menu, press the button repeatedly until the OSD menu disappears. ASUS VW22A LCD Monitor 3-1 Highlight the desired sub-menu function and press the MENU button to reconfigure 1. To adjust other functions, repeat steps 1-3. 3.1.2 OSD function introduction 1. Press , and...
User Guide
Page 19
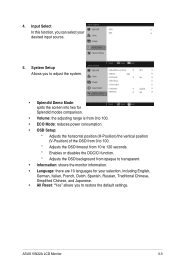
... you to adjust the system. • Splendid Demo Mode: splits the screen into two for your desired input source. 5. ASUS VW22A LCD Monitor 3-3 4. System Setup Allows you to transparent. • Information: shows the monitor information. • Language: there are 10 languages for Splendid modes comparison. • Volume: the adjusting range is from 0 to...
... you to adjust the system. • Splendid Demo Mode: splits the screen into two for your desired input source. 5. ASUS VW22A LCD Monitor 3-3 4. System Setup Allows you to transparent. • Information: shows the monitor information. • Language: there are 10 languages for Splendid modes comparison. • Volume: the adjusting range is from 0 to...
User Guide
Page 21
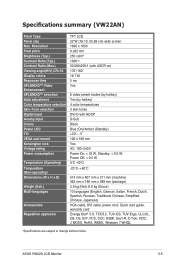
ASUS VW22A LCD Monitor 3-5 Specifications summary (VW22AN) Panel Type Panel size Max. Resolution Pixel pitch Brightness (Typ.) Contrast Ratio (Typ.) Contrast Ratio (Max.) Viewing angle(H/V) CR>10 Display colors ...
ASUS VW22A LCD Monitor 3-5 Specifications summary (VW22AN) Panel Type Panel size Max. Resolution Pixel pitch Brightness (Typ.) Contrast Ratio (Typ.) Contrast Ratio (Max.) Viewing angle(H/V) CR>10 Display colors ...

User Guide
Page 23
ASUS VW22A LCD Monitor 3-7 Resolution Pixel pitch Brightness (Typ.) Contrast Ratio (Typ.) Contrast Ratio (Max.) Viewing angle(H/V) CR>10 Display colors Response time SPLENDID™ Video Enhancement SPLENDID™ ...
ASUS VW22A LCD Monitor 3-7 Resolution Pixel pitch Brightness (Typ.) Contrast Ratio (Typ.) Contrast Ratio (Max.) Viewing angle(H/V) CR>10 Display colors Response time SPLENDID™ Video Enhancement SPLENDID™ ...

User Guide
Page 24
...OSD. Screen image is properly working. 3.3 Troubleshooting (FAQ) Problem Possible Solution Power LED is not ON • Press the button to check if the monitor is in the ON mode. • Check if the power cord is properly present in the ON mode. • Make sure the signal cable ... (white does • Inspect the signal cable and make sure none of the pins are bent. • Connect the computer with another available monitor to check if the computer is too light or dark • Adjust the Contrast and Brightness settings via OSD. Screen image is properly installed and...
...OSD. Screen image is properly working. 3.3 Troubleshooting (FAQ) Problem Possible Solution Power LED is not ON • Press the button to check if the monitor is in the ON mode. • Check if the power cord is properly present in the ON mode. • Make sure the signal cable ... (white does • Inspect the signal cable and make sure none of the pins are bent. • Connect the computer with another available monitor to check if the computer is too light or dark • Adjust the Contrast and Brightness settings via OSD. Screen image is properly installed and...

User Guide
Page 25
ASUS VW22A LCD Monitor 3-9 For optimal resolution, we recommend that you choose a mode listed in the table may not be supported. 3.4 Supported operating modes Resolution Frequency 640x480 640x480 640x480 ...
ASUS VW22A LCD Monitor 3-9 For optimal resolution, we recommend that you choose a mode listed in the table may not be supported. 3.4 Supported operating modes Resolution Frequency 640x480 640x480 640x480 ...


