
K8V SE Deluxe User's Manual
Page 12
xii K8V SE Deluxe specifications summary Back panel I/O Internal I/O BIOS features Industry standard Manageability Power Requirement Form Factor Support CD contents 1 x Parallel port 1 x Serial port 1 x PS/2 keyboard port 1 x PS/2 ... with enhanced ACPI, PnP, DMI2.0, Green ASUS EZ Flash, ASUS MyLogo2, Q-Fan, SM BIOS 2.3, Multi-Language BIOS, CrashFree BIOS 2 PCI 2.2, USB 2.0/1.1 DMI 2.0, WOL by PME, WOR by PME ATX power supply (with 4-pin 12V plug) ATX form factor: 12 in x 9.6 in (30.5 cm x 24.4 cm) Device drivers ASUS PC Probe Anti-virus utility * Specifications...
xii K8V SE Deluxe specifications summary Back panel I/O Internal I/O BIOS features Industry standard Manageability Power Requirement Form Factor Support CD contents 1 x Parallel port 1 x Serial port 1 x PS/2 keyboard port 1 x PS/2 ... with enhanced ACPI, PnP, DMI2.0, Green ASUS EZ Flash, ASUS MyLogo2, Q-Fan, SM BIOS 2.3, Multi-Language BIOS, CrashFree BIOS 2 PCI 2.2, USB 2.0/1.1 DMI 2.0, WOL by PME, WOR by PME ATX power supply (with 4-pin 12V plug) ATX form factor: 12 in x 9.6 in (30.5 cm x 24.4 cm) Device drivers ASUS PC Probe Anti-virus utility * Specifications...

K8V SE Deluxe User's Manual
Page 37
... until the card is already installed in a chassis). 3. Secure the card to the card. Assign an IRQ to the chassis with screws. 6. Install the software drivers for information on the slot. 5. Align the card connector with the expansion card and make the necessary hardware settings for later use . Remove the bracket... a Wireless Fidelity (Wi-Fi) slot. Remove the system unit cover (if your motherboard is completely seated on BIOS setup. 2. Keep the screw for the card. 2. ASUS K8V SE Deluxe motherboard 2-15
... until the card is already installed in a chassis). 3. Secure the card to the card. Assign an IRQ to the chassis with screws. 6. Install the software drivers for information on the slot. 5. Align the card connector with the expansion card and make the necessary hardware settings for later use . Remove the bracket... a Wireless Fidelity (Wi-Fi) slot. Remove the system unit cover (if your motherboard is completely seated on BIOS setup. 2. Keep the screw for the card. 2. ASUS K8V SE Deluxe motherboard 2-15

K8V SE Deluxe User's Manual
Page 50
You must install the driver before you can use the USB 2.0 capability. This speed advantage over the conventional 12 Mbps on the rear panel are inadequate, a USB header is available for additional USB ports. USB+5V USB_P6USB_P6+ GND NC USB+5V USB_P8USB_P8+ GND NC K8V ® USB78 1 K8V SE Deluxe USB 2.0 Header USB56 1 USB+5V USB_P5USB_P5...
You must install the driver before you can use the USB 2.0 capability. This speed advantage over the conventional 12 Mbps on the rear panel are inadequate, a USB header is available for additional USB ports. USB+5V USB_P6USB_P6+ GND NC USB+5V USB_P8USB_P8+ GND NC K8V ® USB78 1 K8V SE Deluxe USB 2.0 Header USB56 1 USB+5V USB_P5USB_P5...
K8V SE Deluxe User's Manual
Page 73
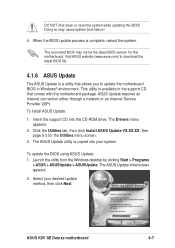
... is available in Windows® environment. See page 5-3 for this motherboard. ASUS K8V SE Deluxe motherboard 4-7 To install ASUS Update: 1. When the BIOS update process is copied into the CD-ROM drive. This utility is a utility that allows you to update ... support CD into your desired update method, then click Next. The Drivers menu appears. 2. Doing so may not be the latest BIOS version for the Utilities menu screen. 3. The recovered BIOS may cause system boot failure! 4. ASUS Update requires an Internet connection either through a network or an Internet Service...
... is available in Windows® environment. See page 5-3 for this motherboard. ASUS K8V SE Deluxe motherboard 4-7 To install ASUS Update: 1. When the BIOS update process is copied into the CD-ROM drive. This utility is a utility that allows you to update ... support CD into your desired update method, then click Next. The Drivers menu appears. 2. Doing so may not be the latest BIOS version for the Utilities menu screen. 3. The recovered BIOS may cause system boot failure! 4. ASUS Update requires an Internet connection either through a network or an Internet Service...

K8V SE Deluxe User's Manual
Page 106
Chapter summary 5.1 Install an operating system 5-1 5.2 Support CD information 5-1 5.3 Software Information 5-7 5.4 AI Net feature 5-12 5.5 Multi-audio feature 5-13 5.6 Promise® RAID configurations 5-17 5.7 VIA RAID configurations 5-25 5.8 Creating a RAID driver disk 5-32 5.9 Cool 'n' Quiet!™ Technology 5-33 ASUS K8V SE Deluxe motherboard
Chapter summary 5.1 Install an operating system 5-1 5.2 Support CD information 5-1 5.3 Software Information 5-7 5.4 AI Net feature 5-12 5.5 Multi-audio feature 5-13 5.6 Promise® RAID configurations 5-17 5.7 VIA RAID configurations 5-25 5.8 Creating a RAID driver disk 5-32 5.9 Cool 'n' Quiet!™ Technology 5-33 ASUS K8V SE Deluxe motherboard

K8V SE Deluxe User's Manual
Page 107
... chapter for updates. 5.2.1 Running the support CD To begin using the support CD, simply insert the CD into your CD-ROM drive. ASUS K8V SE Deluxe motherboard 5-1 Double-click the ASSETUP.EXE to your OS documentation for more information If Autorun is enabled in your computer, browse the contents ... display more information. 5.2 Support CD information The support CD that came with the motherboard contains useful software and several utility drivers that enhance the motherboard features. The CD automatically displays the Drivers menu if Autorun is NOT enabled in your hardware.
... chapter for updates. 5.2.1 Running the support CD To begin using the support CD, simply insert the CD into your CD-ROM drive. ASUS K8V SE Deluxe motherboard 5-1 Double-click the ASSETUP.EXE to your OS documentation for more information If Autorun is enabled in your computer, browse the contents ... display more information. 5.2 Support CD information The support CD that came with the motherboard contains useful software and several utility drivers that enhance the motherboard features. The CD automatically displays the Drivers menu if Autorun is NOT enabled in your hardware.
K8V SE Deluxe User's Manual
Page 109
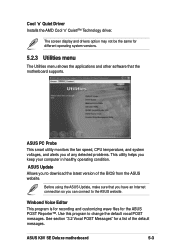
... condition. ASUS K8V SE Deluxe motherboard 5-3 ASUS PC Probe This smart utility monitors the fan speed, CPU temperature, and system voltages, and alerts you of any detected problems. This utility helps you to download the latest version of the default messages. Before using the ASUS Update, ...list of the BIOS from the ASUS website. Use this program to the ASUS website. The screen display and drivers option may not be the same for the ASUS POST Reporter™. Cool 'n' Quiet Driver Installs the AMD Cool 'n' Quiet!™ Technology driver. Winbond Voice Editor This program ...
... condition. ASUS K8V SE Deluxe motherboard 5-3 ASUS PC Probe This smart utility monitors the fan speed, CPU temperature, and system voltages, and alerts you of any detected problems. This utility helps you to download the latest version of the default messages. Before using the ASUS Update, ...list of the BIOS from the ASUS website. Use this program to the ASUS website. The screen display and drivers option may not be the same for the ASUS POST Reporter™. Cool 'n' Quiet Driver Installs the AMD Cool 'n' Quiet!™ Technology driver. Winbond Voice Editor This program ...

K8V SE Deluxe User's Manual
Page 119
... Choose your desired setting. Sound MAX Digital Integrated Audio icon 2. The default setting is Stereo Speakers (2-channel). ASUS K8V SE Deluxe motherboard 5-13 Install the SoundMAX Audio Driver and Application from the support CD that came with the motherboard package to display the SoundMAX Control Panel. Click ... audio feature onboard. 1. To set to display a list of options. 4. Setting to multi-channel audio After installing the audio driver, you to set to a 6-channel speaker system, click the arrow under Select Audio Path to multi-channel speakers, enable or disable...
... Choose your desired setting. Sound MAX Digital Integrated Audio icon 2. The default setting is Stereo Speakers (2-channel). ASUS K8V SE Deluxe motherboard 5-13 Install the SoundMAX Audio Driver and Application from the support CD that came with the motherboard package to display the SoundMAX Control Panel. Click ... audio feature onboard. 1. To set to display a list of options. 4. Setting to multi-channel audio After installing the audio driver, you to set to a 6-channel speaker system, click the arrow under Select Audio Path to multi-channel speakers, enable or disable...

K8V SE Deluxe User's Manual
Page 123
... information on the PRI_RAID interface, you use either Windows® XP or Windows® 2000 operating system (OS), copy first the Promise FastTrak 378 Driver from one drive and have a complete duplicate surviving drive or set up RAID 0, RAID 1, RAID 0+1, and Multi-RAID configurations. If one drive fails...array. Using two Serial ATA hard disks on SATA_RAID1/SATA_RAID2 interfaces, and two UltraDMA133 hard disks on RAID configurations under different operating systems. ASUS K8V SE Deluxe motherboard 5-17 The advantage of a single disk alone, thus improving data access and storage.
... information on the PRI_RAID interface, you use either Windows® XP or Windows® 2000 operating system (OS), copy first the Promise FastTrak 378 Driver from one drive and have a complete duplicate surviving drive or set up RAID 0, RAID 1, RAID 0+1, and Multi-RAID configurations. If one drive fails...array. Using two Serial ATA hard disks on SATA_RAID1/SATA_RAID2 interfaces, and two UltraDMA133 hard disks on RAID configurations under different operating systems. ASUS K8V SE Deluxe motherboard 5-17 The advantage of a single disk alone, thus improving data access and storage.

K8V SE Deluxe User's Manual
Page 129
... your Security array has been created. 10. Follow these steps to continue. ASUS K8V SE Deluxe motherboard 5-23 During the boot-up an array, but they are useful for reconfiguring an array. Power off the system and replace the hard disk with RAID driver" for details. 5.6.5 Other FastBuild Utility Commands Command options 3-6 on the FastBuild...
... your Security array has been created. 10. Follow these steps to continue. ASUS K8V SE Deluxe motherboard 5-23 During the boot-up an array, but they are useful for reconfiguring an array. Power off the system and replace the hard disk with RAID driver" for details. 5.6.5 Other FastBuild Utility Commands Command options 3-6 on the FastBuild...

K8V SE Deluxe User's Manual
Page 139
... Panel is set your Power Option Properties depending on your operating system. The following dialog box appears. 5. Click OK to install the Cool 'n' Quiet!™ driver and application when using Windows® 2000/XP operating system: 1. See section "4.4 Advanced Menu" in the user guide. 4. Click the Power... button. Save your computer... by pressing the key during the Power On Self-Tests (POST). 2. In the Power menu, select the item ACPI 2.0 Support and set it to Enabled. ASUS K8V SE Deluxe motherboard 5-33
... Panel is set your Power Option Properties depending on your operating system. The following dialog box appears. 5. Click OK to install the Cool 'n' Quiet!™ driver and application when using Windows® 2000/XP operating system: 1. See section "4.4 Advanced Menu" in the user guide. 4. Click the Power... button. Save your computer... by pressing the key during the Power On Self-Tests (POST). 2. In the Power menu, select the item ACPI 2.0 Support and set it to Enabled. ASUS K8V SE Deluxe motherboard 5-33


