
K8V SE Deluxe User's Manual
Page 37
..., configure the card by adjusting the software settings. 1. ASUS K8V SE Deluxe motherboard 2-15 Secure the card to the card. Turn on BIOS setup. 2. Failure to do so may need to install expansion cards. Install the software drivers for information on the system and change the necessary BIOS settings... on the slot. 5. Refer to unplug the power cord before adding or removing expansion cards. Remove the system unit cover (if your motherboard is completely seated on the next page. 3. Keep the screw for the card. 2. Remove the bracket opposite the slot that you physical...
..., configure the card by adjusting the software settings. 1. ASUS K8V SE Deluxe motherboard 2-15 Secure the card to the card. Turn on BIOS setup. 2. Failure to do so may need to install expansion cards. Install the software drivers for information on the system and change the necessary BIOS settings... on the slot. 5. Refer to unplug the power cord before adding or removing expansion cards. Remove the system unit cover (if your motherboard is completely seated on the next page. 3. Keep the screw for the card. 2. Remove the bracket opposite the slot that you physical...

K8V SE Deluxe User's Manual
Page 50
Doing so will damage the motherboard! 2-28 Chapter 2: Hardware information USB+5V USB_P6USB_P6+ GND NC USB+5V USB_P8USB_P8+ GND NC K8V ® USB78 1 K8V SE Deluxe USB 2.0 Header USB56 1 USB+5V USB_P5USB_P5+ GND USB+5V USB_P7USB_P7+ GND NEVER connect a 1394 cable to 480 ...Mbps connection speed. This speed advantage over the conventional 12 Mbps on the rear panel are inadequate, a USB header is available for additional USB ports. You must install the driver...
Doing so will damage the motherboard! 2-28 Chapter 2: Hardware information USB+5V USB_P6USB_P6+ GND NC USB+5V USB_P8USB_P8+ GND NC K8V ® USB78 1 K8V SE Deluxe USB 2.0 Header USB56 1 USB+5V USB_P5USB_P5+ GND USB+5V USB_P7USB_P7+ GND NEVER connect a 1394 cable to 480 ...Mbps connection speed. This speed advantage over the conventional 12 Mbps on the rear panel are inadequate, a USB header is available for additional USB ports. You must install the driver...
K8V SE Deluxe User's Manual
Page 73
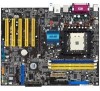
... Internet Service Provider (ISP). The ASUS Update utility is a utility that comes with the motherboard package. ASUS K8V SE Deluxe motherboard 4-7 To update the BIOS using ASUS Update: 1. DO NOT shut down or reset the system while updating the BIOS! Select your system. This utility is complete, reboot the system. The Drivers menu appears. 2. Launch the utility...
... Internet Service Provider (ISP). The ASUS Update utility is a utility that comes with the motherboard package. ASUS K8V SE Deluxe motherboard 4-7 To update the BIOS using ASUS Update: 1. DO NOT shut down or reset the system while updating the BIOS! Select your system. This utility is complete, reboot the system. The Drivers menu appears. 2. Launch the utility...

K8V SE Deluxe User's Manual
Page 106
Chapter summary 5.1 Install an operating system 5-1 5.2 Support CD information 5-1 5.3 Software Information 5-7 5.4 AI Net feature 5-12 5.5 Multi-audio feature 5-13 5.6 Promise® RAID configurations 5-17 5.7 VIA RAID configurations 5-25 5.8 Creating a RAID driver disk 5-32 5.9 Cool 'n' Quiet!™ Technology 5-33 ASUS K8V SE Deluxe motherboard
Chapter summary 5.1 Install an operating system 5-1 5.2 Support CD information 5-1 5.3 Software Information 5-7 5.4 AI Net feature 5-12 5.5 Multi-audio feature 5-13 5.6 Promise® RAID configurations 5-17 5.7 VIA RAID configurations 5-25 5.8 Creating a RAID driver disk 5-32 5.9 Cool 'n' Quiet!™ Technology 5-33 ASUS K8V SE Deluxe motherboard

K8V SE Deluxe User's Manual
Page 107
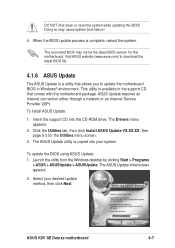
... CD into your CD-ROM drive. The CD automatically displays the Drivers menu if Autorun is NOT enabled in your computer, browse the contents of the support CD to locate the file ASSETUP.EXE from the BIN folder. ASUS K8V SE Deluxe motherboard 5-1 Click an item to install Click an icon to change at...
... CD into your CD-ROM drive. The CD automatically displays the Drivers menu if Autorun is NOT enabled in your computer, browse the contents of the support CD to locate the file ASSETUP.EXE from the BIN folder. ASUS K8V SE Deluxe motherboard 5-1 Click an item to install Click an icon to change at...
K8V SE Deluxe User's Manual
Page 109
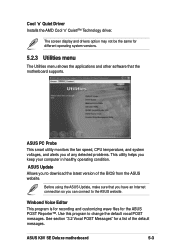
... change the default vocal POST messages. ASUS K8V SE Deluxe motherboard 5-3 Cool 'n' Quiet Driver Installs the AMD Cool 'n' Quiet!™ Technology driver. Winbond Voice Editor This program is for recording and customizing wave files for the ASUS POST Reporter™. Before using the ASUS Update, make sure that the motherboard supports. ASUS PC Probe This smart utility monitors the...
... change the default vocal POST messages. ASUS K8V SE Deluxe motherboard 5-3 Cool 'n' Quiet Driver Installs the AMD Cool 'n' Quiet!™ Technology driver. Winbond Voice Editor This program is for recording and customizing wave files for the ASUS POST Reporter™. Before using the ASUS Update, make sure that the motherboard supports. ASUS PC Probe This smart utility monitors the...

K8V SE Deluxe User's Manual
Page 119
...® AC '97 audio CODEC provides 6-channel audio capability. Select the option Surround Sound Speakers (5.1 Surround). 5. Install the SoundMAX Audio Driver and Application from the support CD that came with the motherboard package to display the Test Listening Environment window. 7. Use 4-channel or 6-channel speakers for this setup. Setting to multi-channel...). Choose your desired setting. The Listening Environment screen allows you can adjust the audio settings to display the SoundMAX Control Panel. Click the Apply button. 6. ASUS K8V SE Deluxe motherboard 5-13
...® AC '97 audio CODEC provides 6-channel audio capability. Select the option Surround Sound Speakers (5.1 Surround). 5. Install the SoundMAX Audio Driver and Application from the support CD that came with the motherboard package to display the Test Listening Environment window. 7. Use 4-channel or 6-channel speakers for this setup. Setting to multi-channel...). Choose your desired setting. The Listening Environment screen allows you can adjust the audio settings to display the SoundMAX Control Panel. Click the Apply button. 6. ASUS K8V SE Deluxe motherboard 5-13

K8V SE Deluxe User's Manual
Page 123
...the PRI_RAID interface, you use either Windows® XP or Windows® 2000 operating system (OS), copy first the Promise FastTrak 378 Driver from one drive fails, the disk array management software directs all applications to the surviving drive as a single drive but with the ...storage. Using two Serial ATA hard disks on SATA_RAID1/SATA_RAID2 interfaces, and two UltraDMA133 hard disks on RAID configurations under different operating systems. ASUS K8V SE Deluxe motherboard 5-17 Two hard disks perform the same work as it contains a complete copy of RAID 0 + 1 is data striping and ...
...the PRI_RAID interface, you use either Windows® XP or Windows® 2000 operating system (OS), copy first the Promise FastTrak 378 Driver from one drive fails, the disk array management software directs all applications to the surviving drive as a single drive but with the ...storage. Using two Serial ATA hard disks on SATA_RAID1/SATA_RAID2 interfaces, and two UltraDMA133 hard disks on RAID configurations under different operating systems. ASUS K8V SE Deluxe motherboard 5-17 Two hard disks perform the same work as it contains a complete copy of RAID 0 + 1 is data striping and ...

K8V SE Deluxe User's Manual
Page 129
... prompts you to enter the FastBuild™ Main Menu. 3. Press to install third-party SCSI or RAID driver. Press to reboot the system. 11. ASUS K8V SE Deluxe motherboard 5-23 Press any key to Rebuild Array. Delete Array (4): This command deletes an array to select malfunctioning ...complete, the utility prompts that your Security array has been created. 10. Power off the system and replace the hard disk with RAID driver" for details. 5.6.5 Other FastBuild Utility Commands Command options 3-6 on the FastBuild™ Utility main menu are not required for reconfiguring an...
... prompts you to enter the FastBuild™ Main Menu. 3. Press to install third-party SCSI or RAID driver. Press to reboot the system. 11. ASUS K8V SE Deluxe motherboard 5-23 Press any key to Rebuild Array. Delete Array (4): This command deletes an array to select malfunctioning ...complete, the utility prompts that your Security array has been created. 10. Power off the system and replace the hard disk with RAID driver" for details. 5.6.5 Other FastBuild Utility Commands Command options 3-6 on the FastBuild™ Utility main menu are not required for reconfiguring an...

K8V SE Deluxe User's Manual
Page 139
...® 2000/XP operating system, click the Start button. Double-click the Display icon in the Control Panel then select the Screen Saver tab. 4. ASUS K8V SE Deluxe motherboard 5-33 Reboot your operating system. button. If you are using this feature. Click the Power... In the Power menu, select the item ACPI 2.0 ... To enable Cool 'n' Quiet!™ Technology: 1. From the Power schemes combo list box, select Minimal Power Management. 6. Click OK to install the Cool 'n' Quiet!™ driver and application when using Windows® 2000/XP operating system: 1.
...® 2000/XP operating system, click the Start button. Double-click the Display icon in the Control Panel then select the Screen Saver tab. 4. ASUS K8V SE Deluxe motherboard 5-33 Reboot your operating system. button. If you are using this feature. Click the Power... In the Power menu, select the item ACPI 2.0 ... To enable Cool 'n' Quiet!™ Technology: 1. From the Power schemes combo list box, select Minimal Power Management. 6. Click OK to install the Cool 'n' Quiet!™ driver and application when using Windows® 2000/XP operating system: 1.


