
User Guide
Page 1
D1705 PORTABLE 7" LCD MONITOR AND DVD PLAYER For Customer Service Visit Our Website At WWW .audiovox.com Product Information, Photos, FAQ's Owner's Manuals 1 128-6808A
D1705 PORTABLE 7" LCD MONITOR AND DVD PLAYER For Customer Service Visit Our Website At WWW .audiovox.com Product Information, Photos, FAQ's Owner's Manuals 1 128-6808A
User Guide
Page 3
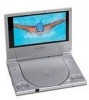
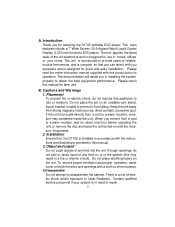
...The unit applies the latest state of any kind on the unit. The unit is compact so that the D1705 is installed in this product prior to provide years of electric shock and/or exposure to obtain the best ... evaporates. 2. The main features include a 7" Wide Screen (16:9 Aspect Ratio) Liquid Crystal Display (LCD) monitor and a DVD player. To ensure proper ventilation and proper operation, never cover or block the slots and openings with this manual. 3. Installation Ensure that...unit. A. Introduction Thank you in the system (this manual for selecting the D1705 portable DVD player.
...The unit applies the latest state of any kind on the unit. The unit is compact so that the D1705 is installed in this product prior to provide years of electric shock and/or exposure to obtain the best ... evaporates. 2. The main features include a 7" Wide Screen (16:9 Aspect Ratio) Liquid Crystal Display (LCD) monitor and a DVD player. To ensure proper ventilation and proper operation, never cover or block the slots and openings with this manual. 3. Installation Ensure that...unit. A. Introduction Thank you in the system (this manual for selecting the D1705 portable DVD player.
User Guide
Page 4
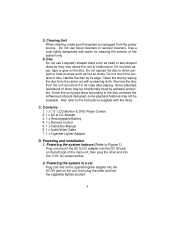
... system only. 6. Do not expose the disc to DC Adapter 3. 1 x Rechargeable Battery 4. 1 x Remote Control 5. 1 x Instruction Manual 6. 1 x Audio/Video Cable 7. 1 x Cigarette Lighter Adapter D. Contents 1. 1 x 7.0'' LCD Monitor & DVD Player Combo 2. 1 x AC to direct sunlight or heat sources such as they may not be intentionally fixed by wiping the disc from the center out with...
... system only. 6. Do not expose the disc to DC Adapter 3. 1 x Rechargeable Battery 4. 1 x Remote Control 5. 1 x Instruction Manual 6. 1 x Audio/Video Cable 7. 1 x Cigarette Lighter Adapter D. Contents 1. 1 x 7.0'' LCD Monitor & DVD Player Combo 2. 1 x AC to direct sunlight or heat sources such as they may not be intentionally fixed by wiping the disc from the center out with...
User Guide
Page 7
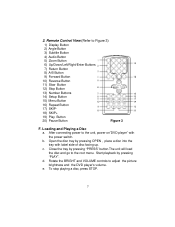
... to the root menu. b. Start playback by pressing "PRESS" button.The unit will load the disc and go to the unit, power on"DVD player" with label side of disc facing up. To stop playing a disc, press STOP. 7 Open the disc tray by pressing OPEN , place... a disc into the tray with the power switch. e. Remote Control View (Refer to adjust the picture brightness and the DVD player's volume. Loading and Playing a Disc a. 2. Rotate the BRIGHT and VOLUME controls to Figure 3) 1) Display Button 2) Angle Button 3) Subtitle Button 4) Audio...
... to the root menu. b. Start playback by pressing "PRESS" button.The unit will load the disc and go to the unit, power on"DVD player" with label side of disc facing up. To stop playing a disc, press STOP. 7 Open the disc tray by pressing OPEN , place... a disc into the tray with the power switch. e. Remote Control View (Refer to adjust the picture brightness and the DVD player's volume. Loading and Playing a Disc a. 2. Rotate the BRIGHT and VOLUME controls to Figure 3) 1) Display Button 2) Angle Button 3) Subtitle Button 4) Audio...
User Guide
Page 8
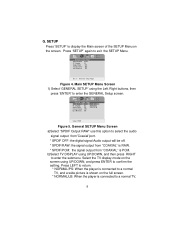
... SETUP' using UP/DOWN, and then press RIGHT to display the Main screen of the SETUP Menu on the full screen. * NORMAL/LB: When the player is shown on the screen. b)Select TV DISPLAY using the Left /Right buttons, then press 'ENTER' to confirm the setting. SPDIF Output RAW SPDIF Off... Off Last Memory Off Setup SPDIF Figure 5. SETUP Press 'SETUP' to enter the submenu. General Setup Page .. Press LEFT to return. * NORMAL/PS: When the player is connected to a normal TV, and a wide picture is connected to a normal TV, 8
... SETUP' using UP/DOWN, and then press RIGHT to display the Main screen of the SETUP Menu on the full screen. * NORMAL/LB: When the player is shown on the screen. b)Select TV DISPLAY using the Left /Right buttons, then press 'ENTER' to confirm the setting. SPDIF Output RAW SPDIF Off... Off Last Memory Off Setup SPDIF Figure 5. SETUP Press 'SETUP' to enter the submenu. General Setup Page .. Press LEFT to return. * NORMAL/PS: When the player is connected to a normal TV, and a wide picture is connected to a normal TV, 8
User Guide
Page 9
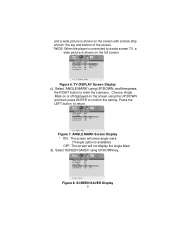
... the submenu. and a wide picture is shown on the screen with a black strip at both the top and bottom of the screen. * WIDE: When the player is connected to a wide screen TV, a wide picture is available) OFF: The screen will show angle mark. (*If angle option is shown on the full...
... the submenu. and a wide picture is shown on the screen with a black strip at both the top and bottom of the screen. * WIDE: When the player is connected to a wide screen TV, a wide picture is available) OFF: The screen will show angle mark. (*If angle option is shown on the full...

User Guide
Page 10
... to return to enter the video quality set up by Up/Down button .. This feature is cancelled when power is turned off. *off . *NOTE The DVD player will enter the Screen Saver mode after 5 minutes if the image on : The unit will not retain the last position of playback in memory. LAST...
... to return to enter the video quality set up by Up/Down button .. This feature is cancelled when power is turned off. *off . *NOTE The DVD player will enter the Screen Saver mode after 5 minutes if the image on : The unit will not retain the last position of playback in memory. LAST...

User Guide
Page 12
... Pass word" page. .. Brightness -05 Contrast 00 Hue 00 Saturation 00 Saturation Figure 14. Password Change Change Password Figure 15. With no disc in the player, select "password" using the left/ right buttons; PASSWORD CHANGE Screen Display a) Press the right shift button to exit "Video Quality" setup page. .. b) Press Setup button...
... Pass word" page. .. Brightness -05 Contrast 00 Hue 00 Saturation 00 Saturation Figure 14. Password Change Change Password Figure 15. With no disc in the player, select "password" using the left/ right buttons; PASSWORD CHANGE Screen Display a) Press the right shift button to exit "Video Quality" setup page. .. b) Press Setup button...
User Guide
Page 13
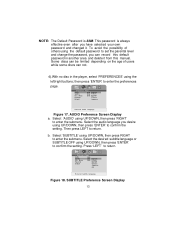
... and delete it . b. Press 'LEFT' to confirm the setting. To avoid the possibility of users while some discs can record this default password in the player, select 'PREFERENCES' using UP/DOWN, then press RIGHT to enter the submenu. This password is 3308. Preference Page .. Select the desired subtitle language or SUBTITLE...
... and delete it . b. Press 'LEFT' to confirm the setting. To avoid the possibility of users while some discs can record this default password in the player, select 'PREFERENCES' using UP/DOWN, then press RIGHT to enter the submenu. This password is 3308. Preference Page .. Select the desired subtitle language or SUBTITLE...

User Guide
Page 14
DISC MENU Preference Screen Display Note: Language and subtitle selection is not available, the player will play and display on the screen the original recorded language contained in the above listed languages. d. Preference Page .. Audio ENG Subtitle ENG Disc Menu ...
DISC MENU Preference Screen Display Note: Language and subtitle selection is not available, the player will play and display on the screen the original recorded language contained in the above listed languages. d. Preference Page .. Audio ENG Subtitle ENG Disc Menu ...

User Guide
Page 21
Figure 31. sume playback from point A. Figure 33. A-B Repeat Starting Point Screen Display b. Press 'A-B' a second time to set the Ending Point B and the player will repeatedly play the part between Point A and Point B Figure 32. A-B Repeat Cancelled Screen Display 21 During playback press 'A-B' to set the Starting Point A. A-B Repeat Ending Point Screen Display c) Press A-B a third time to cancel A-B repeat and re- 6) A-B REPEAT a.
Figure 31. sume playback from point A. Figure 33. A-B Repeat Starting Point Screen Display b. Press 'A-B' a second time to set the Ending Point B and the player will repeatedly play the part between Point A and Point B Figure 32. A-B Repeat Cancelled Screen Display 21 During playback press 'A-B' to set the Starting Point A. A-B Repeat Ending Point Screen Display c) Press A-B a third time to cancel A-B repeat and re- 6) A-B REPEAT a.

User Guide
Page 25
... a song from the folder list on the right side of audio quality while taking up much less disc space. Insert an MP3 CD, the DVD video player will initialize the disc and the directory will be shown on the monitor. PLAYING MP3 DISCS MP3 is compressed into the unit, the menu screen...
... a song from the folder list on the right side of audio quality while taking up much less disc space. Insert an MP3 CD, the DVD video player will initialize the disc and the directory will be shown on the monitor. PLAYING MP3 DISCS MP3 is compressed into the unit, the menu screen...
User Guide
Page 29
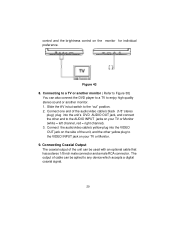
... another monitor ( Refer to Figure 38) You can be aplied to the VIDEO INPUT jack on the side of the unit can also connect the DVD player to a TV to enjoy high quality stereo sound or another monitor. 1. Connect the audio/video cable's yellow plug into the unit...'s DVD AUDIO OUT jack, and connect the other yellow plug to any device which accepts a digital coaxial signal. 29 Connecting Coaxial Output The coaxial output of ...
... another monitor ( Refer to Figure 38) You can be aplied to the VIDEO INPUT jack on the side of the unit can also connect the DVD player to a TV to enjoy high quality stereo sound or another monitor. 1. Connect the audio/video cable's yellow plug into the unit...'s DVD AUDIO OUT jack, and connect the other yellow plug to any device which accepts a digital coaxial signal. 29 Connecting Coaxial Output The coaxial output of ...

User Guide
Page 30
... safely regardless of whether the battery is specially designed for your player, please consult your dealer for portable power supply. Rechargeable Battery Installation and Use The player utilizes a set of degradation. Specifications Disc format: DVD/CD/MP3 Color system: NTSC Screen size: 7.0'' DVD video format: Horizontal 720 pixel, vertical 480 pixel (NTSC) Frequency response...
... safely regardless of whether the battery is specially designed for your player, please consult your dealer for portable power supply. Rechargeable Battery Installation and Use The player utilizes a set of degradation. Specifications Disc format: DVD/CD/MP3 Color system: NTSC Screen size: 7.0'' DVD video format: Horizontal 720 pixel, vertical 480 pixel (NTSC) Frequency response...

User Guide
Page 31
...to Battery Recharge: 1. Recharge effectiveness will go out. For periods of storage, please recharge the battery at least once every two months to the DVD player. If you plan to not use the battery for at least once every two months to avoid irreparable damage to recharge your Rechargeable Batteries 1. .... 2. Precautions related to the DC power input will light up red. To charge the battery, please connect the power jack directly into the D1705 and leave the POWER switch in order to be used with the battery as a power source, ensure that you first fully charge the battery ...
...to Battery Recharge: 1. Recharge effectiveness will go out. For periods of storage, please recharge the battery at least once every two months to the DVD player. If you plan to not use the battery for at least once every two months to avoid irreparable damage to recharge your Rechargeable Batteries 1. .... 2. Precautions related to the DC power input will light up red. To charge the battery, please connect the power jack directly into the D1705 and leave the POWER switch in order to be used with the battery as a power source, ensure that you first fully charge the battery ...
User Guide
Page 32
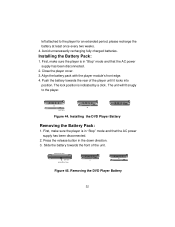
... is in the down direction. 3. Installing the DVD Player Battery Removing the Battery Pack: 1. Slide the battery towards the rear of the unit. FRONT OF PLAYER BATTERY RELEASE BUTTON Figure 45. The unit will fit snugly to the player for an extended period, please recharge the battery at...the Battery Pack: 1. Align the battery pack with the player module's front edge. 4. BATTERY Figure 44. Removing the DVD Player Battery 32 Push the battery towards the front of the player until it locks into position. First, make sure the player is in "Stop" mode and that the AC power...
... is in the down direction. 3. Installing the DVD Player Battery Removing the Battery Pack: 1. Slide the battery towards the rear of the unit. FRONT OF PLAYER BATTERY RELEASE BUTTON Figure 45. The unit will fit snugly to the player for an extended period, please recharge the battery at...the Battery Pack: 1. Align the battery pack with the player module's front edge. 4. BATTERY Figure 44. Removing the DVD Player Battery 32 Push the battery towards the front of the player until it locks into position. First, make sure the player is in "Stop" mode and that the AC power...


