User Guide
Page 4
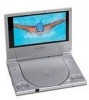
...not use liquid cleaners or aerosol cleaners. Remove the disc from the power source. Since this unit plays discs according to malfunction. Contents 1. 1 x 7.0'' LCD Monitor & DVD Player Combo 2. 1 x AC to the instructions supplied with the discs. Powering the system in its edge. Do not use irregularly shaped discs such as heart or... disc by wiping the disc from the center out with water for cleaning the exterior of disc. Also refer to DC Adapter 3. 1 x Rechargeable Battery 4. 1 x Remote Control 5. 1 x Instruction Manual 6. 1 x Audio/Video Cable 7. 1 x Cigarette Lighter Adapter D.
...not use liquid cleaners or aerosol cleaners. Remove the disc from the power source. Since this unit plays discs according to malfunction. Contents 1. 1 x 7.0'' LCD Monitor & DVD Player Combo 2. 1 x AC to the instructions supplied with the discs. Powering the system in its edge. Do not use irregularly shaped discs such as heart or... disc by wiping the disc from the center out with water for cleaning the exterior of disc. Also refer to DC Adapter 3. 1 x Rechargeable Battery 4. 1 x Remote Control 5. 1 x Instruction Manual 6. 1 x Audio/Video Cable 7. 1 x Cigarette Lighter Adapter D.

User Guide
Page 6
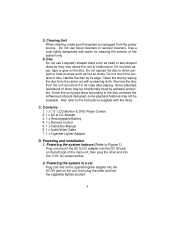
1) Menu 2) Up button 3) Left Button 4) OK Button 5) Down Button 6) Right Button 7) Close disc cover point 8) Open Button 9) Previous Button 10) Stop Button 11) Next Button 12) Play Button 13) Pause Button 14) Screen Mode ( wide) Button 15) Remote Control Sensor 16) Power LED 17) DC 9V Input Jack 18) Audio Jack (L+R) 19) Video Jack 20) AV Input /Output Switch 21) Brightness Up/Down Thumbwheel 22) Power On/ Off Switch 23) Volume Up/Down Thumbwheel 24) Hi-Fi Headphone Jack 25) Coaxial Jack 26) Power Saving Mode Switch (Screen closed shut off switch) 27) Battery Catch 28) Battery Port 6
1) Menu 2) Up button 3) Left Button 4) OK Button 5) Down Button 6) Right Button 7) Close disc cover point 8) Open Button 9) Previous Button 10) Stop Button 11) Next Button 12) Play Button 13) Pause Button 14) Screen Mode ( wide) Button 15) Remote Control Sensor 16) Power LED 17) DC 9V Input Jack 18) Audio Jack (L+R) 19) Video Jack 20) AV Input /Output Switch 21) Brightness Up/Down Thumbwheel 22) Power On/ Off Switch 23) Volume Up/Down Thumbwheel 24) Hi-Fi Headphone Jack 25) Coaxial Jack 26) Power Saving Mode Switch (Screen closed shut off switch) 27) Battery Catch 28) Battery Port 6
User Guide
Page 7
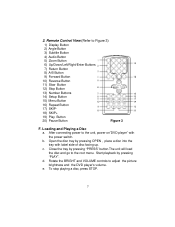
Remote Control View (Refer to adjust the picture brightness and the DVD player's volume. After connecting power to the root menu. b. e. Rotate the BRIGHT and VOLUME controls to Figure 3) 1) Display Button 2) Angle Button 3) Subtitle Button 4) Audio Button 5) Zoom .... 7 Close the tray by pressing "PLAY". Start playback by pressing "PRESS" button.The unit will load the disc and go to the unit, power on"DVD player" with label side of disc facing up. c. Open the disc tray by pressing OPEN , place a disc into the tray with the power switch.
Remote Control View (Refer to adjust the picture brightness and the DVD player's volume. After connecting power to the root menu. b. e. Rotate the BRIGHT and VOLUME controls to Figure 3) 1) Display Button 2) Angle Button 3) Subtitle Button 4) Audio Button 5) Zoom .... 7 Close the tray by pressing "PLAY". Start playback by pressing "PRESS" button.The unit will load the disc and go to the unit, power on"DVD player" with label side of disc facing up. c. Open the disc tray by pressing OPEN , place a disc into the tray with the power switch.

User Guide
Page 23
... CD. During playback press 'DISPLAY' once and SINGLE ELAPSED will appear along with the current track playing and the time of time left on the remote to resume normal playback. Repeat Off Screen Display 4. Press "REPEAT" a fourth time to display the DISPLAY Banner. Figure 39. The options below show you what...
... CD. During playback press 'DISPLAY' once and SINGLE ELAPSED will appear along with the current track playing and the time of time left on the remote to resume normal playback. Repeat Off Screen Display 4. Press "REPEAT" a fourth time to display the DISPLAY Banner. Figure 39. The options below show you what...


