
Owners Manual
Page 1
D1708 PORTABLE 7" LCD MONITOR AND DVD PLAYER 128-6895
D1708 PORTABLE 7" LCD MONITOR AND DVD PLAYER 128-6895
Owners Manual
Page 2
... spray liquid of reliable, trouble-free service, and is compact so that the 7" portable DVD player is designed for choosing the 7" portable DVD player. The main features include a 7" Wide Screen (16:9 Aspect Ratio) Liquid Crystal Display (LCD) monitor and a DVD player. The unit is constructed to using. Caution Do not push objects of the art electronics...
... spray liquid of reliable, trouble-free service, and is compact so that the 7" portable DVD player is designed for choosing the 7" portable DVD player. The main features include a 7" Wide Screen (16:9 Aspect Ratio) Liquid Crystal Display (LCD) monitor and a DVD player. The unit is constructed to using. Caution Do not push objects of the art electronics...

Owners Manual
Page 4
... a car (refer to Figure 1) Plug one end of the main unit, then plug the other end into the 120V AC power outlet. 2. Contents 1. 1 x 7'' LCD Monitor & DVD Player Combo 2. 1 x AC to DC adapter into the DC 9V jack on the unit, then plug the other end into the cigarette lighter socket. Powering and...
... a car (refer to Figure 1) Plug one end of the main unit, then plug the other end into the 120V AC power outlet. 2. Contents 1. 1 x 7'' LCD Monitor & DVD Player Combo 2. 1 x AC to DC adapter into the DC 9V jack on the unit, then plug the other end into the cigarette lighter socket. Powering and...

Owners Manual
Page 6
... unit will light. d. e. 2. To stop playing a disc, press STOP. 6 After connecting power to the unit, power on"DVD player" with the label side facing up. Remote Control View (Refer to adjust the LCD's brightness and the DVD player's volume. b. c. Loading and Playing a Disc a. Rotate BRIGHTNESS and VOLUME to Figure 3) 1) Display Button 2) Angle Button 3) Subtitle...
... unit will light. d. e. 2. To stop playing a disc, press STOP. 6 After connecting power to the unit, power on"DVD player" with the label side facing up. Remote Control View (Refer to adjust the LCD's brightness and the DVD player's volume. b. c. Loading and Playing a Disc a. Rotate BRIGHTNESS and VOLUME to Figure 3) 1) Display Button 2) Angle Button 3) Subtitle...

Owners Manual
Page 9
... Setup"by UP/DOWN button Figure 9. LAST MEMORY Screen Display *on: The unit will return to the last position on the disc. *off ) *NOTE: The DVD player will not return to enter the video quality set up page. d). c). Select 'SCREEN SAVER' using the LEFT/RIGHT buttons, press "enter" to the last position...
... Setup"by UP/DOWN button Figure 9. LAST MEMORY Screen Display *on: The unit will return to the last position on the disc. *off ) *NOTE: The DVD player will not return to enter the video quality set up page. d). c). Select 'SCREEN SAVER' using the LEFT/RIGHT buttons, press "enter" to the last position...
Owners Manual
Page 24
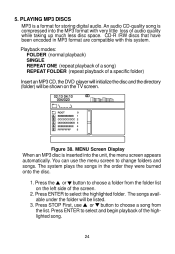
... inserted into the MP3 format with this system. Figure 38. Press ENTER to select and begin playback of a specific folder) Insert an MP3 CD, the DVD player will initialize the disc and the directory (folder) will be shown on the left side of audio quality while taking up much less disc space...
... inserted into the MP3 format with this system. Figure 38. Press ENTER to select and begin playback of a specific folder) Insert an MP3 CD, the DVD player will initialize the disc and the directory (folder) will be shown on the left side of audio quality while taking up much less disc space...

Owners Manual
Page 28
... back of the unit, and the other end to the AUDIO INPUT jacks on another monitor ( Refer to Figure 39) You can also connect the DVD player to a TV to a TV or another monitor. 1. Connecting to enjoy high quality stereo sound and picture on your TV or Monitor. Connect the audio/video... cable's yellow plug into the unit's DVD AUDIO OUT jack, and connect the other yellow plug to the VIDEO INPUT jack on your TV or Monitor (white = left channel, red = right channel...
... back of the unit, and the other end to the AUDIO INPUT jacks on another monitor ( Refer to Figure 39) You can also connect the DVD player to a TV to a TV or another monitor. 1. Connecting to enjoy high quality stereo sound and picture on your TV or Monitor. Connect the audio/video... cable's yellow plug into the unit's DVD AUDIO OUT jack, and connect the other yellow plug to the VIDEO INPUT jack on your TV or Monitor (white = left channel, red = right channel...

Owners Manual
Page 29
...-MH batteries do not have "Memory Effect" and thus can be recharged safely regardless of degradation. Rechargeable Battery Installation and Use The player utilizes a set of long-life Ni-Mh batteries for an extended period of storage, please recharge the battery at least eight hours prior ...to connecting it away properly. Please fully charge the battery prior to the DVD player. NOTE: When the DVD player is fully or only partially discharged. For longer periods of time (one week or longer), we recommend that the battery has ...
...-MH batteries do not have "Memory Effect" and thus can be recharged safely regardless of degradation. Rechargeable Battery Installation and Use The player utilizes a set of long-life Ni-Mh batteries for an extended period of storage, please recharge the battery at least eight hours prior ...to connecting it away properly. Please fully charge the battery prior to the DVD player. NOTE: When the DVD player is fully or only partially discharged. For longer periods of time (one week or longer), we recommend that the battery has ...

Owners Manual
Page 30
...battery, please connect the power jack directly into the DVD player and leave the POWER switch in the off . battery in a humid or damp environment. Each full recharge takes approximately five-hours and one full charge can provide power to the player for a long period, please also recharge the battery... recharge the battery at least once two weeks. 30 During this point you always use battery or not) in an airtight container with the player to be used for approximately 3 hours. Once the battery is not to recharge your Rechargeable Batteries 1.Please make sure you may remove the ...
...battery, please connect the power jack directly into the DVD player and leave the POWER switch in the off . battery in a humid or damp environment. Each full recharge takes approximately five-hours and one full charge can provide power to the player for a long period, please also recharge the battery... recharge the battery at least once two weeks. 30 During this point you always use battery or not) in an airtight container with the player to be used for approximately 3 hours. Once the battery is not to recharge your Rechargeable Batteries 1.Please make sure you may remove the ...

Owners Manual
Page 31
... the unit. The lock position is in "Stop" mode and the AC power supply has been disconnected. 2. Installing the DVD Player Battery Removing the Battery Pack: 1. Figure 41. First, make sure the player is in "Stop" mode and that the AC power supply has been disconnected. 2. Push the battery plug into position. Figure...
... the unit. The lock position is in "Stop" mode and the AC power supply has been disconnected. 2. Installing the DVD Player Battery Removing the Battery Pack: 1. Figure 41. First, make sure the player is in "Stop" mode and that the AC power supply has been disconnected. 2. Push the battery plug into position. Figure...


