
Operation Manual
Page 1
FPE3707HR LCD TV Operating Manual Before connecting, operating or adjusting this manual for future reference. Please keep this product, please read the manual completely. FOR ASSISTANCE CALL 1-800-619-3848 OR VISIT US AT WWW.AUDIOVOX.COM. 128-8036
FPE3707HR LCD TV Operating Manual Before connecting, operating or adjusting this manual for future reference. Please keep this product, please read the manual completely. FOR ASSISTANCE CALL 1-800-619-3848 OR VISIT US AT WWW.AUDIOVOX.COM. 128-8036

Operation Manual
Page 3
... to counter interference. 1 For disposal or recycling information, please contact your local authorities or the Electronic Industries Alliance: www.eia.org FCC STATEMENT FCC Notice LCD TV: A CLASS B digital device This equipment has been tested and found to comply with the instruction manual, may cause radio interference in a commercial environment. The exclamation...
... to counter interference. 1 For disposal or recycling information, please contact your local authorities or the Electronic Industries Alliance: www.eia.org FCC STATEMENT FCC Notice LCD TV: A CLASS B digital device This equipment has been tested and found to comply with the instruction manual, may cause radio interference in a commercial environment. The exclamation...

Operation Manual
Page 4
... result in accidents. 2 This product has been engineered and manufactured with the manufacturer instructions. To ensure your safety and prolong the service life of your LCD TV product, please read and understood before cleaning. Do not use this causes condensation, which may result in fire, electric shock, or other hazards. Ventilation---Do...
... result in accidents. 2 This product has been engineered and manufactured with the manufacturer instructions. To ensure your safety and prolong the service life of your LCD TV product, please read and understood before cleaning. Do not use this causes condensation, which may result in fire, electric shock, or other hazards. Ventilation---Do...

Operation Manual
Page 5
... recommended by the manufacturer, or sold with the same characteristics and performance as the original parts. When the product has been exposed to move the TV unless the power cord has been disconnected. 14. For the same reason, do not spill water or liquid on a wall, be sure to install the...
... recommended by the manufacturer, or sold with the same characteristics and performance as the original parts. When the product has been exposed to move the TV unless the power cord has been disconnected. 14. For the same reason, do not spill water or liquid on a wall, be sure to install the...

Operation Manual
Page 7
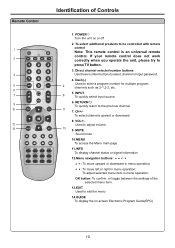
Setup Using the Remote Control
Setup Using the Remote Control

Operation Manual
Page 8
AC cord Connecting the AC plug to the wall outlet as illustrated. Power connection Setup Household power outlet Plug into AC outlet. Note:
AC cord Connecting the AC plug to the wall outlet as illustrated. Power connection Setup Household power outlet Plug into AC outlet. Note:

Operation Manual
Page 9
... CHANNEL SETUP menu and then perform auto channel search.(See section) VHF antenna UHF antenna RS-232 TV Side Mixer 75 Ohm coaxial cable 75 Ohm coaxial cable Connect to Cable TV System Notes: ! Your local television service centre or dealer may require the correct connection cable and... external antenna is required. For best reception, an outdoor antenna is used, you enjoy the terrestrial TV programs only, connect the antenna to the CABLE input on the TV rear. ! Select the TV Source (AIR or CABLE) in obtaining the correct antenna system for your particular area and the accessories...
... CHANNEL SETUP menu and then perform auto channel search.(See section) VHF antenna UHF antenna RS-232 TV Side Mixer 75 Ohm coaxial cable 75 Ohm coaxial cable Connect to Cable TV System Notes: ! Your local television service centre or dealer may require the correct connection cable and... external antenna is required. For best reception, an outdoor antenna is used, you enjoy the terrestrial TV programs only, connect the antenna to the CABLE input on the TV rear. ! Select the TV Source (AIR or CABLE) in obtaining the correct antenna system for your particular area and the accessories...

Operation Manual
Page 11
...-equipped device to this interface. 11.AIR antenna input Connect to outdoor antenna. 12.CABLE input Connect to a cable TV system. 9 USB port For software update only. The user should not use this TV.) 2. HDMI 2 HDMI 1 DVI 2 IN DVI 1 IN AUDIO AUDIO S-VIDEO L R for software update only RS-232 Identification of a DVD...
...-equipped device to this interface. 11.AIR antenna input Connect to outdoor antenna. 12.CABLE input Connect to a cable TV system. 9 USB port For software update only. The user should not use this TV.) 2. HDMI 2 HDMI 1 DVI 2 IN DVI 1 IN AUDIO AUDIO S-VIDEO L R for software update only RS-232 Identification of a DVD...
Operation Manual
Page 12
... program 5 4 channels such as 2-1,2-2, etc. 6 5. To adjust selected menu item in menu operation; CH+/- Direct channel selector/number buttons 3 Use these number buttons to press TV button. 3. If your remote control does not work 2 correctly when you operate the unit, please try to select channel or input password. 4. To select channels...
... program 5 4 channels such as 2-1,2-2, etc. 6 5. To adjust selected menu item in menu operation; CH+/- Direct channel selector/number buttons 3 Use these number buttons to press TV button. 3. If your remote control does not work 2 correctly when you operate the unit, please try to select channel or input password. 4. To select channels...

Operation Manual
Page 13
... mode 24. ZOOM To select screen aspect ratio 16. CCD To select closed caption mode 17.MTS/SAP To select STEREO, SAP or MONO (Analog TV mode) To select audio track (DTV mode) 18.SLEEP To set Sleep timer 19.LIST To display program list 20.PICTURE To select the picture...
... mode 24. ZOOM To select screen aspect ratio 16. CCD To select closed caption mode 17.MTS/SAP To select STEREO, SAP or MONO (Analog TV mode) To select audio track (DTV mode) 18.SLEEP To set Sleep timer 19.LIST To display program list 20.PICTURE To select the picture...

Operation Manual
Page 14
... are often color-coded to connect: Connect the Audio/Video cables between the Audio (L/R)/Video jacks on the TV rear. Note: The S/PDIF OUT terminal only can use the S-VIDEO terminal if your TV, press INPUT button on your source supports it. Use one or the other. Refer to confirm. 2....different depending on your model. Connect an Audio Processor or Hi-Fi (Digital Audio) For a full Home Theater sound experience, you can output digital TV program's audio. Turn on the remote control to display INPUT SELECT menu, use5/6to select AV1/SVideo and then press OK to the user manual...
... are often color-coded to connect: Connect the Audio/Video cables between the Audio (L/R)/Video jacks on the TV rear. Note: The S/PDIF OUT terminal only can use the S-VIDEO terminal if your TV, press INPUT button on your source supports it. Use one or the other. Refer to confirm. 2....different depending on your model. Connect an Audio Processor or Hi-Fi (Digital Audio) For a full Home Theater sound experience, you can output digital TV program's audio. Turn on the remote control to display INPUT SELECT menu, use5/6to select AV1/SVideo and then press OK to the user manual...

Operation Manual
Page 15
... may be different and is dependant on your camcorder and set it to output mode. (For details, refer to confirm operation. 13 Turn on your TV, press INPUT button on the remote control to display INPUT SELECT menu, use 5/6to select AV2 and then press OK to connect: Connect the Audio...
... may be different and is dependant on your camcorder and set it to output mode. (For details, refer to confirm operation. 13 Turn on your TV, press INPUT button on the remote control to display INPUT SELECT menu, use 5/6to select AV2 and then press OK to connect: Connect the Audio...
Operation Manual
Page 16
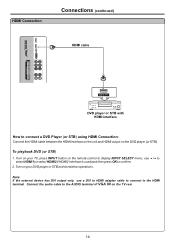
... select HDMI1(or select HDMI2 if HDMI2 interface is used)and then press OK to the AUDIO terminal of VGA IN on the TV rear. 14 Turn on your TV, press INPUT button on the remote control to display INPUT SELECT menu, use a DVI to HDMI adapter cable to connect to connect...
... select HDMI1(or select HDMI2 if HDMI2 interface is used)and then press OK to the AUDIO terminal of VGA IN on the TV rear. 14 Turn on your TV, press INPUT button on the remote control to display INPUT SELECT menu, use a DVI to HDMI adapter cable to connect to connect...
Operation Manual
Page 17
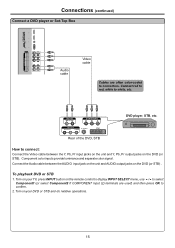
... select Component2 if COMPONENT input (2) terminals are often color-coded to white, etc. Component color inputs provide luminance and separate color signal. Turn on your TV, press INPUT button on your DVD or STB and do relative operations. 15
... select Component2 if COMPONENT input (2) terminals are often color-coded to white, etc. Component color inputs provide luminance and separate color signal. Turn on your TV, press INPUT button on your DVD or STB and do relative operations. 15

Operation Manual
Page 18
Turn on your TV, press INPUT button on your headphone do not match the jack, use 5/6to select Analog RGB and then press OK to avoid excessive levels, as ... PC screen 1. When using headphone, adjust the headphone volume so as hearing damage may result. Connect Headphone Insert the plug of the headphone into the TV's Headphone jack. Connect a PC HDMI 2 HDMI 1 DVI 2 IN DVI 1 IN Connections (continued) Audio cable (stereo mini plug) AUDIO AUDIO VGA cable (analog RGB) To monitor...
Turn on your TV, press INPUT button on your headphone do not match the jack, use 5/6to select Analog RGB and then press OK to avoid excessive levels, as ... PC screen 1. When using headphone, adjust the headphone volume so as hearing damage may result. Connect Headphone Insert the plug of the headphone into the TV's Headphone jack. Connect a PC HDMI 2 HDMI 1 DVI 2 IN DVI 1 IN Connections (continued) Audio cable (stereo mini plug) AUDIO AUDIO VGA cable (analog RGB) To monitor...

Operation Manual
Page 19
...to record. 2. Turn on model. Please read the user manual of your VCR, insert a videotape for recording. 3. To record program 1. Only analog TV programs, AV1 and AV2 input sources can be output through an external amplifier Note: The operations of the VCR External Amplifier How to confirm proper...IN R AUDIO L VIDEO To Audio inputs VCR for recording AV IN R AUDIO L VIDEO Rear of the amplifier may be different depending on your TV, select a program you wish to white, etc. To enjoy high-quality sound through the AV output jacks. 17 Connect the Audio cables between the...
...to record. 2. Turn on model. Please read the user manual of your VCR, insert a videotape for recording. 3. To record program 1. Only analog TV programs, AV1 and AV2 input sources can be output through an external amplifier Note: The operations of the VCR External Amplifier How to confirm proper...IN R AUDIO L VIDEO To Audio inputs VCR for recording AV IN R AUDIO L VIDEO Rear of the amplifier may be different depending on your TV, select a program you wish to white, etc. To enjoy high-quality sound through the AV output jacks. 17 Connect the Audio cables between the...

Operation Manual
Page 20
...you use its features. Press the Power button on the remote control, the unit will appear only on the remote control to your TV features. Turning Off With the power on, press the Power button on some conditions. Main Menu Overview Main Menu PICTURE IMAGE ADJUST ...volume Treble Bass Balance Focus window out* AVC Language Screen Saver Transparency OSD Time Out Clock Setup Source Name Edit Closed Caption Setup TV Source Current Channel Channel Label Channel Skip Favorite Channel Auto Search Input Select Signal Strength Content Password Set Password Password Confirm Parental Control ...
...you use its features. Press the Power button on the remote control, the unit will appear only on the remote control to your TV features. Turning Off With the power on, press the Power button on some conditions. Main Menu Overview Main Menu PICTURE IMAGE ADJUST ...volume Treble Bass Balance Focus window out* AVC Language Screen Saver Transparency OSD Time Out Clock Setup Source Name Edit Closed Caption Setup TV Source Current Channel Channel Label Channel Skip Favorite Channel Auto Search Input Select Signal Strength Content Password Set Password Password Confirm Parental Control ...

Operation Manual
Page 21
...scheme is enabled). - Current program start and end play times. The information banner will display the following information: - Resolution. - TV --------Select TV signal. In DTV mode, it will display current status information such as channel number or signal source, etc. Basic Operations On-...main menu (CHANNEL SETUP menu) to select the input source. You can edit source name to your preference (refer to TV viewing. Analog RGB-------Select signal from COMPONENT INPUT1 terminals. Channel number and name. - Current time. - Component2------Select signal from ...
...scheme is enabled). - Current program start and end play times. The information banner will display the following information: - Resolution. - TV --------Select TV signal. In DTV mode, it will display current status information such as channel number or signal source, etc. Basic Operations On-...main menu (CHANNEL SETUP menu) to select the input source. You can edit source name to your preference (refer to TV viewing. Analog RGB-------Select signal from COMPONENT INPUT1 terminals. Channel number and name. - Current time. - Component2------Select signal from ...

Operation Manual
Page 22
... Skip After setting channels into memory, you can memorize the available channels, you must specify the type of Cable STD/HRC/IRC according to your TV can skip unnecessary channels so that is set to AIR: highlight Auto Search in the CHANNEL SETUP menu and then press 4or 3 to begin the... available through antenna or cable inputs, and store them in memory. buttons to cycle among the channels, the skipped channels can automatically find all available TV/DTV program. This unit can not be selected. 20 Now when you want to stop the auto-search, press MENU button. CHANNEL SETUP...
... Skip After setting channels into memory, you can memorize the available channels, you must specify the type of Cable STD/HRC/IRC according to your TV can skip unnecessary channels so that is set to AIR: highlight Auto Search in the CHANNEL SETUP menu and then press 4or 3 to begin the... available through antenna or cable inputs, and store them in memory. buttons to cycle among the channels, the skipped channels can automatically find all available TV/DTV program. This unit can not be selected. 20 Now when you want to stop the auto-search, press MENU button. CHANNEL SETUP...

Operation Manual
Page 23
...channel, use OK to select that is received by users. Note: the names of digital broadcasting channels are to experience picture degradation. CHANNEL SETUP TV Source Current Channel Channel Label Channel Skip Favorite Channel Auto Search Input Select Signal Strength AIR 2-1 ABCDOFF OFF > > > > > > ... 5 Now a favorite channel list is created, and you can give a name to the programs. (Only for the current DTV channel. CHANNEL SETUP TV Source Current Channel Channel Label Channel Skip Favorite Channel Auto Search Input Select Signal Strength AIR 2-1 WGBHOFF ON > > > > > > 21 The...
...channel, use OK to select that is received by users. Note: the names of digital broadcasting channels are to experience picture degradation. CHANNEL SETUP TV Source Current Channel Channel Label Channel Skip Favorite Channel Auto Search Input Select Signal Strength AIR 2-1 ABCDOFF OFF > > > > > > ... 5 Now a favorite channel list is created, and you can give a name to the programs. (Only for the current DTV channel. CHANNEL SETUP TV Source Current Channel Channel Label Channel Skip Favorite Channel Auto Search Input Select Signal Strength AIR 2-1 WGBHOFF ON > > > > > > 21 The...


