
Operation Manual
Page 3
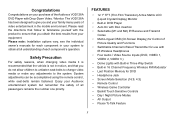
...Selection (16:9, 4:3) • Remote Control • Wireless Game Controller • Backlit Touch Sensitive Controls • Day / Night Picture Modes • AV Output • Pause To Talk Feature 3 Enjoy your purchase of the Audiovox VOD128A DVD Player with Drop-Down Video / Monitor. Safety Precaution For safety reasons,... obtain the best results from your system to the system. FEATURES • 12.1" TFT (Thin Film Transistor) Active Matrix LCD (Liquid Crystal Display) Monitor • Built-in DVD Player • Auto On with Disc insertion • Selectable (M1 and M2) IR Receive ...
...Selection (16:9, 4:3) • Remote Control • Wireless Game Controller • Backlit Touch Sensitive Controls • Day / Night Picture Modes • AV Output • Pause To Talk Feature 3 Enjoy your purchase of the Audiovox VOD128A DVD Player with Drop-Down Video / Monitor. Safety Precaution For safety reasons,... obtain the best results from your system to the system. FEATURES • 12.1" TFT (Thin Film Transistor) Active Matrix LCD (Liquid Crystal Display) Monitor • Built-in DVD Player • Auto On with Disc insertion • Selectable (M1 and M2) IR Receive ...

Operation Manual
Page 5
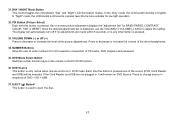
...Also allows the remote control to operate the VOD128A and to release the screen. 14. The dome lights will appear on the screen for 4~5 seconds Selecting a Monitor Code (M1 or M2) 1.Power ON unit and waiting until M1 OSD appears, the M1 OSD will not turn off the LCD panel monitor when in the... same installation or if the vehicle has an RSA (Rear Seat Audio) that allows the user to remote commands when M2 is selected on the remote and will transmit audio on the remote and will respond to select from M2 to wireless headphones. The VOD128A has an...
...Also allows the remote control to operate the VOD128A and to release the screen. 14. The dome lights will appear on the screen for 4~5 seconds Selecting a Monitor Code (M1 or M2) 1.Power ON unit and waiting until M1 OSD appears, the M1 OSD will not turn off the LCD panel monitor when in the... same installation or if the vehicle has an RSA (Rear Seat Audio) that allows the user to remote commands when M2 is selected on the remote and will transmit audio on the remote and will respond to select from M2 to wireless headphones. The VOD128A has an...

Operation Manual
Page 7
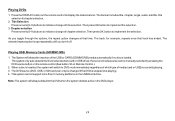
Make sure that proper polarity (+ or -) is not a universal remote control and will operate the VOD128A. The remote control will not control equipment from other manufacturers. 7 1 2 3 4 5 6 7 8 9 10 11 12 13 POWER MONITOR SELECT EJECT M1 M2 SYSTEM TV MENU DVD DVD SOURCE SOURCE 1 2 3 AUTO MEMORY 4 5 6 SKIP/ SEARCH 7... DTV/ATV 21 24 22 23 It is observed. 3) Align the cover tabs with the remote control and slide the cover until it locks. REMOTE CONTROL OPERATION MAIN FUNCTION DESCRIPTION Battery Installation Before attempting to operate your finger, slide the battery...
Make sure that proper polarity (+ or -) is not a universal remote control and will operate the VOD128A. The remote control will not control equipment from other manufacturers. 7 1 2 3 4 5 6 7 8 9 10 11 12 13 POWER MONITOR SELECT EJECT M1 M2 SYSTEM TV MENU DVD DVD SOURCE SOURCE 1 2 3 AUTO MEMORY 4 5 6 SKIP/ SEARCH 7... DTV/ATV 21 24 22 23 It is observed. 3) Align the cover tabs with the remote control and slide the cover until it locks. REMOTE CONTROL OPERATION MAIN FUNCTION DESCRIPTION Battery Installation Before attempting to operate your finger, slide the battery...

Operation Manual
Page 8
...is disable, the TV will stop on channels that are detected with signals of sufficient levels are used. MONITOR SELECT M1 Button - TV Mode Select Button** Switches certain function keys on the remote control for detail) M2 Button - SKIP / SEARCH Button** This button selects between SKIP and SEARCH mode... tuned to select desired screen mode, OSD language and source default on power up. 4. * Function control is available on the unit and the remote control. ** Function not available in this button will alternately store or erase the channel from memory. 8 In "SKIP mode" the TV tuner will...
...is disable, the TV will stop on channels that are detected with signals of sufficient levels are used. MONITOR SELECT M1 Button - TV Mode Select Button** Switches certain function keys on the remote control for detail) M2 Button - SKIP / SEARCH Button** This button selects between SKIP and SEARCH mode... tuned to select desired screen mode, OSD language and source default on power up. 4. * Function control is available on the unit and the remote control. ** Function not available in this button will alternately store or erase the channel from memory. 8 In "SKIP mode" the TV tuner will...
Operation Manual
Page 12
... and password. 35. Press to decrease or increase the volume of the picture adjustments. DVD Mode Select Button Switches certain function keys on the remote control for BRIGHTNESS, CONTRAST, COLOR, TINT or RESET. If the Card Reader and USB are made within 6 seconds, or is any other ... function. 36. Press to eject the disc. 12 31. EJECT () Button* This button is pressed. 33. In the "Day" mode, the LCD backlit intensity is displayed, use the VOLUME(+)/ VOLUME(-) button to 9 for low light operation. 32. Once the desired adjustment bar is brighter. NUMBER Buttons Allow...
... and password. 35. Press to decrease or increase the volume of the picture adjustments. DVD Mode Select Button Switches certain function keys on the remote control for BRIGHTNESS, CONTRAST, COLOR, TINT or RESET. If the Card Reader and USB are made within 6 seconds, or is any other ... function. 36. Press to eject the disc. 12 31. EJECT () Button* This button is pressed. 33. In the "Day" mode, the LCD backlit intensity is displayed, use the VOLUME(+)/ VOLUME(-) button to 9 for low light operation. 32. Once the desired adjustment bar is brighter. NUMBER Buttons Allow...

Operation Manual
Page 13
Note: System Menu can be controlled via Remote Control only. (Items selected in the sub menu and then press the OK button to select. 5) Press the System Menu button to exit System Menu. ... options that let you customize your system to change the screen mode display, OSD language and source default. 1) Press the SYSTEM MENU button on the remote, the main page of the system menu will appear on screen. 2) Use the cursor buttons p or q to select the desired item in the main page...
Note: System Menu can be controlled via Remote Control only. (Items selected in the sub menu and then press the OK button to select. 5) Press the System Menu button to exit System Menu. ... options that let you customize your system to change the screen mode display, OSD language and source default. 1) Press the SYSTEM MENU button on the remote, the main page of the system menu will appear on screen. 2) Use the cursor buttons p or q to select the desired item in the main page...

Operation Manual
Page 15
... Setup Menu. SETTINGS AND ADJUSTMENTS The Setup Menu contains features and options that reside on the same Setup Page. 6. The Setup Menu appears on the remote. Exiting the Setup Menu Press the SETUP button again. 15 Then, repeat steps 2~5. Press u to move the highlight into the setup area using the cursor...
... Setup Menu. SETTINGS AND ADJUSTMENTS The Setup Menu contains features and options that reside on the same Setup Page. 6. The Setup Menu appears on the remote. Exiting the Setup Menu Press the SETUP button again. 15 Then, repeat steps 2~5. Press u to move the highlight into the setup area using the cursor...
Operation Manual
Page 19
Press the DISPLAY button on the remote control to the DVD when the system detects a disc in the DVD player. 19 the second media sourse can only be manually selected by pressing the DVD sourse button on the remote control (See button 36 on the USB thumb drive. This system ...cannot support more than 2 memory partitions on Remote Control.) 2. Note: The system will always default to display the status banner. Title Selection...
Press the DISPLAY button on the remote control to the DVD when the system detects a disc in the DVD player. 19 the second media sourse can only be manually selected by pressing the DVD sourse button on the remote control (See button 36 on the USB thumb drive. This system ...cannot support more than 2 memory partitions on Remote Control.) 2. Note: The system will always default to display the status banner. Title Selection...
Operation Manual
Page 20
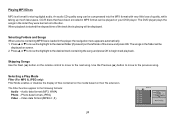
... be compressed into the MP3 format with very little loss of the track that have been encoded in the order they were burned on the remote control to move the highlight to the desired folder (if present) on the left side of files contained on the media based on their file...
... be compressed into the MP3 format with very little loss of the track that have been encoded in the order they were burned on the remote control to move the highlight to the desired folder (if present) on the left side of files contained on the media based on their file...

Operation Manual
Page 25
...Pivot the screen downward until a comfortable viewing angle is inserted Power ON/OFF Button Remote Sensor Infrared Transmitter Screen Release Remote Sensor 25 After the unit has been turned on and off and pivot the LCD to optimize the picture quality. 4. Pushing in the Screen Release button will unlock ...the LCD screen and it will hold the screen in position while the system is in ...
...Pivot the screen downward until a comfortable viewing angle is inserted Power ON/OFF Button Remote Sensor Infrared Transmitter Screen Release Remote Sensor 25 After the unit has been turned on and off and pivot the LCD to optimize the picture quality. 4. Pushing in the Screen Release button will unlock ...the LCD screen and it will hold the screen in position while the system is in ...
Operation Manual
Page 26
...monitors are installed in the ON position, as infrared transmissions, like visible light travel only in infrared transmitter for wire connections. Only two-channel wireless headphones (Audiovox Model IR2CHS) will not work with the dome light switch in one 1/8" headphone jack on the VOD128A...headphones supplied with the supplied wireless headphones. keys located on each headset. OVERHEAD DOME LIGHTS The Dome Lights integrated into the VOD128A are controlled by the volume up/down buttons on the VOD128A remote control or the +/- This jack is one vehicle. WIRED HEADPHONES (...
...monitors are installed in the ON position, as infrared transmissions, like visible light travel only in infrared transmitter for wire connections. Only two-channel wireless headphones (Audiovox Model IR2CHS) will not work with the dome light switch in one 1/8" headphone jack on the VOD128A...headphones supplied with the supplied wireless headphones. keys located on each headset. OVERHEAD DOME LIGHTS The Dome Lights integrated into the VOD128A are controlled by the volume up/down buttons on the VOD128A remote control or the +/- This jack is one vehicle. WIRED HEADPHONES (...
Operation Manual
Page 27
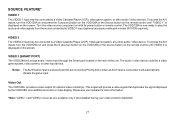
... if pre-installed during your video product installation. 27 To access the A/V inputs, turn the VOD128A on and press the S (source) button on the VOD128A or the Source button on the remote control until VIDEO 2 is a shared input 30-pin connector (Priority AUX); The audio /...VOD128A on and press the S (source) button on the VOD128A or the source button on the remote control until "VIDEO 1" is displayed on with its power button or remote control. VIDEO 3 (SMART PORT) The VOD128A will provide a video signal that duplicates the signal displayed by the VOD128A to an additional monitor...
... if pre-installed during your video product installation. 27 To access the A/V inputs, turn the VOD128A on and press the S (source) button on the VOD128A or the Source button on the remote control until VIDEO 2 is a shared input 30-pin connector (Priority AUX); The audio /...VOD128A on and press the S (source) button on the VOD128A or the source button on the remote control until "VIDEO 1" is displayed on with its power button or remote control. VIDEO 3 (SMART PORT) The VOD128A will provide a video signal that duplicates the signal displayed by the VOD128A to an additional monitor...

Operation Manual
Page 28
... the ON/OFF selector switch to turn on the Game Controller. USING THE WIRELESS GAME CONTROLLER The Game Controller transmits to the VOD128A with two infrared transmitters located on the remote control or the unit until AUX/GAME* is a shared input. Observe the correct polarity. 2. Then use . *Note: The AUX/GAME input...
... the ON/OFF selector switch to turn on the Game Controller. USING THE WIRELESS GAME CONTROLLER The Game Controller transmits to the VOD128A with two infrared transmitters located on the remote control or the unit until AUX/GAME* is a shared input. Observe the correct polarity. 2. Then use . *Note: The AUX/GAME input...

Operation Manual
Page 29
Verify that the remote sensor eye is dirty. Check the type of movies because the disc is programmed to prohibit that action. 29 Make sure all cables are coded by region. If monitor is set to Region Number 1. - Both the unit and the disc are securely inserted into disc tray. ...not obstructed. - Clean it. - If you are fresh. - Make sure that unit is set to M2, press M2 on remote. - Insert a disc with the label side facing up. - If monitor is set to M1 when using the 2-channel IR headphones, make sure the correct channel (A-B) is selected. - This DVD only ...
Verify that the remote sensor eye is dirty. Check the type of movies because the disc is programmed to prohibit that action. 29 Make sure all cables are coded by region. If monitor is set to Region Number 1. - Both the unit and the disc are securely inserted into disc tray. ...not obstructed. - Clean it. - If you are fresh. - Make sure that unit is set to M2, press M2 on remote. - Insert a disc with the label side facing up. - If monitor is set to M1 when using the 2-channel IR headphones, make sure the correct channel (A-B) is selected. - This DVD only ...
Operation Manual
Page 31
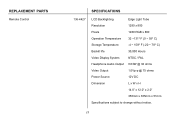
REPLACEMENT PARTS Remote Control SPECIFICATIONS 136-4427 LCD Backlighting Edge Light Tube Resolution 1280 x 800 Pixels 1280 RGB x 800 Operation Temperature 32 ~131º F (0 ~ 55º C) Storage Temperature -4 ~ 158º F (-20 ~ 70º C) Backlit life 30,000 Hours Video Display System NTSC / PAL Headphone Audio Output 0.03W @ 32 ohms Video Output 1.0Vp-p @ 75 ohms Power Source 12V DC Dimension L x W x H 14.0" x 12.0" x 2.0" 356mm x 305mm x 51mm Specifications subject to change without notice. 31
REPLACEMENT PARTS Remote Control SPECIFICATIONS 136-4427 LCD Backlighting Edge Light Tube Resolution 1280 x 800 Pixels 1280 RGB x 800 Operation Temperature 32 ~131º F (0 ~ 55º C) Storage Temperature -4 ~ 158º F (-20 ~ 70º C) Backlit life 30,000 Hours Video Display System NTSC / PAL Headphone Audio Output 0.03W @ 32 ohms Video Output 1.0Vp-p @ 75 ohms Power Source 12V DC Dimension L x W x H 14.0" x 12.0" x 2.0" 356mm x 305mm x 51mm Specifications subject to change without notice. 31


