Installation Guide
Page 2
CONTENTS Congratulations 3 Cautions and Warnings 4 Contents XMC10 5 Accessory Kit 5 Installation/Wiring Precautions 6 Setting Up and Installing Your Kit 7 Interconnect Diagram 6 Using Other Manufacturer's Mounts 9 Installing the Xpress XM® Into the Cradle 9 Connection Options 10 Mounting the Vehicle Antenna 12 Warranty 15 -2- 128-7472 2 of 16
CONTENTS Congratulations 3 Cautions and Warnings 4 Contents XMC10 5 Accessory Kit 5 Installation/Wiring Precautions 6 Setting Up and Installing Your Kit 7 Interconnect Diagram 6 Using Other Manufacturer's Mounts 9 Installing the Xpress XM® Into the Cradle 9 Connection Options 10 Mounting the Vehicle Antenna 12 Warranty 15 -2- 128-7472 2 of 16
Installation Guide
Page 5
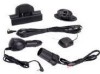
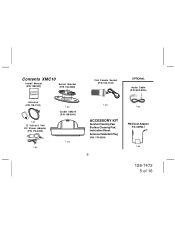
Cradle XMC10 (P/N 136-4041) 1 pc. 1 pc. ACCESSORY KIT Alcohol Cleaning Pad, Surface Cleaning Pad, Instruction Sheet, Antenna Cable Exit Plug (P/N 170-0054) -5- 1 pc. FM Direct Adapter P/N XMFM-1 1 pc. 128-7472 5 of 16 Contents XMC10 Install Manual (P/N 1287472) Swivel Bracket (P/N 136-4048) CLA Female Socket (P/N 154-1132) OPTIONAL Audio Cable (P/N SAT-RCA) Antenna (P/N 118-1133) 1 pc. 12 Volt-to-5 Volt DC Power Adapter (P/N 112-3456) 1 pc. 1 pc.
Cradle XMC10 (P/N 136-4041) 1 pc. 1 pc. ACCESSORY KIT Alcohol Cleaning Pad, Surface Cleaning Pad, Instruction Sheet, Antenna Cable Exit Plug (P/N 170-0054) -5- 1 pc. FM Direct Adapter P/N XMFM-1 1 pc. 128-7472 5 of 16 Contents XMC10 Install Manual (P/N 1287472) Swivel Bracket (P/N 136-4048) CLA Female Socket (P/N 154-1132) OPTIONAL Audio Cable (P/N SAT-RCA) Antenna (P/N 118-1133) 1 pc. 12 Volt-to-5 Volt DC Power Adapter (P/N 112-3456) 1 pc. 1 pc.

Installation Guide
Page 7
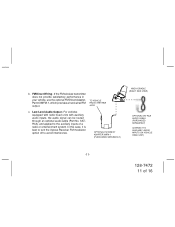
... THE CRADLE. 2. OR CLA FEMALE SOCKET WIRES TO VEHICLE +12 VDC POWER RECEPTACLE XMC10 CRADLE (REAR VIEW) +12V to +5V DC POWER ADAPTER TO VEHICLE RADIO ANTENNA JACK TO VEHICLE +12 VDC POWER RECEPTACLE OPTIONAL FM DIRECT ADAPTER XMFM-1 (PURCHASED SEPARATELY) XM ANTENNA XMC10 CRADLE (RIGHT SIDE VIEW) OPTIONAL SAT-RCA AUDIO CABLE (PURCHASED SEPARATELY) (CONNECT...
... THE CRADLE. 2. OR CLA FEMALE SOCKET WIRES TO VEHICLE +12 VDC POWER RECEPTACLE XMC10 CRADLE (REAR VIEW) +12V to +5V DC POWER ADAPTER TO VEHICLE RADIO ANTENNA JACK TO VEHICLE +12 VDC POWER RECEPTACLE OPTIONAL FM DIRECT ADAPTER XMFM-1 (PURCHASED SEPARATELY) XM ANTENNA XMC10 CRADLE (RIGHT SIDE VIEW) OPTIONAL SAT-RCA AUDIO CABLE (PURCHASED SEPARATELY) (CONNECT...
Installation Guide
Page 11
... SEPARATELY) XMC10 CRADLE (RIGHT SIDE VIEW) OPTIONAL SAT-RCA AUDIO CABLE (PURCHASED SEPARATELY) (CONNECT TO AUXILIARY AUDIO INPUTS ON VEHICLE HEAD UNIT.) -11- 128-7472 11 of a radio or entertainment system. b. TO VEHICLE RADIO ANTENNA JACK c. For vehicles equipped with radio head units... with auxiliary audio inputs, the audio signal can be routed through an optional audio cable (Part No. Low-Level Audio Output - In this case, it is best to turn the Xpress Receiver...
... SEPARATELY) XMC10 CRADLE (RIGHT SIDE VIEW) OPTIONAL SAT-RCA AUDIO CABLE (PURCHASED SEPARATELY) (CONNECT TO AUXILIARY AUDIO INPUTS ON VEHICLE HEAD UNIT.) -11- 128-7472 11 of a radio or entertainment system. b. TO VEHICLE RADIO ANTENNA JACK c. For vehicles equipped with radio head units... with auxiliary audio inputs, the audio signal can be routed through an optional audio cable (Part No. Low-Level Audio Output - In this case, it is best to turn the Xpress Receiver...
Installation Guide
Page 12
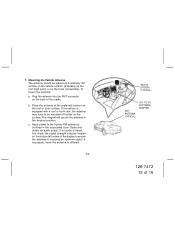
...(convertible). c. If necessary, move the antenna to the Xpress XM system as outlined in the desired position. The magnet will secure the antenna in the associated User Guide and obtain an audio output. Mounting the Vehicle Antenna The antenna should be placed on a relatively flat ... 12:00P A -1 JU MP Xpress SYSTEM (TYPICAL) SAT ANTENNA (TYPICAL) 12V-TO-5V DC POWER ADAPTER 128-7472 12 of the cradle. b. If the vehicle is receiving an optimum signal. Apply power to different -12- seek p. Place the antenna at the preferred location on the roof or trunk surface. ...
...(convertible). c. If necessary, move the antenna to the Xpress XM system as outlined in the desired position. The magnet will secure the antenna in the associated User Guide and obtain an audio output. Mounting the Vehicle Antenna The antenna should be placed on a relatively flat ... 12:00P A -1 JU MP Xpress SYSTEM (TYPICAL) SAT ANTENNA (TYPICAL) 12V-TO-5V DC POWER ADAPTER 128-7472 12 of the cradle. b. If the vehicle is receiving an optimum signal. Apply power to different -12- seek p. Place the antenna at the preferred location on the roof or trunk surface. ...
Installation Guide
Page 13
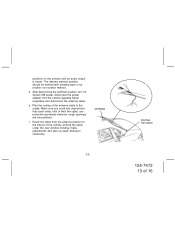
f. After determining the optimum position, turn off Xpress XM power, disconnect the power adapter from the antenna position to the cradle. e. Make sure you avoid any obstructions that could crimp, kink or twist the cable; use protective grommets wherever rough... vehicle, working the cable under the rear window molding; Plan the routing of the antenna cable to the interior of 16 d. ANTENNA -13- Route the cable from the vehicle cigarette lighter receptacle and disconnect the antenna cable. make adjustments and take up slack whenever necessary. positions on the surface until ...
f. After determining the optimum position, turn off Xpress XM power, disconnect the power adapter from the antenna position to the cradle. e. Make sure you avoid any obstructions that could crimp, kink or twist the cable; use protective grommets wherever rough... vehicle, working the cable under the rear window molding; Plan the routing of the antenna cable to the interior of 16 d. ANTENNA -13- Route the cable from the vehicle cigarette lighter receptacle and disconnect the antenna cable. make adjustments and take up slack whenever necessary. positions on the surface until ...
Installation Guide
Page 14
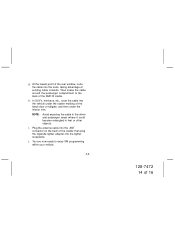
...tailgate, and then under the interior trim. Then snake the cable around the passenger compartment to enjoy XM programming within your vehicle. -14- 128-7472 14 of existing cable conduits. h. Plug the antenna cable into the trunk, taking advantage of 16 j. You are now ready to the back of ...the cradle; At the lowest point of the rear window, route the cable into the ANT connector on the back of the XMC10 cradle. g.
...tailgate, and then under the interior trim. Then snake the cable around the passenger compartment to enjoy XM programming within your vehicle. -14- 128-7472 14 of existing cable conduits. h. Plug the antenna cable into the trunk, taking advantage of 16 j. You are now ready to the back of ...the cradle; At the lowest point of the rear window, route the cable into the ANT connector on the back of the XMC10 cradle. g.
