
Assign an IP Address and Access the Video Stream - Installation Guide
Page 2
..., Real, SMPTE, QuickTime, UNIX, Windows, Windows Vista and WWW are marks of the respective holders. Please inform your Axis reseller. Axis Communications AB cannot be held responsible for its affiliates. This product contains licensed third-party software. All other countries or both .... the UPnPTM Implementers Corporation. This product is available from http://developer.apple.com/darwin/projects/bonjour/ Trademark Acknowledgments AXIS COMMUNICATIONS, AXIS, ETRAX, ARTPEC and VAPIX are trademarks or registered trademarks of any technical or typographical errors and reserves the...
..., Real, SMPTE, QuickTime, UNIX, Windows, Windows Vista and WWW are marks of the respective holders. Please inform your Axis reseller. Axis Communications AB cannot be held responsible for its affiliates. This product contains licensed third-party software. All other countries or both .... the UPnPTM Implementers Corporation. This product is available from http://developer.apple.com/darwin/projects/bonjour/ Trademark Acknowledgments AXIS COMMUNICATIONS, AXIS, ETRAX, ARTPEC and VAPIX are trademarks or registered trademarks of any technical or typographical errors and reserves the...
Assign an IP Address and Access the Video Stream - Installation Guide
Page 3
... upgrades and configure product parameters. Automatic Discovery 1. Click Assign and continue according to selected device and enter the IP address. 4. Start AXIS IP Utility. 3. Acquire an available IP address on multiple products at once. For information about how to the network and has powered ...up . 2. They can automatically search the network for access. Start AXIS Camera Management. 3 Check that automatically assigns IP addresses to open its web pages. 4. Assign an IP Address and Access the ...
... upgrades and configure product parameters. Automatic Discovery 1. Click Assign and continue according to selected device and enter the IP address. 4. Start AXIS IP Utility. 3. Acquire an available IP address on multiple products at once. For information about how to the network and has powered ...up . 2. They can automatically search the network for access. Start AXIS Camera Management. 3 Check that automatically assigns IP addresses to open its web pages. 4. Assign an IP Address and Access the ...
Assign an IP Address and Access the Video Stream - Installation Guide
Page 4
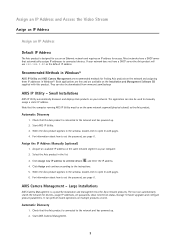
... an IP Address and Access the Video Stream Assign an IP Address 3. Click Next. 4. Applicable to access the web pages. • AXIS Dynamic DNS Service (all operating systems). To manually search for the network DHCP server, see the server's user documentation. 4 Other Operating Systems... and Methods The list below shows the other methods available for example Safari) and click on your computer, the Axis network product is automatically detected and added to configure (different models can be selected) and click Assign IP address to quickly and...
... an IP Address and Access the Video Stream Assign an IP Address 3. Click Next. 4. Applicable to access the web pages. • AXIS Dynamic DNS Service (all operating systems). To manually search for the network DHCP server, see the server's user documentation. 4 Other Operating Systems... and Methods The list below shows the other methods available for example Safari) and click on your computer, the Axis network product is automatically detected and added to configure (different models can be selected) and click Assign IP address to quickly and...
Assign an IP Address and Access the Video Stream - Installation Guide
Page 6
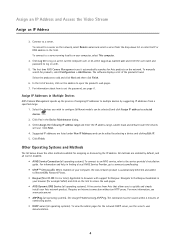
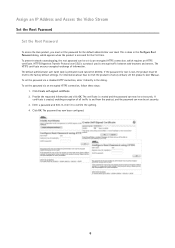
..., which requires an HTTPS certificate. Assign an IP Address and Access the Video Stream Set the Root Password Set the Root Password To access the Axis product, you must set the password for root is lost, the product must be deleted. HTTPS (Hypertext Transfer Protocol over SSL) is created and the...
..., which requires an HTTPS certificate. Assign an IP Address and Access the Video Stream Set the Root Password Set the Root Password To access the Axis product, you must set the password for root is lost, the product must be deleted. HTTPS (Hypertext Transfer Protocol over SSL) is created and the...
Assign an IP Address and Access the Video Stream - Installation Guide
Page 7
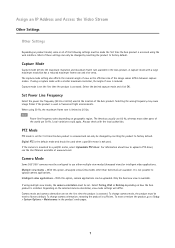
... camera orientation, view mode settings will differ. Capture Mode Capture mode defines the maximum resolution and maximum frame rate available in the Axis product. Local variations could apply. With this option, camera applications can only be changed by resetting the product to factory default. ...° cameras must be configured to use either multiple view modes (dewarped views) or intelligent video applications. Depending on how the Axis product is installed. Assign an IP Address and Access the Video Stream Other Settings Other Settings Depending on product model, some or ...
... camera orientation, view mode settings will differ. Capture Mode Capture mode defines the maximum resolution and maximum frame rate available in the Axis product. Local variations could apply. With this option, camera applications can only be changed by resetting the product to factory default. ...° cameras must be configured to use either multiple view modes (dewarped views) or intelligent video applications. Depending on how the Axis product is installed. Assign an IP Address and Access the Video Stream Other Settings Other Settings Depending on product model, some or ...
Assign an IP Address and Access the Video Stream - Installation Guide
Page 8
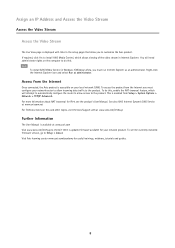
... at www.axiscam.net For Technical notes on this and other topics, visit the Axis Support web at www.axis.com/techsup Further Information The User Manual is available at www.axis.com Visit www.axis.com/techsup to check if there is accessible on the computer to Setup > About... the NAT-traversal feature, which allows viewing of the video stream in Windows 7/Windows Vista, you must configure your network router to install AXIS Media Control, which will need administrator rights on your network product. If required, click Yes to allow you must run Internet Explorer as administrator...
... at www.axiscam.net For Technical notes on this and other topics, visit the Axis Support web at www.axis.com/techsup Further Information The User Manual is available at www.axis.com Visit www.axis.com/techsup to check if there is accessible on the computer to Setup > About... the NAT-traversal feature, which allows viewing of the video stream in Windows 7/Windows Vista, you must configure your network router to install AXIS Media Control, which will need administrator rights on your network product. If required, click Yes to allow you must run Internet Explorer as administrator...

Assign an IP Address and Access the Video Stream - Installation Guide
Page 9
Installation Guide Assign an IP Address and Access the Video Stream © Axis Communications AB, 2012 - 2013 Ver. M1.18 Date: March 2013 Part No. 51375
Installation Guide Assign an IP Address and Access the Video Stream © Axis Communications AB, 2012 - 2013 Ver. M1.18 Date: March 2013 Part No. 51375

P13 Series - Installation Guide
Page 2
...can : • download user documentation and firmware updates • find answers to the Internet, you are designed to radio communications. Axis Communications AB makes no user-serviceable components. WEEE Directive The European Union has enacted a Directive 2002/96/EC on a different circuit... to dispose of merchantability and fitness for a particular purpose. For further information on how to the receiver. AXIS P1311/P1343/P1344/P1346/P1347 uses a 3.0V CR2032 Lithium battery. Electromagnetic Compatibility (EMC) This equipment generates, uses and can radiate ...
...can : • download user documentation and firmware updates • find answers to the Internet, you are designed to radio communications. Axis Communications AB makes no user-serviceable components. WEEE Directive The European Union has enacted a Directive 2002/96/EC on a different circuit... to dispose of merchantability and fitness for a particular purpose. For further information on how to the receiver. AXIS P1311/P1343/P1344/P1346/P1347 uses a 3.0V CR2032 Lithium battery. Electromagnetic Compatibility (EMC) This equipment generates, uses and can radiate ...
P13 Series - Installation Guide
Page 3
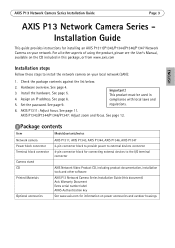
...1. Package contents Item Models/variants/notes Network camera Power block connector Terminal block connector Camera stand CD Printed Materials AXIS P1311, AXIS P1343, AXIS P1344, AXIS P1346, AXIS P1347 2-pin connector block to provide power to install the network camera on your network. Set the password. ...Hardware overview. See page 12. Install the hardware. See page 11. Assign an IP address. Important! See page 6. 5. AXIS P1343/P1344/P1346/P1347: Adjust zoom and focus. See page 4. 3. See page 9. Check the package contents against the list below. 2. ...
...1. Package contents Item Models/variants/notes Network camera Power block connector Terminal block connector Camera stand CD Printed Materials AXIS P1311, AXIS P1343, AXIS P1344, AXIS P1346, AXIS P1347 2-pin connector block to provide power to install the network camera on your network. Set the password. ...Hardware overview. See page 12. Install the hardware. See page 11. Assign an IP address. Important! See page 6. 5. AXIS P1343/P1344/P1346/P1347: Adjust zoom and focus. See page 4. 3. See page 9. Check the package contents against the list below. 2. ...
P13 Series - Installation Guide
Page 4
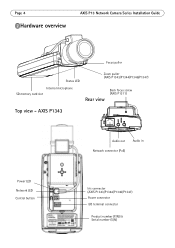
AXIS P1343 Audio out Audio in Network connector (PoE) Power LED Network LED Control button Iris connector (AXIS P1343/P1344/P1346/P1347) Power connector I/O terminal connector Product number (P/N) & Serial number (S/N) Page 4 Hardware overview AXIS P13 Network Camera Series Installation Guide Focus puller Status LED Internal microphone SD memory card slot Zoom puller (AXIS P1343/P1344/P1346/P1347) Rear view Back focus screw (AXIS P1311) Top view -
AXIS P1343 Audio out Audio in Network connector (PoE) Power LED Network LED Control button Iris connector (AXIS P1343/P1344/P1346/P1347) Power connector I/O terminal connector Product number (P/N) & Serial number (S/N) Page 4 Hardware overview AXIS P13 Network Camera Series Installation Guide Focus puller Status LED Internal microphone SD memory card slot Zoom puller (AXIS P1343/P1344/P1346/P1347) Rear view Back focus screw (AXIS P1311) Top view -
P13 Series - Installation Guide
Page 5
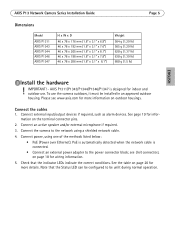
Please see Unit connectors, on outdoor housings. see www.axis.com for wiring information. 5. IMPORTANT! - AXIS P1311/P1343/P1344/P1346/P1347 is connected. • Connect an external power adapter to ... 19 for infor- Connect power, using a shielded network cable. 4. Note that the indicator LEDs indicate the correct conditions. To use . AXIS P13 Network Camera Series Installation Guide Dimensions Model AXIS P1311 AXIS P1343 AXIS P1344 AXIS P1346 AXIS P1347 H x W x D 46 x 78 x 176 mm (1.8" x 3.1" x 6.9") 46 x 78 x 192 mm (1.8" x 3.1" x 7.6") 46 x 78 x 205 mm (1.8" x 3.1" x ...
Please see Unit connectors, on outdoor housings. see www.axis.com for wiring information. 5. IMPORTANT! - AXIS P1311/P1343/P1344/P1346/P1347 is connected. • Connect an external power adapter to ... 19 for infor- Connect power, using a shielded network cable. 4. Note that the indicator LEDs indicate the correct conditions. To use . AXIS P13 Network Camera Series Installation Guide Dimensions Model AXIS P1311 AXIS P1343 AXIS P1344 AXIS P1346 AXIS P1347 H x W x D 46 x 78 x 176 mm (1.8" x 3.1" x 6.9") 46 x 78 x 192 mm (1.8" x 3.1" x 7.6") 46 x 78 x 205 mm (1.8" x 3.1" x ...
P13 Series - Installation Guide
Page 6
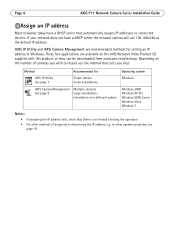
... For other operating systems, see page 16. These free applications are recommended methods for Operating system AXIS IP Utility See page 7 Single camera Small installations Windows AXIS Camera Management Multiple cameras See page 8 Large installations Installation on the number of assigning or discovering ...address, e.g. Method Recommended for setting an IP address in other methods of cameras you wish to connected devices. Page 6 AXIS P13 Network Camera Series Installation Guide Assign an IP address Most networks today have a DHCP server the network camera will ...
... For other operating systems, see page 16. These free applications are recommended methods for Operating system AXIS IP Utility See page 7 Single camera Small installations Windows AXIS Camera Management Multiple cameras See page 8 Large installations Installation on the number of assigning or discovering ...address, e.g. Method Recommended for setting an IP address in other methods of cameras you wish to connected devices. Page 6 AXIS P13 Network Camera Series Installation Guide Assign an IP address Most networks today have a DHCP server the network camera will ...
P13 Series - Installation Guide
Page 7
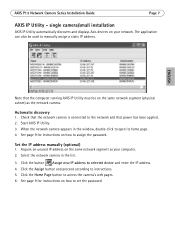
single camera/small installation AXIS IP Utility automatically discovers and displays Axis devices on how to open its home page. 4. Click the Assign button and proceed according to selected device and enter the IP address. 4. Automatic discovery 1. ... address on how to manually assign a static IP address. Start AXIS IP Utility. 3. Click the Home Page button to the network and that the computer running AXIS IP Utility must be used to set the password. AXIS P13 Network Camera Series Installation Guide Page 7 AXIS IP Utility - See page 9 for instructions on your computer...
single camera/small installation AXIS IP Utility automatically discovers and displays Axis devices on how to open its home page. 4. Click the Assign button and proceed according to selected device and enter the IP address. 4. Automatic discovery 1. ... address on how to manually assign a static IP address. Start AXIS IP Utility. 3. Click the Home Page button to the network and that the computer running AXIS IP Utility must be used to set the password. AXIS P13 Network Camera Series Installation Guide Page 7 AXIS IP Utility - See page 9 for instructions on your computer...
P13 Series - Installation Guide
Page 8
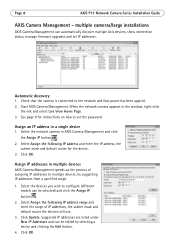
... the network camera appears in a single device 1. Click Update. Automatic discovery 1. Click OK. Select the network camera in multiple devices AXIS Camera Management speeds up the process of IP addresses, the subnet mask and default router the devices will use. 3. Select the devices ...you wish to multiple devices, by selecting a device and clicking the Edit button. 4. Click OK. Page 8 AXIS P13 Network Camera Series Installation Guide AXIS Camera Management - Select Assign the following IP address range and enter the range of assigning IP addresses to configure (different...
... the network camera appears in a single device 1. Click Update. Automatic discovery 1. Click OK. Select the network camera in multiple devices AXIS Camera Management speeds up the process of IP addresses, the subnet mask and default router the devices will use. 3. Select the devices ...you wish to multiple devices, by selecting a device and clicking the Edit button. 4. Click OK. Page 8 AXIS P13 Network Camera Series Installation Guide AXIS Camera Management - Select Assign the following IP address range and enter the range of assigning IP addresses to configure (different...
P13 Series - Installation Guide
Page 9
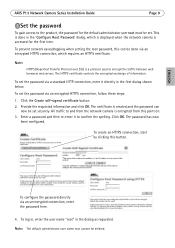
... user name "root" in the 'Configure Root Password' dialog, which requires an HTTPS certificate. Note: The default administrator user name root cannot be set . ENGLISH AXIS P13 Network Camera Series Installation Guide Page 9 Set the password To gain access to the product, the password for the first time. To prevent network...
... user name "root" in the 'Configure Root Password' dialog, which requires an HTTPS certificate. Note: The default administrator user name root cannot be set . ENGLISH AXIS P13 Network Camera Series Installation Guide Page 9 Set the password To gain access to the product, the password for the first time. To prevent network...

P13 Series - Installation Guide
Page 10
... camera is displayed; the Setup link leads to customize the camera. If the password is accessed. If required, click Yes to install AMC (AXIS Media Control), which allows viewing of the video stream in Windows Vista, you to menus that allow you must be changed later from the drop...-down list and click OK. AXIS P1347 Note: To install AMC in Internet Explorer. See page 20. 6. Setup - Help - Right-click the Internet Explorer icon and select Run as administrator...
... camera is displayed; the Setup link leads to customize the camera. If the password is accessed. If required, click Yes to install AMC (AXIS Media Control), which allows viewing of the video stream in Windows Vista, you to menus that allow you must be changed later from the drop...-down list and click OK. AXIS P1347 Note: To install AMC in Internet Explorer. See page 20. 6. Setup - Help - Right-click the Internet Explorer icon and select Run as administrator...
P13 Series - Installation Guide
Page 11
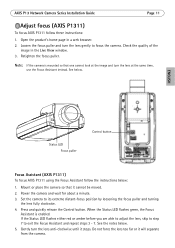
...puller and turning the lens fully clockwise. 4. See the notes below . ENGLISH Status LED Focus puller Control button Focus Assistant (AXIS P1311) To focus AXIS P1311 using the Focus Assistant follow these instructions: 1. Mount or place the camera so that one cannot look at the image ... home page in the Live View window. 3. Power the camera and wait for about a minute. 3. AXIS P13 Network Camera Series Installation Guide Page 11 Adjust focus (AXIS P1311) To focus AXIS P1311 follow the instructions below: 1. When the Status LED flashes green, the Focus Assistant is mounted so...
...puller and turning the lens fully clockwise. 4. See the notes below . ENGLISH Status LED Focus puller Control button Focus Assistant (AXIS P1311) To focus AXIS P1311 using the Focus Assistant follow these instructions: 1. Mount or place the camera so that one cannot look at the image ... home page in the Live View window. 3. Power the camera and wait for about a minute. 3. AXIS P13 Network Camera Series Installation Guide Page 11 Adjust focus (AXIS P1311) To focus AXIS P1311 follow the instructions below: 1. When the Status LED flashes green, the Focus Assistant is mounted so...

P13 Series - Installation Guide
Page 12
...in front of the camera cannot be avoided, the Focus Assistant should not be accessed, you can damage the camera. Adjusting the back focus (AXIS P1311) The back focus of the Focus Assistant. • If the camera is mounted so that the Control button cannot be changed during ...focus adjustment (steps 5 and 6). Loosen the zoom and focus pullers on the lens by 0.5 mm/r. Back focus screw Adjust zoom and focus (AXIS P1343/P1344/P1346/P1347) To adjust the zoom and focus follow these instructions: 1. Retighten the focus puller. 9. If the button is inactive, the iris is...
...in front of the camera cannot be avoided, the Focus Assistant should not be accessed, you can damage the camera. Adjusting the back focus (AXIS P1311) The back focus of the Focus Assistant. • If the camera is mounted so that the Control button cannot be changed during ...focus adjustment (steps 5 and 6). Loosen the zoom and focus pullers on the lens by 0.5 mm/r. Back focus screw Adjust zoom and focus (AXIS P1343/P1344/P1346/P1347) To adjust the zoom and focus follow these instructions: 1. Retighten the focus puller. 9. If the button is inactive, the iris is...

P13 Series - Installation Guide
Page 13
... Network Camera Series Installation Guide Page 13 6. ENGLISH Focus puller Zoom puller Status LED Control button Example image: AXIS P1343 Focus Assistant (AXIS P1343/P1344/P1346/P1347) To focus AXIS P1343/P1344/P1346/P1347 using the Focus Assistant, follow the instructions in steps 1 - 3 on page 12 before you start with the focus puller or Focus Assistant...
... Network Camera Series Installation Guide Page 13 6. ENGLISH Focus puller Zoom puller Status LED Control button Example image: AXIS P1343 Focus Assistant (AXIS P1343/P1344/P1346/P1347) To focus AXIS P1343/P1344/P1346/P1347 using the Focus Assistant, follow the instructions in steps 1 - 3 on page 12 before you start with the focus puller or Focus Assistant...
P13 Series - Installation Guide
Page 14
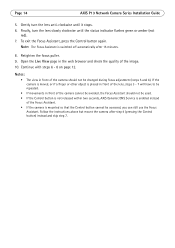
.... • If movements in the web browser and check the quality of the image. 10. Continue with steps 6 - 8 on page 12. Page 14 AXIS P13 Network Camera Series Installation Guide 5. Follow the instructions above but mount the camera after 15 minutes. 8. Retighten the focus puller. 9. Open the Live View... front of the camera cannot be avoided, the Focus Assistant should not be used. • If the Control button is not released within two seconds, AXIS Dynamic DNS Service is placed in front of the lens, steps 3 - 7 will have to be changed during focus adjustment (steps 5 and 6). Finally, ...
.... • If movements in the web browser and check the quality of the image. 10. Continue with steps 6 - 8 on page 12. Page 14 AXIS P13 Network Camera Series Installation Guide 5. Follow the instructions above but mount the camera after 15 minutes. 8. Retighten the focus puller. 9. Open the Live View... front of the camera cannot be avoided, the Focus Assistant should not be used. • If the Control button is not released within two seconds, AXIS Dynamic DNS Service is placed in front of the lens, steps 3 - 7 will have to be changed during focus adjustment (steps 5 and 6). Finally, ...