P13 Series - Installation Guide
Page 3
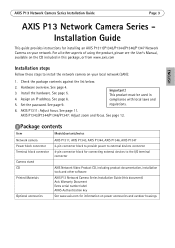
... the hardware. AXIS P13 Network Camera Series Installation Guide Page 3 ENGLISH AXIS P13 Network Camera Series Installation Guide This guide provides instructions for installing an AXIS P1311/P1343/P1344/P1346/P1347 Network Camera on your local network (LAN): 1. Hardware overview. Package contents Item Models/variants/notes Network camera Power block connector Terminal block connector Camera stand CD Printed Materials AXIS P1311, AXIS P1343, AXIS P1344, AXIS P1346, AXIS P1347 2-pin...
... the hardware. AXIS P13 Network Camera Series Installation Guide Page 3 ENGLISH AXIS P13 Network Camera Series Installation Guide This guide provides instructions for installing an AXIS P1311/P1343/P1344/P1346/P1347 Network Camera on your local network (LAN): 1. Hardware overview. Package contents Item Models/variants/notes Network camera Power block connector Terminal block connector Camera stand CD Printed Materials AXIS P1311, AXIS P1343, AXIS P1344, AXIS P1346, AXIS P1347 2-pin...
P13 Series - Installation Guide
Page 4
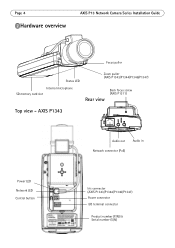
Page 4 Hardware overview AXIS P13 Network Camera Series Installation Guide Focus puller Status LED Internal microphone SD memory card slot Zoom puller (AXIS P1343/P1344/P1346/P1347) Rear view Back focus screw (AXIS P1311) Top view - AXIS P1343 Audio out Audio in Network connector (PoE) Power LED Network LED Control button Iris connector (AXIS P1343/P1344/P1346/P1347) Power connector I/O terminal connector Product number (P/N) & Serial number (S/N)
Page 4 Hardware overview AXIS P13 Network Camera Series Installation Guide Focus puller Status LED Internal microphone SD memory card slot Zoom puller (AXIS P1343/P1344/P1346/P1347) Rear view Back focus screw (AXIS P1311) Top view - AXIS P1343 Audio out Audio in Network connector (PoE) Power LED Network LED Control button Iris connector (AXIS P1343/P1344/P1346/P1347) Power connector I/O terminal connector Product number (P/N) & Serial number (S/N)
P13 Series - Installation Guide
Page 5
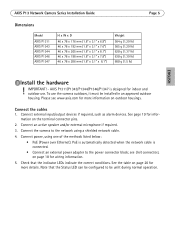
... for infor- Please see Unit connectors, on page 20 for more details. mation on outdoor housings. Connect the camera to the power connector block; AXIS P13 Network Camera Series Installation Guide Dimensions Model AXIS P1311 AXIS P1343 AXIS P1344 AXIS P1346 AXIS P1347 H x W x D 46 x 78 x 176 mm (1.8" x 3.1" x 6.9") 46 x 78 x 192 mm (1.8" x 3.1" x ...hardware ! See the table on page 18 for wiring information. 5. AXIS P1311/P1343/P1344/P1346/P1347 is connected. • Connect an external power adapter to the network using one of the methods listed below: • PoE (Power over...
... for infor- Please see Unit connectors, on page 20 for more details. mation on outdoor housings. Connect the camera to the power connector block; AXIS P13 Network Camera Series Installation Guide Dimensions Model AXIS P1311 AXIS P1343 AXIS P1344 AXIS P1346 AXIS P1347 H x W x D 46 x 78 x 176 mm (1.8" x 3.1" x 6.9") 46 x 78 x 192 mm (1.8" x 3.1" x ...hardware ! See the table on page 18 for wiring information. 5. AXIS P1311/P1343/P1344/P1346/P1347 is connected. • Connect an external power adapter to the network using one of the methods listed below: • PoE (Power over...
P13 Series - Installation Guide
Page 6
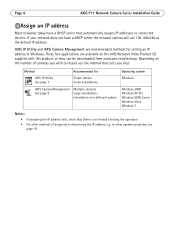
... downloaded from www.axis.com/techsup. Page 6 AXIS P13 Network Camera Series Installation Guide Assign an IP address Most networks today have a DHCP server the network camera will use the method that suits you best. These free applications are recommended methods for Operating system AXIS IP Utility See page 7 Single camera Small installations Windows AXIS Camera Management Multiple cameras See page 8 Large...
... downloaded from www.axis.com/techsup. Page 6 AXIS P13 Network Camera Series Installation Guide Assign an IP address Most networks today have a DHCP server the network camera will use the method that suits you best. These free applications are recommended methods for Operating system AXIS IP Utility See page 7 Single camera Small installations Windows AXIS Camera Management Multiple cameras See page 8 Large...
P13 Series - Installation Guide
Page 7
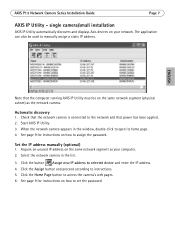
... button Assign new IP address to the network and that the network camera is connected to selected device and enter the IP address. 4. AXIS P13 Network Camera Series Installation Guide Page 7 AXIS IP Utility - single camera/small installation AXIS IP Utility automatically discovers and displays Axis devices on the same network segment as the network camera. Check that power has been applied. 2. Start...
... button Assign new IP address to the network and that the network camera is connected to selected device and enter the IP address. 4. AXIS P13 Network Camera Series Installation Guide Page 7 AXIS IP Utility - single camera/small installation AXIS IP Utility automatically discovers and displays Axis devices on the same network segment as the network camera. Check that power has been applied. 2. Start...
P13 Series - Installation Guide
Page 8
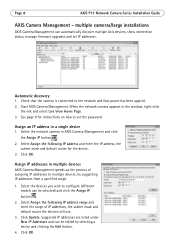
... 9 for the device. 3. Click OK. Check that power has been applied. 2. Assign an IP address in AXIS Camera Management and click the Assign IP button . 2. Select the network camera in a single device 1. When the network camera appears in multiple devices AXIS Camera Management speeds up the process of IP addresses, the subnet mask and default router the devices...
... 9 for the device. 3. Click OK. Check that power has been applied. 2. Assign an IP address in AXIS Camera Management and click the Assign IP button . 2. Select the network camera in a single device 1. When the network camera appears in multiple devices AXIS Camera Management speeds up the process of IP addresses, the subnet mask and default router the devices...
P13 Series - Installation Guide
Page 9
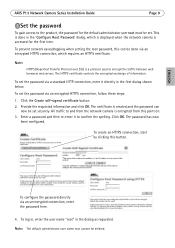
... the spelling. Note: The default administrator user name root cannot be done via an encrypted HTTPS connection, follow these steps: 1. ENGLISH AXIS P13 Network Camera Series Installation Guide Page 9 Set the password To gain access to the product, the password for the first time. To set the ...password via an encrypted HTTPS connection, which is displayed when the network camera is done in the 'Configure Root Password' dialog, which requires an HTTPS certificate. To create an HTTPS connection, start by clicking ...
... the spelling. Note: The default administrator user name root cannot be done via an encrypted HTTPS connection, follow these steps: 1. ENGLISH AXIS P13 Network Camera Series Installation Guide Page 9 Set the password To gain access to the product, the password for the first time. To set the ...password via an encrypted HTTPS connection, which is displayed when the network camera is done in the 'Configure Root Password' dialog, which requires an HTTPS certificate. To create an HTTPS connection, start by clicking ...

P13 Series - Installation Guide
Page 10
... rights on all the tools for configuring the camera to the factory default settings. Provides all aspects of the network camera is displayed; If the password is accessed. You will reset most other settings. AXIS P1346/AXIS P1347: The capture mode must run Inter- If... required, click Yes to customize the camera. Select the desired capture mode from the...
... rights on all the tools for configuring the camera to the factory default settings. Provides all aspects of the network camera is displayed; If the password is accessed. You will reset most other settings. AXIS P1346/AXIS P1347: The capture mode must run Inter- If... required, click Yes to customize the camera. Select the desired capture mode from the...
P13 Series - Installation Guide
Page 11
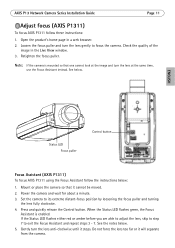
... enabled. When the Status LED flashes green, the Focus Assistant is mounted so that it will separate from the camera. AXIS P13 Network Camera Series Installation Guide Page 11 Adjust focus (AXIS P1311) To focus AXIS P1311 follow the instructions below . Check the quality of the image in a web browser. 2. Open the product's home page in...
... enabled. When the Status LED flashes green, the Focus Assistant is mounted so that it will separate from the camera. AXIS P13 Network Camera Series Installation Guide Page 11 Adjust focus (AXIS P1311) To focus AXIS P1311 follow the instructions below . Check the quality of the image in a web browser. 2. Open the product's home page in...

P13 Series - Installation Guide
Page 12
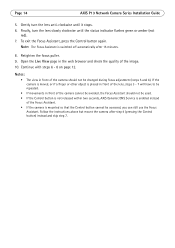
...beyond the end stop since it can still use the Focus Assistant instead. Page 12 AXIS P13 Network Camera Series Installation Guide 6. If focus has been set zoom and focus and check the quality of the camera should not be used. • If the Control button is not released within ...If the camera is switched off automatically after step 4 (pressing the Control button) instead and skip step 7. Note: The Focus Assistant is mounted so that one cannot look at the image and move the sensor away from the original lens. Back focus screw Adjust zoom and focus (AXIS P1343/P1344/P1346...
...beyond the end stop since it can still use the Focus Assistant instead. Page 12 AXIS P13 Network Camera Series Installation Guide 6. If focus has been set zoom and focus and check the quality of the camera should not be used. • If the Control button is not released within ...If the camera is switched off automatically after step 4 (pressing the Control button) instead and skip step 7. Note: The Focus Assistant is mounted so that one cannot look at the image and move the sensor away from the original lens. Back focus screw Adjust zoom and focus (AXIS P1343/P1344/P1346...

P13 Series - Installation Guide
Page 13
... zoom puller. 3. See the notes below . 1. AXIS P13 Network Camera Series Installation Guide Page 13 6. this gives the smallest depth of field and thus the best conditions for more information. Mount or place the camera so that it anti-clockwise. Move the puller to ...its maximum while focusing; Press and quickly release the Control button. Click Enable iris. ENGLISH Focus puller Zoom puller Status LED Control button Example image: AXIS P1343 Focus Assistant (AXIS P1343/P1344/P1346/P1347) To focus AXIS P1343...
... zoom puller. 3. See the notes below . 1. AXIS P13 Network Camera Series Installation Guide Page 13 6. this gives the smallest depth of field and thus the best conditions for more information. Mount or place the camera so that it anti-clockwise. Move the puller to ...its maximum while focusing; Press and quickly release the Control button. Click Enable iris. ENGLISH Focus puller Zoom puller Status LED Control button Example image: AXIS P1343 Focus Assistant (AXIS P1343/P1344/P1346/P1347) To focus AXIS P1343...
P13 Series - Installation Guide
Page 14
...Assistant is placed in front of the lens, steps 3 - 7 will have to be repeated. • If movements in front of the camera cannot be avoided, the Focus Assistant should not be accessed, you can still use the Focus Assistant. Gently turn the lens slowly clockwise until ...so that the Control button cannot be changed during focus adjustment (steps 5 and 6). Follow the instructions above but mount the camera after 15 minutes. 8. Page 14 AXIS P13 Network Camera Series Installation Guide 5. Notes: • The view in the web browser and check the quality of the Focus Assistant. ...
...Assistant is placed in front of the lens, steps 3 - 7 will have to be repeated. • If movements in front of the camera cannot be avoided, the Focus Assistant should not be accessed, you can still use the Focus Assistant. Gently turn the lens slowly clockwise until ...so that the Control button cannot be changed during focus adjustment (steps 5 and 6). Follow the instructions above but mount the camera after 15 minutes. 8. Page 14 AXIS P13 Network Camera Series Installation Guide 5. Notes: • The view in the web browser and check the quality of the Focus Assistant. ...
P13 Series - Installation Guide
Page 15
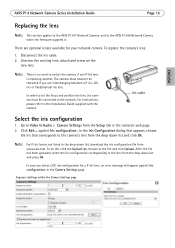
... lens; attach and screw on the new lens. The camera must be restarted if you select a DC iris configuration for your network camera. In the Iris Configuration dialog that appears, choose the iris that corresponds to the AXIS P1347 Network Camera; In case you are optional lenses available for a P-...iris lens, an error message will appear against Iris configuration:. and to restart the camera if one P-Iris lens is replacing another. Note: There is no need to the AXIS P1346 Network Camera when the firmware supports it. To do this click the Upload tab, browse to the...
... lens; attach and screw on the new lens. The camera must be restarted if you select a DC iris configuration for your network camera. In the Iris Configuration dialog that appears, choose the iris that corresponds to the AXIS P1347 Network Camera; In case you are optional lenses available for a P-...iris lens, an error message will appear against Iris configuration:. and to restart the camera if one P-Iris lens is replacing another. Note: There is no need to the AXIS P1346 Network Camera when the firmware supports it. To do this click the Upload tab, browse to the...
P13 Series - Installation Guide
Page 16
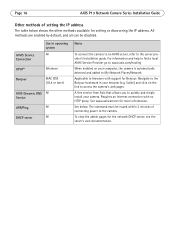
... with no HTTP proxy. The command must be disabled. A free service from Axis that allows you to quickly and simply install your computer, the camera is automatically detected and added to My Network Places/Network. AVHS Service Connection UPnP™ Bonjour Use in your browser (e.g. For information ...can be issued within 2 minutes of setting the IP address The table below . Safari) and click on your camera. Requires an Internet connection with support for more information. Page 16 AXIS P13 Network Camera Series Installation Guide Other methods of connecting power to the...
... with no HTTP proxy. The command must be disabled. A free service from Axis that allows you to quickly and simply install your computer, the camera is automatically detected and added to My Network Places/Network. AVHS Service Connection UPnP™ Bonjour Use in your browser (e.g. For information ...can be issued within 2 minutes of setting the IP address The table below . Safari) and click on your camera. Requires an Internet connection with support for more information. Page 16 AXIS P13 Network Camera Series Installation Guide Other methods of connecting power to the...

P13 Series - Installation Guide
Page 17
...as administrator. • To use the ARP command on a Mac OS X, use the Terminal utility in Windows: from 192.168.0.125:...' AXIS P13 Network Camera Series Installation Guide Page 17 Set the IP address with ARP/Ping 1. In your browser, type in http:// in the Location/Address field ...18:10:00 temp ping -s 408 192.168.0.125 4. Check that the network cable is connected to the camera and then start/restart the camera, by disconnecting and reconnecting power. 5. Acquire a free static IP address on the camera's label. 3. Close the command prompt when you see 'Reply from the Start...
...as administrator. • To use the ARP command on a Mac OS X, use the Terminal utility in Windows: from 192.168.0.125:...' AXIS P13 Network Camera Series Installation Guide Page 17 Set the IP address with ARP/Ping 1. In your browser, type in http:// in the Location/Address field ...18:10:00 temp ping -s 408 192.168.0.125 4. Check that the network cable is connected to the camera and then start/restart the camera, by disconnecting and reconnecting power. 5. Acquire a free static IP address on the camera's label. 3. Close the command prompt when you see 'Reply from the Start...
P13 Series - Installation Guide
Page 18
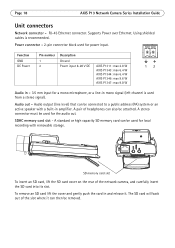
.... A stereo connector must be attached. Page 18 AXIS P13 Network Camera Series Installation Guide Unit connectors Network connector - The SD card will back out of the network camera, and carefully insert the SD card into its slot.... Audio output (line level) that can be connected to a public address (PA) system or an active speaker with removable storage. SDHC memory card slot - Audio out - Function GND DC Power Pin number 1 2 Description Ground Power input 8-20 V DC AXIS P1311: max 2.8 W AXIS P1343: max 6.4 W AXIS...
.... A stereo connector must be attached. Page 18 AXIS P13 Network Camera Series Installation Guide Unit connectors Network connector - The SD card will back out of the network camera, and carefully insert the SD card into its slot.... Audio output (line level) that can be connected to a public address (PA) system or an active speaker with removable storage. SDHC memory card slot - Audio out - Function GND DC Power Pin number 1 2 Description Ground Power input 8-20 V DC AXIS P1311: max 2.8 W AXIS P1343: max 6.4 W AXIS...
P13 Series - Installation Guide
Page 19
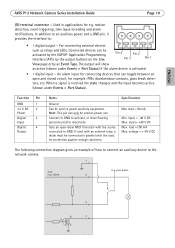
In addition to an auxiliary power and a GND pin, it provides the interface to deactivate. Note: This pin can only be used to the network camera. 1 3.3V max. 50mA E.g. Uses an open and closed circuit, for e.g. push button 2 3 D 4 G S An alarm input for ...+ 40 V DC The following connection diagram gives an example of how to connect an auxiliary device to power auxiliary equipment. ENGLISH AXIS P13 Network Camera Series Installation Guide Page 19 I/O terminal connector - For connecting external devices such as power out. Connected devices can toggle between an...
In addition to an auxiliary power and a GND pin, it provides the interface to deactivate. Note: This pin can only be used to the network camera. 1 3.3V max. 50mA E.g. Uses an open and closed circuit, for e.g. push button 2 3 D 4 G S An alarm input for ...+ 40 V DC The following connection diagram gives an example of how to connect an auxiliary device to power auxiliary equipment. ENGLISH AXIS P13 Network Camera Series Installation Guide Page 19 I/O terminal connector - For connecting external devices such as power out. Connected devices can toggle between an...
P13 Series - Installation Guide
Page 20
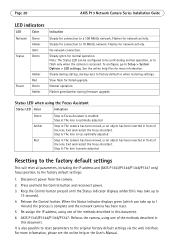
... Setup > System Options > LED settings. To configure, go to a 100 Mbit/s network. Step 6: The lens is optimally adjusted Amber Step 4: The camera has been moved, or an object has been inserted in front of the lens. AXIS P1343/P1344/P1346/P1347: Refocus the camera, using the Focus Assistant Status LED Color Indication Green Step 4: Focus...
... Setup > System Options > LED settings. To configure, go to a 100 Mbit/s network. Step 6: The lens is optimally adjusted Amber Step 4: The camera has been moved, or an object has been inserted in front of the lens. AXIS P1343/P1344/P1346/P1347: Refocus the camera, using the Focus Assistant Status LED Color Indication Green Step 4: Focus...
P13 Series - Installation Guide
Page 21
...). To see the currently installed firmware version, see Camera Settings > About in the camera's web page. AXIS P13 Network Camera Series Installation Guide Page 21 Accessing the camera from the Internet Once installed, your network camera is accessible on this and other topics, visit the Axis Support Web at www.axis.com/techsup Further information The User's Manual is available...
...). To see the currently installed firmware version, see Camera Settings > About in the camera's web page. AXIS P13 Network Camera Series Installation Guide Page 21 Accessing the camera from the Internet Once installed, your network camera is accessible on this and other topics, visit the Axis Support Web at www.axis.com/techsup Further information The User's Manual is available...

P1343 - User Manual
Page 2
... manual is intended for administrators and users of the AXIS P1343 Network Camera, and is available from http://developer.apple.com/darwin/projects/bonjour/ Equipment Modifications This equipment must be installed and used in strict accordance with the instructions given in the user documentation. Axis Communications AB cannot be beneficial, for a particular...
... manual is intended for administrators and users of the AXIS P1343 Network Camera, and is available from http://developer.apple.com/darwin/projects/bonjour/ Equipment Modifications This equipment must be installed and used in strict accordance with the instructions given in the user documentation. Axis Communications AB cannot be beneficial, for a particular...
