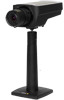

Assign an IP Address and Access the Video Stream - Installation Guide
Page 2
... in the product described in various jurisdictions. The source code is available from http://developer.apple.com/darwin/projects/bonjour/ Trademark Acknowledgments AXIS COMMUNICATIONS, AXIS, ETRAX, ARTPEC and VAPIX are trademarks or registered trademarks of Oracle and/or its intended purpose. Apple, Boa, Apache, Bonjour...all Java-based trademarks and logos are registered trademarks of SD-3C, LLC in the United States, other countries or both . Axis Communications AB shall not be held responsible for a particular purpose. All other countries. WPA, WPA2 and Wi-Fi Protected Setup are...
... in the product described in various jurisdictions. The source code is available from http://developer.apple.com/darwin/projects/bonjour/ Trademark Acknowledgments AXIS COMMUNICATIONS, AXIS, ETRAX, ARTPEC and VAPIX are trademarks or registered trademarks of Oracle and/or its intended purpose. Apple, Boa, Apache, Bonjour...all Java-based trademarks and logos are registered trademarks of SD-3C, LLC in the United States, other countries or both . Axis Communications AB shall not be held responsible for a particular purpose. All other countries. WPA, WPA2 and Wi-Fi Protected Setup are...
Assign an IP Address and Access the Video Stream - Installation Guide
Page 3
... on the Installation and Management Software CD supplied with this product. Both applications are free and are recommended methods for finding Axis products on the network and assigning them IP addresses in the list. 3. The application can automatically search the network for ...automatically assigns IP addresses to open its web pages. 6. Acquire an available IP address on your computer. 2. When the Axis product appears in the window, double-click to set passwords, show connection status, manage firmware upgrades and configure product parameters. Small Installations...
... on the Installation and Management Software CD supplied with this product. Both applications are free and are recommended methods for finding Axis products on the network and assigning them IP addresses in the list. 3. The application can automatically search the network for ...automatically assigns IP addresses to open its web pages. 6. Acquire an available IP address on your computer. 2. When the Axis product appears in the window, double-click to set passwords, show connection status, manage firmware upgrades and configure product parameters. Small Installations...
Assign an IP Address and Access the Video Stream - Installation Guide
Page 4
... to an AVHS service, refer to add and click Next and then click Finish. 6. When enabled on the address to log on with support for Axis products on the link to a server running locally on the network, select Remote server and select a server from a specified range. 1. Requires an ... IP Addresses and can be selected) and click Assign IP address to configure (different models can be issued within 2 minutes of devices, click on your Axis network product. Applicable to Network/My Network Places. • Bonjour (Mac OS X® 10.4 or later). Assign an IP Address and Access the...
... to an AVHS service, refer to add and click Next and then click Finish. 6. When enabled on the address to log on with support for Axis products on the link to a server running locally on the network, select Remote server and select a server from a specified range. 1. Requires an ... IP Addresses and can be selected) and click Assign IP address to configure (different models can be issued within 2 minutes of devices, click on your Axis network product. Applicable to Network/My Network Places. • Bonjour (Mac OS X® 10.4 or later). Assign an IP Address and Access the...
Assign an IP Address and Access the Video Stream - Installation Guide
Page 6
... of information. To set securely. 3. Assign an IP Address and Access the Video Stream Set the Root Password Set the Root Password To access the Axis product, you must be set the password via a standard HTTP connection, enter it to factory default, see the product's User Manual.
... of information. To set securely. 3. Assign an IP Address and Access the Video Stream Set the Root Password Set the Root Password To access the Axis product, you must be set the password via a standard HTTP connection, enter it to factory default, see the product's User Manual.
Assign an IP Address and Access the Video Stream - Installation Guide
Page 7
... reduced maximum frame rate and vice versa. Multiple view modes - Intelligent video applications - Select Ceiling, Wall or Desktop depending on how the Axis product is sufficient. To change camera orientation, restoring the product is installed. To change camera mode, the product must be made the first ... OK. Local variations could apply. If the camera is available. With this option, dewarped views (view modes other parts of the Axis product. Only the Overview view is mounted to factory default. Assign an IP Address and Access the Video Stream Other Settings Other Settings...
... reduced maximum frame rate and vice versa. Multiple view modes - Intelligent video applications - Select Ceiling, Wall or Desktop depending on how the Axis product is sufficient. To change camera orientation, restoring the product is installed. To change camera mode, the product must be made the first ... OK. Local variations could apply. If the camera is available. With this option, dewarped views (view modes other parts of the Axis product. Only the Overview view is mounted to factory default. Assign an IP Address and Access the Video Stream Other Settings Other Settings...
Assign an IP Address and Access the Video Stream - Installation Guide
Page 8
...at www.axiscam.net For Technical notes on this and other topics, visit the Axis Support web at www.axis.com/techsup Further Information The User Manual is available at www.axis.com Visit www.axis.com/techsup to check if there is updated firmware available for useful trainings, webinars..., tutorials and guides. 8 This is enabled from the Internet Once connected, the Axis product is accessible on the computer to do this . For more information about NAT trasversal for IPv4, see the currently installed firmware version, ...
...at www.axiscam.net For Technical notes on this and other topics, visit the Axis Support web at www.axis.com/techsup Further Information The User Manual is available at www.axis.com Visit www.axis.com/techsup to check if there is updated firmware available for useful trainings, webinars..., tutorials and guides. 8 This is enabled from the Internet Once connected, the Axis product is accessible on the computer to do this . For more information about NAT trasversal for IPv4, see the currently installed firmware version, ...

Assign an IP Address and Access the Video Stream - Installation Guide
Page 9
M1.18 Date: March 2013 Part No. 51375 Installation Guide Assign an IP Address and Access the Video Stream © Axis Communications AB, 2012 - 2013 Ver.
M1.18 Date: March 2013 Part No. 51375 Installation Guide Assign an IP Address and Access the Video Stream © Axis Communications AB, 2012 - 2013 Ver.

Q1614 Network Camera - User Manual
Page 2
...rights may be obtained from https://developer.apple.com/bonjour/ Equipment Modifications This equipment must be installed and used in various jurisdictions. Axis Communications AB cannot be connected using a shielded network cable (STP) that is properly grounded. In particular, and without prior notice. ... pursuant to comply with the furnishing, performance or use when using a shielded network cable (STP) and found to part 15 of the AXIS Q1614/Q1614-E Fixed Dome Network Camera, and is applicable to firmware 5.60 and later. See also the product's online help . See the menu item...
...rights may be obtained from https://developer.apple.com/bonjour/ Equipment Modifications This equipment must be installed and used in various jurisdictions. Axis Communications AB cannot be connected using a shielded network cable (STP) that is properly grounded. In particular, and without prior notice. ... pursuant to comply with the furnishing, performance or use when using a shielded network cable (STP) and found to part 15 of the AXIS Q1614/Q1614-E Fixed Dome Network Camera, and is applicable to firmware 5.60 and later. See also the product's online help . See the menu item...
Q1614 Network Camera - User Manual
Page 3
...real-time clock (RTC). This product complies with local legislation, penalties may be disposed of together with this waste. Contact Information Axis Communications AB Emdalavägen 14 223 69 Lund Sweden Tel: +46 46 272 18 00 Fax: +46 46 13 61 30 www...authority responsible for assistance. Under normal conditions this product correctly. Safety This product complies with an identical battery or a battery which is recommended by Axis. • Dispose of used with household or commercial waste. WARNING • Risk of explosion if the battery is incorrectly replaced. • Replace...
...real-time clock (RTC). This product complies with local legislation, penalties may be disposed of together with this waste. Contact Information Axis Communications AB Emdalavägen 14 223 69 Lund Sweden Tel: +46 46 272 18 00 Fax: +46 46 13 61 30 www...authority responsible for assistance. Under normal conditions this product correctly. Safety This product complies with an identical battery or a battery which is recommended by Axis. • Dispose of used with household or commercial waste. WARNING • Risk of explosion if the battery is incorrectly replaced. • Replace...
Q1614 Network Camera - User Manual
Page 4
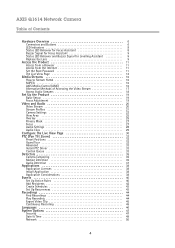
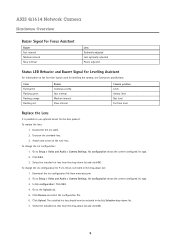
AXIS Q1614 Network Camera Table of Contents Hardware Overview 6 Connectors and Buttons 6 LED Indicators 8 Status LED Behavior for Focus Assistant 8 Buzzer Signal for Focus Assistant 9 Status LED ... Access from the Internet 11 Set the Root Password 11 The Live View Page 12 Media Streams 16 How to Stream H.264 16 MJPEG 16 AXIS Media Control (AMC 16 Alternative Methods of Accessing the Video Stream 17 Access Audio Streams 18 Set Up the Product 19 Basic Setup 19 Focus...
AXIS Q1614 Network Camera Table of Contents Hardware Overview 6 Connectors and Buttons 6 LED Indicators 8 Status LED Behavior for Focus Assistant 8 Buzzer Signal for Focus Assistant 9 Status LED ... Access from the Internet 11 Set the Root Password 11 The Live View Page 12 Media Streams 16 How to Stream H.264 16 MJPEG 16 AXIS Media Control (AMC 16 Alternative Methods of Accessing the Video Stream 17 Access Audio Streams 18 Set Up the Product 19 Basic Setup 19 Focus...
Q1614 Network Camera - User Manual
Page 5
AXIS Q1614 Network Camera Table of Contents Storage 55 I/O Ports 57 Maintenance 57 Support 58 Advanced 58 Reset to Factory Default Settings 59 Troubleshooting 60 Check the Firmware 60 Upgrade the Firmware 60 Symptoms, Possible Causes and Remedial Actions 61 Technical Specifications 64 64 Connectors 67 Performance Considerations 68 5
AXIS Q1614 Network Camera Table of Contents Storage 55 I/O Ports 57 Maintenance 57 Support 58 Advanced 58 Reset to Factory Default Settings 59 Troubleshooting 60 Check the Firmware 60 Upgrade the Firmware 60 Symptoms, Possible Causes and Remedial Actions 61 Technical Specifications 64 64 Connectors 67 Performance Considerations 68 5
Q1614 Network Camera - User Manual
Page 6
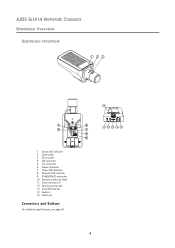
Focus puller 4. Iris connector 6. Network LED indicator 9. Network connector (PoE) 11. Control button (1) 12. microSD Card slot 14. I/O connector 5. Audio in 15. Audio out Connectors and Buttons For technical specifications, see page 64. 10 6 11 12 13 14 15 7 8 9 6 Power LED indicator 8. Function button (2) 13. Status LED indicator 2. Power connector 7. Zoom puller 3. AXIS Q1614 Network Camera Hardware Overview Hardware Overview 1 23 4 5 1. RS485/RS422 connector 10.
Focus puller 4. Iris connector 6. Network LED indicator 9. Network connector (PoE) 11. Control button (1) 12. microSD Card slot 14. I/O connector 5. Audio in 15. Audio out Connectors and Buttons For technical specifications, see page 64. 10 6 11 12 13 14 15 7 8 9 6 Power LED indicator 8. Function button (2) 13. Status LED indicator 2. Power connector 7. Zoom puller 3. AXIS Q1614 Network Camera Hardware Overview Hardware Overview 1 23 4 5 1. RS485/RS422 connector 10.
Q1614 Network Camera - User Manual
Page 7
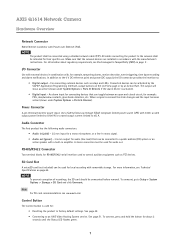
...see Electromagnetic Compatibility (EMC) on page 64. To connect, press and hold the button for local recording with a built-in amplifier. AXIS Q1614 Network Camera Hardware Overview Network Connector RJ45 Ethernet connector with either a rated output power limited to ≤100 W or a rated output ... I /O connector provides the interface to Setup > System Options > Storage > SD Card and click Unmount. All cables connecting the product to an AXIS Video Hosting System service. To unmount, go to : • Digital output - Make sure that can toggle between an open and closed circuit,...
...see Electromagnetic Compatibility (EMC) on page 64. To connect, press and hold the button for local recording with a built-in amplifier. AXIS Q1614 Network Camera Hardware Overview Network Connector RJ45 Ethernet connector with either a rated output power limited to ≤100 W or a rated output ... I /O connector provides the interface to Setup > System Options > Storage > SD Card and click Unmount. All cables connecting the product to an AXIS Video Hosting System service. To unmount, go to : • Digital output - Make sure that can toggle between an open and closed circuit,...
Q1614 Network Camera - User Manual
Page 8
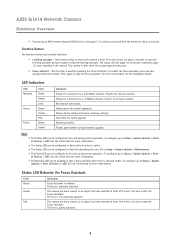
... front of the camera. This function is active. • The Status LED can be unlit during normal operation. See page 51. Flashes for network activity. AXIS Q1614 Network Camera Hardware Overview • Connecting to a 10 Mbit/s network. To configure, go to be configured to Setup > System Options > Ports & Devices > LED. Go to.... • Focus assistant - Note • The Status LED can be configured to Setup > System Options > Ports & Devices > LED. See the online help for connection to AXIS Internet Dynamic DNS Service. The lens is network traffic.
... front of the camera. This function is active. • The Status LED can be unlit during normal operation. See page 51. Flashes for network activity. AXIS Q1614 Network Camera Hardware Overview • Connecting to a 10 Mbit/s network. To configure, go to be configured to Setup > System Options > Ports & Devices > LED. Go to.... • Focus assistant - Note • The Status LED can be configured to Setup > System Options > Ports & Devices > LED. See the online help for connection to AXIS Internet Dynamic DNS Service. The lens is network traffic.
Q1614 Network Camera - User Manual
Page 9
...file from level Replace the Lens It is possible to the Upload tab. 5. Go to use optional lenses for the Axis product. In Iris configuration: Click Edit. 4. AXIS Q1614 Network Camera Hardware Overview Buzzer Signal for Focus Assistant Buzzer Fast interval Medium interval Slow interval Lens Optimally adjusted Less optimally adjusted... orange Flashing red Buzzer Continuous beep Fast interval Medium interval Slow interval Camera position Level Almost level Not level Far from www.axis.com 2. Select the installed iris lens from the drop-down list. 7. To replace the lens: 1.
...file from level Replace the Lens It is possible to the Upload tab. 5. Go to use optional lenses for the Axis product. In Iris configuration: Click Edit. 4. AXIS Q1614 Network Camera Hardware Overview Buzzer Signal for Focus Assistant Buzzer Fast interval Medium interval Slow interval Lens Optimally adjusted Less optimally adjusted... orange Flashing red Buzzer Continuous beep Fast interval Medium interval Slow interval Camera position Level Almost level Not level Far from www.axis.com 2. Select the installed iris lens from the drop-down list. 7. To replace the lens: 1.

Q1614 Network Camera - User Manual
Page 10
In order to set the focus and position the lens, the product must be connected to restart the product after changing the lens. However, the product must be restarted if you select a DC iris configuration file for a P-iris lens, an error message will appear below the iris configuration type in the Camera Settings page. AXIS Q1614 Network Camera Hardware Overview Note • If you are interchanging between a P-iris, DC-Iris or fixed/manual iris lens. For custom DC Iris lenses, select Generic DC Iris option. • There is no need to the network. 10
In order to set the focus and position the lens, the product must be connected to restart the product after changing the lens. However, the product must be restarted if you select a DC iris configuration file for a P-iris lens, an error message will appear below the iris configuration type in the Camera Settings page. AXIS Q1614 Network Camera Hardware Overview Note • If you are interchanging between a P-iris, DC-Iris or fixed/manual iris lens. For custom DC Iris lenses, select Generic DC Iris option. • There is no need to the network. 10
Q1614 Network Camera - User Manual
Page 11
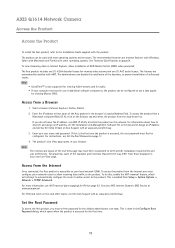
...for IPv4 on the network. To access the product from a Macintosh computer (Mac OS X), click on Axis Support web at www.axis.com/techsup 3. If you do this, enable the NAT-traversal feature, which opens when the product is...can disable the installation of the decoders, to the Installation Guide supplied with other topics, visit the Axis Support web at www.axiscam.net For Technical notes on this is the first time the product is ...this and other operating systems. See Technical Specifications on page 11 . 4. AXIS Q1614 Network Camera Access the Product Access the Product To install the...
...for IPv4 on the network. To access the product from a Macintosh computer (Mac OS X), click on Axis Support web at www.axis.com/techsup 3. If you do this, enable the NAT-traversal feature, which opens when the product is...can disable the installation of the decoders, to the Installation Guide supplied with other topics, visit the Axis Support web at www.axiscam.net For Technical notes on this is the first time the product is ...this and other operating systems. See Technical Specifications on page 11 . 4. AXIS Q1614 Network Camera Access the Product Access the Product To install the...
Q1614 Network Camera - User Manual
Page 12
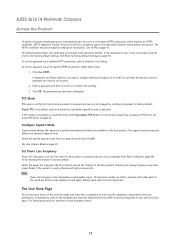
.... The default administrator user name root is a protocol used in the dialog. Note Power line frequency varies depending on page 22. AXIS Q1614 Network Camera Access the Product To prevent network eavesdropping, the root password can now be set securely. 2. Click Use HTTPS. Enter... cannot be reset to meet specific installation requirements and user preferences. Select the desired capture mode from those displayed in the Axis product. Selecting the wrong frequency may have been customized to the factory default settings. A temporary certificate (valid for root is...
.... The default administrator user name root is a protocol used in the dialog. Note Power line frequency varies depending on page 22. AXIS Q1614 Network Camera Access the Product To prevent network eavesdropping, the root password can now be set securely. 2. Click Use HTTPS. Enter... cannot be reset to meet specific installation requirements and user preferences. Select the desired capture mode from those displayed in the Axis product. Selecting the wrong frequency may have been customized to the factory default settings. A temporary certificate (valid for root is...

Q1614 Network Camera - User Manual
Page 13
...stream profiles, see page 31. For information about how to validate actions during product installation and configuration. To configure the manual trigger: 1. AXIS Q1614 Network Camera Access the Product Controls on page 40. For information about how to trigger an action rule from the Live View page. ... about action rules, see page 31. The Manual Trigger button is not available. This button is primarily intended for use when the AXIS Media Control viewer toolbar is used to disable WDR in the Live View page: 13 The manual trigger can for a defined period of...
...stream profiles, see page 31. For information about how to validate actions during product installation and configuration. To configure the manual trigger: 1. AXIS Q1614 Network Camera Access the Product Controls on page 40. For information about how to trigger an action rule from the Live View page. ... about action rules, see page 31. The Manual Trigger button is not available. This button is primarily intended for use when the AXIS Media Control viewer toolbar is used to disable WDR in the Live View page: 13 The manual trigger can for a defined period of...

Q1614 Network Camera - User Manual
Page 14
...Simplex - Note These controls are only visible when audio is saved can enable/disable controls for more information. For more information on how to the Axis product. Press ESC (Escape) on page 12. 14 Microphone button - speaker only mode, the Microphone and Talk buttons must both be active....send audio, the Talk and Microphone buttons must both be active to send audio to upload a driver, see View Area on page 33. AXIS Q1614 Network Camera Access the Product 1. Enable this button from the Audio tab in the AMC Control Panel. PTZ Controls The Live View page ...
...Simplex - Note These controls are only visible when audio is saved can enable/disable controls for more information. For more information on how to the Axis product. Press ESC (Escape) on page 12. 14 Microphone button - speaker only mode, the Microphone and Talk buttons must both be active....send audio, the Talk and Microphone buttons must both be active to send audio to upload a driver, see View Area on page 33. AXIS Q1614 Network Camera Access the Product 1. Enable this button from the Audio tab in the AMC Control Panel. PTZ Controls The Live View page ...