
Assign an IP Address and Access the Video Stream - Installation Guide
Page 2
...other countries or both . The source code is available from http://developer.apple.com/darwin/projects/bonjour/ Trademark Acknowledgments AXIS COMMUNICATIONS, AXIS, ETRAX, ARTPEC and VAPIX are trademarks or registered trademarks of their respective companies. Support Should you require any technical... products are registered trademarks or trademark applications of Axis AB in various jurisdictions. Visit Axis learning center www.axis.com/academy/ for more of the patents listed at www.axis.com/techsup/ Learn More! Axis Communications AB makes no warranty of any inaccuracies or ...
...other countries or both . The source code is available from http://developer.apple.com/darwin/projects/bonjour/ Trademark Acknowledgments AXIS COMMUNICATIONS, AXIS, ETRAX, ARTPEC and VAPIX are trademarks or registered trademarks of their respective companies. Support Should you require any technical... products are registered trademarks or trademark applications of Axis AB in various jurisdictions. Visit Axis learning center www.axis.com/academy/ for more of the patents listed at www.axis.com/techsup/ Learn More! Axis Communications AB makes no warranty of any inaccuracies or ...
Assign an IP Address and Access the Video Stream - Installation Guide
Page 3
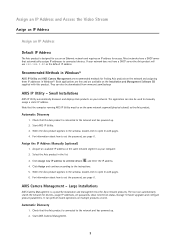
... assigns IP addresses to the network and has powered up . 2. Check that the Axis product is connected to connected devices. Select the Axis product in Windows® AXIS IP Utility and AXIS Camera Management are available on the Installation and Management Software CD supplied with this product....segment (physical subnet) as the default IP address. Acquire an available IP address on your computer. 2. AXIS Camera Management - Recommended Methods in the list. 3. Start AXIS IP Utility. 3. The tool can perform batch operations on multiple products at once. Assign an IP ...
... assigns IP addresses to the network and has powered up . 2. Check that the Axis product is connected to connected devices. Select the Axis product in Windows® AXIS IP Utility and AXIS Camera Management are available on the Installation and Management Software CD supplied with this product....segment (physical subnet) as the default IP address. Acquire an available IP address on your computer. 2. AXIS Camera Management - Recommended Methods in the list. 3. Start AXIS IP Utility. 3. The tool can perform batch operations on multiple products at once. Assign an IP ...
Assign an IP Address and Access the Video Stream - Installation Guide
Page 4
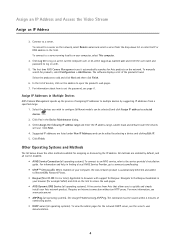
... When enabled on the network, select Remote server and select a server from a specified range. 1. Navigate to access the web pages. • AXIS Dynamic DNS Service (all operating systems). For information about how to configure (different models can be disabled. • AVHS Service Connection (all operating ...systems). A free service from Axis that allows you wish to set the password, see www.axiscam.net • ARP/Ping (all can be issued within 2 minutes ...
... When enabled on the network, select Remote server and select a server from a specified range. 1. Navigate to access the web pages. • AXIS Dynamic DNS Service (all operating systems). For information about how to configure (different models can be disabled. • AVHS Service Connection (all operating ...systems). A free service from Axis that allows you wish to set the password, see www.axiscam.net • ARP/Ping (all can be issued within 2 minutes ...
Assign an IP Address and Access the Video Stream - Installation Guide
Page 6
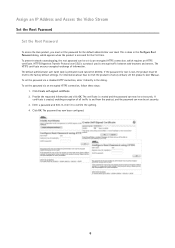
... password has now been configured. 6 Assign an IP Address and Access the Video Stream Set the Root Password Set the Root Password To access the Axis product, you must set the password for root is lost, the product must be reset to the factory default settings. Enter a password and then re...
... password has now been configured. 6 Assign an IP Address and Access the Video Stream Set the Root Password Set the Root Password To access the Axis product, you must set the password for root is lost, the product must be reset to the factory default settings. Enter a password and then re...
Assign an IP Address and Access the Video Stream - Installation Guide
Page 7
... the wrong frequency may cause image flicker if the product is accessed using a capture mode with a smaller maximum resolution, the angle of the Axis product. Digital PTZ is accessed. If the camera is installed. It is sufficient. If using 50 Hz, the maximum frame rate is available.... time the product is the default mode and should be changed by resetting the product to Setup > System Options > Maintenance in the Axis product. Capture Mode Capture mode defines the maximum resolution and maximum frame rate available in the product's web pages. 7 Only the Overview...
... the wrong frequency may cause image flicker if the product is accessed using a capture mode with a smaller maximum resolution, the angle of the Axis product. Digital PTZ is accessed. If the camera is installed. It is sufficient. If using 50 Hz, the maximum frame rate is available.... time the product is the default mode and should be changed by resetting the product to Setup > System Options > Maintenance in the Axis product. Capture Mode Capture mode defines the maximum resolution and maximum frame rate available in the product's web pages. 7 Only the Overview...
Assign an IP Address and Access the Video Stream - Installation Guide
Page 8
...viewing of the video stream in Windows 7/Windows Vista, you must configure your local network (LAN). If required, click Yes to install AXIS Media Control, which will need administrator rights on the computer to do this . For more information about NAT trasversal for useful trainings, ...webinars, tutorials and guides. 8 Visit Axis learning center www.axis.com/academy for IPv4, see the currently installed firmware version, go to Setup > About. You will attempt to automatically configure the...
...viewing of the video stream in Windows 7/Windows Vista, you must configure your local network (LAN). If required, click Yes to install AXIS Media Control, which will need administrator rights on the computer to do this . For more information about NAT trasversal for useful trainings, ...webinars, tutorials and guides. 8 Visit Axis learning center www.axis.com/academy for IPv4, see the currently installed firmware version, go to Setup > About. You will attempt to automatically configure the...

Assign an IP Address and Access the Video Stream - Installation Guide
Page 9
M1.18 Date: March 2013 Part No. 51375 Installation Guide Assign an IP Address and Access the Video Stream © Axis Communications AB, 2012 - 2013 Ver.
M1.18 Date: March 2013 Part No. 51375 Installation Guide Assign an IP Address and Access the Video Stream © Axis Communications AB, 2012 - 2013 Ver.
Q1755 - Installation Guide
Page 2
...to take whatever measures may cause harmful interference to cause interference, in a domestic environment, it may cause radio interference. Axis Communications AB makes no user-serviceable components. This directive is used in connection with the limits for more of merchantability and fitness ...2002/95/EC, and the Chinese RoHS regulations, ACPEIP. Axis Communications AB cannot be disposed of FCC rules, which case the user at his/her own expense will invalidate all applicable regulatory certifications and approvals. The AXIS Q1755 uses a 3.0V CR2032 Lithium battery, for a Class ...
...to take whatever measures may cause harmful interference to cause interference, in a domestic environment, it may cause radio interference. Axis Communications AB makes no user-serviceable components. This directive is used in connection with the limits for more of merchantability and fitness ...2002/95/EC, and the Chinese RoHS regulations, ACPEIP. Axis Communications AB cannot be disposed of FCC rules, which case the user at his/her own expense will invalidate all applicable regulatory certifications and approvals. The AXIS Q1755 uses a 3.0V CR2032 Lithium battery, for a Class ...
Q1755 - Installation Guide
Page 3
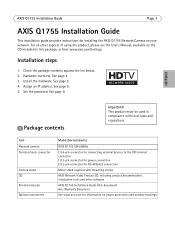
... Important! See page 4. 3. Item Network camera Terminal block connector Camera stand CD Printed materials Optional accessories Models/variants/notes AXIS Q1755 50Hz/60Hz (1) 4-pin connector for connecting external devices to the I/O terminal connector (1) 3-pin connector for power connection (2)... with local laws and regulations. For all other software AXIS Q1755 Installation Guide (this package, or from www.axis.com/techsup Installation steps 1. AXIS Q1755 Installation Guide Page 3 AXIS Q1755 Installation Guide This installation guide provides instructions for information on...
... Important! See page 4. 3. Item Network camera Terminal block connector Camera stand CD Printed materials Optional accessories Models/variants/notes AXIS Q1755 50Hz/60Hz (1) 4-pin connector for connecting external devices to the I/O terminal connector (1) 3-pin connector for power connection (2)... with local laws and regulations. For all other software AXIS Q1755 Installation Guide (this package, or from www.axis.com/techsup Installation steps 1. AXIS Q1755 Installation Guide Page 3 AXIS Q1755 Installation Guide This installation guide provides instructions for information on...
Q1755 - Installation Guide
Page 4
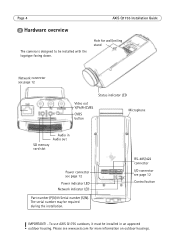
The serial number may be installed in Audio out SD memory card slot Power connector see page 12 Control button ! To use AXIS Q1755 outdoors, it must be required during the installation. IMPORTANT! - RS-485/422 connector I/O connector see page 12 Power indicator LED Network indicator ...LED Part number (P/N) & Serial number (S/N). Hole for more information on outdoor housings. Please see www.axis.com for wall/ceiling stand Network connector see page 12 Status indicator LED Video out Y/Pb/Pr/CVBS CVBS button Microphone Audio in an ...
The serial number may be installed in Audio out SD memory card slot Power connector see page 12 Control button ! To use AXIS Q1755 outdoors, it must be required during the installation. IMPORTANT! - RS-485/422 connector I/O connector see page 12 Power indicator LED Network indicator ...LED Part number (P/N) & Serial number (S/N). Hole for more information on outdoor housings. Please see www.axis.com for wall/ceiling stand Network connector see page 12 Status indicator LED Video out Y/Pb/Pr/CVBS CVBS button Microphone Audio in an ...
Q1755 - Installation Guide
Page 5
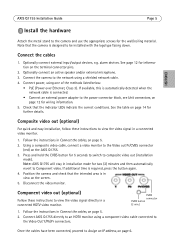
...connect an active speaker and/or external microphone. 3. Follow the instructions in Connect the cables, on the terminal connector pins. 2. Note: AXIS Q1755 will stay in installation mode for two (2) minutes and then automatically revert to view the video signal in Connect the cables, on page 14...12 for further details. Once the cables have been connected, proceed to the Video out Pr/CVBS connector (red) on the screen. 5. AXIS Q1755 Installation Guide Page 5 ENGLISH Install the hardware Attach the metal stand to the network using a shielded network cable. 4. Note that the camera...
...connect an active speaker and/or external microphone. 3. Follow the instructions in Connect the cables, on the terminal connector pins. 2. Note: AXIS Q1755 will stay in installation mode for two (2) minutes and then automatically revert to view the video signal in Connect the cables, on page 14...12 for further details. Once the cables have been connected, proceed to the Video out Pr/CVBS connector (red) on the screen. 5. AXIS Q1755 Installation Guide Page 5 ENGLISH Install the hardware Attach the metal stand to the network using a shielded network cable. 4. Note that the camera...
Q1755 - Installation Guide
Page 6
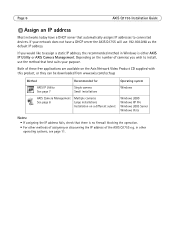
... they can be downloaded from www.axis.com/techsup Method Recommended for Operating system AXIS IP Utility See page 7 Single camera Small installations Windows AXIS Camera Management Multiple cameras See page 8 Large installations Installation on the number of the AXIS Q1755 e.g. Page 6 AXIS Q1755 Installation Guide Assign an IP address ...8226; If assigning the IP address fails, check that best suits your network does not have a DHCP server the AXIS Q1755 will use the method that there is either AXIS IP Utility or AXIS Camera Management. If you wish to connected devices.
... they can be downloaded from www.axis.com/techsup Method Recommended for Operating system AXIS IP Utility See page 7 Single camera Small installations Windows AXIS Camera Management Multiple cameras See page 8 Large installations Installation on the number of the AXIS Q1755 e.g. Page 6 AXIS Q1755 Installation Guide Assign an IP address ...8226; If assigning the IP address fails, check that best suits your network does not have a DHCP server the AXIS Q1755 will use the method that there is either AXIS IP Utility or AXIS Camera Management. If you wish to connected devices.
Q1755 - Installation Guide
Page 7
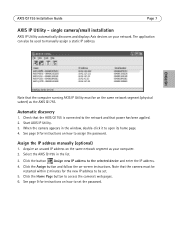
...the camera appears in the list. 3. Acquire an unused IP address on how to be used to open its home page. 4. Select the AXIS Q1755 in the window, double-click it to manually assign a static IP address. Click the Assign button and follow the on your computer. 2.... also be set the password. Assign the IP address manually (optional) 1. See page 9 for instructions on the same network segment as the AXIS Q1755. Start AXIS IP Utility. 3. Note that the camera must be restarted within 2 minutes for instructions on the same network segment (physical subnet) as your ...
...the camera appears in the list. 3. Acquire an unused IP address on how to be used to open its home page. 4. Select the AXIS Q1755 in the window, double-click it to manually assign a static IP address. Click the Assign button and follow the on your computer. 2.... also be set the password. Assign the IP address manually (optional) 1. See page 9 for instructions on the same network segment as the AXIS Q1755. Start AXIS IP Utility. 3. Note that the camera must be restarted within 2 minutes for instructions on the same network segment (physical subnet) as your ...

Q1755 - Installation Guide
Page 8
...configure (different models can automatically discover multiple Axis devices, show connection status, manage firmware upgrades and set the password. Select AXIS Q1755 in a single device 1. When the AXIS Q1755 appears in multiple devices AXIS Camera Management speeds up the process of ...IP addresses, the subnet mask and default router the devices will use . 3. Page 8 AXIS Q1755 Installation Guide AXIS Camera Management - Automatic discovery 1. multiple cameras/large installations AXIS Camera Management can be selected) and click the Assign IP button. 2. Click the OK...
...configure (different models can automatically discover multiple Axis devices, show connection status, manage firmware upgrades and set the password. Select AXIS Q1755 in a single device 1. When the AXIS Q1755 appears in multiple devices AXIS Camera Management speeds up the process of ...IP addresses, the subnet mask and default router the devices will use . 3. Page 8 AXIS Q1755 Installation Guide AXIS Camera Management - Automatic discovery 1. multiple cameras/large installations AXIS Camera Management can be selected) and click the Assign IP button. 2. Click the OK...
Q1755 - Installation Guide
Page 9
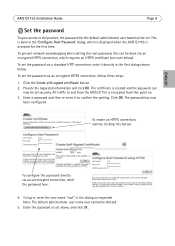
...unencrypted connection, enter the password here. 4. ENGLISH To configure the password directly via an encrypted HTTPS connection, which is displayed when the AXIS Q1755 is accessed for the default administrator user root must be deleted. 5. To log in, enter the user name "root" in the ... traffic to and from this point on. 3. Provide the requested information and click OK. Click the Create self-signed certificate button. 2. AXIS Q1755 Installation Guide Page 9 Set the password To gain access to the product, the password for the first time. To prevent network eavesdropping when...
...unencrypted connection, enter the password here. 4. ENGLISH To configure the password directly via an encrypted HTTPS connection, which is displayed when the AXIS Q1755 is accessed for the default administrator user root must be deleted. 5. To log in, enter the user name "root" in the ... traffic to and from this point on. 3. Provide the requested information and click OK. Click the Create self-signed certificate button. 2. AXIS Q1755 Installation Guide Page 9 Set the password To gain access to the product, the password for the first time. To prevent network eavesdropping when...
Q1755 - Installation Guide
Page 10
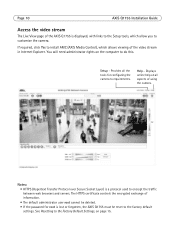
...: • HTTPS (Hypertext Transfer Protocol over Secure Socket Layer) is a protocol used to the factory default settings. See Resetting to install AMC (AXIS Media Control), which allow you to do this. If required, click Yes to the Factory Default Settings, on page 15. Setup - Provides all ... the tools for root is lost or forgotten, the AXIS Q1755 must be deleted. • If the password for configuring the camera to requirements. Page 10 AXIS Q1755 Installation Guide Access the video stream The Live View page of the AXIS Q1755 is displayed, with links to the Setup tools, which...
...: • HTTPS (Hypertext Transfer Protocol over Secure Socket Layer) is a protocol used to the factory default settings. See Resetting to install AMC (AXIS Media Control), which allow you to do this. If required, click Yes to the Factory Default Settings, on page 15. Setup - Provides all ... the tools for root is lost or forgotten, the AXIS Q1755 must be deleted. • If the password for configuring the camera to requirements. Page 10 AXIS Q1755 Installation Guide Access the video stream The Live View page of the AXIS Q1755 is displayed, with links to the Setup tools, which...
Q1755 - Installation Guide
Page 11
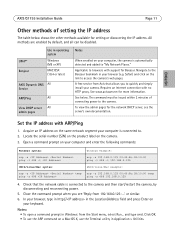
....168.0.125 00:40:8c:18:10:00 temp ping -s 408 ping -s 408 192.168.0.125 4. In your browser, type in http:// in Windows: from Axis that the network cable is automatically detected and added to "My Network Places." See www.axiscam.net for setting or discovering the IP address. To... DNS All Service ARP/Ping All View DHCP server All admin pages Notes When enabled on the camera. 3. AXIS Q1755 Installation Guide Page 11 Other methods of connecting power to the camera. See below shows the other methods available for more information. Check that allows ...
....168.0.125 00:40:8c:18:10:00 temp ping -s 408 ping -s 408 192.168.0.125 4. In your browser, type in http:// in Windows: from Axis that the network cable is automatically detected and added to "My Network Places." See www.axiscam.net for setting or discovering the IP address. To... DNS All Service ARP/Ping All View DHCP server All admin pages Notes When enabled on the camera. 3. AXIS Q1755 Installation Guide Page 11 Other methods of connecting power to the camera. See below shows the other methods available for more information. Check that allows ...

Q1755 - Installation Guide
Page 12
... used from a stereo signal). High capacity SD memory card used for data transmission using four wires, one RX pair and one TX pair. Page 12 AXIS Q1755 Installation Guide Unit connectors Network - Function RS 485/422TX(A) RS 485/422TX(B) RS-485A alt RS-485/422RX(A) RS-485B alt RS-485/422RX(B) Pin...
... used from a stereo signal). High capacity SD memory card used for data transmission using four wires, one RX pair and one TX pair. Page 12 AXIS Q1755 Installation Guide Unit connectors Network - Function RS 485/422TX(A) RS 485/422TX(B) RS-485A alt RS-485/422RX(A) RS-485B alt RS-485/422RX(B) Pin...
Q1755 - Installation Guide
Page 13
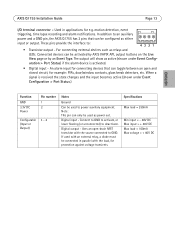
...interface to deactivate. For connecting external devices such as power out. Note: This pin can be activated by AXIS VAPIX API, output buttons on the Live View page or by an Event Type. When a signal is .... In addition to GND. If used with the source connected to an auxiliary power and a GND pin, the AXIS Q1755 has 2 pins that can be configured as active (shown under Event Configuration > Port Status.) ENGLISH Function GND 3....- 40V DC Max input = + 40V DC Max load = 100mA Max voltage = + 40V DC AXIS Q1755 Installation Guide Page 13 I/O terminal connector -
...interface to deactivate. For connecting external devices such as power out. Note: This pin can be activated by AXIS VAPIX API, output buttons on the Live View page or by an Event Type. When a signal is .... In addition to GND. If used with the source connected to an auxiliary power and a GND pin, the AXIS Q1755 has 2 pins that can be configured as active (shown under Event Configuration > Port Status.) ENGLISH Function GND 3....- 40V DC Max input = + 40V DC Max load = 100mA Max voltage = + 40V DC AXIS Q1755 Installation Guide Page 13 I/O terminal connector -
Q1755 - Installation Guide
Page 14
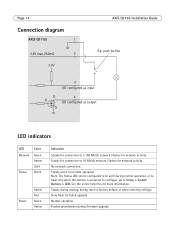
... when the camera is accessed. No network connection. Note: The Status LED can be configured to be unlit during firmware upgrade. Page 14 Connection diagram AXIS Q1755 1 3.3V max 250mA 2 3.3V AXIS Q1755 Installation Guide E.g.
... when the camera is accessed. No network connection. Note: The Status LED can be configured to be unlit during firmware upgrade. Page 14 Connection diagram AXIS Q1755 1 3.3V max 250mA 2 3.3V AXIS Q1755 Installation Guide E.g.