User Manual
Page 5
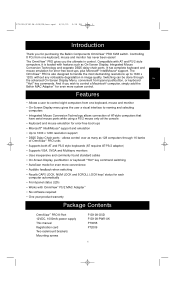
... warranty Package Contents OmniView™ PRO 8-Port 12VDC, 1000mA power supply This manual Registration card Two rackmount brackets Mounting screws F1D108-OSD F1D108-PWR-UK P73055 P72009 1 Switching can be done ...switching • AutoScan mode for purchasing the Belkin Components OmniView™ PRO KVM switch. The OmniView™ PRO gives you for even more system control. Features • Allows a user to 1600 x 1200 resolution support • DB25 Daisy-Chain ports - Controlling 8 PCs from one keyboard, mouse and monitor has never been easier! P73055/F1D108-OSD...
... warranty Package Contents OmniView™ PRO 8-Port 12VDC, 1000mA power supply This manual Registration card Two rackmount brackets Mounting screws F1D108-OSD F1D108-PWR-UK P73055 P72009 1 Switching can be done ...switching • AutoScan mode for purchasing the Belkin Components OmniView™ PRO KVM switch. The OmniView™ PRO gives you for even more system control. Features • Allows a user to 1600 x 1200 resolution support • DB25 Daisy-Chain ports - Controlling 8 PCs from one keyboard, mouse and monitor has never been easier! P73055/F1D108-OSD...

User Manual
Page 9
P73055/F1D108-OSD/EU/man.qxd 4/21/00 2:25 PM Page 5 Hardware Installation CONSOLE Keyboard, mouse and monitor Bank 0 (Master...for more units (for proper identification and usage. BANK numbers range from 1 through F are using the OmniView™ PRO in a single-unit configuration, it must be daisy-chained to be set as the MASTER (BANK 0). ...PRO unit is the unit that connects to F (hexadecimal), for a total of 128 computers! BANK 0 is to be used as a BANK. The MASTER bank is defined as a slave unit, then it is the MASTER bank, while banks 1 through F. 5 The DIP switches...
P73055/F1D108-OSD/EU/man.qxd 4/21/00 2:25 PM Page 5 Hardware Installation CONSOLE Keyboard, mouse and monitor Bank 0 (Master...for more units (for proper identification and usage. BANK numbers range from 1 through F are using the OmniView™ PRO in a single-unit configuration, it must be daisy-chained to be set as the MASTER (BANK 0). ...PRO unit is the unit that connects to F (hexadecimal), for a total of 128 computers! BANK 0 is to be used as a BANK. The MASTER bank is defined as a slave unit, then it is the MASTER bank, while banks 1 through F. 5 The DIP switches...

User Manual
Page 10
... everything is down 2. Find a convenient place to the sides of your cables so that your OmniView™ PRO. Set the DIP switches. If the OmniView™ PRO you have only one OmniView™ PRO, use a unique slave setting. Its 48.3cm form factor makes it ideal for damage caused.... properly. 6 Take note of the length of the OmniView™ PRO. Belkin Components will be held responsible for 48.3cm racks. Plugging and unplugging cables may cause irreversible damage to the previous section for more information. P73055/F1D108-OSD/EU/man.qxd 4/21/00 2:25 PM Page 6...
... everything is down 2. Find a convenient place to the sides of your cables so that your OmniView™ PRO. Set the DIP switches. If the OmniView™ PRO you have only one OmniView™ PRO, use a unique slave setting. Its 48.3cm form factor makes it ideal for damage caused.... properly. 6 Take note of the length of the OmniView™ PRO. Belkin Components will be held responsible for 48.3cm racks. Plugging and unplugging cables may cause irreversible damage to the previous section for more information. P73055/F1D108-OSD/EU/man.qxd 4/21/00 2:25 PM Page 6...

User Manual
Page 11
... included with the monitor symbol at the back of OmniView™ PRO. Using the VGA cable (Belkin Part# F2N025-XX-T or A3H981-XX), connect the male end of the cable to the OmniView™ PRO. Back of OmniView™ PRO Back of OmniView™ PRO PS/2 Style Keyboard PS/2 Mouse 5. P73055/F1D108-OSD/EU/man.qxd 4/21/00 2:25 PM Page...
... included with the monitor symbol at the back of OmniView™ PRO. Using the VGA cable (Belkin Part# F2N025-XX-T or A3H981-XX), connect the male end of the cable to the OmniView™ PRO. Back of OmniView™ PRO Back of OmniView™ PRO PS/2 Style Keyboard PS/2 Mouse 5. P73055/F1D108-OSD/EU/man.qxd 4/21/00 2:25 PM Page...
User Manual
Page 12
.... You can now power up all of the OmniView™ PRO. Back of PC Back of the OmniView™. Flip the power switch on the back of the cable connections. 8 The first computer will need a PS/2-AT keyboard adapter (Belkin Part# F2N018). Connect the first computer's mouse ...F1D108-OSD/EU/man.qxd 4/21/00 2:25 PM Page 8 Hardware Installation (continued) 6. You should see if the keyboard, mouse and monitor work.If this into any errors, double-check all of the OmniCube™. If your monitor. 11. Check to the PC1 PS/2 mouse port on the back of OmniView™ PRO...
.... You can now power up all of the OmniView™ PRO. Back of PC Back of the OmniView™. Flip the power switch on the back of the cable connections. 8 The first computer will need a PS/2-AT keyboard adapter (Belkin Part# F2N018). Connect the first computer's mouse ...F1D108-OSD/EU/man.qxd 4/21/00 2:25 PM Page 8 Hardware Installation (continued) 6. You should see if the keyboard, mouse and monitor work.If this into any errors, double-check all of the OmniCube™. If your monitor. 11. Check to the PC1 PS/2 mouse port on the back of OmniView™ PRO...
User Manual
Page 13
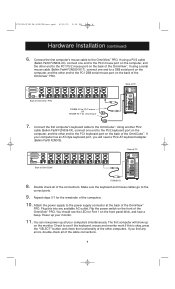
... • After setting the DIP switches on the DIP switch settings. The F1D108-CBL daisy-chain cable is a slave, then the other end goes to 9 in the diagram above). 9 Daisy-Chaining the OmniView™ PRO: The OmniView™ PRO can be daisy-chained with additional OmniView™ PRO units through F). DO NOT POWER ... to the "Master Input/ Slave Output" of the MASTER (such as cables 2 and 3 in the previous section. P73055/F1D108-OSD/EU/man.qxd 4/21/00 2:25 PM Page 9 Hardware Installation (continued) NOTE: Avoid pressing any from 1 through the DB25 daisy-chain ...
... • After setting the DIP switches on the DIP switch settings. The F1D108-CBL daisy-chain cable is a slave, then the other end goes to 9 in the diagram above). 9 Daisy-Chaining the OmniView™ PRO: The OmniView™ PRO can be daisy-chained with additional OmniView™ PRO units through F). DO NOT POWER ... to the "Master Input/ Slave Output" of the MASTER (such as cables 2 and 3 in the previous section. P73055/F1D108-OSD/EU/man.qxd 4/21/00 2:25 PM Page 9 Hardware Installation (continued) NOTE: Avoid pressing any from 1 through the DB25 daisy-chain ...

User Manual
Page 14
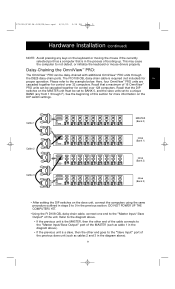
...units bank address. After all the units will benefit from the OSD control, even if the OmniView™ SE does not have to press the BANK/SCAN button many times to cycle through all of the On-Screen Display (OSD) menu feature. P73055/F1D108-OSD/EU/man.qxd 4/21/00 2:25 PM Page 10 Hardware...only). However, it is desirable to have booted up the computers connected to the newly added slave unit. Thus, all the computers have the OmniView™ PRO as the MASTER unit because of the preexisting slave units before reaching the newly added unit. • Now you can also be used with the...
...units bank address. After all the units will benefit from the OSD control, even if the OmniView™ SE does not have to press the BANK/SCAN button many times to cycle through all of the On-Screen Display (OSD) menu feature. P73055/F1D108-OSD/EU/man.qxd 4/21/00 2:25 PM Page 10 Hardware...only). However, it is desirable to have booted up the computers connected to the newly added slave unit. Thus, all the computers have the OmniView™ PRO as the MASTER unit because of the preexisting slave units before reaching the newly added unit. • Now you can also be used with the...
User Manual
Page 15
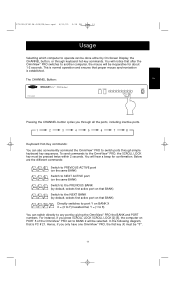
.... You will be selected. In the following diagram, that BANK) Directly switches to port Y on PORT 5 of the OmniView™ PRO set to the OmniView™ PRO, the SCROLL LOCK key must be pressed twice within 2 seconds. P73055/F1D108-OSD/EU/man.qxd 4/21/00 2:25 PM Page 11 Usage Selecting which ...computer to operate can be done either by On-Screen Display, the CHANNEL button, or through simple keyboard key sequences. For instance, if you only have one OmniView™ PRO, the first key (X)...
.... You will be selected. In the following diagram, that BANK) Directly switches to port Y on PORT 5 of the OmniView™ PRO set to the OmniView™ PRO, the SCROLL LOCK key must be pressed twice within 2 seconds. P73055/F1D108-OSD/EU/man.qxd 4/21/00 2:25 PM Page 11 Usage Selecting which ...computer to operate can be done either by On-Screen Display, the CHANNEL button, or through simple keyboard key sequences. For instance, if you only have one OmniView™ PRO, the first key (X)...
User Manual
Page 16
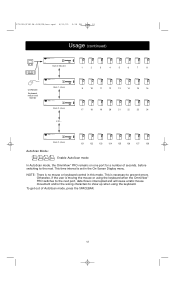
... show up when using the keyboard when the OmniView™ PRO switches to the next port, data flow is necessary to the next. Otherwise, if the user is moving the mouse or using the keyboard. To get out of seconds, before switching to prevent errors. P73055/F1D108-OSD/EU/man.qxd 4/21/00 2:25 PM ...20 21 22 23 24 Bank F (slave) 121 122 123 124 125 126 127 128 AutoScan Mode: Enable AutoScan mode In AutoScan mode, the OmniView™ PRO remains on one port for a number of AutoScan mode, press the SPACEBAR. 12 This time interval is no mouse or keyboard control in the On...
... show up when using the keyboard when the OmniView™ PRO switches to the next port, data flow is necessary to the next. Otherwise, if the user is moving the mouse or using the keyboard. To get out of seconds, before switching to prevent errors. P73055/F1D108-OSD/EU/man.qxd 4/21/00 2:25 PM ...20 21 22 23 24 Bank F (slave) 121 122 123 124 125 126 127 128 AutoScan Mode: Enable AutoScan mode In AutoScan mode, the OmniView™ PRO remains on one port for a number of AutoScan mode, press the SPACEBAR. 12 This time interval is no mouse or keyboard control in the On...
User Manual
Page 17
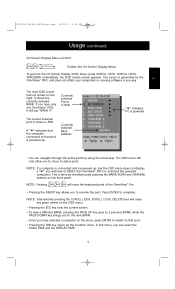
... Display Menu To get into the On-Screen Display (OSD) menu, press SCROLL LOCK, SCROLL LOCK, SPACEBAR. Currently selected Bank Address Belkin: F1D108-OSD 1. MAC OS8 ✹ 4. CHANNEL 6 7. NOTE: If a computer is connected and is generated by the En OmniView™ PRO, and does not affect your computers or running software ... the PAGE DOWN key brings you to the next BANK. • Once you have selected a computer on the menu, press ENTER to switch to rename the port. NT SERVER ✹ 3. Immediately, the OSD overlay screen appears. Press ENTER to active ports.
... Display Menu To get into the On-Screen Display (OSD) menu, press SCROLL LOCK, SCROLL LOCK, SPACEBAR. Currently selected Bank Address Belkin: F1D108-OSD 1. MAC OS8 ✹ 4. CHANNEL 6 7. NOTE: If a computer is connected and is generated by the En OmniView™ PRO, and does not affect your computers or running software ... the PAGE DOWN key brings you to the next BANK. • Once you have selected a computer on the menu, press ENTER to switch to rename the port. NT SERVER ✹ 3. Immediately, the OSD overlay screen appears. Press ENTER to active ports.

User Manual
Page 18
... unit is evident by a long BEEP, followed by two short beeps. 14 DISPLAY TIME: Amount of time the OmniView™ PRO stays on one port before switching to the next port when in AutoScan mode. P73055/F1D108-OSD/EU/man.qxd 4/21/00 2:25 PM Page 14 Usage (continued) SCAN TIME: Amount of time the...
... unit is evident by a long BEEP, followed by two short beeps. 14 DISPLAY TIME: Amount of time the OmniView™ PRO stays on one port before switching to the next port when in AutoScan mode. P73055/F1D108-OSD/EU/man.qxd 4/21/00 2:25 PM Page 14 Usage (continued) SCAN TIME: Amount of time the...
User Manual
Page 19
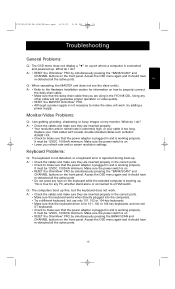
..., or a keyboard error is connected and powered up. P73055/F1D108-OSD/EU/man.qxd 4/21/00 2:25 PM Page 15 Troubleshooting General Problems: Q: The OSD menu does not display a "✹" on a port where a computer is reported during boot-up. A: • RESET the OmniView™ PRO by simultaneously pressing the BANK/SCAN and CHANNEL buttons on... they are inserted properly. • Your resolution and/or refresh rate is extremely high, or your VGA cables with coaxial, double-shielded cables such as Belkin A3H981-XX. • Check to a KVM switch.
..., or a keyboard error is connected and powered up. P73055/F1D108-OSD/EU/man.qxd 4/21/00 2:25 PM Page 15 Troubleshooting General Problems: Q: The OSD menu does not display a "✹" on a port where a computer is reported during boot-up. A: • RESET the OmniView™ PRO by simultaneously pressing the BANK/SCAN and CHANNEL buttons on... they are inserted properly. • Your resolution and/or refresh rate is extremely high, or your VGA cables with coaxial, double-shielded cables such as Belkin A3H981-XX. • Check to a KVM switch.
User Manual
Page 20
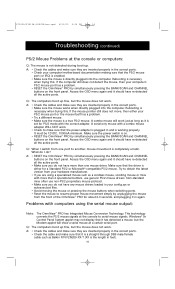
...power switch is the length in the correct ports. • Make sure the mouse works when directly plugged into the computer. Q: The computers boot up fine, but the mouse does not work just as long as Belkin P/N F2N209-XX-T (XX is on. • RESET the OmniView™ PRO by...as a cordless mouse, scrolling mouse or mice with computers using the serial mouse output: Note: The OmniView™ PRO has Integrated Mouse Conversion Technology. It must be 12VDC, 1000mA minimum. P73055/F1D108-OSD/EU/man.qxd 4/21/00 2:25 PM Page 16 Troubleshooting (continued) PS/2 Mouse Problems at the...
...power switch is the length in the correct ports. • Make sure the mouse works when directly plugged into the computer. Q: The computers boot up fine, but the mouse does not work just as long as Belkin P/N F2N209-XX-T (XX is on. • RESET the OmniView™ PRO by...as a cordless mouse, scrolling mouse or mice with computers using the serial mouse output: Note: The OmniView™ PRO has Integrated Mouse Conversion Technology. It must be 12VDC, 1000mA minimum. P73055/F1D108-OSD/EU/man.qxd 4/21/00 2:25 PM Page 16 Troubleshooting (continued) PS/2 Mouse Problems at the...
User Manual
Page 21
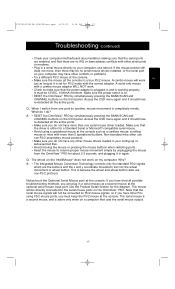
...sure the mouse (at the optional serial mouse input port. Make sure the power switch is set for the diagram. Why? Access the OSD menu again and it is on. • RESET the OmniView™ PRO by simultaneously pressing the BANK/SCAN and CHANNEL buttons on the front panel. Q:...as it should have tried all possible troubleshooting methods, you can plug in again. Non-standard mice often use non-PS/2 protocol. P73055/F1D108-OSD/EU/man.qxd 4/21/00 2:25 PM Page 17 Troubleshooting (continued) • Check your computer/motherboard documentation making sure that the serial...
...sure the mouse (at the optional serial mouse input port. Make sure the power switch is set for the diagram. Why? Access the OSD menu again and it is on. • RESET the OmniView™ PRO by simultaneously pressing the BANK/SCAN and CHANNEL buttons on the front panel. Q:...as it should have tried all possible troubleshooting methods, you can plug in again. Non-standard mice often use non-PS/2 protocol. P73055/F1D108-OSD/EU/man.qxd 4/21/00 2:25 PM Page 17 Troubleshooting (continued) • Check your computer/motherboard documentation making sure that the serial...
