User Manual
Page 5
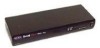
...keyboard "Hot" key commands. It has complete keyboard and mouse emulation for purchasing the Belkin Components OmniView™ PRO KVM switch. allows control over as many as On-Screen Display, Integrated Mouse Conversion Technology and separate DB25 daisy-chain ...; support. The OmniView™ PRO is loaded with OmniView™ PS/2 MAC Adapter™ • No software required • One year product warranty Package Contents OmniView™ PRO 8-Port 12VDC, 1000mA power supply This manual Registration card Two rackmount brackets Mounting screws F1D108-OSD F1D108-PWR-UK P73055...
...keyboard "Hot" key commands. It has complete keyboard and mouse emulation for purchasing the Belkin Components OmniView™ PRO KVM switch. allows control over as many as On-Screen Display, Integrated Mouse Conversion Technology and separate DB25 daisy-chain ...; support. The OmniView™ PRO is loaded with OmniView™ PS/2 MAC Adapter™ • No software required • One year product warranty Package Contents OmniView™ PRO 8-Port 12VDC, 1000mA power supply This manual Registration card Two rackmount brackets Mounting screws F1D108-OSD F1D108-PWR-UK P73055...
User Manual
Page 8
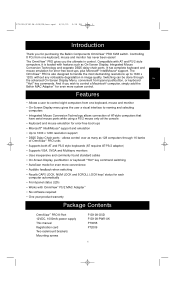
P73055/F1D108-OSD/EU/man.qxd 4/21/00 2:25 PM Page 4 List of each) Individual Cables and Adapters: 6 pin MiniDIN HDDB15 5 pin DIN DB9 HDDB15 • PS/2 cable for keyboard and mouse ports 6 pin MiniDIN male/male Part# F2N036-XX • Standard VGA cable for monitor port ...x F2N025-06-T • 1 x F2N209-06-T • 1 x F2N017 (see below for use with thumbscrews Part# A3H981-XX • PS/2 to the OmniView™ SE: PS/2 Cable Kit - We recommend purchasing Cable Kits based on the type of mouse port your computer uses. Below are the Belkin part numbers and their descriptions.
P73055/F1D108-OSD/EU/man.qxd 4/21/00 2:25 PM Page 4 List of each) Individual Cables and Adapters: 6 pin MiniDIN HDDB15 5 pin DIN DB9 HDDB15 • PS/2 cable for keyboard and mouse ports 6 pin MiniDIN male/male Part# F2N036-XX • Standard VGA cable for monitor port ...x F2N025-06-T • 1 x F2N209-06-T • 1 x F2N017 (see below for use with thumbscrews Part# A3H981-XX • PS/2 to the OmniView™ SE: PS/2 Cable Kit - We recommend purchasing Cable Kits based on the type of mouse port your computer uses. Below are the Belkin part numbers and their descriptions.

User Manual
Page 10
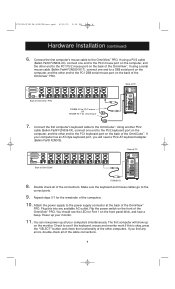
...to the sides of your cables so that your computers, OmniView™ PRO, keyboard, mouse, and monitor are using will not be daisy-chained off . P73055/F1D108-OSD/EU/man.qxd 4/21/00 2:25 PM Page 6 Hardware Installation (continued) PLEASE FOLLOW THIS INSTALLATION PROCEDURE EXACTLY. Belkin Components will be held ... for damage caused. 1. When mounting to a rack, attach the included brackets to put your computers and the OmniView™ PRO. Set the DIP switches. If you are distanced properly. 6 DIP SWITCH # 3 4 5 6 ON ON ON ON OFF ON ON ON ON OFF ON ON OFF OFF ON...
...to the sides of your cables so that your computers, OmniView™ PRO, keyboard, mouse, and monitor are using will not be daisy-chained off . P73055/F1D108-OSD/EU/man.qxd 4/21/00 2:25 PM Page 6 Hardware Installation (continued) PLEASE FOLLOW THIS INSTALLATION PROCEDURE EXACTLY. Belkin Components will be held ... for damage caused. 1. When mounting to a rack, attach the included brackets to put your computers and the OmniView™ PRO. Set the DIP switches. If you are distanced properly. 6 DIP SWITCH # 3 4 5 6 ON ON ON ON OFF ON ON ON ON OFF ON ON OFF OFF ON...

User Manual
Page 11
Connect the keyboard and mouse to the OmniView™ PRO. P73055/F1D108-OSD/EU/man.qxd 4/21/00 2:25 PM Page 7 Hardware Installation (continued) 3. If you have an AT-style keyboard, you will need an AT-PS/2 adapter (Belkin Part# F2N017). Using the VGA cable (Belkin Part# F2N025-XX-T or A3H981-XX), connect the male end of the...
Connect the keyboard and mouse to the OmniView™ PRO. P73055/F1D108-OSD/EU/man.qxd 4/21/00 2:25 PM Page 7 Hardware Installation (continued) 3. If you have an AT-style keyboard, you will need an AT-PS/2 adapter (Belkin Part# F2N017). Using the VGA cable (Belkin Part# F2N025-XX-T or A3H981-XX), connect the male end of the...
User Manual
Page 12
... Check to the PC1 DB9 serial mouse port on the front panel blink, and hear a beep. P73055/F1D108-OSD/EU/man.qxd 4/21/00 2:25 PM Page 8 Hardware Installation (continued) 6. If using a PS/2 cable (Belkin Part# F2N036-XX), connect one end to the PC1 PS/2 mouse port on the back of the OmniCube...™. Using another PS/2 cable (Belkin Part# F2N036-XX), connect one end to a DB9 serial port on the computer, and the other end to the OmniView™ PRO. Flip the power switch on the back of the OmniView™. If you will show up all of the computers. ...
... Check to the PC1 DB9 serial mouse port on the front panel blink, and hear a beep. P73055/F1D108-OSD/EU/man.qxd 4/21/00 2:25 PM Page 8 Hardware Installation (continued) 6. If using a PS/2 cable (Belkin Part# F2N036-XX), connect one end to the PC1 PS/2 mouse port on the back of the OmniCube...™. Using another PS/2 cable (Belkin Part# F2N036-XX), connect one end to a DB9 serial port on the computer, and the other end to the OmniView™ PRO. Flip the power switch on the back of the OmniView™. If you will show up all of the computers. ...
User Manual
Page 13
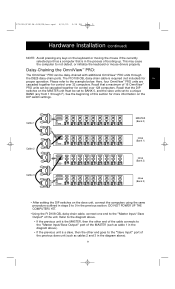
.... • Using the F1D108-CBL daisy-chain cable, connect one end to the "Slave Input" port of the unit. Recall that a maximum of 16 OmniView™ PRO units can be daisy-chained with additional OmniView™ PRO units through F). Cable 1 Cable 2 Cable 3 MASTER (Bank 0) slave (Bank 1) slave (Bank 2) slave (Bank 3) • After setting the DIP switches on the MASTER unit...
.... • Using the F1D108-CBL daisy-chain cable, connect one end to the "Slave Input" port of the unit. Recall that a maximum of 16 OmniView™ PRO units can be daisy-chained with additional OmniView™ PRO units through F). Cable 1 Cable 2 Cable 3 MASTER (Bank 0) slave (Bank 1) slave (Bank 2) slave (Bank 3) • After setting the DIP switches on the MASTER unit...
User Manual
Page 14
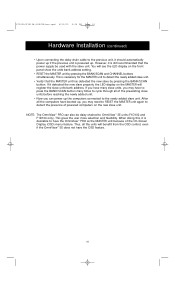
P73055/F1D108-OSD/EU/man.qxd 4/21/00 2:25 PM Page 10 Hardware Installation (continued) • Upon connecting the daisy-chain cable to the previous unit, it is desirable to have the OmniView™ PRO as the MASTER unit because of the On-Screen Display (OSD) menu feature. You will see the LED display ...on the MASTER will benefit from the OSD control, even if the OmniView™ SE does not...
P73055/F1D108-OSD/EU/man.qxd 4/21/00 2:25 PM Page 10 Hardware Installation (continued) • Upon connecting the daisy-chain cable to the previous unit, it is desirable to have the OmniView™ PRO as the MASTER unit because of the On-Screen Display (OSD) menu feature. You will see the LED display ...on the MASTER will benefit from the OSD control, even if the OmniView™ SE does not...
User Manual
Page 19
...the F1D108-CBL. Q: The computers boot up . A: • Check the cables ...OmniView™ PRO by simultaneously pressing the "BANK/SCAN" and CHANNEL buttons on the front panel. Access the OSD menu again and it should have re-detected all the active ports. • Do not press any PC, whether stand-alone or connected to a KVM switch. A: • Check the cables... and make sure they are inserted properly. • Your resolution and/or refresh rate is extremely high, or your VGA cables with coaxial, double-shielded cables such as Belkin...
...the F1D108-CBL. Q: The computers boot up . A: • Check the cables ...OmniView™ PRO by simultaneously pressing the "BANK/SCAN" and CHANNEL buttons on the front panel. Access the OSD menu again and it should have re-detected all the active ports. • Do not press any PC, whether stand-alone or connected to a KVM switch. A: • Check the cables... and make sure they are inserted properly. • Your resolution and/or refresh rate is extremely high, or your VGA cables with coaxial, double-shielded cables such as Belkin...
User Manual
Page 20
..., then either for about 2-3 seconds, and plugging it is a straight-through DB9 male/female cable such as Belkin P/N F2N209-XX-T (XX is the length in the correct ports. • Make sure the...config.sys or autoexec.bat files. • Avoid moving the mouse or pressing the mouse buttons when switching ports. • Reset the mouse to obtain the latest version from your PS/2 mouse port or ...PS/2 mouse port has a problem. • RESET the OmniView™ PRO by unplugging the mouse from one mouse driver. Q: The computers boot up . P73055/F1D108-OSD/EU/man.qxd 4/21/00 2:25 PM Page 16 ...
..., then either for about 2-3 seconds, and plugging it is a straight-through DB9 male/female cable such as Belkin P/N F2N209-XX-T (XX is the length in the correct ports. • Make sure the...config.sys or autoexec.bat files. • Avoid moving the mouse or pressing the mouse buttons when switching ports. • Reset the mouse to obtain the latest version from your PS/2 mouse port or ...PS/2 mouse port has a problem. • RESET the OmniView™ PRO by unplugging the mouse from one mouse driver. Q: The computers boot up . P73055/F1D108-OSD/EU/man.qxd 4/21/00 2:25 PM Page 16 ...
