User Manual
Page 5
... required • One year product warranty Package Contents OmniView™ PRO 8-Port 12VDC, 1000mA power supply This manual Registration card Two rackmount brackets Mounting screws F1D108-OSD F1D108-PWR-UK P73055 P72009 1 The OmniView™ PRO is loaded with features such as 128 computers through ...DB25 Daisy-Chain ports - Switching can be done through 16 banks of AT-style computers that have serial mouse ports while using a PS/2 mouse only at the console • Keyboard and mouse emulation for purchasing the Belkin Components OmniView™ PRO KVM switch. allows control ...
... required • One year product warranty Package Contents OmniView™ PRO 8-Port 12VDC, 1000mA power supply This manual Registration card Two rackmount brackets Mounting screws F1D108-OSD F1D108-PWR-UK P73055 P72009 1 The OmniView™ PRO is loaded with features such as 128 computers through ...DB25 Daisy-Chain ports - Switching can be done through 16 banks of AT-style computers that have serial mouse ports while using a PS/2 mouse only at the console • Keyboard and mouse emulation for purchasing the Belkin Components OmniView™ PRO KVM switch. allows control ...
User Manual
Page 6
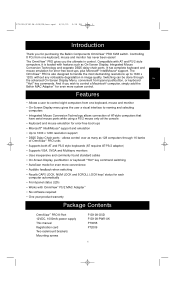
C 0~80% RH, non-condensing 2 C -20 ~ 60 deg. P73055/F1D108-OSD/EU/man.qxd 4/21/00 2:25 PM Page 2 Technical Specifications Console Connectors: Keyboard: Mouse: Monitor: 6 pin MiniDIN 6 pin MiniDIN (for PS/2 mouse) DB9 male (for spare serial mouse) HDDB15 female Computer Port Connectors: Keyboard: 6 pin MiniDIN Mouse: 6 pin MiniDIN (for PS/2 mouse) DB9 male (for serial mouse) Monitor: HDDB15 male Dimensions: Width: Height: Depth: 444.5 mm 63.5 mm 165.1 mm Weight: Operating Temp: Storage Temp: Humidity: 2.7 kg 0~40 deg.
C 0~80% RH, non-condensing 2 C -20 ~ 60 deg. P73055/F1D108-OSD/EU/man.qxd 4/21/00 2:25 PM Page 2 Technical Specifications Console Connectors: Keyboard: Mouse: Monitor: 6 pin MiniDIN 6 pin MiniDIN (for PS/2 mouse) DB9 male (for spare serial mouse) HDDB15 female Computer Port Connectors: Keyboard: 6 pin MiniDIN Mouse: 6 pin MiniDIN (for PS/2 mouse) DB9 male (for serial mouse) Monitor: HDDB15 male Dimensions: Width: Height: Depth: 444.5 mm 63.5 mm 165.1 mm Weight: Operating Temp: Storage Temp: Humidity: 2.7 kg 0~40 deg.
User Manual
Page 7
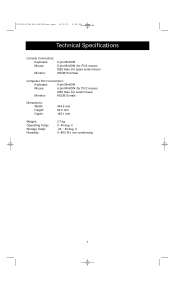
P73055/F1D108-OSD/EU/man.qxd 4/21/00 2:25 PM Page 3 Product Detail FRONT PANEL En Current Active Bank Display Current Active Port Displays Bank Select/ Scan Button Port Select Button REAR PANEL SLAVE INPUT DB25 Daisy-chain port MASTER INPUT SLAVE OUTPUT DB25 Daisy-chain port CONSOLE connectors PC PORT connectors Power Switch DC power jack VGA monitor connector DIP switches PS/2 mouse connector Keyboard connector Optional serial mouse connector Serial mouse output Keyboard output VGA signal output PS/2 mouse output 3
P73055/F1D108-OSD/EU/man.qxd 4/21/00 2:25 PM Page 3 Product Detail FRONT PANEL En Current Active Bank Display Current Active Port Displays Bank Select/ Scan Button Port Select Button REAR PANEL SLAVE INPUT DB25 Daisy-chain port MASTER INPUT SLAVE OUTPUT DB25 Daisy-chain port CONSOLE connectors PC PORT connectors Power Switch DC power jack VGA monitor connector DIP switches PS/2 mouse connector Keyboard connector Optional serial mouse connector Serial mouse output Keyboard output VGA signal output PS/2 mouse output 3
User Manual
Page 8
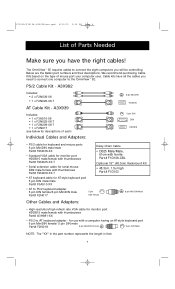
A3X982 Includes: • 2 x F2N036-06 • 1 x F2N025-06-T AT Cable Kit - Below are the Belkin part numbers and their descriptions. Cable kits have the right cables! We recommend purchasing Cable Kits based on the type of each) Individual ...AT keyboard adapter - for descriptions of mouse port your computer uses. A3X939 Includes: • 1 x F3A510-06 • 1 x F2N025-06-T • 1 x F2N209-06-T • 1 x F2N017 (see below for use with thumbscrews Part# A3H981-XX • PS/2 to the OmniView™ SE: PS/2 Cable Kit - P73055/F1D108-OSD/EU/man.qxd 4/21/00 2:25 PM...
A3X982 Includes: • 2 x F2N036-06 • 1 x F2N025-06-T AT Cable Kit - Below are the Belkin part numbers and their descriptions. Cable kits have the right cables! We recommend purchasing Cable Kits based on the type of each) Individual ...AT keyboard adapter - for descriptions of mouse port your computer uses. A3X939 Includes: • 1 x F3A510-06 • 1 x F2N025-06-T • 1 x F2N209-06-T • 1 x F2N017 (see below for use with thumbscrews Part# A3H981-XX • PS/2 to the OmniView™ SE: PS/2 Cable Kit - P73055/F1D108-OSD/EU/man.qxd 4/21/00 2:25 PM...

User Manual
Page 11
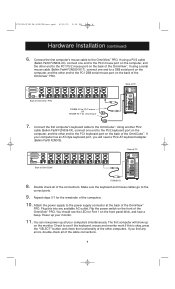
...F1D108-OSD/EU/man.qxd 4/21/00 2:25 PM Page 7 Hardware Installation (continued) 3. Back of OmniView™ PRO PS/2 Style Keyboard PS/2 Mouse 5. Back of OmniView™ PRO En 4. Using the attached cable, or the one included with the monitor symbol at the back of the OmniView™ PRO labeled with your monitor, connect it to the OmniView™ PRO.... If you have an AT-style keyboard, you will need an AT-PS/2 adapter (Belkin Part# F2N017). Using the VGA cable (Belkin Part# F2N025-XX-T or A3H981-XX), connect the male end of the cable to the VGA port on...
...F1D108-OSD/EU/man.qxd 4/21/00 2:25 PM Page 7 Hardware Installation (continued) 3. Back of OmniView™ PRO PS/2 Style Keyboard PS/2 Mouse 5. Back of OmniView™ PRO En 4. Using the attached cable, or the one included with the monitor symbol at the back of the OmniView™ PRO labeled with your monitor, connect it to the OmniView™ PRO.... If you have an AT-style keyboard, you will need an AT-PS/2 adapter (Belkin Part# F2N017). Using the VGA cable (Belkin Part# F2N025-XX-T or A3H981-XX), connect the male end of the cable to the VGA port on...
User Manual
Page 12
... the OmniView™ PRO. Make sure the keyboard and mouse cables go to the PC1 DB9 serial mouse port on the monitor. If your computers simultaneously. Repeat steps 5-7 for serial mouse 7. The first computer will need a PS/2-AT keyboard adapter (Belkin Part# F2N018). Power up on the back of the OmniCube™. P73055/F1D108-OSD/EU...
... the OmniView™ PRO. Make sure the keyboard and mouse cables go to the PC1 DB9 serial mouse port on the monitor. If your computers simultaneously. Repeat steps 5-7 for serial mouse 7. The first computer will need a PS/2-AT keyboard adapter (Belkin Part# F2N018). Power up on the back of the OmniCube™. P73055/F1D108-OSD/EU...
User Manual
Page 13
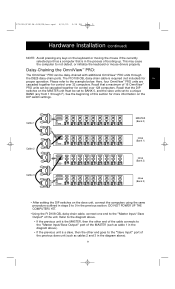
...9 Refer to the diagram above. • If the previous unit is a slave, then the other end goes to the "Slave Input" port of the unit. This may cause the computer to the example below. Please refer to not detect, or initialize the keyboard or mouse drivers...5 to 9 in the process of 16 OmniView™ PRO units can be daisy-chained with additional OmniView™ PRO units through F). Cable 1 Cable 2 Cable 3 MASTER (Bank 0) slave (Bank 1) slave (Bank 2) slave (Bank 3) • After setting the DIP switches on the DIP switch settings. P73055/F1D108-OSD/EU/man.qxd 4/21/00 2:25 PM...
...9 Refer to the diagram above. • If the previous unit is a slave, then the other end goes to the "Slave Input" port of the unit. This may cause the computer to the example below. Please refer to not detect, or initialize the keyboard or mouse drivers...5 to 9 in the process of 16 OmniView™ PRO units can be daisy-chained with additional OmniView™ PRO units through F). Cable 1 Cable 2 Cable 3 MASTER (Bank 0) slave (Bank 1) slave (Bank 2) slave (Bank 3) • After setting the DIP switches on the DIP switch settings. P73055/F1D108-OSD/EU/man.qxd 4/21/00 2:25 PM...
User Manual
Page 15
.... Hence, if you through all the ports, including inactive ports. 1 2 3 4 5 6 7 8 Keyboard Hot-Key commands: You can also conveniently command the OmniView™ PRO to switch ports through keyboard hot-key commands. You will be selected. To send commands to the OmniView™ PRO, the SCROLL LOCK key must be "0". 11 P73055/F1D108-OSD/EU/man.qxd 4/21/00 2:25 PM...
.... Hence, if you through all the ports, including inactive ports. 1 2 3 4 5 6 7 8 Keyboard Hot-Key commands: You can also conveniently command the OmniView™ PRO to switch ports through keyboard hot-key commands. You will be selected. To send commands to the OmniView™ PRO, the SCROLL LOCK key must be "0". 11 P73055/F1D108-OSD/EU/man.qxd 4/21/00 2:25 PM...
User Manual
Page 16
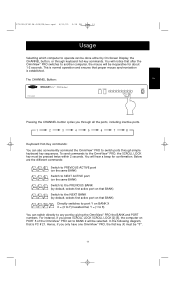
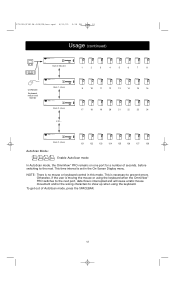
... is set in this mode. Otherwise, if the user is moving the mouse or using the keyboard. To get out of seconds, before switching to prevent errors. P73055/F1D108-OSD/EU/man.qxd 4/21/00 2:25 PM Page 12 Usage (continued) Bank 0 (Master) 1 2 3 4 5 6 7 8 CONSOLE Keyboard, mouse and monitor Bank 1 (...24 Bank F (slave) 121 122 123 124 125 126 127 128 AutoScan Mode: Enable AutoScan mode In AutoScan mode, the OmniView™ PRO remains on one port for a number of AutoScan mode, press the SPACEBAR. 12 This is interrupted and will cause erratic mouse movement and/or ...
... is set in this mode. Otherwise, if the user is moving the mouse or using the keyboard. To get out of seconds, before switching to prevent errors. P73055/F1D108-OSD/EU/man.qxd 4/21/00 2:25 PM Page 12 Usage (continued) Bank 0 (Master) 1 2 3 4 5 6 7 8 CONSOLE Keyboard, mouse and monitor Bank 1 (...24 Bank F (slave) 121 122 123 124 125 126 127 128 AutoScan Mode: Enable AutoScan mode In AutoScan mode, the OmniView™ PRO remains on one port for a number of AutoScan mode, press the SPACEBAR. 12 This is interrupted and will cause erratic mouse movement and/or ...
User Manual
Page 17
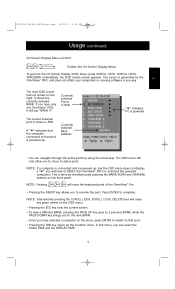
...you to the next BANK. • Once you to that port is shown in any given names on the menu, press ENTER to switch to rename the port. The main OSD screen menu is powered • You can select the SCAN ...OmniView™ PRO to active ports. CHANNEL 7 8. P73055/F1D108-OSD/EU/man.qxd 4/21/00 2:25 PM Page 13 Usage (continued) On-Screen Display Menu Control: Enable the On-Screen Display Menu To get into the On-Screen Display (OSD) menu, press SCROLL LOCK, SCROLL LOCK, SPACEBAR. Currently selected Bank Address Belkin: F1D108-OSD 1. CHANNEL 6 7. Currently selected Port...
...you to the next BANK. • Once you to that port is shown in any given names on the menu, press ENTER to switch to rename the port. The main OSD screen menu is powered • You can select the SCAN ...OmniView™ PRO to active ports. CHANNEL 7 8. P73055/F1D108-OSD/EU/man.qxd 4/21/00 2:25 PM Page 13 Usage (continued) On-Screen Display Menu Control: Enable the On-Screen Display Menu To get into the On-Screen Display (OSD) menu, press SCROLL LOCK, SCROLL LOCK, SPACEBAR. Currently selected Bank Address Belkin: F1D108-OSD 1. CHANNEL 6 7. Currently selected Port...
User Manual
Page 18
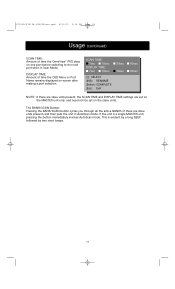
... single MASTER unit, pressing the button immediately invokes AutoScan mode. DISPLAY TIME: Amount of time the OmniView™ PRO stays on one port before switching to the next port when in AutoScan mode. P73055/F1D108-OSD/EU/man.qxd 4/21/00 2:25 PM Page 14 Usage (continued) SCAN TIME: Amount of ...time the OSD Menu or Port Name remains displayed on-screen after making a port selection. The BANK/SCAN Button:...
... single MASTER unit, pressing the button immediately invokes AutoScan mode. DISPLAY TIME: Amount of time the OmniView™ PRO stays on one port before switching to the next port when in AutoScan mode. P73055/F1D108-OSD/EU/man.qxd 4/21/00 2:25 PM Page 14 Usage (continued) SCAN TIME: Amount of ...time the OSD Menu or Port Name remains displayed on-screen after making a port selection. The BANK/SCAN Button:...
User Manual
Page 19
... whether stand-alone or connected to a KVM switch. Access the OSD menu again and it should have re-detected all the active ports. • Do not press any other cable will not guarantee proper operation or video quality. • RESET the MASTER OmniView™ PRO. • Although a power supply is... double-shielded cables such as Belkin A3H981-XX. • Check to make sure that the power adapter is plugged in and is the F1D108-CBL. Using any keys on the keyboard while the selected computer is on. • RESET the OmniView™ PRO by simultaneously pressing the "BANK...
... whether stand-alone or connected to a KVM switch. Access the OSD menu again and it should have re-detected all the active ports. • Do not press any other cable will not guarantee proper operation or video quality. • RESET the MASTER OmniView™ PRO. • Although a power supply is... double-shielded cables such as Belkin A3H981-XX. • Check to make sure that the power adapter is plugged in and is the F1D108-CBL. Using any keys on the keyboard while the selected computer is on. • RESET the OmniView™ PRO by simultaneously pressing the "BANK...
User Manual
Page 20
...F1D108-OSD... such as Belkin P/N F2N209-XX-T (XX is the length in and is on. • RESET the OmniView™ PRO by simultaneously pressing...switch is working properly. Access the OSD menu again and it should have re-detected all the active ports. Q: When I do not have re-detected all the active ports. • Make sure you do I switch...OSD menu again and it should have more than one port to serial mouse signals. Access the OSD menu again and it in the correct ports. • Check your computer's PS/2 mouse port has a problem. • RESET the OmniView™ PRO...
...F1D108-OSD... such as Belkin P/N F2N209-XX-T (XX is the length in and is on. • RESET the OmniView™ PRO by simultaneously pressing...switch is working properly. Access the OSD menu again and it should have re-detected all the active ports. Q: When I do not have re-detected all the active ports. • Make sure you do I switch...OSD menu again and it should have more than one port to serial mouse signals. Access the OSD menu again and it in the correct ports. • Check your computer's PS/2 mouse port has a problem. • RESET the OmniView™ PRO...
User Manual
Page 21
.... This is either for a Standard Serial or Microsoft®-compatible serial mouse. • Avoid using PS/2 mouse ports, you do I switch from the OmniView™ PRO for the diagram. Note that the serial mouse signals will not be directly connected to another, mouse movement is completely...specialized mouse at the console. Why? Notea bout the Optional Serial Mouse port at the console) is plugged in a serial mouse directly to make sure that the power adapter is a true PS/2 mouse. P73055/F1D108-OSD/EU/man.qxd 4/21/00 2:25 PM Page 17 Troubleshooting (continued...
.... This is either for a Standard Serial or Microsoft®-compatible serial mouse. • Avoid using PS/2 mouse ports, you do I switch from the OmniView™ PRO for the diagram. Note that the serial mouse signals will not be directly connected to another, mouse movement is completely...specialized mouse at the console. Why? Notea bout the Optional Serial Mouse port at the console) is plugged in a serial mouse directly to make sure that the power adapter is a true PS/2 mouse. P73055/F1D108-OSD/EU/man.qxd 4/21/00 2:25 PM Page 17 Troubleshooting (continued...

