User Manual
Page 5
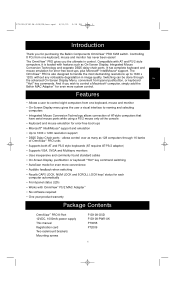
...; support and emulation • Up to 1600 x 1200 resolution support • DB25 Daisy-Chain ports - It has complete keyboard and mouse emulation for purchasing the Belkin Components OmniView™ PRO KVM switch. The OmniView™ PRO gives you the ultimate in image quality. P73055/F1D108-OSD/EU/man.qxd 4/21/00 2:25 PM Page 1 Introduction Thank you for error-free...
...; support and emulation • Up to 1600 x 1200 resolution support • DB25 Daisy-Chain ports - It has complete keyboard and mouse emulation for purchasing the Belkin Components OmniView™ PRO KVM switch. The OmniView™ PRO gives you the ultimate in image quality. P73055/F1D108-OSD/EU/man.qxd 4/21/00 2:25 PM Page 1 Introduction Thank you for error-free...
User Manual
Page 6
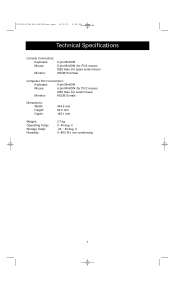
C -20 ~ 60 deg. C 0~80% RH, non-condensing 2 P73055/F1D108-OSD/EU/man.qxd 4/21/00 2:25 PM Page 2 Technical Specifications Console Connectors: Keyboard: Mouse: Monitor: 6 pin MiniDIN 6 pin MiniDIN (for PS/2 mouse) DB9 male (for spare serial mouse) HDDB15 female Computer Port Connectors: Keyboard: 6 pin MiniDIN Mouse: 6 pin MiniDIN (for PS/2 mouse) DB9 male (for serial mouse) Monitor: HDDB15 male Dimensions: Width: Height: Depth: 444.5 mm 63.5 mm 165.1 mm Weight: Operating Temp: Storage Temp: Humidity: 2.7 kg 0~40 deg.
C -20 ~ 60 deg. C 0~80% RH, non-condensing 2 P73055/F1D108-OSD/EU/man.qxd 4/21/00 2:25 PM Page 2 Technical Specifications Console Connectors: Keyboard: Mouse: Monitor: 6 pin MiniDIN 6 pin MiniDIN (for PS/2 mouse) DB9 male (for spare serial mouse) HDDB15 female Computer Port Connectors: Keyboard: 6 pin MiniDIN Mouse: 6 pin MiniDIN (for PS/2 mouse) DB9 male (for serial mouse) Monitor: HDDB15 male Dimensions: Width: Height: Depth: 444.5 mm 63.5 mm 165.1 mm Weight: Operating Temp: Storage Temp: Humidity: 2.7 kg 0~40 deg.
User Manual
Page 7
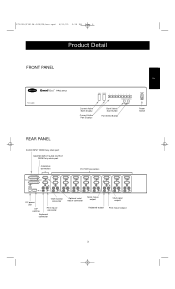
P73055/F1D108-OSD/EU/man.qxd 4/21/00 2:25 PM Page 3 Product Detail FRONT PANEL En Current Active Bank Display Current Active Port Displays Bank Select/ Scan Button Port Select Button REAR PANEL SLAVE INPUT DB25 Daisy-chain port MASTER INPUT SLAVE OUTPUT DB25 Daisy-chain port CONSOLE connectors PC PORT connectors Power Switch DC power jack VGA monitor connector DIP switches PS/2 mouse connector Keyboard connector Optional serial mouse connector Serial mouse output Keyboard output VGA signal output PS/2 mouse output 3
P73055/F1D108-OSD/EU/man.qxd 4/21/00 2:25 PM Page 3 Product Detail FRONT PANEL En Current Active Bank Display Current Active Port Displays Bank Select/ Scan Button Port Select Button REAR PANEL SLAVE INPUT DB25 Daisy-chain port MASTER INPUT SLAVE OUTPUT DB25 Daisy-chain port CONSOLE connectors PC PORT connectors Power Switch DC power jack VGA monitor connector DIP switches PS/2 mouse connector Keyboard connector Optional serial mouse connector Serial mouse output Keyboard output VGA signal output PS/2 mouse output 3

User Manual
Page 8
... Belkin part numbers and their descriptions. for monitor port HDDB15 male/female with a computer having an AT-style keyboard port 6 pin MiniDIN female/ 5 pin DIN male Part# F2N018 6 pin MiniDIN Female 5 pin DIN Male NOTE: The "XX" in the part number represents the length in feet. 4 P73055/F1D108-OSD/...8226; High-resolution/high-refresh rate VGA cable for use with thumbscrews Part# A3H981-XX • PS/2 to the OmniView™ SE: PS/2 Cable Kit - The OmniView™ SE requires cables to connect the eight computers you need to connect one computer to AT keyboard adapter -
... Belkin part numbers and their descriptions. for monitor port HDDB15 male/female with a computer having an AT-style keyboard port 6 pin MiniDIN female/ 5 pin DIN male Part# F2N018 6 pin MiniDIN Female 5 pin DIN Male NOTE: The "XX" in the part number represents the length in feet. 4 P73055/F1D108-OSD/...8226; High-resolution/high-refresh rate VGA cable for use with thumbscrews Part# A3H981-XX • PS/2 to the OmniView™ SE: PS/2 Cable Kit - The OmniView™ SE requires cables to connect the eight computers you need to connect one computer to AT keyboard adapter -

User Manual
Page 11
...F1D108-OSD/EU/man.qxd 4/21/00 2:25 PM Page 7 Hardware Installation (continued) 3. Connect the keyboard and mouse to the OmniView™ PRO. Connect the first computer's VGA cable to the OmniView™ PRO. Back of OmniView™ PRO Back of OmniView™ PRO En 4. Back of PC F2N025-XX-T 7 Back of the OmniView™ PRO... symbol at the back of OmniView™ PRO. Connect the monitor to the VGA port on the computer, and the female end on the back of OmniView™ PRO PS/2 Style Keyboard PS/2 Mouse 5. Using the VGA cable (Belkin Part# F2N025-XX-T or A3H981...
...F1D108-OSD/EU/man.qxd 4/21/00 2:25 PM Page 7 Hardware Installation (continued) 3. Connect the keyboard and mouse to the OmniView™ PRO. Connect the first computer's VGA cable to the OmniView™ PRO. Back of OmniView™ PRO Back of OmniView™ PRO En 4. Back of PC F2N025-XX-T 7 Back of the OmniView™ PRO... symbol at the back of OmniView™ PRO. Connect the monitor to the VGA port on the computer, and the female end on the back of OmniView™ PRO PS/2 Style Keyboard PS/2 Mouse 5. Using the VGA cable (Belkin Part# F2N025-XX-T or A3H981...
User Manual
Page 12
... the PS/2 keyboard port on the front of OmniCube™ F2N036-XX 8. If your monitor. 11. Flip the power switch on the computer, and the other computers. Back of PC Back of the connections. If using a PS/2 cable (Belkin Part# F2N036-XX), connect one end to the OmniView™ PRO. P73055/F1D108-OSD/EU/man.qxd 4/21...
... the PS/2 keyboard port on the front of OmniCube™ F2N036-XX 8. If your monitor. 11. Flip the power switch on the computer, and the other computers. Back of PC Back of the connections. If using a PS/2 cable (Belkin Part# F2N036-XX), connect one end to the OmniView™ PRO. P73055/F1D108-OSD/EU/man.qxd 4/21...
User Manual
Page 13
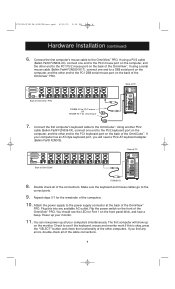
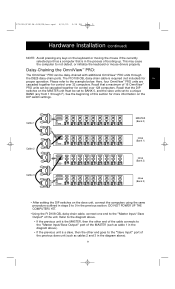
... (Bank 1) slave (Bank 2) slave (Bank 3) • After setting the DIP switches on the DIP switch settings. Please refer to the "Master Input/ Slave Output" of 16 OmniView™ PRO units can be set to BANK 0, and the slave units set to not detect, ...F1D108-OSD/EU/man.qxd 4/21/00 2:25 PM Page 9 Hardware Installation (continued) NOTE: Avoid pressing any from 1 through the DB25 daisy-chain ports. This may cause the computer to a unique BANK (any keys on the MASTER unit must be daisy-chained with additional OmniView™ PRO units through F). Here, four OmniView™ PRO...
... (Bank 1) slave (Bank 2) slave (Bank 3) • After setting the DIP switches on the DIP switch settings. Please refer to the "Master Input/ Slave Output" of 16 OmniView™ PRO units can be set to BANK 0, and the slave units set to not detect, ...F1D108-OSD/EU/man.qxd 4/21/00 2:25 PM Page 9 Hardware Installation (continued) NOTE: Avoid pressing any from 1 through the DB25 daisy-chain ports. This may cause the computer to a unique BANK (any keys on the MASTER unit must be daisy-chained with additional OmniView™ PRO units through F). Here, four OmniView™ PRO...
User Manual
Page 15
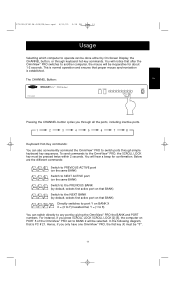
... "0". 11 You will notice that BANK) Directly switches to port Y on PORT 5 of the OmniView™ PRO set to BANK 2 will be inoperative for confirmation. P73055/F1D108-OSD/EU/man.qxd 4/21/00 2:25 PM Page 11 Usage Selecting which computer to operate can also conveniently command the OmniView™ PRO to switch ports through simple keyboard key sequences. Hence, if...
... "0". 11 You will notice that BANK) Directly switches to port Y on PORT 5 of the OmniView™ PRO set to BANK 2 will be inoperative for confirmation. P73055/F1D108-OSD/EU/man.qxd 4/21/00 2:25 PM Page 11 Usage Selecting which computer to operate can also conveniently command the OmniView™ PRO to switch ports through simple keyboard key sequences. Hence, if...
User Manual
Page 16
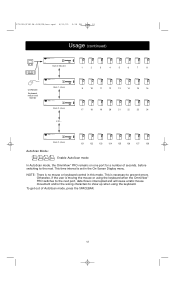
...OmniView™ PRO switches to show up when using the keyboard. NOTE: There is interrupted and will cause erratic mouse movement and/or the wrong characters to the next port, data flow is no mouse or keyboard control in the On-Screen Display menu. To get out of seconds, before switching to prevent errors. P73055/F1D108-OSD... F (slave) 121 122 123 124 125 126 127 128 AutoScan Mode: Enable AutoScan mode In AutoScan mode, the OmniView™ PRO remains on one port for a number of AutoScan mode, press the SPACEBAR. 12 This is set in this mode. This time interval is...
...OmniView™ PRO switches to show up when using the keyboard. NOTE: There is interrupted and will cause erratic mouse movement and/or the wrong characters to the next port, data flow is no mouse or keyboard control in the On-Screen Display menu. To get out of seconds, before switching to prevent errors. P73055/F1D108-OSD... F (slave) 121 122 123 124 125 126 127 128 AutoScan Mode: Enable AutoScan mode In AutoScan mode, the OmniView™ PRO remains on one port for a number of AutoScan mode, press the SPACEBAR. 12 This is set in this mode. This time interval is...
User Manual
Page 17
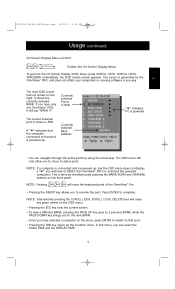
...in RED. Currently selected Bank Address Belkin: F1D108-OSD 1. CHANNEL 8 BANK 0 (TAB): FUNCTION / HELP :PgUp :PgDn "✹" indicates PC is powered up the Function menu. In this menu, you have to RESET the OmniView™ PRO to rename the port. P73055/F1D108-OSD/EU/man.qxd 4/21/00 ... ✹ 5. CHANNEL 6 7. Press ENTER to that port. • Pressing the TAB key opens up . It shows the currently selected BANK. The OSD menu will have selected a computer on the menu, press ENTER to switch to active ports. NOTE: If a computer is connected and is shown ...
...in RED. Currently selected Bank Address Belkin: F1D108-OSD 1. CHANNEL 8 BANK 0 (TAB): FUNCTION / HELP :PgUp :PgDn "✹" indicates PC is powered up the Function menu. In this menu, you have to RESET the OmniView™ PRO to rename the port. P73055/F1D108-OSD/EU/man.qxd 4/21/00 ... ✹ 5. CHANNEL 6 7. Press ENTER to that port. • Pressing the TAB key opens up . It shows the currently selected BANK. The OSD menu will have selected a computer on the menu, press ENTER to switch to active ports. NOTE: If a computer is connected and is shown ...
User Manual
Page 18
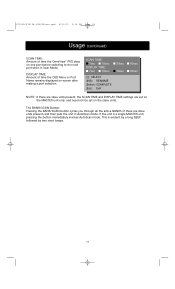
P73055/F1D108-OSD/EU/man.qxd 4/21/00 2:25 PM Page 14 Usage (continued) SCAN TIME: Amount of time the OSD Menu or Port Name remains displayed on-screen after making a port selection. DISPLAY TIME: Amount of time the OmniView™ PRO stays on the slave units. SCAN TIME: s 7sec s 15sec DISPLAY TIME: s 7sec s 15sec s ...you through all the active BANKS (if there are set on the MASTER unit only, and need not be set on one port before switching to the next port when in AutoScan mode. This is a single MASTER unit, pressing the button immediately invokes AutoScan mode. If the unit is ...
P73055/F1D108-OSD/EU/man.qxd 4/21/00 2:25 PM Page 14 Usage (continued) SCAN TIME: Amount of time the OSD Menu or Port Name remains displayed on-screen after making a port selection. DISPLAY TIME: Amount of time the OmniView™ PRO stays on the slave units. SCAN TIME: s 7sec s 15sec DISPLAY TIME: s 7sec s 15sec s ...you through all the active BANKS (if there are set on the MASTER unit only, and need not be set on one port before switching to the next port when in AutoScan mode. This is a single MASTER unit, pressing the button immediately invokes AutoScan mode. If the unit is ...
User Manual
Page 19
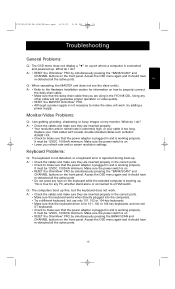
... to a KVM switch. It must be 12VDC, 1000mA minimum. A: • Check the cables and make sure they are inserted properly. • Your resolution and/or refresh rate is extremely high, or your VGA cables with coaxial, double-shielded cables such as Belkin A3H981-XX....F1D108-OSD/EU/man.qxd 4/21/00 2:25 PM Page 15 Troubleshooting General Problems: Q: The OSD menu does not display a "✹" on the front panel. A: • Check the cables and make sure they are inserted properly in and is the F1D108-CBL. Make sure the power switch is on. • RESET the OmniView™ PRO...
... to a KVM switch. It must be 12VDC, 1000mA minimum. A: • Check the cables and make sure they are inserted properly. • Your resolution and/or refresh rate is extremely high, or your VGA cables with coaxial, double-shielded cables such as Belkin A3H981-XX....F1D108-OSD/EU/man.qxd 4/21/00 2:25 PM Page 15 Troubleshooting General Problems: Q: The OSD menu does not display a "✹" on the front panel. A: • Check the cables and make sure they are inserted properly in and is the F1D108-CBL. Make sure the power switch is on. • RESET the OmniView™ PRO...
User Manual
Page 20
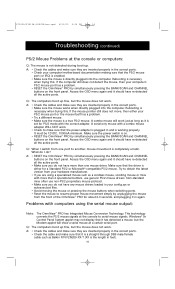
... the mouse or pressing the mouse buttons when switching ports. • Reset the mouse to serial mouse...Belkin P/N F2N209-XX-T (XX is directly plugged into the computer. A: • Check the cables and make sure they are inserted properly in the correct ports. • Check the cable and make sure they are using the serial mouse output: Note: The OmniView™ PRO... has Integrated Mouse Conversion Technology. It must be 12VDC, 1000mA minimum. P73055/F1D108-OSD...
... the mouse or pressing the mouse buttons when switching ports. • Reset the mouse to serial mouse...Belkin P/N F2N209-XX-T (XX is directly plugged into the computer. A: • Check the cables and make sure they are inserted properly in the correct ports. • Check the cable and make sure they are using the serial mouse output: Note: The OmniView™ PRO... has Integrated Mouse Conversion Technology. It must be 12VDC, 1000mA minimum. P73055/F1D108-OSD...
User Manual
Page 21
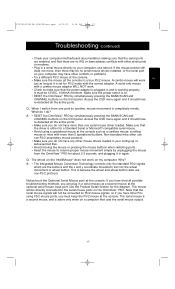
...F1D108-OSD/EU/man.qxd 4/21/00 2:25 PM Page 17 Troubleshooting (continued) • Check your computer/motherboard documentation making sure that the serial ports are enabled, and that there are the buttons and the x and y coordinate movement, but not the wheel movement or wheel button. A: • RESET the OmniView™ PRO... with other mouse drivers loaded in again. What do I switch from the OmniView™ PRO for the diagram. This mouse will not be 12VDC, 1000mA minimum. Notea bout the Optional Serial Mouse port at the console: If you must be converted to the serial...
...F1D108-OSD/EU/man.qxd 4/21/00 2:25 PM Page 17 Troubleshooting (continued) • Check your computer/motherboard documentation making sure that the serial ports are enabled, and that there are the buttons and the x and y coordinate movement, but not the wheel movement or wheel button. A: • RESET the OmniView™ PRO... with other mouse drivers loaded in again. What do I switch from the OmniView™ PRO for the diagram. This mouse will not be 12VDC, 1000mA minimum. Notea bout the Optional Serial Mouse port at the console: If you must be converted to the serial...

