
User Manual
Page 3
... the Switch on 2x8 and 2x16 models only. Hosts 1 & 2 Hosts 3 & 4 STEP 4: Connect the console keyboard, monitor, and mouse.* (For mouse and keyboard, use PS/2 or USB or any combination of "Daisy-Chain Configuration" below. STEP 1: Remove the contents from the box. Otherwise, proceed to Step 1 of both.) *Note: Dual-console support...
... the Switch on 2x8 and 2x16 models only. Hosts 1 & 2 Hosts 3 & 4 STEP 4: Connect the console keyboard, monitor, and mouse.* (For mouse and keyboard, use PS/2 or USB or any combination of "Daisy-Chain Configuration" below. STEP 1: Remove the contents from the box. Otherwise, proceed to Step 1 of both.) *Note: Dual-console support...

User Manual
Page 4
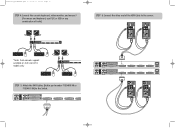
Hosts 1 & 2 Hosts 3 & 4 Hosts 5 & 6 Hosts 7 & 8 PS/2 connection STEP 7: Connect the IEC power cable to the Switch (Belkin part number F1D9400-XX or F1D9401-XX). Check for keyboard, video, and mouse function. P74291ea_F1DExxxC.qxd 30-10-2003 13:56 Page 6 STEP 5: Attach the ... Cables to the Switch and power up the connected servers. Hosts 1 & 2 Hosts 3 & 4 Hosts 5 & 6 Hosts 7 & 8 STEP 8: Power up the unit. Hosts 1 & 2 Hosts 3 & 4 Hosts 1 & 2 Hosts 3 & 4 Hosts 5 & 6 Hosts 7 & 8 USB connection STEP 6: Connect the other end of the KVM Cable to the servers.
Hosts 1 & 2 Hosts 3 & 4 Hosts 5 & 6 Hosts 7 & 8 PS/2 connection STEP 7: Connect the IEC power cable to the Switch (Belkin part number F1D9400-XX or F1D9401-XX). Check for keyboard, video, and mouse function. P74291ea_F1DExxxC.qxd 30-10-2003 13:56 Page 6 STEP 5: Attach the ... Cables to the Switch and power up the connected servers. Hosts 1 & 2 Hosts 3 & 4 Hosts 5 & 6 Hosts 7 & 8 STEP 8: Power up the unit. Hosts 1 & 2 Hosts 3 & 4 Hosts 1 & 2 Hosts 3 & 4 Hosts 5 & 6 Hosts 7 & 8 USB connection STEP 6: Connect the other end of the KVM Cable to the servers.
User Manual
Page 6
...30-10-2003 13:56 Page 10 STEP 4: Connect the console keyboard, video monitor, and mouse.* (For mouse and keyboard, use PS/2 or USB or any combination of both.) STEP 6: Connect the other end of the KVM Cable to the Switch. Hosts 1 & 2 Hosts 3 & 4... Hosts 5 & 6 Hosts 7 & 8 *Note: Dual-console support available on 2x8 and 2x16 models only Hosts 1 & 2 Hosts 3 & 4 Hosts 5 STEP 5: Attach the KVM Cables (Belkin part number F1D9400-XX or F1D9401-XX) to the server. Hosts 1 & 2 Hosts 3 & 4 Hosts 5 & 6 Hosts 7 Hosts 1 & 2 Hosts 3 & 4 Hosts 5 & 6 Hosts 7 & 8 Hosts 1 & ...
...30-10-2003 13:56 Page 10 STEP 4: Connect the console keyboard, video monitor, and mouse.* (For mouse and keyboard, use PS/2 or USB or any combination of both.) STEP 6: Connect the other end of the KVM Cable to the Switch. Hosts 1 & 2 Hosts 3 & 4... Hosts 5 & 6 Hosts 7 & 8 *Note: Dual-console support available on 2x8 and 2x16 models only Hosts 1 & 2 Hosts 3 & 4 Hosts 5 STEP 5: Attach the KVM Cables (Belkin part number F1D9400-XX or F1D9401-XX) to the server. Hosts 1 & 2 Hosts 3 & 4 Hosts 5 & 6 Hosts 7 Hosts 1 & 2 Hosts 3 & 4 Hosts 5 & 6 Hosts 7 & 8 Hosts 1 & ...


