User Manual
Page 3
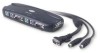
...integrity at high resolutions, 75-Ohm coaxial VGA cabling is included and recommended for simple, manual port selection. Control multiple computers using designated key commands. Belkin OmniView KVM Cables offer the highest quality possible to your keyboard. AutoScan The AutoScan feature allows you to ...all operating computers connected to ensure that your KVM Switch: F1D9000-XX OmniView E Series KVM Cable kit (PS/2 Style) (-XX denotes the length in feet) 3 12/11/04 11:33:46 am OVERVIEW The Belkin KVM Switch allows you to the Switch, you will need one VGA cable, one ...
...integrity at high resolutions, 75-Ohm coaxial VGA cabling is included and recommended for simple, manual port selection. Control multiple computers using designated key commands. Belkin OmniView KVM Cables offer the highest quality possible to your keyboard. AutoScan The AutoScan feature allows you to ...all operating computers connected to ensure that your KVM Switch: F1D9000-XX OmniView E Series KVM Cable kit (PS/2 Style) (-XX denotes the length in feet) 3 12/11/04 11:33:46 am OVERVIEW The Belkin KVM Switch allows you to the Switch, you will need one VGA cable, one ...
User Manual
Page 4
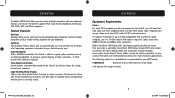
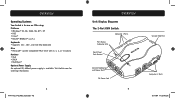
Visit belkin.com for use on CPUs using: Platforms • Windows® 95, 98, 2000, Me, NT®, XP • DOS • Linux® • Novell® ... Power Supply An optional 9V, 600mA power supply is available. OVERVIEW Operating Systems Your Switch is for ordering information. 4 P74711uk_F1DJ10x_man.indd 4-5 OVERVIEW Unit Display Diagrams The 2-Port KVM Switch: Computer 1 Ports Port Status Indicator LEDs Front-Panel Push Button Console Keyboard and Mouse Ports DC Power Jack 5 Console VGA Port Computer 2 Ports 12/11/04 11:33:46 am
Visit belkin.com for use on CPUs using: Platforms • Windows® 95, 98, 2000, Me, NT®, XP • DOS • Linux® • Novell® ... Power Supply An optional 9V, 600mA power supply is available. OVERVIEW Operating Systems Your Switch is for ordering information. 4 P74711uk_F1DJ10x_man.indd 4-5 OVERVIEW Unit Display Diagrams The 2-Port KVM Switch: Computer 1 Ports Port Status Indicator LEDs Front-Panel Push Button Console Keyboard and Mouse Ports DC Power Jack 5 Console VGA Port Computer 2 Ports 12/11/04 11:33:46 am

User Manual
Page 5
OVERVIEW The 4-Port KVM Switch: Computer 4 Ports Front-Panel Push Button Computer 2 Ports Port Status Indicator LEDs Console VGA Port Computer 3 Ports Console Keyboard and Mouse Ports DC Power Jack P74711uk_F1DJ10x_man.indd 6-7 Computer 1 Ports 6 OVERVIEW Specifications Part No.: F1DJ102P, F1DJ104P Power: Optional 9V DC, 600mA adapter with center-pin positive polarity PCs Supported: F1DJ102P: 2 F1DJ104P: 4 Keyboard Emulation: PS/2 Mouse Emulation: PS/2 and Serial...
OVERVIEW The 4-Port KVM Switch: Computer 4 Ports Front-Panel Push Button Computer 2 Ports Port Status Indicator LEDs Console VGA Port Computer 3 Ports Console Keyboard and Mouse Ports DC Power Jack P74711uk_F1DJ10x_man.indd 6-7 Computer 1 Ports 6 OVERVIEW Specifications Part No.: F1DJ102P, F1DJ104P Power: Optional 9V DC, 600mA adapter with center-pin positive polarity PCs Supported: F1DJ102P: 2 F1DJ104P: 4 Keyboard Emulation: PS/2 Mouse Emulation: PS/2 and Serial...
User Manual
Page 6
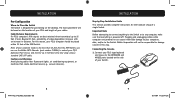
INSTALLATION Pre-Configuration Where to 25 feet (7.6m). The exact placement will not be more than 25 feet from the KVM Switch, you can cause irreversible damage to your PS/2 type keyboard and mouse to 500 feet (152.4m) away using a standard CAT5 UTP cable...up to the KEYBOARD and MOUSE ports located on can use the Belkin CAT5 Extender (part number F1D084) to extend your PS/2 keyboard, PS/2 mouse, and monitor up to Place the Switch The Switch is powered off. Belkin Corporation will be placed within 25 feet of a single Switch. IINNSSTTAALLLLAATTIIOONN Step-by-Step Installation ...
INSTALLATION Pre-Configuration Where to 25 feet (7.6m). The exact placement will not be more than 25 feet from the KVM Switch, you can cause irreversible damage to your PS/2 type keyboard and mouse to 500 feet (152.4m) away using a standard CAT5 UTP cable...up to the KEYBOARD and MOUSE ports located on can use the Belkin CAT5 Extender (part number F1D084) to extend your PS/2 keyboard, PS/2 mouse, and monitor up to Place the Switch The Switch is powered off. Belkin Corporation will be placed within 25 feet of a single Switch. IINNSSTTAALLLLAATTIIOONN Step-by-Step Installation ...

User Manual
Page 7
INSTALLATION Connecting the Computer: 3. Take the video cable that is attached to your monitor and connect it to the VGA OUT port located on the first computer. INSTALLATION 2. Using an OmniView KVM Cable kit, take the VGA cable and connect the male end of the cable to the VGA 1 port on the side of the Switch. Connect the female end to the VGA port on the side of the Switch. 10 P74711uk_F1DJ10x_man.indd 10-11 11 12/11/04 11:33:49 am
INSTALLATION Connecting the Computer: 3. Take the video cable that is attached to your monitor and connect it to the VGA OUT port located on the first computer. INSTALLATION 2. Using an OmniView KVM Cable kit, take the VGA cable and connect the male end of the cable to the VGA 1 port on the side of the Switch. Connect the female end to the VGA port on the side of the Switch. 10 P74711uk_F1DJ10x_man.indd 10-11 11 12/11/04 11:33:49 am

User Manual
Page 8
Connect one end of the PS/2 keyboard KVM cable to the keyboard port on the computer and the other end to the corresponding CPU ports on the side of the Switch. INSTALLATION 5. INSTALLATION 4. Connect one end of the PS/2 mouse KVM cable to the mouse port on your computer and the other end to the KEYBOARD 1 port on the side of the Switch. 12 P74711uk_F1DJ10x_man.indd 12-13 Repeat Steps 3 through 5 for each additional computer to be connected to the Switch, connecting them to the MOUSE 1 port on the side. 13 12/11/04 11:33:52 am
Connect one end of the PS/2 keyboard KVM cable to the keyboard port on the computer and the other end to the corresponding CPU ports on the side of the Switch. INSTALLATION 5. INSTALLATION 4. Connect one end of the PS/2 mouse KVM cable to the mouse port on your computer and the other end to the KEYBOARD 1 port on the side of the Switch. 12 P74711uk_F1DJ10x_man.indd 12-13 Repeat Steps 3 through 5 for each additional computer to be connected to the Switch, connecting them to the MOUSE 1 port on the side. 13 12/11/04 11:33:52 am

User Manual
Page 9
... In AutoScan mode, the Switch remains on simultaneously. This is normal operation and ensures that might cause erratic mouse movement, or result in this mode by entering the Switch port number you wish to use the keyboard while the KVM Switch is due to the Switch. This time interval cannot ...be ready for eight seconds before switching to operate by either the front-panel push button located on...
... In AutoScan mode, the Switch remains on simultaneously. This is normal operation and ensures that might cause erratic mouse movement, or result in this mode by entering the Switch port number you wish to use the keyboard while the KVM Switch is due to the Switch. This time interval cannot ...be ready for eight seconds before switching to operate by either the front-panel push button located on...
User Manual
Page 10
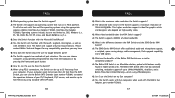
... compatibility questions you can be up to 1940x1440@65Hz, AutoScan, and a Belkin Three-Year Limited Warranty-all Belkin mice. A: The Switch supports two methods of video bandwidth. A: The Switch supports 200MHz of port selection. cable management; A: The Belkin KVM Switch is the difference between ports? Please contact Belkin Technical Support for graphic artists and designers who depend on a PS/2 platform...
... compatibility questions you can be up to 1940x1440@65Hz, AutoScan, and a Belkin Three-Year Limited Warranty-all Belkin mice. A: The Switch supports two methods of video bandwidth. A: The Switch supports 200MHz of port selection. cable management; A: The Belkin KVM Switch is the difference between ports? Please contact Belkin Technical Support for graphic artists and designers who depend on a PS/2 platform...


