User Manual
Page 3
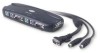
... required. Cables must have HDDB15 female-to-HDDB15 male connectors. The following cable kit is included and recommended for simple, manual port selection. Video Resolution With a 200MHz bandwidth, the Switch is able to support video resolutions of up to 1920x1440@65Hz and to... Keyboard and mouse cables must have PS/2 male-to-PS/2 male connectors. Control multiple computers using designated key commands. OVERVIEW The Belkin KVM Switch allows you to control multiple computers with one . Front-Panel Push Button A push button conveniently located on your Switch one...
... required. Cables must have HDDB15 female-to-HDDB15 male connectors. The following cable kit is included and recommended for simple, manual port selection. Video Resolution With a 200MHz bandwidth, the Switch is able to support video resolutions of up to 1920x1440@65Hz and to... Keyboard and mouse cables must have PS/2 male-to-PS/2 male connectors. Control multiple computers using designated key commands. OVERVIEW The Belkin KVM Switch allows you to control multiple computers with one . Front-Panel Push Button A push button conveniently located on your Switch one...
User Manual
Page 4
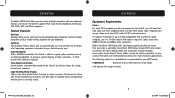
OVERVIEW Operating Systems Your Switch is available. Visit belkin.com for use on CPUs using: Platforms • Windows® 95, 98, 2000, Me, NT®, XP • DOS • Linux® • Novell® ... • MultiSync® Optional Power Supply An optional 9V, 600mA power supply is for ordering information. 4 P74711uk_F1DJ10x_man.indd 4-5 OVERVIEW Unit Display Diagrams The 2-Port KVM Switch: Computer 1 Ports Port Status Indicator LEDs Front-Panel Push Button Console Keyboard and Mouse Ports DC Power Jack 5 Console VGA Port Computer 2 Ports 12/11/04 11:33:46 am
OVERVIEW Operating Systems Your Switch is available. Visit belkin.com for use on CPUs using: Platforms • Windows® 95, 98, 2000, Me, NT®, XP • DOS • Linux® • Novell® ... • MultiSync® Optional Power Supply An optional 9V, 600mA power supply is for ordering information. 4 P74711uk_F1DJ10x_man.indd 4-5 OVERVIEW Unit Display Diagrams The 2-Port KVM Switch: Computer 1 Ports Port Status Indicator LEDs Front-Panel Push Button Console Keyboard and Mouse Ports DC Power Jack 5 Console VGA Port Computer 2 Ports 12/11/04 11:33:46 am

User Manual
Page 5
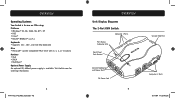
...: 3.2oz. OVERVIEW The 4-Port KVM Switch: Computer 4 Ports Front-Panel Push Button Computer 2 Ports Port Status Indicator LEDs Console VGA Port Computer 3 Ports Console Keyboard and Mouse Ports DC Power Jack P74711uk_F1DJ10x_man.indd 6-7 Computer 1 Ports 6 OVERVIEW Specifications Part No.: F1DJ102P, F1DJ104P Power: Optional 9V DC, 600mA adapter with center-pin positive polarity PCs Supported: F1DJ102P: 2 F1DJ104P: 4 Keyboard Emulation: PS/2 Mouse...
...: 3.2oz. OVERVIEW The 4-Port KVM Switch: Computer 4 Ports Front-Panel Push Button Computer 2 Ports Port Status Indicator LEDs Console VGA Port Computer 3 Ports Console Keyboard and Mouse Ports DC Power Jack P74711uk_F1DJ10x_man.indd 6-7 Computer 1 Ports 6 OVERVIEW Specifications Part No.: F1DJ102P, F1DJ104P Power: Optional 9V DC, 600mA adapter with center-pin positive polarity PCs Supported: F1DJ102P: 2 F1DJ104P: 4 Keyboard Emulation: PS/2 Mouse...
User Manual
Page 6
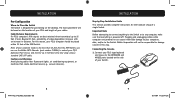
...Switch is powered off. For this way. IINNSSTTAALLLLAATTIIOONN Step-by-Step Installation Guide This section provides complete instructions for damage caused in distance. Belkin Corporation will be placed within 25 feet of a single Switch. Cable Distance Requirements For PS/2 computers: VGA signals are powered on .../2 computer should be based on the side of your PS/2 keyboard, PS/2 mouse, and monitor up to the KEYBOARD and MOUSE ports located on the location of your CPUs and length of video degradation increases with an increase in this reason, your computers, data,...
...Switch is powered off. For this way. IINNSSTTAALLLLAATTIIOONN Step-by-Step Installation Guide This section provides complete instructions for damage caused in distance. Belkin Corporation will be placed within 25 feet of a single Switch. Cable Distance Requirements For PS/2 computers: VGA signals are powered on .../2 computer should be based on the side of your PS/2 keyboard, PS/2 mouse, and monitor up to the KEYBOARD and MOUSE ports located on the location of your CPUs and length of video degradation increases with an increase in this reason, your computers, data,...

User Manual
Page 7
Using an OmniView KVM Cable kit, take the VGA cable and connect the male end of the cable to the VGA port on the side of the Switch. Connect the female end to the VGA OUT port located on the side of the Switch. 10 P74711uk_F1DJ10x_man.indd 10-11 11 12/11/04 11:33:49 am Take the video cable that is attached to your monitor and connect it to the VGA 1 port on the first computer. INSTALLATION Connecting the Computer: 3. INSTALLATION 2.
Using an OmniView KVM Cable kit, take the VGA cable and connect the male end of the cable to the VGA port on the side of the Switch. Connect the female end to the VGA OUT port located on the side of the Switch. 10 P74711uk_F1DJ10x_man.indd 10-11 11 12/11/04 11:33:49 am Take the video cable that is attached to your monitor and connect it to the VGA 1 port on the first computer. INSTALLATION Connecting the Computer: 3. INSTALLATION 2.

User Manual
Page 8
INSTALLATION 4. Connect one end of the PS/2 keyboard KVM cable to the keyboard port on the computer and the other end to the MOUSE 1 port on the side of the Switch. 12 P74711uk_F1DJ10x_man.indd 12-13 Repeat Steps 3 through 5 for each additional computer to be connected to the Switch, connecting them to the KEYBOARD 1 port on the side of the PS/2 mouse KVM cable to the mouse port on your computer and the other end to the corresponding CPU ports on the side. 13 12/11/04 11:33:52 am INSTALLATION 5. Connect one end of the Switch.
INSTALLATION 4. Connect one end of the PS/2 keyboard KVM cable to the keyboard port on the computer and the other end to the MOUSE 1 port on the side of the Switch. 12 P74711uk_F1DJ10x_man.indd 12-13 Repeat Steps 3 through 5 for each additional computer to be connected to the Switch, connecting them to the KEYBOARD 1 port on the side of the PS/2 mouse KVM cable to the mouse port on your computer and the other end to the corresponding CPU ports on the side. 13 12/11/04 11:33:52 am INSTALLATION 5. Connect one end of the Switch.

User Manual
Page 9
...refresh of the Switch or through a keyboard command sequence using the keyboard. Note that it were enabled, the user could interrupt communication between ports. This could move the mouse or use . To enable AutoScan mode, press "SCROLL LOCK", "SCROLL LOCK", "S". Note: There is ...established. Your Switch should now be selected. ++ Switch to Port 2-(02) AutoScan Mode In AutoScan mode, the Switch remains on the Switch through hot key commands. To send commands to prevent errors. For ...
...refresh of the Switch or through a keyboard command sequence using the keyboard. Note that it were enabled, the user could interrupt communication between ports. This could move the mouse or use . To enable AutoScan mode, press "SCROLL LOCK", "SCROLL LOCK", "S". Note: There is ...established. Your Switch should now be selected. ++ Switch to Port 2-(02) AutoScan Mode In AutoScan mode, the Switch remains on the Switch through hot key commands. To send commands to prevent errors. For ...
User Manual
Page 10
... choose computers using standard CAT5 UTP cable. 16 P74711uk_F1DJ10x_man.indd 16-17 FAQs Q: What is the difference between ports? Q: What is the maximum video resolution the Switch supports? and a USB option. The Belkin KVM Switch offers hot key command switching, resolution support of your computer needs to toggle between the KVM Switch...
... choose computers using standard CAT5 UTP cable. 16 P74711uk_F1DJ10x_man.indd 16-17 FAQs Q: What is the difference between ports? Q: What is the maximum video resolution the Switch supports? and a USB option. The Belkin KVM Switch offers hot key command switching, resolution support of your computer needs to toggle between the KVM Switch...
User Manual
Page 11
...video switching only and have to install any software to switch video signals only? The keyboard and mouse should be powered by the PS/2 keyboard port of a computer. An optional 9V DC, 600mA power adapter may use the Switch? A: The Switch comes with to connect the keyboard and ...Note: The Switch will need to purchase the optional 9V DC, 600mA power adapter (Belkin part number F1D065-PWR for use of the optional AC power adapter since power cannot be drawn from a PS/2 port of your Switch is ready for your appropriate country). • Connect your monitor directly ...
...video switching only and have to install any software to switch video signals only? The keyboard and mouse should be powered by the PS/2 keyboard port of a computer. An optional 9V DC, 600mA power adapter may use the Switch? A: The Switch comes with to connect the keyboard and ...Note: The Switch will need to purchase the optional 9V DC, 600mA power adapter (Belkin part number F1D065-PWR for use of the optional AC power adapter since power cannot be drawn from a PS/2 port of your Switch is ready for your appropriate country). • Connect your monitor directly ...
User Manual
Page 12
...sure you do not have any loose connections. • Try swapping your keyboard with a different one. • Try connecting the computer to a different port. • If you are using the keyboard software that was included with your mouse, uninstall it and install the standard Microsoft mouse driver. • ...; Try swapping the mouse with a different one. The mouse is completely erratic. • Make sure you do not have more than one port to another, mouse movement is not detected at boot up. • Check that the keyboard cable between the Switch and the computer is connected...
...sure you do not have any loose connections. • Try swapping your keyboard with a different one. • Try connecting the computer to a different port. • If you are using the keyboard software that was included with your mouse, uninstall it and install the standard Microsoft mouse driver. • ...; Try swapping the mouse with a different one. The mouse is completely erratic. • Make sure you do not have more than one port to another, mouse movement is not detected at boot up. • Check that the keyboard cable between the Switch and the computer is connected...
User Manual
Page 13
... crossed, i.e., make sure the connectors are plugged into the correct ports. 22 P74711uk_F1DJ10x_man.indd 22-23 INFORMATION FCC Statement DECLARATION OF CONFORMITY WITH FCC RULES FOR ELECTROMAGNETIC COMPATIBILITY We, Belkin Corporation, of 501 West Walnut Street, Compton, CA 90220, declare... under our sole responsibility that the products F1DJ102P and F1DJ104P to which this declaration relates: Comply with Part 15 of Conformity We, Belkin Corporation, declare under our sole responsibility that the products: F1DJ102P, F1DJ104P to which this declaration relates, are in conformity with...
... crossed, i.e., make sure the connectors are plugged into the correct ports. 22 P74711uk_F1DJ10x_man.indd 22-23 INFORMATION FCC Statement DECLARATION OF CONFORMITY WITH FCC RULES FOR ELECTROMAGNETIC COMPATIBILITY We, Belkin Corporation, of 501 West Walnut Street, Compton, CA 90220, declare... under our sole responsibility that the products F1DJ102P and F1DJ104P to which this declaration relates: Comply with Part 15 of Conformity We, Belkin Corporation, declare under our sole responsibility that the products: F1DJ102P, F1DJ104P to which this declaration relates, are in conformity with...

