
- PRJ Networking Operation Guide
Page 2
... Using QPresenter 8 Controlling the projector remotely through a web browser 11 Using the web control lock 18 Projecting computer screen contents 20 One projector displaying one computer screen 20 One projector displaying screens of up to 4 computers 20 Up to 8 projectors displaying one computer screen 21 ...Up to 255 projectors displaying one computer screen (for selective models ...
... Using QPresenter 8 Controlling the projector remotely through a web browser 11 Using the web control lock 18 Projecting computer screen contents 20 One projector displaying one computer screen 20 One projector displaying screens of up to 4 computers 20 Up to 8 projectors displaying one computer screen 21 ...Up to 255 projectors displaying one computer screen (for selective models ...
- PRJ Networking Operation Guide
Page 3
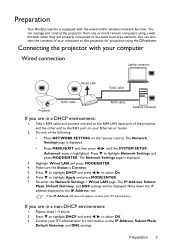
... browser when they are properly connected to the RJ45 port on the remote control. Repeat steps 1-4 above. 2. Preparation 3 Connecting the projector with the wired and/or wireless network function. The Network Settings page is highlighted. The IP Address, Subnet Mask, Default Gateway, and...to highlight DHCP and press / to highlight Network Settings and press MODE/ENTER. Preparation Your BenQ projector is equipped with your computer Wired connection Laptop computer Wired LAN RJ45 cable Projector RJ45 cable RJ45 cable Desktop computer If you are in the IP Address row. Contact ...
... browser when they are properly connected to the RJ45 port on the remote control. Repeat steps 1-4 above. 2. Preparation 3 Connecting the projector with the wired and/or wireless network function. The Network Settings page is highlighted. The IP Address, Subnet Mask, Default Gateway, and...to highlight DHCP and press / to highlight Network Settings and press MODE/ENTER. Preparation Your BenQ projector is equipped with your computer Wired connection Laptop computer Wired LAN RJ45 cable Projector RJ45 cable RJ45 cable Desktop computer If you are in the IP Address row. Contact ...

- PRJ Networking Operation Guide
Page 4
... 7. Highlight Wireless LAN and press MODE/ENTER. 4. Make sure the Status is highlighted. Make sure the BenQ wireless dongle (optional) is able to be accessed by the projector's SSID from your local area network and ready to operate as a wireless LAN access point, which allows ...computers to connect to highlight Apply and press MODE/ENTER. Plug a BenQ wireless dongle (optional) to the USB Type A connector on the projector. 2. Do one of the projector. The Network Settings page is displayed. • Press MENU/EXIT and then press / until the...
... 7. Highlight Wireless LAN and press MODE/ENTER. 4. Make sure the Status is highlighted. Make sure the BenQ wireless dongle (optional) is able to be accessed by the projector's SSID from your local area network and ready to operate as a wireless LAN access point, which allows ...computers to connect to highlight Apply and press MODE/ENTER. Plug a BenQ wireless dongle (optional) to the USB Type A connector on the projector. 2. Do one of the projector. The Network Settings page is displayed. • Press MENU/EXIT and then press / until the...
- PRJ Networking Operation Guide
Page 5
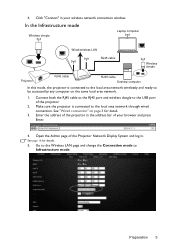
... connection window. In the Infrastructure mode Wireless dongle Laptop computer Wired/wireless LAN RJ45 cable Wireless dongle Projector RJ45 cable RJ45 cable Desktop computer In this mode, the projector is connected to be accessed by any computer on page 3 for details. 5. Enter the address ...of the projector in the address bar of the projector. 2. 4. Click "Connect" in . Make sure the projector is connected to the local area network wirelessly and ready to the local area network through wired ...
... connection window. In the Infrastructure mode Wireless dongle Laptop computer Wired/wireless LAN RJ45 cable Wireless dongle Projector RJ45 cable RJ45 cable Desktop computer In this mode, the projector is connected to be accessed by any computer on page 3 for details. 5. Enter the address ...of the projector in the address bar of the projector. 2. 4. Click "Connect" in . Make sure the projector is connected to the local area network wirelessly and ready to the local area network through wired ...

- PRJ Networking Operation Guide
Page 6
Select the same SSID from the computer. 8. Disconnect the RJ45 cable from your computer. 9. Click Search in the Search result list and click Apply. 7. Open QPresenter and search for the correct projector and click Connect. 6 Preparation 6. Click the desired SSID in the SSID row to list all the available wireless access points.
Select the same SSID from the computer. 8. Disconnect the RJ45 cable from your computer. 9. Click Search in the Search result list and click Apply. 7. Open QPresenter and search for the correct projector and click Connect. 6 Preparation 6. Click the desired SSID in the SSID row to list all the available wireless access points.

- PRJ Networking Operation Guide
Page 7
... the QPresenter for detail. iii. Insert the user manual CD that comes with your local BenQ.com to your computer" on the host PC. Click "I agree" to the projector. Downloading QPresenter There are using a Mac computer, the projector automatically provides Mac version of your browser and press Enter. i. Connect the computer to agree...
... the QPresenter for detail. iii. Insert the user manual CD that comes with your local BenQ.com to your computer" on the host PC. Click "I agree" to the projector. Downloading QPresenter There are using a Mac computer, the projector automatically provides Mac version of your browser and press Enter. i. Connect the computer to agree...
- PRJ Networking Operation Guide
Page 8
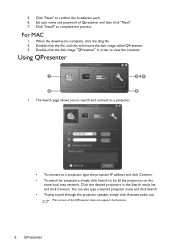
..., simply click Activate audio out. Mac version of Qpresenter and then click "Next". 7. Click "Install" to list all the projectors on the same local area network. When the download is complete, click the dmg file. 2. Double-click the file, and this function. 8 ... the Search result list, and click Connect. The Search page allows you to search and connect to a projector. • To connect to a projector, type the projector IP address and click Connect. • To search for projectors, simply click Search to complete the process. For MAC 1. Click "Next" to view the contents. Set...
..., simply click Activate audio out. Mac version of Qpresenter and then click "Next". 7. Click "Install" to list all the projectors on the same local area network. When the download is complete, click the dmg file. 2. Double-click the file, and this function. 8 ... the Search result list, and click Connect. The Search page allows you to search and connect to a projector. • To connect to a projector, type the projector IP address and click Connect. • To search for projectors, simply click Search to complete the process. For MAC 1. Click "Next" to view the contents. Set...

- PRJ Networking Operation Guide
Page 9
This function is not available when audio out is activated. • To pause projection, click Pause. • If there are multiple computers connected to the projector, you to the projector OSD menu SYSTEM SETUP: Advanced > Network Settings > Remote Desktop, and enter Account (the name for your computer. A square appears on your computer) and...
This function is not available when audio out is activated. • To pause projection, click Pause. • If there are multiple computers connected to the projector, you to the projector OSD menu SYSTEM SETUP: Advanced > Network Settings > Remote Desktop, and enter Account (the name for your computer. A square appears on your computer) and...
- PRJ Networking Operation Guide
Page 10
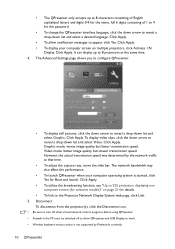
.... Click Apply. • To utilize the broadcasting function, see "Up to the Projector Network Display System web page, click Link. 5. Click Apply. • To allow QPresenter and USB Display to 8 projectors at that time. • To adjust the capture rate, move the slide bar.... However, the actual transmission speed was determined by Pixelworks currently. 10 QPresenter Disconnect To disconnect from the projector(s), click the Disconnect icon. • Be sure to turn off other virtual network control programs before using QPresenter. • Firewall...
.... Click Apply. • To utilize the broadcasting function, see "Up to the Projector Network Display System web page, click Link. 5. Click Apply. • To allow QPresenter and USB Display to 8 projectors at that time. • To adjust the capture rate, move the slide bar.... However, the actual transmission speed was determined by Pixelworks currently. 10 QPresenter Disconnect To disconnect from the projector(s), click the Disconnect icon. • Be sure to turn off other virtual network control programs before using QPresenter. • Firewall...
- PRJ Networking Operation Guide
Page 11
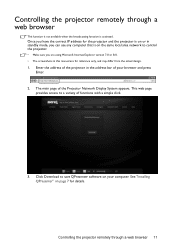
... through a web browser This function is not available when the broadcasting function is on the same local area network to control the projector. • Make sure you can use any computer that is activated. Click Download to a variety of functions with a simple click. 3. This web... page provides access to save QPresenter software on page 7 for the projector and the projector is on or in standby mode, you are using Microsoft Internet Explorer version 7.0 or 8.0. • The screenshots in the address bar of the...
... through a web browser This function is not available when the broadcasting function is on the same local area network to control the projector. • Make sure you can use any computer that is activated. Click Download to a variety of functions with a simple click. 3. This web... page provides access to save QPresenter software on page 7 for the projector and the projector is on or in standby mode, you are using Microsoft Internet Explorer version 7.0 or 8.0. • The screenshots in the address bar of the...
- PRJ Networking Operation Guide
Page 12
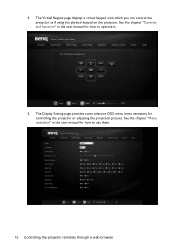
4. The Display Setting page provides some selective OSD menu items necessary for how to operate it. 5. The Virtual Keypad page displays a virtual keypad with which you can control the projector as if using the physical keypad on the projector. See the chapter "Menu operation" in the user manual for how to use them. 12 Controlling the projector remotely through a web browser See the chapter "Controls and functions" in the user manual for controlling the projector or adjusting the projected pictures.
4. The Display Setting page provides some selective OSD menu items necessary for how to operate it. 5. The Virtual Keypad page displays a virtual keypad with which you can control the projector as if using the physical keypad on the projector. See the chapter "Menu operation" in the user manual for how to use them. 12 Controlling the projector remotely through a web browser See the chapter "Controls and functions" in the user manual for controlling the projector or adjusting the projected pictures.
- PRJ Networking Operation Guide
Page 13
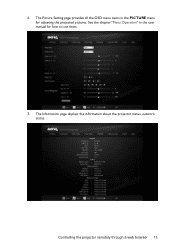
The Picture Setting page provides all the OSD menu items in the user manual for adjusting the projected pictures. Controlling the projector remotely through a web browser 13 6. See the chapter "Menu Operation" in the PICTURE menu for how to use them. 7. The Information page displays the information about the projector status, network status.
The Picture Setting page provides all the OSD menu items in the user manual for adjusting the projected pictures. Controlling the projector remotely through a web browser 13 6. See the chapter "Menu Operation" in the PICTURE menu for how to use them. 7. The Information page displays the information about the projector status, network status.
- PRJ Networking Operation Guide
Page 14
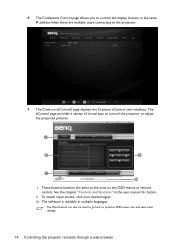
.... 8. The Conference Control page allows you to control the display location in the same IP address when there are multiple users connecting to control the projector or adjust the projected pictures. i ii i i iii i. These buttons function the same as the ones on the OSD menus or remote control. The software is... eControl user interface. The Menu button can also be used to go back to previous OSD menu, exit and save menu settings. 14 Controlling the projector remotely through a web browser To switch input source, click your desired signal.
.... 8. The Conference Control page allows you to control the display location in the same IP address when there are multiple users connecting to control the projector or adjust the projected pictures. i ii i i iii i. These buttons function the same as the ones on the OSD menus or remote control. The software is... eControl user interface. The Menu button can also be used to go back to previous OSD menu, exit and save menu settings. 14 Controlling the projector remotely through a web browser To switch input source, click your desired signal.
- PRJ Networking Operation Guide
Page 15
...press the Send button and the data will be saved in charge of it. Controlling the projector remotely through a web browser 15 iii. Once set , access to the remote network operation on this projector. Press exit to go back to the remote network operation page. iii i ii iv...v. ii. For more information, visit http://www.crestron.com & www.crestron.com/ getroomview. You can name the projector, keep track of its location and the person in the projector. Once set , access to the tools page has been password-protected. The info page displays the information and status...
...press the Send button and the data will be saved in charge of it. Controlling the projector remotely through a web browser 15 iii. Once set , access to the remote network operation on this projector. Press exit to go back to the remote network operation page. iii i ii iv...v. ii. For more information, visit http://www.crestron.com & www.crestron.com/ getroomview. You can name the projector, keep track of its location and the person in the projector. Once set , access to the tools page has been password-protected. The info page displays the information and status...
- PRJ Networking Operation Guide
Page 16
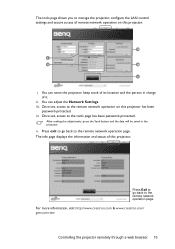
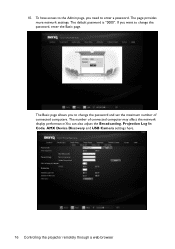
The default password is "0000". If you want to enter a password. The number of connected computers. The Basic page allows you need to change the password and set the maximum number of connected computer may affect the network display performance.You can also adjust the Broadcasting, Projection Log In Code, AMX Device Discovery and USB Camera settings here. 16 Controlling the projector remotely through a web browser 10. To have access to the Admin page, you to change the password, enter the Basic page. The page provides more network settings.
The default password is "0000". If you want to enter a password. The number of connected computers. The Basic page allows you need to change the password and set the maximum number of connected computer may affect the network display performance.You can also adjust the Broadcasting, Projection Log In Code, AMX Device Discovery and USB Camera settings here. 16 Controlling the projector remotely through a web browser 10. To have access to the Admin page, you to change the password, enter the Basic page. The page provides more network settings.
- PRJ Networking Operation Guide
Page 17
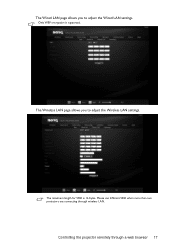
Controlling the projector remotely through wireless LAN. Please use different SSID when more than two projectors are connecting through a web browser 17 Only WEP encryption is 16 bytes. The maximum length for SSID is supported. The Wireless LAN page allows you to adjust the Wireless LAN settings. The Wired LAN page allows you to adjust the Wired LAN settings.
Controlling the projector remotely through wireless LAN. Please use different SSID when more than two projectors are connecting through a web browser 17 Only WEP encryption is 16 bytes. The maximum length for SSID is supported. The Wireless LAN page allows you to adjust the Wireless LAN settings. The Wired LAN page allows you to adjust the Wired LAN settings.

- PRJ Networking Operation Guide
Page 18
... Mail works. 11. The next time someone connects to this function: 18 Controlling the projector remotely through the Projector Network Display System. You can also use the OSD menu to toggle this projector, the Projector Network Display System page provides limited functions. Go to the Admin page of the... Display System. 3. Go to the Admin page of your computer is designed to prevent unauthorized people from maliciously changing the projector settings through a web browser Click OFF in the Web Control Lock row. Using the web control lock This function is connected...
... Mail works. 11. The next time someone connects to this function: 18 Controlling the projector remotely through the Projector Network Display System. You can also use the OSD menu to toggle this projector, the Projector Network Display System page provides limited functions. Go to the Admin page of the... Display System. 3. Go to the Admin page of your computer is designed to prevent unauthorized people from maliciously changing the projector settings through a web browser Click OFF in the Web Control Lock row. Using the web control lock This function is connected...
- PRJ Networking Operation Guide
Page 19
The message "INPUT PASSWORD" appears. Enter the current password. 2. Controlling the projector remotely through a web browser 19 1. Press MODE/ ENTER. If the password is correct, the OSD menu returns to the SYSTEM SETUP: Advanced > Security Settings > Change Security Settings menu after opening the OSD menu system. Go to the Security Settings page. Press to highlight Web Control Lock and press / to select On or Off.
The message "INPUT PASSWORD" appears. Enter the current password. 2. Controlling the projector remotely through a web browser 19 1. Press MODE/ ENTER. If the password is correct, the OSD menu returns to the SYSTEM SETUP: Advanced > Security Settings > Change Security Settings menu after opening the OSD menu system. Go to the Security Settings page. Press to highlight Web Control Lock and press / to select On or Off.
- PRJ Networking Operation Guide
Page 20
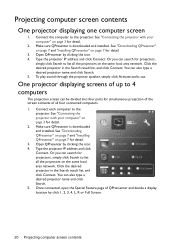
... click Connect. See "Downloading QPresenter" on page 7 and "Installing QPresenter" on page 7 for projectors, simply click Search to list all the projectors on page 3 for projectors, simply click Search to 4 computers The projection screen can be divided into four parts for detail... Or you can search for detail. 3. Projecting computer screen contents One projector displaying one computer screen 1. One projector displaying screens of all the projectors on page 3 for detail. 2. See "Connecting the projector with your computer" on the same local area network. See "Downloading ...
... click Connect. See "Downloading QPresenter" on page 7 and "Installing QPresenter" on page 7 for projectors, simply click Search to list all the projectors on page 3 for projectors, simply click Search to 4 computers The projection screen can be divided into four parts for detail... Or you can search for detail. 3. Projecting computer screen contents One projector displaying one computer screen 1. One projector displaying screens of all the projectors on page 3 for detail. 2. See "Connecting the projector with your computer" on the same local area network. See "Downloading ...

- PRJ Networking Operation Guide
Page 21
... The minimum system requirement for your computer to the same local area network. 3. Selecting a certain channel for detail. 4. i. Open the Projector Network Display System and go to the SYSTEM SETUP: Advanced > Network Settings menu after opening the OSD menu system. Click ON in the ...Infrastructure mode. Click Activate 1:N Display and click Apply. ii. Connect the projectors to the same local area network through wired connection. 2. Open QPresenter by clicking the icon. 5. Go to the Basic page. ii. Projecting...
... The minimum system requirement for your computer to the same local area network. 3. Selecting a certain channel for detail. 4. i. Open the Projector Network Display System and go to the SYSTEM SETUP: Advanced > Network Settings menu after opening the OSD menu system. Click ON in the ...Infrastructure mode. Click Activate 1:N Display and click Apply. ii. Connect the projectors to the same local area network through wired connection. 2. Open QPresenter by clicking the icon. 5. Go to the Basic page. ii. Projecting...


