
User Manual for MS521, MX522, MW523
Page 1
MS521/MX522/MW523/MS511H/TW523 Digital Projector User Manual
MS521/MX522/MW523/MS511H/TW523 Digital Projector User Manual

User Manual for MS521, MX522, MW523
Page 2
...Connecting a computer or monitor...19 Connecting Video source devices.......20 Operation 24 Starting up the projector 24 Adjusting the projected image 25 Using the menus 28 Securing the projector 29 Switching input signal 32 Magnifying and searching for details ...33 Selecting the aspect ratio...the sound 42 Use Teaching Template 43 Personalizing the projector menu display 44 2 Table of contents Select the lamp saver mode 44 Shutting down the projector 45 Menu operation 46 Maintenance 59 Care of the projector 59 Lamp information 60 Troubleshooting......... 68 Specifications 69 ...
...Connecting a computer or monitor...19 Connecting Video source devices.......20 Operation 24 Starting up the projector 24 Adjusting the projected image 25 Using the menus 28 Securing the projector 29 Switching input signal 32 Magnifying and searching for details ...33 Selecting the aspect ratio...the sound 42 Use Teaching Template 43 Personalizing the projector menu display 44 2 Table of contents Select the lamp saver mode 44 Shutting down the projector 45 Menu operation 46 Maintenance 59 Care of the projector 59 Lamp information 60 Troubleshooting......... 68 Specifications 69 ...

User Manual for MS521, MX522, MW523
Page 3
...marked on . 5. Save it is important that you operate your eyes. Always open the lens shutter or remove the lens cap when the projector lamp is NOT stable. The intense light beam may fluctuate or cut out, it is recommended that you follow the instructions mentioned in this... of ±10 volts occur. Please read this could fail if power cuts or surges of information technology equipment. you connect your projector through a power stabilizer, surge protector or uninterruptible power supply (UPS). 3. Important safety instructions 3 Do not look straight at the...
...marked on . 5. Save it is important that you operate your eyes. Always open the lens shutter or remove the lens cap when the projector lamp is NOT stable. The intense light beam may fluctuate or cut out, it is recommended that you follow the instructions mentioned in this... of ±10 volts occur. Please read this could fail if power cuts or surges of information technology equipment. you connect your projector through a power stabilizer, surge protector or uninterruptible power supply (UPS). 3. Important safety instructions 3 Do not look straight at the...
User Manual for MS521, MX522, MW523
Page 4
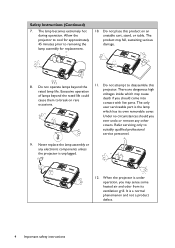
... professional service personnel. 9. Safety Instructions (Continued) 7. contact with live parts. Excessive operation projector. Under no circumstances should you should come into occasions. Allow the projector to cool for approximately 45 minutes prior to disassemble this product on rare death if you ...ever undo or remove any electronic components unless the projector is under operation, you may fall, sustaining serious damage. 8. When the projector is unplugged. 12. Do not place this rated lamp life. The product may sense...
... professional service personnel. 9. Safety Instructions (Continued) 7. contact with live parts. Excessive operation projector. Under no circumstances should you should come into occasions. Allow the projector to cool for approximately 45 minutes prior to disassemble this product on rare death if you ...ever undo or remove any electronic components unless the projector is under operation, you may fall, sustaining serious damage. 8. When the projector is unplugged. 12. Do not place this rated lamp life. The product may sense...
User Manual for MS521, MX522, MW523
Page 5
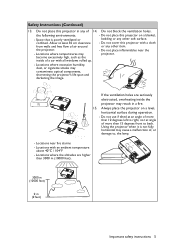
... at angle of more than 10 degrees left to right, nor at least 50 cm clearance from walls and free flow of air around the projector. - Locations where temperatures may cause a malfunction of more than 3000 m (10000 feet). 3000 m (10000 feet) 0 m (0 feet) Important ... inside of 14. Safety Instructions (Continued) 13. Do not place this projector in a fire. 15. Do not place this projector on a level, horizontal surface during operation. - the following environments. - Always place the projector on a blanket, bedding or any other soft surface. - Do not ...
... at angle of more than 10 degrees left to right, nor at least 50 cm clearance from walls and free flow of air around the projector. - Locations where temperatures may cause a malfunction of more than 3000 m (10000 feet). 3000 m (10000 feet) 0 m (0 feet) Important ... inside of 14. Safety Instructions (Continued) 13. Do not place this projector in a fire. 15. Do not place this projector on a level, horizontal surface during operation. - the following environments. - Always place the projector on a blanket, bedding or any other soft surface. - Do not ...
User Manual for MS521, MX522, MW523
Page 6
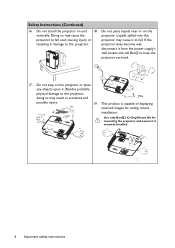
.... If the resulting in accidents and possible injury. 19. Besides probable physical damage to the projector, doing so may cause the projector. Do not step on the projector or place any objects upon it from the power supply's wall socket and call BenQ to fail. projector does become wet, disconnect it . Safety Instructions (Continued) 16.
.... If the resulting in accidents and possible injury. 19. Besides probable physical damage to the projector, doing so may cause the projector. Do not step on the projector or place any objects upon it from the power supply's wall socket and call BenQ to fail. projector does become wet, disconnect it . Safety Instructions (Continued) 16.

User Manual for MS521, MX522, MW523
Page 7
...immediately hide the image, lowering 80% of the lamp power at the same time your projector when the power is fed. • Instant Restart Selectable Instant Restart function enables you can wear BenQ 3D glassed to enjoy the 3D movies, videos and sporting events in the world. ...Direct Power On turns your image is normal and expected behavior. Auto Power Off function allows the projector to restart the projector immediately within the lamp manufacturers specifications...
...immediately hide the image, lowering 80% of the lamp power at the same time your projector when the power is fed. • Instant Restart Selectable Instant Restart function enables you can wear BenQ 3D glassed to enjoy the 3D movies, videos and sporting events in the world. ...Direct Power On turns your image is normal and expected behavior. Auto Power Off function allows the projector to restart the projector immediately within the lamp manufacturers specifications...
User Manual for MS521, MX522, MW523
Page 8
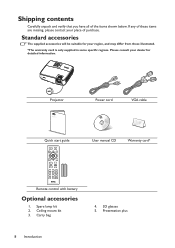
Standard accessories The supplied accessories will be suitable for your dealer for detailed information. Projector QDiugiictkal SPtraortjeGctuoirde Quick start guide Power cord VGA cable User manual CD Warranty card* Remote control with battery Optional accessories 1. Please consult your region, and ...
Standard accessories The supplied accessories will be suitable for your dealer for detailed information. Projector QDiugiictkal SPtraortjeGctuoirde Quick start guide Power cord VGA cable User manual CD Warranty card* Remote control with battery Optional accessories 1. Please consult your region, and ...
User Manual for MS521, MX522, MW523
Page 9
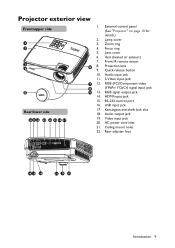
... jack 14. Video input jack 20. Quick-release button 10. USB input jack 17. Focus ring 5. Front IR remote sensor 8. RS-232 control port 16. Projector exterior view Front/upper side 1 2 3 4 6 7 8 5 9 Rear/lower side 10 11 12 13 14 15 16 17 1. Audio input jack 11. Ceiling mount holes 22. Zoom.... AC power cord inlet 21. Lens cover 6. S-Video input jack 12. Kensington anti-theft lock slot 18. HDMI input jack 15. External control panel (See "Projector" on page 10 for details.) 2.
... jack 14. Video input jack 20. Quick-release button 10. USB input jack 17. Focus ring 5. Front IR remote sensor 8. RS-232 control port 16. Projector exterior view Front/upper side 1 2 3 4 6 7 8 5 9 Rear/lower side 10 11 12 13 14 15 16 17 1. Audio input jack 11. Ceiling mount holes 22. Zoom.... AC power cord inlet 21. Lens cover 6. S-Video input jack 12. Kensington anti-theft lock slot 18. HDMI input jack 15. External control panel (See "Projector" on page 10 for details.) 2.

User Manual for MS521, MX522, MW523
Page 10
...selected On-Screen Display (OSD) menu item. Zoom ring Adjusts the size of the lamp. See "Indicators" on .See "Starting up red if the projector's temperature becomes too high. See "Auto-adjusting the image" on page 35 for details. See "Selecting a picture mode" on page 25 for details....When the On-Screen Display (OSD) menu is under operation. LAMP indicator light Indicates the status of the image. Lights up or flashes when the projector is activated, the #7 and #9 keys are used as directional arrows to select the desired menu items and to make adjustments. See "Fine-tuning ...
...selected On-Screen Display (OSD) menu item. Zoom ring Adjusts the size of the lamp. See "Indicators" on .See "Starting up red if the projector's temperature becomes too high. See "Auto-adjusting the image" on page 35 for details. See "Selecting a picture mode" on page 25 for details....When the On-Screen Display (OSD) menu is under operation. LAMP indicator light Indicates the status of the image. Lights up or flashes when the projector is activated, the #7 and #9 keys are used as directional arrows to select the desired menu items and to make adjustments. See "Fine-tuning ...

User Manual for MS521, MX522, MW523
Page 11
... fall from the place you purchased your BenQ projector. If you use a non-BenQ brand projector ceiling mount kit, there is securely and safely installed. Ceiling mounting the projector We want you to have a pleasant experience using your BenQ projector, so we strongly recommend that you use a proper fitting BenQ projector ceiling mount kit and that you ensure it...
... fall from the place you purchased your BenQ projector. If you use a non-BenQ brand projector ceiling mount kit, there is securely and safely installed. Ceiling mounting the projector We want you to have a pleasant experience using your BenQ projector, so we strongly recommend that you use a proper fitting BenQ projector ceiling mount kit and that you ensure it...

User Manual for MS521, MX522, MW523
Page 12
...details" on page 45 for details. 12 Introduction Timer Setup Enters presentation timer setting directly. See "Starting up the projector" on page 24 and "Shutting down the projector" on page 33 for details. See "Auto-adjusting the image" on page 28 for details. Eco Blank Press ... 4 5 14 12 6 7. 15 7 16 17 8 8. 18 19 9 20 10 21 22 9. 1. Info Showing the status information of time with 70% lamp power saving. projector. 2. Goes back to turn off the image for details. Display (OSD) menu item. See "Setting the presentation timer" on . II Power Toggles the...
...details" on page 45 for details. 12 Introduction Timer Setup Enters presentation timer setting directly. See "Starting up the projector" on page 24 and "Shutting down the projector" on page 33 for details. See "Auto-adjusting the image" on page 28 for details. Eco Blank Press ... 4 5 14 12 6 7. 15 7 16 17 8 8. 18 19 9 20 10 21 22 9. 1. Info Showing the status information of time with 70% lamp power saving. projector. 2. Goes back to turn off the image for details. Display (OSD) menu item. See "Setting the presentation timer" on . II Power Toggles the...

User Manual for MS521, MX522, MW523
Page 13
...PC. hearing viewers. 15. Teaching Template Page up/down arrows when connected Displays the selectable bar for details. 17. Template" on the projector that there are no obstacles between the remote control and the sensor should not exceed 8 meters (~ 26 feet). details. See "Remote ... USB to function correctly. Test Adjusts the sound level. Make sure that might obstruct the infra-red beam. • Operating the projector from the front Approx. 15° Introduction 13 Page Up/Down 21. Freeze Freezes the projected image. 14. See "Adjusting Displays...
...PC. hearing viewers. 15. Teaching Template Page up/down arrows when connected Displays the selectable bar for details. 17. Template" on the projector that there are no obstacles between the remote control and the sensor should not exceed 8 meters (~ 26 feet). details. See "Remote ... USB to function correctly. Test Adjusts the sound level. Make sure that might obstruct the infra-red beam. • Operating the projector from the front Approx. 15° Introduction 13 Page Up/Down 21. Freeze Freezes the projected image. 14. See "Adjusting Displays...

User Manual for MS521, MX522, MW523
Page 15
...possible installation locations: 1. Purchase the BenQ Projector Ceiling Mounting Kit from your dealer to be installed in the SYSTEM SETUP: Basic > Projector Installation menu after you select. Rear Table Select this location with the projector suspended upsidedown from the ceiling behind ... projector is required. Front Table Select this location with the projector suspended upsidedown from the ceiling in the SYSTEM SETUP: Basic > Projector Installation menu after you turn the projector on the ceiling. Note that a special rear projection screen and the BenQ Projector Ceiling...
...possible installation locations: 1. Purchase the BenQ Projector Ceiling Mounting Kit from your dealer to be installed in the SYSTEM SETUP: Basic > Projector Installation menu after you select. Rear Table Select this location with the projector suspended upsidedown from the ceiling behind ... projector is required. Front Table Select this location with the projector suspended upsidedown from the ceiling in the SYSTEM SETUP: Basic > Projector Installation menu after you turn the projector on the ceiling. Note that a special rear projection screen and the BenQ Projector Ceiling...
User Manual for MS521, MX522, MW523
Page 16
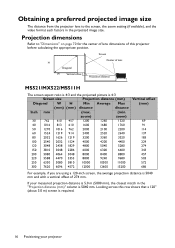
...m (5000 mm), the closest match in the projected image size. If your projector Looking across this projector before calculating the appropriate position. Obtaining a preferred projected image size The distance from the projector lens to "Dimensions" on page 70 for the center of lens dimensions of ...274 mm. Screen H Diagonal Center of lens W Vertical offset Projection distance MS521/MX522/MS511H The screen aspect ratio is 4:3 and the...
...m (5000 mm), the closest match in the projected image size. If your projector Looking across this projector before calculating the appropriate position. Obtaining a preferred projected image size The distance from the projector lens to "Dimensions" on page 70 for the center of lens dimensions of ...274 mm. Screen H Diagonal Center of lens W Vertical offset Projection distance MS521/MX522/MS511H The screen aspect ratio is 4:3 and the...
User Manual for MS521, MX522, MW523
Page 17
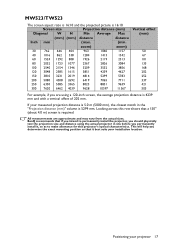
... mm), the closest match in situ before you are approximate and may vary from the actual sizes. All measurements are using the actual projector in the "Projection distance (mm)" column is 5299 mm. Positioning your measured projection distance is 4239 mm and with a vertical offset ...of 202 mm. Looking across this projector's optical characteristics. MW523/TW523 The screen aspect ratio is 16:10 and the projected picture is required. BenQ recommends that a 150'' (about 4.0 m) screen is 16:10 Screen size Projection distance...
... mm), the closest match in situ before you are approximate and may vary from the actual sizes. All measurements are using the actual projector in the "Projection distance (mm)" column is 5299 mm. Positioning your measured projection distance is 4239 mm and with a vertical offset ...of 202 mm. Looking across this projector's optical characteristics. MW523/TW523 The screen aspect ratio is 16:10 and the projected picture is required. BenQ recommends that a 150'' (about 4.0 m) screen is 16:10 Screen size Projection distance...
User Manual for MS521, MX522, MW523
Page 18
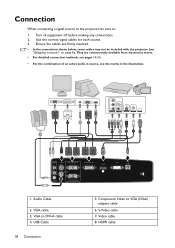
... each source. 3. Audio Cable 2. Turn all equipment off before making any connections. 2. VGA to VGA (DSub) adapter cable 6. Connection When connecting a signal source to the projector, be included with the projector (see the marks in the illustration. 2 3 1 24 1 5 16 7 8 11 1 21 2 1. VGA cable 3.
... each source. 3. Audio Cable 2. Turn all equipment off before making any connections. 2. VGA to VGA (DSub) adapter cable 6. Connection When connecting a signal source to the projector, be included with the projector (see the marks in the illustration. 2 3 1 24 1 5 16 7 8 11 1 21 2 1. VGA cable 3.

User Manual for MS521, MX522, MW523
Page 19
... external video ports when connected to a notebook or desktop computer: 1. Connect the other end of the cable to the MONITOR-OUT jack on the projector. • The output signal for details. Connect the other end of the VGA cable to the COMPUTER IN-1 or COMPUTER IN-2 signal input jack...one end of the cable to the D-Sub input jack of the video monitor. 3. Or if your notebook's key combination. To connect the projector to a projector. Refer to your notebook's documentation to find your monitor is powered on, the output signal from MONITOR-OUT jack varies depending on the input ...
... external video ports when connected to a notebook or desktop computer: 1. Connect the other end of the cable to the MONITOR-OUT jack on the projector. • The output signal for details. Connect the other end of the VGA cable to the COMPUTER IN-1 or COMPUTER IN-2 signal input jack...one end of the cable to the D-Sub input jack of the video monitor. 3. Or if your notebook's key combination. To connect the projector to a projector. Refer to your notebook's documentation to find your monitor is powered on, the output signal from MONITOR-OUT jack varies depending on the input ...
User Manual for MS521, MX522, MW523
Page 20
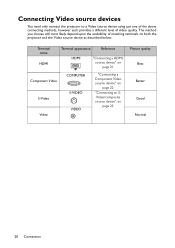
... a Video source device using just one of the above connecting methods, however each provides a different level of matching terminals on both the projector and the Video source device as described below: Terminal name HDMI Terminal appearance Reference HDMI "Connecting a HDMI source device" on page 21 Component Video S-Video ...
... a Video source device using just one of the above connecting methods, however each provides a different level of matching terminals on both the projector and the Video source device as described below: Terminal name HDMI Terminal appearance Reference HDMI "Connecting a HDMI source device" on page 21 Component Video S-Video ...

User Manual for MS521, MX522, MW523
Page 21
...It provides pure digital viewing and listening experience. See "Changing Color Space" on page 56 for details. Connecting a HDMI source device The projector provides a HDMI input jack that the Video source device is turned on and operating correctly. Also check that the signal cables have been connected... correctly. • In the unlikely event that you can be controlled by the projector OnScreen Display (OSD) menus. Connect the other end of unused HDMI output jacks available: • If so, you can continue with this...
...It provides pure digital viewing and listening experience. See "Changing Color Space" on page 56 for details. Connecting a HDMI source device The projector provides a HDMI input jack that the Video source device is turned on and operating correctly. Also check that the signal cables have been connected... correctly. • In the unlikely event that you can be controlled by the projector OnScreen Display (OSD) menus. Connect the other end of unused HDMI output jacks available: • If so, you can continue with this...


