

MX660P User Manual
Page 2
... power off 43 Menu operation 44 Maintenance 53 Care of the projector 53 Lamp information 54 Troubleshooting 60 Specifications 61 Projector specifications 61 Dimensions 62 Ceiling mount installation 62 Timing chart 63 Warranty and Copyright information 66 Regulation statements ......67 2 Table of contents
... power off 43 Menu operation 44 Maintenance 53 Care of the projector 53 Lamp information 54 Troubleshooting 60 Specifications 61 Projector specifications 61 Dimensions 62 Ceiling mount installation 62 Timing chart 63 Warranty and Copyright information 66 Regulation statements ......67 2 Table of contents

MX660P User Manual
Page 6
...you to fail. This product is securely installed. If you use a proper fitting BenQ projector ceiling mount kit and that you intend to an improper attachment through the use of the ceiling mount bracket. This apparatus must be earthed. 6 Important safety instructions Hg - If ... the projector does become loose. Use only BenQ's Ceiling Mount Kit for ceiling mount installation. BenQ recommends that the projector may cause it from the power supply's power outlet and call BenQ to have a pleasant experience using your BenQ projector. This will perform the secondary role ...
...you to fail. This product is securely installed. If you use a proper fitting BenQ projector ceiling mount kit and that you intend to an improper attachment through the use of the ceiling mount bracket. This apparatus must be earthed. 6 Important safety instructions Hg - If ... the projector does become loose. Use only BenQ's Ceiling Mount Kit for ceiling mount installation. BenQ recommends that the projector may cause it from the power supply's power outlet and call BenQ to have a pleasant experience using your BenQ projector. This will perform the secondary role ...

MX660P User Manual
Page 8
.... Please consult your region, and may differ from those illustrated. *The warranty card is only supplied in some specific regions. Soft carry case Optional accessories 1. Ceiling mount kit 8 Introduction 3. Projector Power cord VGA cable Quick start guide User manual CD Warranty card* Capture Remote control with battery Pull the tab before using...
.... Please consult your region, and may differ from those illustrated. *The warranty card is only supplied in some specific regions. Soft carry case Optional accessories 1. Ceiling mount kit 8 Introduction 3. Projector Power cord VGA cable Quick start guide User manual CD Warranty card* Capture Remote control with battery Pull the tab before using...

MX660P User Manual
Page 9
... 21 22 19. Audio (L/R) input jacks 22. Focus and Zoom ring 7. Projection lens 4 11. S-Video input jack Video input jack 21. Front adjuster foot 15. Ceiling mount holes 14. External control panel (See "Controls and functions" on page 10 2 for details.) 5 1 3. Vent (cool air intake) 3 8. Lamp cover 2. Front IR remote sensor 9 10...
... 21 22 19. Audio (L/R) input jacks 22. Focus and Zoom ring 7. Projection lens 4 11. S-Video input jack Video input jack 21. Front adjuster foot 15. Ceiling mount holes 14. External control panel (See "Controls and functions" on page 10 2 for details.) 5 1 3. Vent (cool air intake) 3 8. Lamp cover 2. Front IR remote sensor 9 10...

MX660P User Manual
Page 13
... the projector for this location with the projector placed on . This is required. Purchase the BenQ Projector Ceiling Mount Kit from the ceiling behind the screen. Set Front Ceiling in the SYSTEM SETUP: Basic > Projector Position menu after you turn the projector on the table... and distance between the projector and the rest of four possible installation locations: 1. Front Ceiling Select this installation location. Note that a special rear projection screen and the BenQ Projector Ceiling Mount Kit are required for quick setup and portability. 3. Set Rear Table in the SYSTEM ...
... the projector for this location with the projector placed on . This is required. Purchase the BenQ Projector Ceiling Mount Kit from the ceiling behind the screen. Set Front Ceiling in the SYSTEM SETUP: Basic > Projector Position menu after you turn the projector on the table... and distance between the projector and the rest of four possible installation locations: 1. Front Ceiling Select this installation location. Note that a special rear projection screen and the BenQ Projector Ceiling Mount Kit are required for quick setup and portability. 3. Set Rear Table in the SYSTEM ...
MX660P User Manual
Page 62
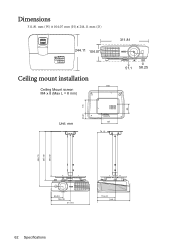
Dimensions 311.81 mm (W) x 104.07 mm (H) x 244.11 mm (D) 244.11 104.07 311.81 Ceiling mount installation Ceiling Mount screw: M4 x 8 (Max L = 8 mm) 51.1 58.25 160 80 46.21 115 Unit: mm 137 74.19 446.15 397.90 364.40 95.33 156.33 311.81 119.21 244.12 62 Specifications
Dimensions 311.81 mm (W) x 104.07 mm (H) x 244.11 mm (D) 244.11 104.07 311.81 Ceiling mount installation Ceiling Mount screw: M4 x 8 (Max L = 8 mm) 51.1 58.25 160 80 46.21 115 Unit: mm 137 74.19 446.15 397.90 364.40 95.33 156.33 311.81 119.21 244.12 62 Specifications


