

User Manual
Page 1
MS524/MS514H/MX525/MW526/ TW526 Digital Projector User Manual
MS524/MS514H/MX525/MW526/ TW526 Digital Projector User Manual

User Manual
Page 2
...image size 14 Connection 16 Connecting video source devices........17 Operation 18 Starting up the projector 18 Adjusting the projected image 19 Using the menus 21 Securing the projector 22 Switching input signal 24 Magnifying and searching for details ...25 Selecting the aspect ... of contents Using the teaching templates 34 Shutting down the projector 35 Direct power off 35 Menu operation 36 Maintenance 46 Care of the projector 46 Lamp information 47 Troubleshooting 51 Specifications 52 Projector specifications 52 Dimensions 53 Ceiling mount installation 53 Timing chart...
...image size 14 Connection 16 Connecting video source devices........17 Operation 18 Starting up the projector 18 Adjusting the projected image 19 Using the menus 21 Securing the projector 22 Switching input signal 24 Magnifying and searching for details ...25 Selecting the aspect ... of contents Using the teaching templates 34 Shutting down the projector 35 Direct power off 35 Menu operation 36 Maintenance 46 Care of the projector 46 Lamp information 47 Troubleshooting 51 Specifications 52 Projector specifications 52 Dimensions 53 Ceiling mount installation 53 Timing chart...

User Manual
Page 3
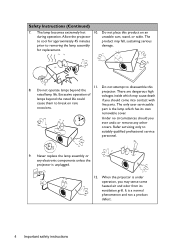
...product, it for safety of ±10 volts occur. Do not block the projection lens with any ) when the projector lamp is NOT stable. This projector is designed to operate safely within a mains voltage between 100 to 240 volts AC, but could cause the objects ...to become heated and deformed or even cause a fire. To temporarily turn off the lamp, press ECO BLANK on . Important safety instructions Your projector is designed and tested to meet the latest standards for future reference. 2. However, to qualified service personnel. 6. Important safety instructions 3 Safety ...
...product, it for safety of ±10 volts occur. Do not block the projection lens with any ) when the projector lamp is NOT stable. This projector is designed to operate safely within a mains voltage between 100 to 240 volts AC, but could cause the objects ...to become heated and deformed or even cause a fire. To temporarily turn off the lamp, press ECO BLANK on . Important safety instructions Your projector is designed and tested to meet the latest standards for future reference. 2. However, to qualified service personnel. 6. Important safety instructions 3 Safety ...
User Manual
Page 4
... lamp life. part is under operation, you ever undo or remove any electronic components unless the projector is a normal phenomenon and not a product defect. 4 Important safety instructions It is unplugged. 12. Safety Instructions (Continued) 7. Allow... the projector unstable cart, stand, or table. When the projector is the lamp which may cause death lamps beyond the projector. The to removing the lamp assembly damage. The only user serviceable occasions. Do...
... lamp life. part is under operation, you ever undo or remove any electronic components unless the projector is a normal phenomenon and not a product defect. 4 Important safety instructions It is unplugged. 12. Safety Instructions (Continued) 7. Allow... the projector unstable cart, stand, or table. When the projector is the lamp which may cause death lamps beyond the projector. The to removing the lamp assembly damage. The only user serviceable occasions. Do...
User Manual
Page 5
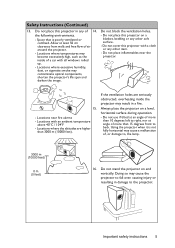
...in any other soft surface. - Space that is not fully horizontal may become excessively high, such as the inside the projector may contaminate optical components, shorten the projector's life span and darken the image. Locations where temperatures may cause a malfunction of a car with all windows rolled up.... are seriously obstructed, overheating inside of , or damage to, the lamp. 3000 m (10000 feet) 0 m (0 feet) 16. Do not stand the projector on end vertically. Do not use if tilted at an angle of more than 10 degrees left to right, nor at least 50 cm clearance...
...in any other soft surface. - Space that is not fully horizontal may become excessively high, such as the inside the projector may contaminate optical components, shorten the projector's life span and darken the image. Locations where temperatures may cause a malfunction of a car with all windows rolled up.... are seriously obstructed, overheating inside of , or damage to, the lamp. 3000 m (10000 feet) 0 m (0 feet) 16. Do not stand the projector on end vertically. Do not use if tilted at an angle of more than 10 degrees left to right, nor at least 50 cm clearance...
User Manual
Page 6
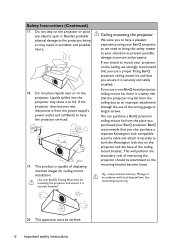
... installed. You can purchase a BenQ projector ceiling mount kit from the power supply's power outlet and call BenQ to have the projector serviced. 19. BenQ recommends that the projector may fall from the ceiling due to your BenQ projector. If you intend to mount your BenQ projector, so we strongly recommend that ...from the place you also purchase a separate Kensington lock compatible security cable and attach it . If you use a proper fitting BenQ projector ceiling mount kit and that you ensure it is a safety risk that you purchased your attention to prevent possible damage to ...
... installed. You can purchase a BenQ projector ceiling mount kit from the power supply's power outlet and call BenQ to have the projector serviced. 19. BenQ recommends that the projector may fall from the ceiling due to your BenQ projector. If you intend to mount your BenQ projector, so we strongly recommend that ...from the place you also purchase a separate Kensington lock compatible security cable and attach it . If you use a proper fitting BenQ projector ceiling mount kit and that you ensure it is a safety risk that you purchased your attention to prevent possible damage to ...

User Manual
Page 7
...the best picture quality immediately. • Built-in speaker(s) Built-in a more flexible. Introduction 7 Auto Power Off function allows the projector to projection distance. • The lamp brightness will decline over time and may vary within 90 seconds after a set period of the...The apparent brightness of time. This is connected. • Instant Restart Selectable Instant Restart function enables you can wear BenQ 3D glasses to restart the projector immediately within the lamp manufacturers specifications. By presenting the depth of the images, you to enjoy the 3D movies, ...
...the best picture quality immediately. • Built-in speaker(s) Built-in a more flexible. Introduction 7 Auto Power Off function allows the projector to projection distance. • The lamp brightness will decline over time and may vary within 90 seconds after a set period of the...The apparent brightness of time. This is connected. • Instant Restart Selectable Instant Restart function enables you can wear BenQ 3D glasses to restart the projector immediately within the lamp manufacturers specifications. By presenting the depth of the images, you to enjoy the 3D movies, ...
User Manual
Page 8
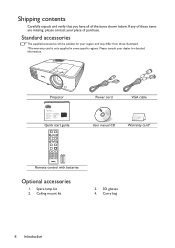
... will be suitable for detailed information. Please consult your dealer for your place of the items shown below. Spare lamp kit 2. Projector Digital Projector Quick Start Guide Quick Start Guide Guide de démarrage rapide Kurzanleitung Guida rapida Guía de inicio rápido Guia de...;ugi Hızlı başlangıç kılavuzu Průvodce rychlým používáním BenQ.com Quick start guide Power cord VGA cable User manual CD Warranty card* Remote control with batteries Optional accessories 1. Shipping contents Carefully unpack...
... will be suitable for detailed information. Please consult your dealer for your place of the items shown below. Spare lamp kit 2. Projector Digital Projector Quick Start Guide Quick Start Guide Guide de démarrage rapide Kurzanleitung Guida rapida Guía de inicio rápido Guia de...;ugi Hızlı başlangıç kılavuzu Průvodce rychlým používáním BenQ.com Quick start guide Power cord VGA cable User manual CD Warranty card* Remote control with batteries Optional accessories 1. Shipping contents Carefully unpack...
User Manual
Page 9
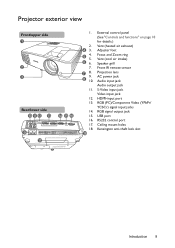
Projector exterior view Front/upper side 1 2 3 Rear/lower side 10 11 12 13 14 15 16 9 17 1. 2. 4 3. 4. 5 5. 6 6. 7. 7 8. 9. 8 10. 11. 12. 13. 14. 15. 16. 17. 18. ...
Projector exterior view Front/upper side 1 2 3 Rear/lower side 10 11 12 13 14 15 16 9 17 1. 2. 4 3. 4. 5 5. 6 6. 7. 7 8. 9. 8 10. 11. 12. 13. 14. 15. 16. 17. 18. ...
User Manual
Page 10
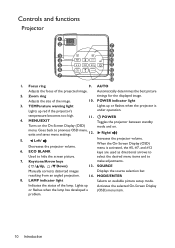
... Zoom ring timings for the displayed image. menu is under operation. Lights up or flashes when the projector is activated, the #5, #7, and #12 6. POWER 4. Left/ Increases the projector volume. Activates the selected On-Screen Display (OSD) menu item. 10 Introduction Focus ring 9. AUTO ...of the image. 3. Goes back to hide the screen picture. 7. menu, 12. When the On-Screen Display (OSD) Decreases the projector volume. ECO BLANK keys are used as directional arrows to Used to previous OSD exits and saves menu settings. Keystone/Arrow keys select the...
... Zoom ring timings for the displayed image. menu is under operation. Lights up or flashes when the projector is activated, the #5, #7, and #12 6. POWER 4. Left/ Increases the projector volume. Activates the selected On-Screen Display (OSD) menu item. 10 Introduction Focus ring 9. AUTO ...of the image. 3. Goes back to hide the screen picture. 7. menu, 12. When the On-Screen Display (OSD) Decreases the projector volume. ECO BLANK keys are used as directional arrows to Used to previous OSD exits and saves menu settings. Keystone/Arrow keys select the...
User Manual
Page 11
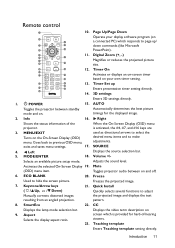
... on . Automatically determines the best picture timings for hard-of the When the On-Screen Display (OSD) menu projector. Info 16. MODE/ENTER Displays the source selection bar. 18. Mute (OSD) menu item. SmartEco 22. CC Displays the lamp mode ... Volume +/- Freezes the projected image. 7. Right Shows the status information of -hearing viewers. 23. Goes back to hide the screen picture. Toggles projector audio between standby mode and on and off. 6. the projected image and displays the test pattern. 8. Aspect Selects the display aspect ratio. Page ...
... on . Automatically determines the best picture timings for hard-of the When the On-Screen Display (OSD) menu projector. Info 16. MODE/ENTER Displays the source selection bar. 18. Mute (OSD) menu item. SmartEco 22. CC Displays the lamp mode ... Volume +/- Freezes the projected image. 7. Right Shows the status information of -hearing viewers. 23. Goes back to hide the screen picture. Toggles projector audio between standby mode and on and off. 6. the projected image and displays the test pattern. 8. Aspect Selects the display aspect ratio. Page ...
User Manual
Page 12
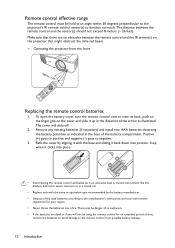
To open the battery cover, turn the remote control over to view its back, push on the finger grip on the projector that might obstruct the infra-red beam. • Operating the projector from possible battery leakage. 12 Introduction Positive (+) goes to positive and negative (-) goes to function correctly. Stop when it clicks...; Never throw the batteries into position. Remote control effective range The remote control must be held at an angle within 30 degrees perpendicular to the projector's IR remote control sensor(s) to negative. 3.
To open the battery cover, turn the remote control over to view its back, push on the finger grip on the projector that might obstruct the infra-red beam. • Operating the projector from possible battery leakage. 12 Introduction Positive (+) goes to positive and negative (-) goes to function correctly. Stop when it clicks...; Never throw the batteries into position. Remote control effective range The remote control must be held at an angle within 30 degrees perpendicular to the projector's IR remote control sensor(s) to negative. 3.
User Manual
Page 13
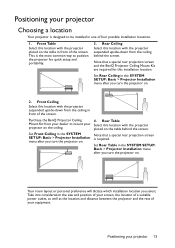
...Ceiling Select this location with the projector placed on . 4. Rear Table Select this location with the projector suspended upside-down from your dealer to mount your projector 13 Note that a special rear projection screen and the BenQ Projector Ceiling Mount Kit are required for...distance between the projector and the rest of your projector Choosing a location Your projector is required. Note that a special rear projection screen is designed to position the projector for this location with the projector placed on the ceiling. Purchase the BenQ Projector Ceiling Mount Kit...
...Ceiling Select this location with the projector placed on . 4. Rear Table Select this location with the projector suspended upside-down from your dealer to mount your projector 13 Note that a special rear projection screen and the BenQ Projector Ceiling Mount Kit are required for...distance between the projector and the rest of your projector Choosing a location Your projector is required. Note that a special rear projection screen is designed to position the projector for this location with the projector placed on the ceiling. Purchase the BenQ Projector Ceiling Mount Kit...
User Manual
Page 14
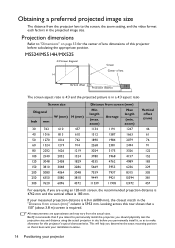
..."Dimensions" on page 53 for this row shows that if you intend to permanently install the projector, you are approximate and may vary from the actual sizes. If your projector This will help you permanently install it best suits your installation location. 14 Positioning your measured... projection distance is 4762 mm and the vertical offset is 5953 mm. BenQ recommends that a 150'' (about 3.8 m) screen is in the projected image size. zoom) Average Max length (min. All measurements are using the actual projector in the "Distance from screen (mm)" column is 183 mm. Obtaining...
..."Dimensions" on page 53 for this row shows that if you intend to permanently install the projector, you are approximate and may vary from the actual sizes. If your projector This will help you permanently install it best suits your installation location. 14 Positioning your measured... projection distance is 4762 mm and the vertical offset is 5953 mm. BenQ recommends that a 150'' (about 3.8 m) screen is in the projected image size. zoom) Average Max length (min. All measurements are using the actual projector in the "Distance from screen (mm)" column is 183 mm. Obtaining...
User Manual
Page 15
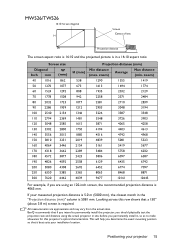
... 6435 6742 6452 6774 7097 8065 8468 8871 9677 10161 10645 For example, if you are approximate and may vary from the actual sizes. BenQ recommends that a 150'' (about 3.8 m) screen is 4065 mm. This will help you determine the exact mounting position so that it ,...as to make allowance for this row shows that if you intend to permanently install the projector, you permanently install it best suits your installation location. zoom) Average Max distance (min. If your projector 15 MW526/TW526 16:10 Screen diagonal H Screen Center of lens W Projection distance ...
... 6435 6742 6452 6774 7097 8065 8468 8871 9677 10161 10645 For example, if you are approximate and may vary from the actual sizes. BenQ recommends that a 150'' (about 3.8 m) screen is 4065 mm. This will help you determine the exact mounting position so that it ,...as to make allowance for this row shows that if you intend to permanently install the projector, you permanently install it best suits your installation location. zoom) Average Max distance (min. If your projector 15 MW526/TW526 16:10 Screen diagonal H Screen Center of lens W Projection distance ...
User Manual
Page 16
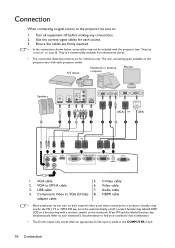
...to find your notebook's key combination. • The D-Sub output only works when an appropriate D-Sub input is made to a projector. Ensure the cables are firmly inserted. • In the connections shown below are commercially available from electronics stores. • The... connection illustrations below , some cables may not be sure to: 1. Audio cable 4. Connection When connecting a signal source to the projector, be included with the projector (see "Shipping contents" on page 8). S-Video cable 2. USB cable 7. VGA cable 5. Video cable 3. HDMI cable adapter cable...
...to find your notebook's key combination. • The D-Sub output only works when an appropriate D-Sub input is made to a projector. Ensure the cables are firmly inserted. • In the connections shown below are commercially available from electronics stores. • The... connection illustrations below , some cables may not be sure to: 1. Audio cable 4. Connection When connecting a signal source to the projector, be included with the projector (see "Shipping contents" on page 8). S-Video cable 2. USB cable 7. VGA cable 5. Video cable 3. HDMI cable adapter cable...
User Manual
Page 17
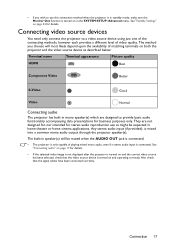
...basic audio functionality accompanying data presentations for details. See "Connecting audio" on page 17 for stereo audio reproduction use this connection method when the projector is in standby mode, make sure the Monitor Out function is turned on in the SYSTEM SETUP: Advanced menu. The method you wish ... mono speaker(s) which are not designed for, nor intended for details. • If the selected video image is not displayed after the projector is turned on and the correct video source has been selected, check that the signal cables have been connected correctly. • If you...
...basic audio functionality accompanying data presentations for details. See "Connecting audio" on page 17 for stereo audio reproduction use this connection method when the projector is in standby mode, make sure the Monitor Out function is turned on in the SYSTEM SETUP: Advanced menu. The method you wish ... mono speaker(s) which are not designed for, nor intended for details. • If the selected video image is not displayed after the projector is turned on and the correct video source has been selected, check that the signal cables have been connected correctly. • If you...
User Manual
Page 18
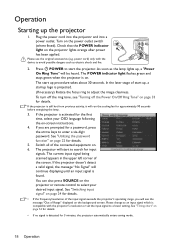
... light on . 6. Press POWER to start up procedure takes about 30 seconds. In the later stage of the input signal exceeds the projector's operating range, you are prompted for a password, press the arrow keys to adjust the image clearness. The current input signal being scanned...the cooling fan for approximately 90 seconds before energizing the lamp. 3. Operation Starting up , a startup logo is detected for 3 minutes, the projector automatically enters saving mode. 18 Operation Please use the original accessories (e.g. To turn off the Power On/Off Ring Tone" on page 22 for ...
... light on . 6. Press POWER to start up procedure takes about 30 seconds. In the later stage of the input signal exceeds the projector's operating range, you are prompted for a password, press the arrow keys to adjust the image clearness. The current input signal being scanned...the cooling fan for approximately 90 seconds before energizing the lamp. 3. Operation Starting up , a startup logo is detected for 3 minutes, the projector automatically enters saving mode. 18 Operation Please use the original accessories (e.g. To turn off the Power On/Off Ring Tone" on page 22 for ...
User Manual
Page 19
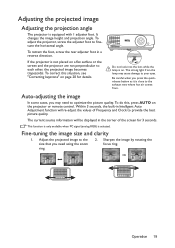
...when you press the quickrelease button as it is close to optimize the picture quality. Fine-tuning the image size and clarity 1. If the projector is on page 20 for 3 seconds. To do this situation, see "Correcting keystone" on . This function is only available when PC... ring. 2. Sharpen the image by rotating the focus ring. The strong light from . Adjusting the projected image Adjusting the projection angle The projector is selected. Within 3 seconds, the built-in Intelligent Auto Adjustment function will be displayed in a reverse direction. To retract the foot, ...
...when you press the quickrelease button as it is close to optimize the picture quality. Fine-tuning the image size and clarity 1. If the projector is on page 20 for 3 seconds. To do this situation, see "Correcting keystone" on . This function is only available when PC... ring. 2. Sharpen the image by rotating the focus ring. The strong light from . Adjusting the projected image Adjusting the projection angle The projector is selected. Within 3 seconds, the built-in Intelligent Auto Adjustment function will be displayed in a reverse direction. To retract the foot, ...
User Manual
Page 20
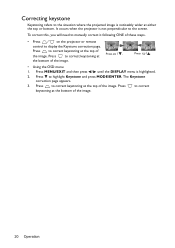
... at the bottom of the image. To correct this, you will need to manually correct it following ONE of these steps. • Press / on the projector or remote control to correct keystoning at the top of the image. Press / . • Using the OSD menu 1. Press to correct keystoning at the top... and press MODE/ENTER. Press to correct keystoning at either the top or bottom. Correcting keystone Keystoning refers to the screen. It occurs when the projector is not perpendicular to the situation where the projected image is highlighted. 2. the bottom of the image. 20 Operation
... at the bottom of the image. To correct this, you will need to manually correct it following ONE of these steps. • Press / on the projector or remote control to correct keystoning at the top of the image. Press / . • Using the OSD menu 1. Press to correct keystoning at the top... and press MODE/ENTER. Press to correct keystoning at either the top or bottom. Correcting keystone Keystoning refers to the screen. It occurs when the projector is not perpendicular to the situation where the projected image is highlighted. 2. the bottom of the image. 20 Operation


