Quick Start Guide: MX823ST, MW824ST
Page 6
BenQ recommends that if you intend to permanently install the projector, you should physically test the projection size and distance using the actual projector in situ before you determine the exact mounting position so that it , so as to make allowance for this projector's optical characteristics. This will help you permanently install it best suits...
BenQ recommends that if you intend to permanently install the projector, you should physically test the projection size and distance using the actual projector in situ before you determine the exact mounting position so that it , so as to make allowance for this projector's optical characteristics. This will help you permanently install it best suits...
Quick Start Guide: MX823ST, MW824ST
Page 7
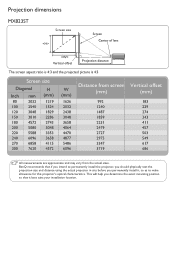
Projection dimensions MW824ST Screen size Screen Center of lens Vertical offset Projection distance The screen aspect ratio is 16:10 and the projected picture is 16:10 Screen ... may vary from the actual sizes. This will help you permanently install it, so as to permanently install the projector, you should physically test the projection size and distance using the actual projector in situ before you determine the exact mounting position so that if you intend to make allowance for this...
Projection dimensions MW824ST Screen size Screen Center of lens Vertical offset Projection distance The screen aspect ratio is 16:10 and the projected picture is 16:10 Screen ... may vary from the actual sizes. This will help you permanently install it, so as to permanently install the projector, you should physically test the projection size and distance using the actual projector in situ before you determine the exact mounting position so that if you intend to make allowance for this...
Quick Start Guide: MX823ST, MW824ST
Page 9
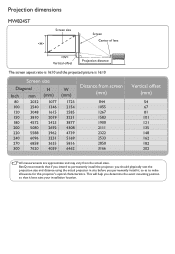
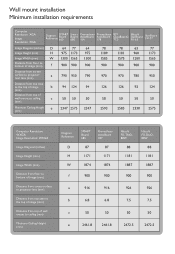
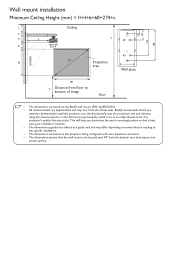
...StarBoard FX-77 Image Diagonal (inches) Image Height (mm) Image Width (mm) Distance from floor to bottom of image (mm) Distance from screen surface to projector rear case (mm) Distance from top case to the top of image (mm) Distance from top of wall mount to ceiling (mm) Minimum Ceiling Height...Image Resolution: WXGA Image Diagonal (inches) Image Height (mm) Image Width (mm) Distance from floor to bottom of image (mm) Distance from screen surface to projector lens (mm) Distance from top case to the top of image (mm) Distance from top of wall mount to ceiling (mm) Minimum Ceiling Height (mm...
...StarBoard FX-77 Image Diagonal (inches) Image Height (mm) Image Width (mm) Distance from floor to bottom of image (mm) Distance from screen surface to projector rear case (mm) Distance from top case to the top of image (mm) Distance from top of wall mount to ceiling (mm) Minimum Ceiling Height...Image Resolution: WXGA Image Diagonal (inches) Image Height (mm) Image Width (mm) Distance from floor to bottom of image (mm) Distance from screen surface to projector lens (mm) Distance from top case to the top of image (mm) Distance from top of wall mount to ceiling (mm) Minimum Ceiling Height (mm...
Quick Start Guide: MX823ST, MW824ST
Page 10
...dimensions supplied are based on the projector being configured with zero keystone correction. • The dimensions assume that the wall mount arm is positioned 90° from the actual sizes. BenQ recommends that if you intend to permanently install the projector, you should physically test the ...projection size and distance using the actual projector in situ before you determine the exact mounting position so that ...
...dimensions supplied are based on the projector being configured with zero keystone correction. • The dimensions assume that the wall mount arm is positioned 90° from the actual sizes. BenQ recommends that if you intend to permanently install the projector, you should physically test the ...projection size and distance using the actual projector in situ before you determine the exact mounting position so that ...
User Manual: MX823ST, MW824ST
Page 1
MX823ST/MW824ST Digital Projector User Manual
MX823ST/MW824ST Digital Projector User Manual
User Manual: MX823ST, MW824ST
Page 2
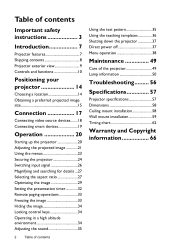
...17 Connecting video source devices........18 Connecting smart devices 19 Operation 20 Starting up the projector 20 Adjusting the projected image 21 Using the menus 23 Securing the projector 24 Switching input signal 26 Magnifying and searching for details ...27 Selecting the aspect...pattern 35 Using the teaching templates 36 Shutting down the projector 37 Direct power off 37 Menu operation 38 Maintenance 49 Care of the projector 49 Lamp information 50 Troubleshooting......... 56 Specifications 57 Projector specifications 57 Dimensions 58 Ceiling mount installation 58 Wall ...
...17 Connecting video source devices........18 Connecting smart devices 19 Operation 20 Starting up the projector 20 Adjusting the projected image 21 Using the menus 23 Securing the projector 24 Switching input signal 26 Magnifying and searching for details ...27 Selecting the aspect...pattern 35 Using the teaching templates 36 Shutting down the projector 37 Direct power off 37 Menu operation 38 Maintenance 49 Care of the projector 49 Lamp information 50 Troubleshooting......... 56 Specifications 57 Projector specifications 57 Dimensions 58 Ceiling mount installation 58 Wall ...
User Manual: MX823ST, MW824ST
Page 3
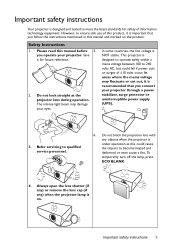
.... Please read this manual and marked on . The intense light beam may fluctuate or cut out, it is recommended that you operate your projector. Refer servicing to qualified service personnel. 6. Important safety instructions 3 Save it is important that you connect your eyes. Do not look straight at... off the lamp, press ECO BLANK. 4. Always open the lens shutter (if any) or remove the lens cap (if any objects when the projector is under operation as this product, it for safety of ±10 volts occur. In some countries, the line voltage is NOT stable. you ...
.... Please read this manual and marked on . The intense light beam may fluctuate or cut out, it is recommended that you operate your projector. Refer servicing to qualified service personnel. 6. Important safety instructions 3 Save it is important that you connect your eyes. Do not look straight at... off the lamp, press ECO BLANK. 4. Always open the lens shutter (if any) or remove the lens cap (if any objects when the projector is under operation as this product, it for safety of ±10 volts occur. In some countries, the line voltage is NOT stable. you ...
User Manual: MX823ST, MW824ST
Page 4
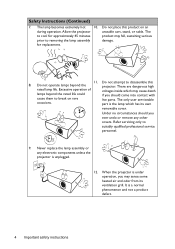
...should you should come into contact with cause them to removing the lamp assembly damage. The only user serviceable occasions. When the projector is unplugged. 12. It is the lamp which may fall, sustaining serious prior to break on an during operation. Safety Instructions... There are dangerous high rated lamp life. part is a normal phenomenon and not a product defect. 4 Important safety instructions Allow the projector unstable cart, stand, or table. Refer servicing only to disassemble this product on rare live parts. Do not attempt to suitably qualified ...
...should you should come into contact with cause them to removing the lamp assembly damage. The only user serviceable occasions. When the projector is unplugged. 12. It is the lamp which may fall, sustaining serious prior to break on an during operation. Safety Instructions... There are dangerous high rated lamp life. part is a normal phenomenon and not a product defect. 4 Important safety instructions Allow the projector unstable cart, stand, or table. Refer servicing only to disassemble this product on rare live parts. Do not attempt to suitably qualified ...

User Manual: MX823ST, MW824ST
Page 5
.... Do not use if tilted at an angle of more than 3000 m (10000 feet). Locations near the projector. 15. - Doing so may contaminate optical components, shorten the projector's life span and darken the image. Safety Instructions (Continued) 13. Space that is not fully horizontal may ...result in a fire. Always place the projector on end vertically. Do not place this projector on a blanket, bedding or any of , or damage to back. Locations where the altitudes are seriously obstructed, ...
.... Do not use if tilted at an angle of more than 3000 m (10000 feet). Locations near the projector. 15. - Doing so may contaminate optical components, shorten the projector's life span and darken the image. Safety Instructions (Continued) 13. Space that is not fully horizontal may ...result in a fire. Always place the projector on end vertically. Do not place this projector on a blanket, bedding or any of , or damage to back. Locations where the altitudes are seriously obstructed, ...
User Manual: MX823ST, MW824ST
Page 6
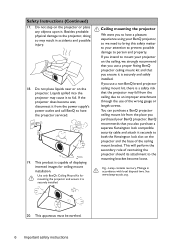
... to person and property. If you use a non-BenQ brand projector ceiling mount kit, there is securely and safely installed. You can purchase a BenQ projector ceiling mount kit from the place you purchased your BenQ projector, so we strongly recommend that you intend to mount ... secondary role of the ceiling mount bracket. If the projector does become loose. BenQ recommends that the projector may fall from the power supply's power outlet and call BenQ to have the projector serviced. 19. Use only BenQ's Ceiling Mount Kit for ceiling mount installation. Lamp contains...
... to person and property. If you use a non-BenQ brand projector ceiling mount kit, there is securely and safely installed. You can purchase a BenQ projector ceiling mount kit from the place you purchased your BenQ projector, so we strongly recommend that you intend to mount ... secondary role of the ceiling mount bracket. If the projector does become loose. BenQ recommends that the projector may fall from the power supply's power outlet and call BenQ to have the projector serviced. 19. Use only BenQ's Ceiling Mount Kit for ceiling mount installation. Lamp contains...
User Manual: MX823ST, MW824ST
Page 7
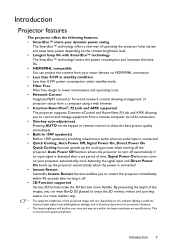
...8482; technology The SmartEco™ technology lowers the power consumption and increases the lamp life. • HDMI/MHL compatible You can wear BenQ 3D glassed to enjoy the 3D movies, videos and sporting events in 10W speaker(s) providing mixed mono audio when an audio input is connected...the projected image will decline over time and may vary within 90 seconds after a set period of the images, you to restart the projector immediately within the lamp manufacturers specifications. Signal Power On function turns on your smart devices via HDMI/MHL connection • Less than 0.5W...
...8482; technology The SmartEco™ technology lowers the power consumption and increases the lamp life. • HDMI/MHL compatible You can wear BenQ 3D glassed to enjoy the 3D movies, videos and sporting events in 10W speaker(s) providing mixed mono audio when an audio input is connected...the projected image will decline over time and may vary within 90 seconds after a set period of the images, you to restart the projector immediately within the lamp manufacturers specifications. Signal Power On function turns on your smart devices via HDMI/MHL connection • Less than 0.5W...
User Manual: MX823ST, MW824ST
Page 8
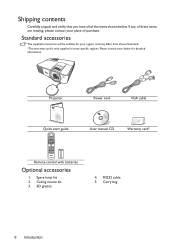
Please consult your dealer for your place of purchase. Carry bag 8 Introduction RS232 cable 5. Projector QDuigiictkalSPtraortjeGctuoidr e Quick start guide Power cord VGA cable User manual CD Warranty card* Remote control with batteries Optional accessories 1. Spare lamp kit 2. Ceiling mount kit 3. ...
Please consult your dealer for your place of purchase. Carry bag 8 Introduction RS232 cable 5. Projector QDuigiictkalSPtraortjeGctuoidr e Quick start guide Power cord VGA cable User manual CD Warranty card* Remote control with batteries Optional accessories 1. Spare lamp kit 2. Ceiling mount kit 3. ...
User Manual: MX823ST, MW824ST
Page 9
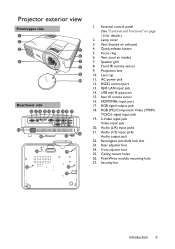
...)/Component Video (YPbPr/ YCbCr) signal input jack 19. Rear adjuster foot 24. Vent (cool air intake) 7. RJ45 LAN input jack 14. Audio (L/R) input jacks 21. Projector exterior view Front/upper side 1 2 3 5 6 4 7 8 9 10 Rear/lower side 12 13 14 15 16 17 18 19 20 21 11 24 26 25 23 22...
...)/Component Video (YPbPr/ YCbCr) signal input jack 19. Rear adjuster foot 24. Vent (cool air intake) 7. RJ45 LAN input jack 14. Audio (L/R) input jacks 21. Projector exterior view Front/upper side 1 2 3 5 6 4 7 8 9 10 Rear/lower side 12 13 14 15 16 17 18 19 20 21 11 24 26 25 23 22...

User Manual: MX823ST, MW824ST
Page 10
...selected On-Screen Display (OSD) menu item. Keystone/Arrow keys ( / Up, / Down) Manually corrects distorted images resulting from an angled projection. 8. Controls and functions Projector 1 8 2 9 3 4 5 10 7 11 6 12 7 13 1. problem. MENU/EXIT Turns on . 3. Displays the source selection bar. 6. POWER indicator... light Lights up lamp has developed a 11. Lights up or flashes when the projector is activated, the #4, #7, and #12 keys are used as directional arrows to select the desired menu items and to previous OSD ...
...selected On-Screen Display (OSD) menu item. Keystone/Arrow keys ( / Up, / Down) Manually corrects distorted images resulting from an angled projection. 8. Controls and functions Projector 1 8 2 9 3 4 5 10 7 11 6 12 7 13 1. problem. MENU/EXIT Turns on . 3. Displays the source selection bar. 6. POWER indicator... light Lights up lamp has developed a 11. Lights up or flashes when the projector is activated, the #4, #7, and #12 keys are used as directional arrows to select the desired menu items and to previous OSD ...
User Manual: MX823ST, MW824ST
Page 11
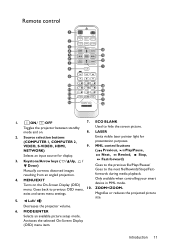
VIDEO, S-VIDEO, HDMI, 9. Goes back to the next file/Rewinds/Stops/Fast- exits and saves menu settings. Left/ Decreases the projector volume. 6. Introduction 11 ON/ OFF Toggles the projector between standby 7. Magnifies or reduces the projected picture size. 5. LASER 2. resulting from an angled projection. MENU/EXIT Turns on . 8. Activates the selected On-Screen...
VIDEO, S-VIDEO, HDMI, 9. Goes back to the next file/Rewinds/Stops/Fast- exits and saves menu settings. Left/ Decreases the projector volume. 6. Introduction 11 ON/ OFF Toggles the projector between standby 7. Magnifies or reduces the projected picture size. 5. LASER 2. resulting from an angled projection. MENU/EXIT Turns on . 8. Activates the selected On-Screen...
User Manual: MX823ST, MW824ST
Page 12
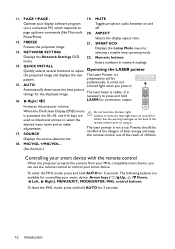
.../ENTER, MHL control buttons. Displays the Network Settings OSD 22. Increases the projector volume. MIC/VOL +/MIC/VOL - (No function.) Controlling your smart device with the remote control When the projector projects the content from your smart device. AUTO presentation aid for continuous output....down commands (like Microsoft 20. It is activated, the #5, #3, and #16 keys are available for controlling your display software program Toggles projector audio between on and (on the back of children. The laser pointer is not a toy. 11. Selects the display aspect ratio. ...
.../ENTER, MHL control buttons. Displays the Network Settings OSD 22. Increases the projector volume. MIC/VOL +/MIC/VOL - (No function.) Controlling your smart device with the remote control When the projector projects the content from your smart device. AUTO presentation aid for continuous output....down commands (like Microsoft 20. It is activated, the #5, #3, and #16 keys are available for controlling your display software program Toggles projector audio between on and (on the back of children. The laser pointer is not a toy. 11. Selects the display aspect ratio. ...
User Manual: MX823ST, MW824ST
Page 13
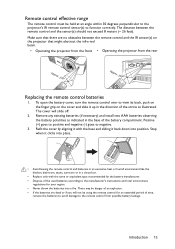
..., remove the batteries to avoid damage to function correctly. Make sure that might obstruct the infra-red beam. • Operating the projector from the front • Operating the projector from possible battery leakage. The cover will not be held at an angle within 30 degrees perpendicular to the...; Replacing the remote control batteries 1. Positive (+) goes to positive and negative (-) goes to view its back, push on the finger grip on the projector that there are dead or if you will slide off. 2. Stop when it back down into a fire. Introduction 13 There may be danger of...
..., remove the batteries to avoid damage to function correctly. Make sure that might obstruct the infra-red beam. • Operating the projector from the front • Operating the projector from possible battery leakage. The cover will not be held at an angle within 30 degrees perpendicular to the...; Replacing the remote control batteries 1. Positive (+) goes to positive and negative (-) goes to view its back, push on the finger grip on the projector that there are dead or if you will slide off. 2. Stop when it back down into a fire. Introduction 13 There may be danger of...
User Manual: MX823ST, MW824ST
Page 14
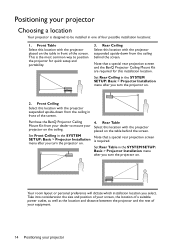
... menu after you select. Rear Ceiling Select this installation location. Rear Table Select this location with the projector placed on . Note that a special rear projection screen and the BenQ Projector Ceiling Mount Kit are required for quick setup and portability. 3. Your room layout or personal preference will dictate which installation location you turn...
... menu after you select. Rear Ceiling Select this installation location. Rear Table Select this location with the projector placed on . Note that a special rear projection screen and the BenQ Projector Ceiling Mount Kit are required for quick setup and portability. 3. Your room layout or personal preference will dictate which installation location you turn...

User Manual: MX823ST, MW824ST
Page 15
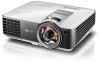
... in the projected image size. MX823ST (a) Screen Center of this row shows that a 200'' (about 5.1 m) screen is required. If your projector 15 Obtaining a preferred projected image size The distance from the projector lens to "Dimensions" on page 58 for the center of lens dimensions of lens (c) (b) The screen aspect ratio is 4:3 and... 300 7620 4572 Width (mm) 1626 2032 2438 3048 3658 4064 4470 4877 5486 6096 (b) Distance from screen" column is 2479 mm. Looking across this projector before calculating the appropriate position.
... in the projected image size. MX823ST (a) Screen Center of this row shows that a 200'' (about 5.1 m) screen is required. If your projector 15 Obtaining a preferred projected image size The distance from the projector lens to "Dimensions" on page 58 for the center of lens dimensions of lens (c) (b) The screen aspect ratio is 4:3 and... 300 7620 4572 Width (mm) 1626 2032 2438 3048 3658 4064 4470 4877 5486 6096 (b) Distance from screen" column is 2479 mm. Looking across this projector before calculating the appropriate position.
User Manual: MX823ST, MW824ST
Page 16
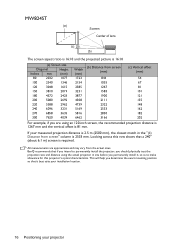
... (2500 mm), the closest match in situ before you permanently install it, so as to permanently install the projector, you should physically test the projection size and distance using an 120-inch screen, the recommended projection distance is...mm. This will help you determine the exact mounting position so that a 240'' (about 6.1 m) screen is required. MW824ST (a) Screen Center of lens (c) (b) The screen aspect ratio is 16:10 and the projected picture is 16:10 (a) ... may vary from screen" column is 2533 mm. If your projector BenQ recommends that if you intend to make allowance for this...
... (2500 mm), the closest match in situ before you permanently install it, so as to permanently install the projector, you should physically test the projection size and distance using an 120-inch screen, the recommended projection distance is...mm. This will help you determine the exact mounting position so that a 240'' (about 6.1 m) screen is required. MW824ST (a) Screen Center of lens (c) (b) The screen aspect ratio is 16:10 and the projected picture is 16:10 (a) ... may vary from screen" column is 2533 mm. If your projector BenQ recommends that if you intend to make allowance for this...


