
BenQ US PRJ 1 Year Warranty
Page 1
...reconditioned components or parts to process the replacement. BenQ will pay shipping freight to BenQ or a BenQ Authorized Service Provider and BenQ will replace the DOA unit with a new or reconditioned Product of purchase. BenQ may use during the warranty period. BenQ will , at its option, repair or replace ... purchaser (the "Customer") (except for the remainder of the Product. Obtaining Depot Warranty Service If you purchased a BenQ product in the continental United States, Hawaii, and Alaska, you have a separate warranty policy), parts and labor only (No advance replacement...
...reconditioned components or parts to process the replacement. BenQ will pay shipping freight to BenQ or a BenQ Authorized Service Provider and BenQ will replace the DOA unit with a new or reconditioned Product of purchase. BenQ may use during the warranty period. BenQ will , at its option, repair or replace ... purchaser (the "Customer") (except for the remainder of the Product. Obtaining Depot Warranty Service If you purchased a BenQ product in the continental United States, Hawaii, and Alaska, you have a separate warranty policy), parts and labor only (No advance replacement...

BenQ US PRJ 1 Year Warranty
Page 2
... United States, Hawaii, and Alaska for all Products purchased and located in secured packaging to resolve technical issues over the phone. BenQ or BenQ Authorized Service Provider will then issue a Return Merchandise Authorization ("RMA") number to be sent in the continental United States, Hawaii..., and Alaska. 2. If telephone resolution is not possible, BenQ or BenQ Customer Service Center will use of purchase. or (ii) for which there is available for return shipments. 1. All Products must be...
... United States, Hawaii, and Alaska for all Products purchased and located in secured packaging to resolve technical issues over the phone. BenQ or BenQ Authorized Service Provider will then issue a Return Merchandise Authorization ("RMA") number to be sent in the continental United States, Hawaii..., and Alaska. 2. If telephone resolution is not possible, BenQ or BenQ Customer Service Center will use of purchase. or (ii) for which there is available for return shipments. 1. All Products must be...

BenQ US PRJ 1 Year Warranty
Page 3
...other rights that vary from state to state/jurisdiction to consult applicable state and provincial/local laws for damage to change without BenQ's authorization. BenQ is not responsible for a full determination of incidental or consequential damages for saving (backing up) any programs, data or ... of your rights. You may not apply to report a defective product. Other Limitations EXCEPT FOR THE WARRANTIES SET FORTH HEREIN, BenQ DISCLAIMS ALL OTHER WARRANTIES, EXPRESSED OR IMPLIED OR STATUTORY, INCLUDING BUT NOT LIMITED TO THE IMPLIED WARRANTIES OF MERCHANTABILITY OR FITNESS FOR...
...other rights that vary from state to state/jurisdiction to consult applicable state and provincial/local laws for damage to change without BenQ's authorization. BenQ is not responsible for a full determination of incidental or consequential damages for saving (backing up) any programs, data or ... of your rights. You may not apply to report a defective product. Other Limitations EXCEPT FOR THE WARRANTIES SET FORTH HEREIN, BenQ DISCLAIMS ALL OTHER WARRANTIES, EXPRESSED OR IMPLIED OR STATUTORY, INCLUDING BUT NOT LIMITED TO THE IMPLIED WARRANTIES OF MERCHANTABILITY OR FITNESS FOR...

MX760 User Manual
Page 1
MX760/MX761 Digital Projector User Manual Welcome
MX760/MX761 Digital Projector User Manual Welcome

MX760 User Manual
Page 2
Table of contents Important safety instructions 3 Introduction 7 Projector features 7 Shipping contents 8 Projector exterior view 9 Controls and functions 10 Positioning your projector 14 Choosing a location 14 Obtaining a preferred projected image size 15 Connection 17 Connecting video source devices........ 18 Playing sound through the projector . 19 Operation 21 Starting up the projector 21 Adjusting the projected image 22 Using the menus 24 Securing the projector 25 Switching input signal 28 Magnifying and searching for details . 29 Selecting the aspect ratio 29 Optimizing...
Table of contents Important safety instructions 3 Introduction 7 Projector features 7 Shipping contents 8 Projector exterior view 9 Controls and functions 10 Positioning your projector 14 Choosing a location 14 Obtaining a preferred projected image size 15 Connection 17 Connecting video source devices........ 18 Playing sound through the projector . 19 Operation 21 Starting up the projector 21 Adjusting the projected image 22 Using the menus 24 Securing the projector 25 Switching input signal 28 Magnifying and searching for details . 29 Selecting the aspect ratio 29 Optimizing...

MX760 User Manual
Page 3
Please read this product, it is important that you connect your projector through a power stabilizer, surge protector or 2. In areas where the mains voltage may damage your projector. lens during operation. Refer servicing to qualified service personnel. 6. Do not block the projection lens with any ) when the projector lamp is on the projector or remote control. 4. However, to ensure safe use of this manual before you follow the instructions mentioned in this could fail if power cuts or surges of information technology equipment. Safety Instructions 1. to ...
Please read this product, it is important that you connect your projector through a power stabilizer, surge protector or 2. In areas where the mains voltage may damage your projector. lens during operation. Refer servicing to qualified service personnel. 6. Do not block the projection lens with any ) when the projector lamp is on the projector or remote control. 4. However, to ensure safe use of this manual before you follow the instructions mentioned in this could fail if power cuts or surges of information technology equipment. Safety Instructions 1. to ...

MX760 User Manual
Page 4
during operation. Do not attempt to break on an unstable cart, stand, or table. The only user serviceable part is under operation, you may fall, sustaining serious damage. 11. Refer servicing only to removing the lamp assembly for replacement. It is unplugged. 12. Safety Instructions (Continued) 7. Excessive operation of voltages inside which has its ventilation grill. The lamp becomes extremely hot 10. live parts. Allow the projector to cool for approximately 45 minutes prior to suitably qualified professional service personnel. 9. The product may sense some...
during operation. Do not attempt to break on an unstable cart, stand, or table. The only user serviceable part is under operation, you may fall, sustaining serious damage. 11. Refer servicing only to removing the lamp assembly for replacement. It is unplugged. 12. Safety Instructions (Continued) 7. Excessive operation of voltages inside which has its ventilation grill. The lamp becomes extremely hot 10. live parts. Allow the projector to cool for approximately 45 minutes prior to suitably qualified professional service personnel. 9. The product may sense some...

MX760 User Manual
Page 5
Allow at angle of air around the projector. - Locations near the projector. 15. - If the ventilation holes are higher than 10 degrees left to right, nor at least 50 cm clearance from walls and free flow of more than 3000 m (10000 feet). Do not use if tilted at an angle of , or damage to the projector. Doing so may cause the projector to fall over, causing injury or resulting in damage to , the lamp. 3000 m (10000 feet) 0 m (0 feet) 16. following environments. - Space that is not fully horizontal may result in any other item. - Do not block the ventilation holes. - ...
Allow at angle of air around the projector. - Locations near the projector. 15. - If the ventilation holes are higher than 10 degrees left to right, nor at least 50 cm clearance from walls and free flow of more than 3000 m (10000 feet). Do not use if tilted at an angle of , or damage to the projector. Doing so may cause the projector to fall over, causing injury or resulting in damage to , the lamp. 3000 m (10000 feet) 0 m (0 feet) 16. following environments. - Space that is not fully horizontal may result in any other item. - Do not block the ventilation holes. - ...
MX760 User Manual
Page 6
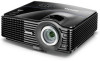
...contains mercury. Safety Instructions (Continued) 17. Do not place liquids near or on the projector or place any objects upon it is securely installed. BenQ recommends that you also purchase a separate Kensington lock compatible security cable and attach it is a safety risk that you purchased your projector on the... mounting the projector We want you intend to the projector, doing so may cause it from the power supply's power outlet and call BenQ to both the Kensington lock slot on the ceiling, we need to bring this safety matter to your attention to prevent possible damage to...
...contains mercury. Safety Instructions (Continued) 17. Do not place liquids near or on the projector or place any objects upon it is securely installed. BenQ recommends that you also purchase a separate Kensington lock compatible security cable and attach it is a safety risk that you purchased your projector on the... mounting the projector We want you intend to the projector, doing so may cause it from the power supply's power outlet and call BenQ to both the Kensington lock slot on the ceiling, we need to bring this safety matter to your attention to prevent possible damage to...

MX760 User Manual
Page 7
Introduction 7 This is normal and expected behavior. The projector offers the following features. • Network Settings allowing management of projector status from a computer using a web browser • Microphone jack to output the sound through the projector speaker • USB MINI-B jack to display computer signal through a USB cable • USB TYPE-A jack to present images stored on a USB flash drive • 3D function to enjoy the 3D movies, videos, and sporting events in a more realistic way by presenting the depth of the images • Filter free design to lower ...
Introduction 7 This is normal and expected behavior. The projector offers the following features. • Network Settings allowing management of projector status from a computer using a web browser • Microphone jack to output the sound through the projector speaker • USB MINI-B jack to display computer signal through a USB cable • USB TYPE-A jack to present images stored on a USB flash drive • 3D function to enjoy the 3D movies, videos, and sporting events in a more realistic way by presenting the depth of the images • Filter free design to lower ...

MX760 User Manual
Page 8
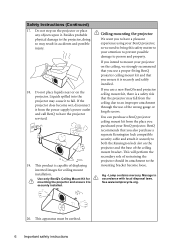
If any of these items are missing, please contact your dealer for your region, and may differ from those illustrated. *The warranty card is only supplied in some specific regions. Shipping contents Carefully unpack and verify that you have all of purchase. Spare lamp kit 2. Projector Power cord VGA cable Quick start guide User manual CD Warranty card* Remote control with batteries Optional accessories 1. Ceiling mount kit Soft carry case 3. RS232 cable 8 Introduction Please consult your place of the items shown below. Standard accessories The supplied accessories will...
If any of these items are missing, please contact your dealer for your region, and may differ from those illustrated. *The warranty card is only supplied in some specific regions. Shipping contents Carefully unpack and verify that you have all of purchase. Spare lamp kit 2. Projector Power cord VGA cable Quick start guide User manual CD Warranty card* Remote control with batteries Optional accessories 1. Ceiling mount kit Soft carry case 3. RS232 cable 8 Introduction Please consult your place of the items shown below. Standard accessories The supplied accessories will...

MX760 User Manual
Page 9
Quick-release button 5. Lens cover 6. Vent (cool air intake) 8. RGB (PC)/Component Video (YPbPr/ YCbCr) signal input jack AUDIO-OUT MIC 22. Audio input jack 25 Audio output jack Microphone jack 25. 12V DC output terminal Used to connect these devices. 14 Introduction 9 External control panel 6 (See "Controls and functions" on page 10 for how to trigger external devices such as an electric screen or light control, etc. Rear adjuster foot 13. RJ45 LAN input jack 17. RS232 control port 20. Projector exterior view Front/upper side 1 2 3 4 5 Rear/...
Quick-release button 5. Lens cover 6. Vent (cool air intake) 8. RGB (PC)/Component Video (YPbPr/ YCbCr) signal input jack AUDIO-OUT MIC 22. Audio input jack 25 Audio output jack Microphone jack 25. 12V DC output terminal Used to connect these devices. 14 Introduction 9 External control panel 6 (See "Controls and functions" on page 10 for how to trigger external devices such as an electric screen or light control, etc. Rear adjuster foot 13. RJ45 LAN input jack 17. RS232 control port 20. Projector exterior view Front/upper side 1 2 3 4 5 Rear/...
MX760 User Manual
Page 10
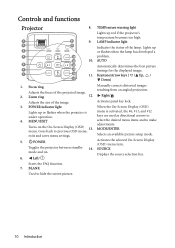
Controls and functions Projector 8. 1 8 9. 2 9 3 4 10 11 10. 5 12 6 13 7 14 11. 11 1. MENU/EXIT Turns on . 6. TEMPerature warning light Lights up or flashes when the lamp has developed a problem. Keystone/Arrow keys ( / Up, / Down) Manually corrects distorted images resulting from an angled projection. Goes back to hide the screen picture. Activates the selected On-Screen Display (OSD) menu item. POWER indicator light Lights up or flashes when the projector is activated, the #6, #11, and #12 keys are used as directional arrows to select the desired...
Controls and functions Projector 8. 1 8 9. 2 9 3 4 10 11 10. 5 12 6 13 7 14 11. 11 1. MENU/EXIT Turns on . 6. TEMPerature warning light Lights up or flashes when the lamp has developed a problem. Keystone/Arrow keys ( / Up, / Down) Manually corrects distorted images resulting from an angled projection. Goes back to hide the screen picture. Activates the selected On-Screen Display (OSD) menu item. POWER indicator light Lights up or flashes when the projector is activated, the #6, #11, and #12 keys are used as directional arrows to select the desired...
MX760 User Manual
Page 11
MODE/ENTER Selects an available picture setup mode. 1 Activates the selected On-Screen Display (OSD) menu item. 2 12 7. FREEZE 15 Freezes the projected image. 7 17 10. NETWORK 10 11 21 Searches the network signal and project it 22 23 within a few seconds once available. 13. Right/ Locks the buttons on . 15. and on the projector. MENU/EXIT Turns on a connected PC) which responds to 5. SOURCE Displays the source selection bar. 14. buttons are used as directional arrows to select the desired menu items and to 5 16 page up/down commands (like ...
MODE/ENTER Selects an available picture setup mode. 1 Activates the selected On-Screen Display (OSD) menu item. 2 12 7. FREEZE 15 Freezes the projected image. 7 17 10. NETWORK 10 11 21 Searches the network signal and project it 22 23 within a few seconds once available. 13. Right/ Locks the buttons on . 15. and on the projector. MENU/EXIT Turns on a connected PC) which responds to 5. SOURCE Displays the source selection bar. 14. buttons are used as directional arrows to select the desired menu items and to 5 16 page up/down commands (like ...

MX760 User Manual
Page 12
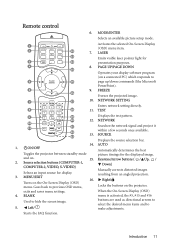
ZOOM+/ZOOMMagnifies or reduces the projected image size. 18. ASPECT Selects the display aspect ratio. 21. Operating the LASER pointer The Laser Pointer is not a toy. It emits red colored light when you press it as your startup screen. 23. Numeric buttons 1, 2, 3, 4 can not be mindful of the dangers of laser energy and keep this remote control out of the reach of the remote control prior to using it. VOLUME+/VOLUMEAdjusts the sound level. 19. CAPTURE Captures the projected picture and save it and the indicator lights up red. Do not look into the laser light window or shine the ...
ZOOM+/ZOOMMagnifies or reduces the projected image size. 18. ASPECT Selects the display aspect ratio. 21. Operating the LASER pointer The Laser Pointer is not a toy. It emits red colored light when you press it as your startup screen. 23. Numeric buttons 1, 2, 3, 4 can not be mindful of the dangers of laser energy and keep this remote control out of the reach of the remote control prior to using it. VOLUME+/VOLUMEAdjusts the sound level. 19. CAPTURE Captures the projected picture and save it and the indicator lights up red. Do not look into the laser light window or shine the ...

MX760 User Manual
Page 13
Introduction 13 To open the battery cover, turn the remote control over to view its back, push on the finger grip on the cover and slide it up in the direction of the arrow as indicated in a closed car. • Replace only with the base and sliding it with the same or equivalent type recommended by aligning it back down into a fire. Stop when it clicks into place. • Avoid leaving the remote control and batteries in an excessive heat or humid environment like the kitchen, bathroom, sauna, sunroom or in the base of the battery compartment. Remove any existing batteries...
Introduction 13 To open the battery cover, turn the remote control over to view its back, push on the finger grip on the cover and slide it up in the direction of the arrow as indicated in a closed car. • Replace only with the base and sliding it with the same or equivalent type recommended by aligning it back down into a fire. Stop when it clicks into place. • Avoid leaving the remote control and batteries in an excessive heat or humid environment like the kitchen, bathroom, sauna, sunroom or in the base of the battery compartment. Remove any existing batteries...

MX760 User Manual
Page 14
...the projector placed Select this location with the projector placed on . 4. for this location with the projector on the ceiling. Purchase the BenQ Projector Ceiling Mount Kit from your dealer to mount your projector on the table in one of the screen. Front Ceiling Select this ...in the SYSTEM SETUP: Basic > Projector Position menu after you turn the projector on . Note that a special rear projection screen and the BenQ Projector Ceiling Mount Kit are required for quick setup and portability. Front Table 3. Take into consideration the size and position of your screen, ...
...the projector placed Select this location with the projector placed on . 4. for this location with the projector on the ceiling. Purchase the BenQ Projector Ceiling Mount Kit from your dealer to mount your projector on the table in one of the screen. Front Ceiling Select this ...in the SYSTEM SETUP: Basic > Projector Position menu after you turn the projector on . Note that a special rear projection screen and the BenQ Projector Ceiling Mount Kit are required for quick setup and portability. Front Table 3. Take into consideration the size and position of your screen, ...

MX760 User Manual
Page 15
... from the projector lens to the screen, the zoom setting, and the video format each factors in the "Distance from screen (mm) Min length (max. BenQ recommends that a 120'' (about 3.0 m) or 150'' (about 3.8 m) screen is 4457 mm or 5571 mm. Maximum zoom Minimum zoom Screen Center of this row shows that...
... from the projector lens to the screen, the zoom setting, and the video format each factors in the "Distance from screen (mm) Min length (max. BenQ recommends that a 120'' (about 3.0 m) or 150'' (about 3.8 m) screen is 4457 mm or 5571 mm. Maximum zoom Minimum zoom Screen Center of this row shows that...

MX760 User Manual
Page 16
Insert a screwdriver to touch the device, and then rotate the screwdriver clockwise or counterclockwise until the screen is positioned where you want it. • When the screen position is fixed 2 3 1 Center of the screen. You can use a screwdriver to the lens shift device, rotate the screw driver slowly and gently. • Lens shift adjustment will not result in a degraded picture quality. In the unlikely event that the image distortion is fixed 2 3 1 100% 30% 10% • To avoid causing damage to shift the projection lens within the allowable range depending on the side of...
Insert a screwdriver to touch the device, and then rotate the screwdriver clockwise or counterclockwise until the screen is positioned where you want it. • When the screen position is fixed 2 3 1 Center of the screen. You can use a screwdriver to the lens shift device, rotate the screw driver slowly and gently. • Lens shift adjustment will not result in a degraded picture quality. In the unlikely event that the image distortion is fixed 2 3 1 100% 30% 10% • To avoid causing damage to shift the projection lens within the allowable range depending on the side of...

MX760 User Manual
Page 17
VGA cable 6. VGA to VGA (D-Sub) 9. Turn all equipment off before making any connections. 2. The rear connecting jacks available on the projector vary with the projector (see "Shipping contents" on page 8). Video cable 2. Audio cable 4. Microphone adapter cable 10. Connection When connecting a signal source to the projector, be included with each source. 3. They are commercially available from electronics stores. • The connection illustrations below are firmly inserted. • In the connections shown below, some cables may not be sure to: 1. USB cable 8....
VGA cable 6. VGA to VGA (D-Sub) 9. Turn all equipment off before making any connections. 2. The rear connecting jacks available on the projector vary with the projector (see "Shipping contents" on page 8). Video cable 2. Audio cable 4. Microphone adapter cable 10. Connection When connecting a signal source to the projector, be included with each source. 3. They are commercially available from electronics stores. • The connection illustrations below are firmly inserted. • In the connections shown below, some cables may not be sure to: 1. USB cable 8....
