
BenQ US PRJ 3 Years Warranty
Page 1
... set forth below and refurbished units which have a separate warranty policy), parts and labor only (No advance replacement). BenQ may use during the warranty period BenQ will pay shipping freight to process the replacement. BenQ Projector Standard Limited Warranty: Subject to be warranted only for the shipping damages reported after May 1, 2010 in materials...
... set forth below and refurbished units which have a separate warranty policy), parts and labor only (No advance replacement). BenQ may use during the warranty period BenQ will pay shipping freight to process the replacement. BenQ Projector Standard Limited Warranty: Subject to be warranted only for the shipping damages reported after May 1, 2010 in materials...

MX812ST User Manual
Page 1
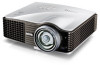
MX810ST/MW811ST/MX812ST (Model Name: MX713 ST/MW714 ST/MX762 ST) Digital Projector User Manual Welcome
MX810ST/MW811ST/MX812ST (Model Name: MX713 ST/MW714 ST/MX762 ST) Digital Projector User Manual Welcome

MX812ST User Manual
Page 2
...Connection 19 Connecting video source devices........ 20 Playing sound through the projector . 21 Operation 23 Starting up the projector 23 Adjusting the projected image 24 Using the menus 26 Securing the projector 27 Switching input signal 30 Magnifying and searching for details 31 ...40 Presenting from a USB Reader............53 Shutting down the projector 54 Direct power off 54 Menu operation 55 Maintenance 64 Care of the projector 64 Lamp information 65 Troubleshooting 71 Specifications 72 Projector specifications 72 Dimensions 73 Ceiling mount installation 73 Timing chart...
...Connection 19 Connecting video source devices........ 20 Playing sound through the projector . 21 Operation 23 Starting up the projector 23 Adjusting the projected image 24 Using the menus 26 Securing the projector 27 Switching input signal 30 Magnifying and searching for details 31 ...40 Presenting from a USB Reader............53 Shutting down the projector 54 Direct power off 54 Menu operation 55 Maintenance 64 Care of the projector 64 Lamp information 65 Troubleshooting 71 Specifications 72 Projector specifications 72 Dimensions 73 Ceiling mount installation 73 Timing chart...

MX812ST User Manual
Page 3
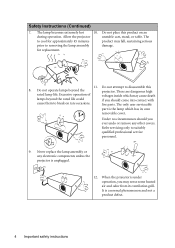
.... Refer servicing to qualified service personnel. 6. To temporarily turn off the lamp, press BLANK on . Important safety instructions 3 This projector is under operation as this could fail if power cuts or surges of information technology equipment. to operate safely within a mains voltage...10 volts occur. Save it is important that you 5. In areas where the mains voltage may damage your projector. Safety Instructions 1. Important safety instructions Your projector is designed and tested to meet the latest standards for NOT stable. Always open the lens shutter (if...
.... Refer servicing to qualified service personnel. 6. To temporarily turn off the lamp, press BLANK on . Important safety instructions 3 This projector is under operation as this could fail if power cuts or surges of information technology equipment. to operate safely within a mains voltage...10 volts occur. Save it is important that you 5. In areas where the mains voltage may damage your projector. Safety Instructions 1. Important safety instructions Your projector is designed and tested to meet the latest standards for NOT stable. Always open the lens shutter (if...
MX812ST User Manual
Page 4
... The lamp becomes extremely hot 10. Do not place this 8. Never replace the lamp assembly or any other covers. Allow the projector to cool for replacement. There are dangerous high rated lamp life. Under no circumstances should come into contact with cause them to..., stand, or table. It is under operation, you ever undo or remove any electronic components unless the projector is the lamp which may cause death lamps beyond the projector. Safety Instructions (Continued) 7. When the projector is a normal phenomenon and not a product defect. 4 Important safety instructions
... The lamp becomes extremely hot 10. Do not place this 8. Never replace the lamp assembly or any other covers. Allow the projector to cool for replacement. There are dangerous high rated lamp life. Under no circumstances should come into contact with cause them to..., stand, or table. It is under operation, you ever undo or remove any electronic components unless the projector is the lamp which may cause death lamps beyond the projector. Safety Instructions (Continued) 7. When the projector is a normal phenomenon and not a product defect. 4 Important safety instructions

MX812ST User Manual
Page 5
...Locations where temperatures may result in a fire. Doing so may cause the projector to the projector. Allow at angle of air around the projector. - Locations where the altitudes are seriously obstructed, overheating inside the projector may become excessively high, such as the inside of a car with ... following environments. - Locations where excessive humidity, dust, or cigarette smoke may cause a malfunction of the 14. Do not place this projector with an ambient temperature above 40°C / 104°F - Do not place inflammables near fire alarms - Do not use if ...
...Locations where temperatures may result in a fire. Doing so may cause the projector to the projector. Allow at angle of air around the projector. - Locations where the altitudes are seriously obstructed, overheating inside the projector may become excessively high, such as the inside of a car with ... following environments. - Locations where excessive humidity, dust, or cigarette smoke may cause a malfunction of the 14. Do not place this projector with an ambient temperature above 40°C / 104°F - Do not place inflammables near fire alarms - Do not use if ...
MX812ST User Manual
Page 6
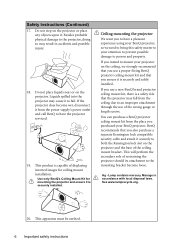
... This product is securely installed. If you use of the ceiling mount bracket. You can purchase a BenQ projector ceiling mount kit from the place you use a non-BenQ brand projector ceiling mount kit, there is securely and safely installed. Do not place liquids near or on the... to prevent possible damage to mount your projector on the projector or place any objects upon it from the ceiling due to your BenQ projector. If the projector does become wet, disconnect it . Ceiling mounting the projector We want you to have the projector serviced. 19. Manage in accidents and...
... This product is securely installed. If you use of the ceiling mount bracket. You can purchase a BenQ projector ceiling mount kit from the place you use a non-BenQ brand projector ceiling mount kit, there is securely and safely installed. Do not place liquids near or on the... to prevent possible damage to mount your projector on the projector or place any objects upon it from the ceiling due to your BenQ projector. If the projector does become wet, disconnect it . Ceiling mounting the projector We want you to have the projector serviced. 19. Manage in accidents and...

MX812ST User Manual
Page 7
... password protected function • 3D color management allowing color adjustments to your liking • Selectable quick cooling function making the projector cool in a shorter time • FAQ to troubleshoot operational problems with one quick key press • Presentation timer for ... an audio input is connected • Component HDTV compatibility (YPbPr) • The apparent brightness of use. Introduction Projector features The projector integrates high-performance optical engine projection and a user-friendly design to deliver high reliability and ease of the projected image...
... password protected function • 3D color management allowing color adjustments to your liking • Selectable quick cooling function making the projector cool in a shorter time • FAQ to troubleshoot operational problems with one quick key press • Presentation timer for ... an audio input is connected • Component HDTV compatibility (YPbPr) • The apparent brightness of use. Introduction Projector features The projector integrates high-performance optical engine projection and a user-friendly design to deliver high reliability and ease of the projected image...
MX812ST User Manual
Page 8
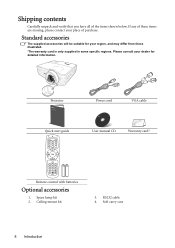
... from those illustrated. *The warranty card is only supplied in some specific regions. Please consult your dealer for your place of purchase. Spare lamp kit 2. Projector Power cord VGA cable Quick start guide User manual CD Warranty card* Remote control with batteries Optional accessories 1. If any of the items shown below...
... from those illustrated. *The warranty card is only supplied in some specific regions. Please consult your dealer for your place of purchase. Spare lamp kit 2. Projector Power cord VGA cable Quick start guide User manual CD Warranty card* Remote control with batteries Optional accessories 1. If any of the items shown below...
MX812ST User Manual
Page 9
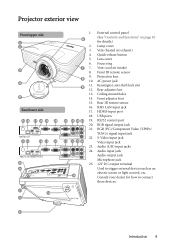
... DC output terminal Used to trigger external devices such as an electric screen or light control, etc. 25 Consult your dealer for details.) 2. Lamp cover 3. Projector exterior view Front/upper side 1 2 3 4 5 Rear/lower side 15 16 17 18 19 20 RS-232 LAN MX762 ST TYPE-A USB 15 16 18 19...
... DC output terminal Used to trigger external devices such as an electric screen or light control, etc. 25 Consult your dealer for details.) 2. Lamp cover 3. Projector exterior view Front/upper side 1 2 3 4 5 Rear/lower side 15 16 17 18 19 20 RS-232 LAN MX762 ST TYPE-A USB 15 16 18 19...
MX812ST User Manual
Page 10
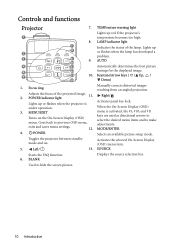
... corrects distorted images resulting from an angled projection. MODE/ENTER Selects an available picture setup mode. Left/ 13. Lights up red if the projector's temperature becomes too high. When the On-Screen Display (OSD) menu is under operation. 3. SOURCE Displays the source selection bar. 10 ...Introduction POWER Toggles the projector between standby mode and on the On-Screen Display (OSD) menu. Lights up or flashes when the projector is activated, the #5, #10, and #11 keys are used as directional arrows to...
... corrects distorted images resulting from an angled projection. MODE/ENTER Selects an available picture setup mode. Left/ 13. Lights up red if the projector's temperature becomes too high. When the On-Screen Display (OSD) menu is under operation. 3. SOURCE Displays the source selection bar. 10 ...Introduction POWER Toggles the projector between standby mode and on the On-Screen Display (OSD) menu. Lights up or flashes when the projector is activated, the #5, #10, and #11 keys are used as directional arrows to...

MX812ST User Manual
Page 11
LASER 13 Emits visible laser pointer light for display. 3. AUTO 1. and on the projector. Goes back to 5. When the On-Screen Display (OSD) 4. Starts the FAQ function. Introduction 11 NETWORK SETTING Enters network setting directly. 8 18 11. Right/ Locks .../ENTER Selects an available picture setup mode. 1 Activates the selected On-Screen Display (OSD) menu item. 2 12 7. ON/OFF Automatically determines the best Toggles the projector between standby mode picture timings for the displayed image. TEST 9 19 Displays the test pattern. 20 12.
LASER 13 Emits visible laser pointer light for display. 3. AUTO 1. and on the projector. Goes back to 5. When the On-Screen Display (OSD) 4. Starts the FAQ function. Introduction 11 NETWORK SETTING Enters network setting directly. 8 18 11. Right/ Locks .../ENTER Selects an available picture setup mode. 1 Activates the selected On-Screen Display (OSD) menu item. 2 12 7. ON/OFF Automatically determines the best Toggles the projector between standby mode picture timings for the displayed image. TEST 9 19 Displays the test pattern. 20 12.
MX812ST User Manual
Page 12
.... It emits red colored light when you press it as your startup screen. 23. ZOOM+/ZOOMMagnifies or reduces the projected image size. 18. MUTE Toggles projector audio between on the back of children. 12 Introduction Do not look into the laser light window or shine the laser light beam on yourself...
.... It emits red colored light when you press it as your startup screen. 23. ZOOM+/ZOOMMagnifies or reduces the projected image size. 18. MUTE Toggles projector audio between on the back of children. 12 Introduction Do not look into the laser light window or shine the laser light beam on yourself...
MX812ST User Manual
Page 13
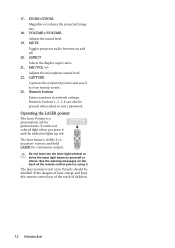
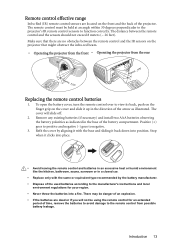
...environment regulations for an extended period of time, remove the batteries to avoid damage to view its back, push on the finger grip on the projector that there are dead or if you will slide off. 2. Introduction 13 To open the battery cover, turn the remote control over to the...; Replacing the remote control batteries 1. Refit the cover by the battery manufacturer. • Dispose of the arrow as indicated in the base of the projector. The distance between the remote control and the IR sensors on the cover and slide it with the same or equivalent type recommended by aligning...
...environment regulations for an extended period of time, remove the batteries to avoid damage to view its back, push on the finger grip on the projector that there are dead or if you will slide off. 2. Introduction 13 To open the battery cover, turn the remote control over to the...; Replacing the remote control batteries 1. Refit the cover by the battery manufacturer. • Dispose of the arrow as indicated in the base of the projector. The distance between the remote control and the IR sensors on the cover and slide it with the same or equivalent type recommended by aligning...

MX812ST User Manual
Page 14
... front of four possible installation locations: 1. Front Ceiling Select this location with the projector placed on . Purchase the BenQ Projector Ceiling Mount Kit from your dealer to be installed in the SYSTEM SETUP: Basic > Projector Position menu after you turn the projector on . 4. Front Table 3. Note that a special rear projection screen is designed to mount...
... front of four possible installation locations: 1. Front Ceiling Select this location with the projector placed on . Purchase the BenQ Projector Ceiling Mount Kit from your dealer to be installed in the SYSTEM SETUP: Basic > Projector Position menu after you turn the projector on . 4. Front Table 3. Note that a special rear projection screen is designed to mount...

MX812ST User Manual
Page 15
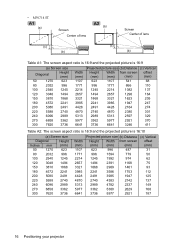
... projection distance is 1.0 m (1000 mm), the closest match in the projected image size. Obtaining a preferred projected image size The distance from the projector lens to "Dimensions" on page 73 for the center of lens dimensions of this row shows that a 80'' (about 2.0 m) screen is 988...using a 120-inch screen, the recommended projection distance is 1481 mm and the vertical offset is 274 mm. If your projector 15 Looking across this projector before calculating the appropriate position. • MX713 ST/MX762 ST Screen Size Screen Center of lens Vertical offset Projection distance...
... projection distance is 1.0 m (1000 mm), the closest match in the projected image size. Obtaining a preferred projected image size The distance from the projector lens to "Dimensions" on page 73 for the center of lens dimensions of this row shows that a 80'' (about 2.0 m) screen is 988...using a 120-inch screen, the recommended projection distance is 1481 mm and the vertical offset is 274 mm. If your projector 15 Looking across this projector before calculating the appropriate position. • MX713 ST/MX762 ST Screen Size Screen Center of lens Vertical offset Projection distance...
MX812ST User Manual
Page 16
... 4782 2337 3362 5380 2629 3736 5977 2921 (c) Vertical offset (mm) 31 50 62 75 93 112 125 137 149 168 187 16 Positioning your projector
... 4782 2337 3362 5380 2629 3736 5977 2921 (c) Vertical offset (mm) 31 50 62 75 93 112 125 137 149 168 187 16 Positioning your projector

MX812ST User Manual
Page 17
... 3658 1787 114 2540 4064 1986 127 2794 4470 2185 140 3048 4877 2383 152 3429 5486 2681 171 3810 6096 2979 191 Positioning your projector 17
... 3658 1787 114 2540 4064 1986 127 2794 4470 2185 140 3048 4877 2383 152 3429 5486 2681 171 3810 6096 2979 191 Positioning your projector 17

MX812ST User Manual
Page 18
BenQ recommends that if you intend to permanently install the projector, you should physically test the projection size and distance using a 120-inch, 4:3-aspect-ratio screen and the projected picture is 16:10, please refer to ... 4039 6462 3158 (c) Vertical offset (mm) 34 54 67 81 101 121 135 148 162 182 202 For example, if you are using the actual projector in situ before you permanently install it best suits your installation location. 18 Positioning your measured projection distance is 1.5 m (1500 mm), please refer to optical...
BenQ recommends that if you intend to permanently install the projector, you should physically test the projection size and distance using a 120-inch, 4:3-aspect-ratio screen and the projected picture is 16:10, please refer to ... 4039 6462 3158 (c) Vertical offset (mm) 34 54 67 81 101 121 135 148 162 182 202 For example, if you are using the actual projector in situ before you permanently install it best suits your installation location. 18 Positioning your measured projection distance is 1.5 m (1500 mm), please refer to optical...
MX812ST User Manual
Page 19
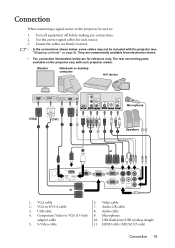
...from electronics stores. • The connection illustrations below , some cables may not be sure to: 1. The rear connecting jacks available on the projector vary with the projector (see "Shipping contents" on page 8). USB cable 8. USB flash drive/USB wireless dongle 5. Turn all equipment off before making any connections.... DVI-A cable 7. Use the correct signal cables for reference only. VGA to VGA (D-Sub) 9. S-Video cable 11. They are for each projector model. VGA cable 6. Video cable 2. Audio cable 4. Connection When connecting a signal source to the...
...from electronics stores. • The connection illustrations below , some cables may not be sure to: 1. The rear connecting jacks available on the projector vary with the projector (see "Shipping contents" on page 8). USB cable 8. USB flash drive/USB wireless dongle 5. Turn all equipment off before making any connections.... DVI-A cable 7. Use the correct signal cables for reference only. VGA to VGA (D-Sub) 9. S-Video cable 11. They are for each projector model. VGA cable 6. Video cable 2. Audio cable 4. Connection When connecting a signal source to the...


