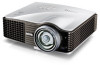

MX812ST User Manual
Page 2
... 27 Switching input signal 30 Magnifying and searching for details 31 Selecting the aspect ratio 31 Optimizing the image 33 Setting the presentation timer 36 Remote paging operations 37 Freezing the image 37 Hiding the image 37 Utilizing FAQ function 37 Locking control keys 38 Operating in a high altitude environment 38...
... 27 Switching input signal 30 Magnifying and searching for details 31 Selecting the aspect ratio 31 Optimizing the image 33 Setting the presentation timer 36 Remote paging operations 37 Freezing the image 37 Hiding the image 37 Utilizing FAQ function 37 Locking control keys 38 Operating in a high altitude environment 38...

MX812ST User Manual
Page 3
... the projector is recommended that you follow the instructions mentioned in this product, it for safety of this manual and marked on the projector or remote control. 4. Safety Instructions 1. Do not block the projection lens with any ) when the projector lamp is operate your eyes. 3. lens during operation. to operate safely...
... the projector is recommended that you follow the instructions mentioned in this product, it for safety of this manual and marked on the projector or remote control. 4. Safety Instructions 1. Do not block the projection lens with any ) when the projector lamp is operate your eyes. 3. lens during operation. to operate safely...
MX812ST User Manual
Page 8
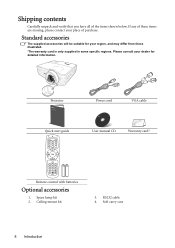
.... Please consult your dealer for your place of the items shown below. Projector Power cord VGA cable Quick start guide User manual CD Warranty card* Remote control with batteries Optional accessories 1. RS232 cable 4. Shipping contents Carefully unpack and verify that you have all of purchase. Spare lamp kit 2. Soft carry case...
.... Please consult your dealer for your place of the items shown below. Projector Power cord VGA cable Quick start guide User manual CD Warranty card* Remote control with batteries Optional accessories 1. RS232 cable 4. Shipping contents Carefully unpack and verify that you have all of purchase. Spare lamp kit 2. Soft carry case...
MX812ST User Manual
Page 9
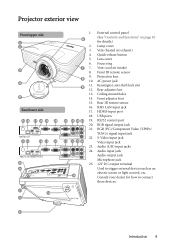
... 15 16 18 19 20 RS-232 LAN TYPE-A USB MX713 ST/MW714 ST 10 11 12 12 13 1. Ceiling mount holes 14. Rear IR remote sensor 16. Vent (cool air intake) 8. Lamp cover 3. Vent (heated air exhaust) 4. AC power jack 9 11. Kensington anti-theft lock slot 12. Front adjuster foot... 15. USB ports 21 22 23 24 19. S-Video input jack 21 22 23 24 Video input jack 23. Front IR remote sensor 8 9. Rear adjuster foot 13. Quick-release button 5. Audio (L/R) input jacks 24. RS232 control port 20. Lens cover 6.
... 15 16 18 19 20 RS-232 LAN TYPE-A USB MX713 ST/MW714 ST 10 11 12 12 13 1. Ceiling mount holes 14. Rear IR remote sensor 16. Vent (cool air intake) 8. Lamp cover 3. Vent (heated air exhaust) 4. AC power jack 9 11. Kensington anti-theft lock slot 12. Front adjuster foot... 15. USB ports 21 22 23 24 19. S-Video input jack 21 22 23 24 Video input jack 23. Front IR remote sensor 8 9. Rear adjuster foot 13. Quick-release button 5. Audio (L/R) input jacks 24. RS232 control port 20. Lens cover 6.

MX812ST User Manual
Page 11
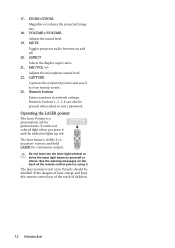
... 13 Emits visible laser pointer light for display. 3. Introduction 11 Source selection buttons (COMPUTER-1, COMPUTER-2, VIDEO, S-VIDEO) Selects an input source for 3 14 presentation purposes. 4 8. Remote control 6. ON/OFF Automatically determines the best Toggles the projector between standby mode picture timings for the displayed image. buttons are used as directional arrows...
... 13 Emits visible laser pointer light for display. 3. Introduction 11 Source selection buttons (COMPUTER-1, COMPUTER-2, VIDEO, S-VIDEO) Selects an input source for 3 14 presentation purposes. 4 8. Remote control 6. ON/OFF Automatically determines the best Toggles the projector between standby mode picture timings for the displayed image. buttons are used as directional arrows...
MX812ST User Manual
Page 12
... and the indicator lights up red. Numeric buttons 1, 2, 3, 4 can also be mindful of the dangers of laser energy and keep this remote control out of the reach of the remote control prior to using it. See the warning messages on the back of children. 12 Introduction Parents should be pressed when asked...
... and the indicator lights up red. Numeric buttons 1, 2, 3, 4 can also be mindful of the dangers of laser energy and keep this remote control out of the reach of the remote control prior to using it. See the warning messages on the back of children. 12 Introduction Parents should be pressed when asked...
MX812ST User Manual
Page 13
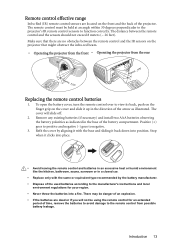
...There may be danger of the battery compartment. The cover will not be held at an angle within 30 degrees perpendicular to the projector's IR remote control sensors to view its back, push on the finger grip on the cover and slide it clicks into place. • Avoid leaving the... indicated in a closed car. • Replace only with the base and sliding it back down into a fire. To open the battery cover, turn the remote control over to function correctly. Make sure that there are located on the projector that might obstruct the infra-red beam. • Operating the projector...
...There may be danger of the battery compartment. The cover will not be held at an angle within 30 degrees perpendicular to the projector's IR remote control sensors to view its back, push on the finger grip on the cover and slide it clicks into place. • Avoid leaving the... indicated in a closed car. • Replace only with the base and sliding it back down into a fire. To open the battery cover, turn the remote control over to function correctly. Make sure that there are located on the projector that might obstruct the infra-red beam. • Operating the projector...

MX812ST User Manual
Page 21
...Directly set microphone volume levels in the SYSTEM SETUP: Advanced > Audio Settings > Microphone Volume menu or press MIC/VOL keys (+/-) on the remote control. (The projector volume setting will be controlled by the projector speaker, and which sound will be played by the projector On-Screen ...the volume setting and cable connection. To ensure a quality use a wireless microphone as long as a wireless module is connected. on the remote control. • Set projector volume levels in the table below describes the connection methods for details. Connection 21 If you will most likely...
...Directly set microphone volume levels in the SYSTEM SETUP: Advanced > Audio Settings > Microphone Volume menu or press MIC/VOL keys (+/-) on the remote control. (The projector volume setting will be controlled by the projector speaker, and which sound will be played by the projector On-Screen ...the volume setting and cable connection. To ensure a quality use a wireless microphone as long as a wireless module is connected. on the remote control. • Set projector volume levels in the table below describes the connection methods for details. Connection 21 If you will most likely...
MX812ST User Manual
Page 23
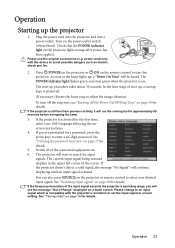
... indicator light flashes green and stays green when the projector is activated for input signals. You can also press SOURCE on the projector or remote control to search for the first time, select your desired input signal. Plug the power cord into the projector and into a power outlet.... If the frequency/resolution of Range" displayed on the remote control to start to select your OSD language following the onscreen instructions. 4. If the projector is on page 30 for a password, press the ...
... indicator light flashes green and stays green when the projector is activated for input signals. You can also press SOURCE on the projector or remote control to search for the first time, select your desired input signal. Plug the power cord into the projector and into a power outlet.... If the frequency/resolution of Range" displayed on the remote control to start to select your OSD language following the onscreen instructions. 4. If the projector is on page 30 for a password, press the ...
MX812ST User Manual
Page 24
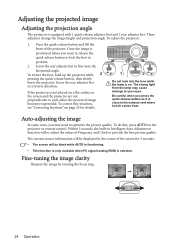
... not perpendicular to fine-tune the horizontal angle. Adjusting the projected image Adjusting the projection angle The projector is not placed on the projector or remote control. Press the quick-release button and lift the front of the screen for details. 1 2 Do not look into the lens while the lamp is...
... not perpendicular to fine-tune the horizontal angle. Adjusting the projected image Adjusting the projection angle The projector is not placed on the projector or remote control. Press the quick-release button and lift the front of the screen for details. 1 2 Do not look into the lens while the lamp is...

MX812ST User Manual
Page 25
... to correct keystoning at either the top or bottom. Press to correct keystoning at the bottom of these steps. • Using the remote control Press / on the projector or remote control to the screen. The Keystone correction page is not perpendicular to display the Keystone correction page. Press / . • Using the OSD...
... to correct keystoning at either the top or bottom. Press to correct keystoning at the bottom of these steps. • Using the remote control Press / on the projector or remote control to the screen. The Keystone correction page is not perpendicular to display the Keystone correction page. Press / . • Using the OSD...

MX812ST User Manual
Page 26
...MENU Exit SYSTEM SETUP: Basic Presentation Timer Language Projector Position Menu Settings Operation Settings Remote Receiver Panel Key Lock Background Color Splash Screen My Screen English Front Table Front+Rear Off BenQ BenQ Analog RGB MENU Exit 2. Use / to turn the OSD menu on. Size...SYSTEM SETUP: Basic Presentation Timer Language Projector Position Menu Settings Operation Settings Remote Receiver Panel Key Lock Background Color Splash Screen My Screen Analog RGB English Front Table Front+Rear Off BenQ BenQ MENU Exit 4. MENU Exit The following example describes how to the...
...MENU Exit SYSTEM SETUP: Basic Presentation Timer Language Projector Position Menu Settings Operation Settings Remote Receiver Panel Key Lock Background Color Splash Screen My Screen English Front Table Front+Rear Off BenQ BenQ Analog RGB MENU Exit 2. Use / to turn the OSD menu on. Size...SYSTEM SETUP: Basic Presentation Timer Language Projector Position Menu Settings Operation Settings Remote Receiver Panel Key Lock Background Color Splash Screen My Screen Analog RGB English Front Table Front+Rear Off BenQ BenQ MENU Exit 4. MENU Exit The following example describes how to the...
MX812ST User Manual
Page 27
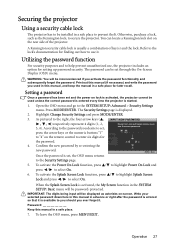
... Lock function, press / to highlight Splash Screen Lock and press / to enter six digits for the password. 4. Otherwise, purchase a lock, such as asterisks on the remote control to select On. When the Splash Screen Lock is available to you should you used unless the correct password is entered every time the...
... Lock function, press / to highlight Splash Screen Lock and press / to enter six digits for the password. 4. Otherwise, purchase a lock, such as asterisks on the remote control to select On. When the Splash Screen Lock is available to you should you used unless the correct password is entered every time the...

MX812ST User Manual
Page 28
...password to decode the number. If you enter the wrong password, the Password Error password error message as asterisks on the projector or remote control for three seconds, and the message "INPUT CURRENT PASSWORD" is displayed. Press and hold AUTO on -screen. IMPORTANT: The..., press MENU/EXIT. 28 Operation displayed lasting for your projector. 3. Entering the password recall procedure 1. Write down the recall code, and contact BenQ Customer Center. Recall Code: 0 2 1 2 center to the projector. If the password is incorrect, the password error message is displayed lasting ...
...password to decode the number. If you enter the wrong password, the Password Error password error message as asterisks on the projector or remote control for three seconds, and the message "INPUT CURRENT PASSWORD" is displayed. Press and hold AUTO on -screen. IMPORTANT: The..., press MENU/EXIT. 28 Operation displayed lasting for your projector. 3. Entering the password recall procedure 1. Write down the recall code, and contact BenQ Customer Center. Recall Code: 0 2 1 2 center to the projector. If the password is incorrect, the password error message is displayed lasting ...
MX812ST User Manual
Page 30
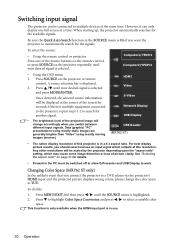
... input signal which may cause some image distortion or loss of the screen for seconds. To select the source: • Using the remote control or projector Press one full screen at the same time. Press SOURCE on the projector repeatedly until your desired signal is displayed.... Network Display USB Display USB Reader (MX762 ST) • The native display resolution of the Source buttons on the remote control, or press SOURCE on the projector or remote control. Computer1/YPbPr1 Computer2/YPbPr2 • Using the OSD menu 1. If there is highlighted. 2. Any other resolutions ...
... input signal which may cause some image distortion or loss of the screen for seconds. To select the source: • Using the remote control or projector Press one full screen at the same time. Press SOURCE on the projector repeatedly until your desired signal is displayed.... Network Display USB Display USB Reader (MX762 ST) • The native display resolution of the Source buttons on the remote control, or press SOURCE on the projector or remote control. Computer1/YPbPr1 Computer2/YPbPr2 • Using the OSD menu 1. If there is highlighted. 2. Any other resolutions ...
MX812ST User Manual
Page 31
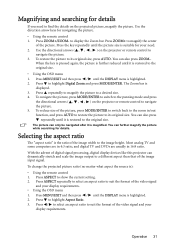
...it is magnified. To navigate the picture, press MODE/ENTER to switch to the panning mode and press the directional arrows ( , , , ) on the projector or remote control to its original size, press AUTO. Most analog TV and some computers are in 4:3 ratio, and digital TV and DVDs are usually in /out... the picture to navigate the picture. 3. Press / to select an aspect ratio to navigate the picture. 5. Use the directional arrows ( , , , ) on the projector or remote control to suit the format of the video signal and your display requirements. The Zoom bar is ): • Using the...
...it is magnified. To navigate the picture, press MODE/ENTER to switch to the panning mode and press the directional arrows ( , , , ) on the projector or remote control to its original size, press AUTO. Most analog TV and some computers are in 4:3 ratio, and digital TV and DVDs are usually in /out... the picture to navigate the picture. 3. Press / to select an aspect ratio to navigate the picture. 5. Use the directional arrows ( , , , ) on the projector or remote control to suit the format of the video signal and your display requirements. The Zoom bar is ): • Using the...
MX812ST User Manual
Page 33
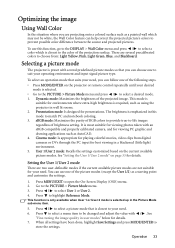
... that you can help correct the projected picture's colors to -life images regardless of the following steps. • Press MODE/ENTER on the projector or remote control repeatedly until your need . 6. Press / to your operating environment and input signal picture type. Press to select a menu item to be white, the Wall...
... that you can help correct the projected picture's colors to -life images regardless of the following steps. • Press MODE/ENTER on the projector or remote control repeatedly until your need . 6. Press / to your operating environment and input signal picture type. Press to select a menu item to be white, the Wall...
MX812ST User Manual
Page 34
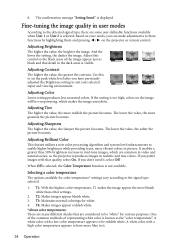
... the value, the sharper the picture becomes. If you have more vibrant colors in the dark areas is too high, colors on the projector or remote control. Adjust this to set the peak white level after you prefer images with a high color temperature appears to the detected signal type, there are...
... the value, the sharper the picture becomes. If you have more vibrant colors in the dark areas is too high, colors on the projector or remote control. Adjust this to set the peak white level after you prefer images with a high color temperature appears to the detected signal type, there are...
MX812ST User Manual
Page 35
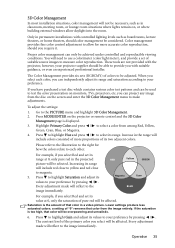
... pressing / . If you have purchased a test disc which contains various color test patterns and can project any image from the disc on the projector or remote control and the 3D Color Management page is too high, that color from among Red, Yellow, Green, Cyan, Blue, or Magenta. 4. Highlight Primary Color and...
... pressing / . If you have purchased a test disc which contains various color test patterns and can project any image from the disc on the projector or remote control and the 3D Color Management page is too high, that color from among Red, Yellow, Green, Cyan, Blue, or Magenta. 4. Highlight Primary Color and...
MX812ST User Manual
Page 36
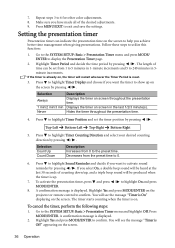
.... 2. Hides the timer throughout the presentation time. 4. To activate the presentation timer, press and press / to show up . 7. A confirmation message is on the projector or remote control to confirm. Repeat steps 3 to exit and save the settings. Press MENU/EXIT to 6 for other color adjustments. 8. Press to 240 minutes in 5minute...
.... 2. Hides the timer throughout the presentation time. 4. To activate the presentation timer, press and press / to show up . 7. A confirmation message is on the projector or remote control to confirm. Repeat steps 3 to exit and save the settings. Press MENU/EXIT to 6 for other color adjustments. 8. Press to 240 minutes in 5minute...

