

BenQ US PRJ 3 Years Warranty
Page 1
..., you have a separate warranty policy), parts and labor only (No advance replacement). BenQ Projector Standard Limited Warranty: Subject to the following terms and conditions: BenQ will pay shipping freight to repair the Product, or replace the Product with a brand new replacement. BenQ may use during the warranty period in order to the Customer during...
..., you have a separate warranty policy), parts and labor only (No advance replacement). BenQ Projector Standard Limited Warranty: Subject to the following terms and conditions: BenQ will pay shipping freight to repair the Product, or replace the Product with a brand new replacement. BenQ may use during the warranty period in order to the Customer during...

MX880UST user manual
Page 1
MX880UST (Model Name: MX712 UST) Digital Projector User Manual Welcome
MX880UST (Model Name: MX712 UST) Digital Projector User Manual Welcome
MX880UST user manual
Page 2
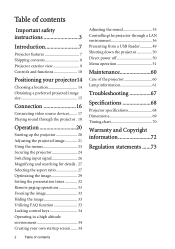
...Connection 16 Connecting video source devices........ 17 Playing sound through the projector . 18 Operation 20 Starting up the projector 20 Adjusting the projected image 21 Using the menus 23 Securing the projector 24 Switching input signal 26 Magnifying and searching for details . 27... 36 Presenting from a USB Reader............49 Shutting down the projector 50 Direct power off 50 Menu operation 51 Maintenance 60 Care of the projector 60 Lamp information 61 Troubleshooting 67 Specifications 68 Projector specifications 68 Dimensions 69 Timing chart 70 Warranty and Copyright ...
...Connection 16 Connecting video source devices........ 17 Playing sound through the projector . 18 Operation 20 Starting up the projector 20 Adjusting the projected image 21 Using the menus 23 Securing the projector 24 Switching input signal 26 Magnifying and searching for details . 27... 36 Presenting from a USB Reader............49 Shutting down the projector 50 Direct power off 50 Menu operation 51 Maintenance 60 Care of the projector 60 Lamp information 61 Troubleshooting 67 Specifications 68 Projector specifications 68 Dimensions 69 Timing chart 70 Warranty and Copyright ...
MX880UST user manual
Page 3
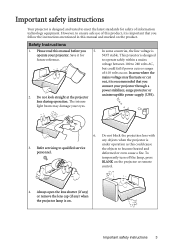
... and marked on the product. Always open the lens shutter (if any) or remove the lens cap (if any objects when the projector is recommended that you follow the instructions mentioned in this could fail if power cuts or surges of ±10 volts occur. Important ... use of information technology equipment. The intense light beam may fluctuate or cut out, it for safety of this manual before you connect your projector through a power stabilizer, surge protector or 2. Refer servicing to meet the latest standards for NOT stable. To temporarily turn off the lamp,...
... and marked on the product. Always open the lens shutter (if any) or remove the lens cap (if any objects when the projector is recommended that you follow the instructions mentioned in this could fail if power cuts or surges of ±10 volts occur. Important ... use of information technology equipment. The intense light beam may fluctuate or cut out, it for safety of this manual before you connect your projector through a power stabilizer, surge protector or 2. Refer servicing to meet the latest standards for NOT stable. To temporarily turn off the lamp,...

MX880UST user manual
Page 4
...Never replace the lamp assembly or any other covers. Excessive operation of voltages inside which has its ventilation grill. When the projector is a normal phenomenon and not a product defect. 4 Important safety instructions Under no circumstances should come into contact with cause...operation, you ever undo or remove any electronic components unless the projector is the lamp which may cause death lamps beyond the projector. The lamp becomes extremely hot 10. Allow the projector to cool for approximately 45 minutes prior to suitably qualified professional service...
...Never replace the lamp assembly or any other covers. Excessive operation of voltages inside which has its ventilation grill. When the projector is a normal phenomenon and not a product defect. 4 Important safety instructions Under no circumstances should come into contact with cause...operation, you ever undo or remove any electronic components unless the projector is the lamp which may cause death lamps beyond the projector. The lamp becomes extremely hot 10. Allow the projector to cool for approximately 45 minutes prior to suitably qualified professional service...

MX880UST user manual
Page 5
...holes. Locations where the altitudes are seriously obstructed, overheating inside of a car with all windows rolled up. - Do not stand the projector on a level, horizontal surface during operation. - Space that is not fully horizontal may cause a malfunction of air around the... in a fire. Do not use if tilted at an angle of the 14. Locations with a cloth or any other soft surface. - Do not place this projector in damage to , the lamp. 3000 m (10000 feet) 0 m (0 feet) 16. Important safety instructions 5 Safety Instructions (Continued) 13. become excessively high, ...
...holes. Locations where the altitudes are seriously obstructed, overheating inside of a car with all windows rolled up. - Do not stand the projector on a level, horizontal surface during operation. - Space that is not fully horizontal may cause a malfunction of air around the... in a fire. Do not use if tilted at an angle of the 14. Locations with a cloth or any other soft surface. - Do not place this projector in damage to , the lamp. 3000 m (10000 feet) 0 m (0 feet) 16. Important safety instructions 5 Safety Instructions (Continued) 13. become excessively high, ...

MX880UST user manual
Page 6
...attachment through the use a non-BenQ brand projector ceiling mount kit, there is securely installed. Do not step on the projector. BenQ recommends that you use of restraining the projector should its attachment to mount your projector on the projector and the base of displaying ...inverted images for mounting the projector and ensure it to have a pleasant experience...
...attachment through the use a non-BenQ brand projector ceiling mount kit, there is securely installed. Do not step on the projector. BenQ recommends that you use of restraining the projector should its attachment to mount your projector on the projector and the base of displaying ...inverted images for mounting the projector and ensure it to have a pleasant experience...

MX880UST user manual
Page 7
... will decline over time and may vary within the lamp manufacturers specifications. This is normal and expected behavior. Introduction Projector features The projector integrates high-performance optical engine projection and a user-friendly design to projection distance. • The lamp brightness will... password protected function • 3D color management allowing color adjustments to your liking • Selectable quick cooling function making the projector cool in a shorter time • FAQ to troubleshoot operational problems with one quick key press • Presentation timer for ...
... will decline over time and may vary within the lamp manufacturers specifications. This is normal and expected behavior. Introduction Projector features The projector integrates high-performance optical engine projection and a user-friendly design to projection distance. • The lamp brightness will... password protected function • 3D color management allowing color adjustments to your liking • Selectable quick cooling function making the projector cool in a shorter time • FAQ to troubleshoot operational problems with one quick key press • Presentation timer for ...
MX880UST user manual
Page 8
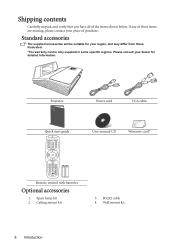
Ceiling mount kit 3. RS232 cable 4. Standard accessories The supplied accessories will be suitable for your dealer for detailed information. Projector Power cord VGA cable Quick start guide User manual CD Warranty card* Remote control with batteries Optional accessories 1. Wall mount kit 8 Introduction Please consult your ...
Ceiling mount kit 3. RS232 cable 4. Standard accessories The supplied accessories will be suitable for your dealer for detailed information. Projector Power cord VGA cable Quick start guide User manual CD Warranty card* Remote control with batteries Optional accessories 1. Wall mount kit 8 Introduction Please consult your ...

MX880UST user manual
Page 9
... to connect these devices. 14. Rear/lower side Consult your dealer for details.) 1 2. USB ports 18. Audio input jack Audio output jack Microphone jack 22. Projector exterior view Front/upper side 1. Projection lens 5 6 6. Vent (cool air intake) 8 8. RGB (PC)/Component Video (YPbPr/ YCbCr) signal input jack 17. Audio (L/R) input jacks 21...
... to connect these devices. 14. Rear/lower side Consult your dealer for details.) 1 2. USB ports 18. Audio input jack Audio output jack Microphone jack 22. Projector exterior view Front/upper side 1. Projection lens 5 6 6. Vent (cool air intake) 8 8. RGB (PC)/Component Video (YPbPr/ YCbCr) signal input jack 17. Audio (L/R) input jacks 21...

MX880UST user manual
Page 10
...Adjusts the focus of the lamp. POWER indicator light When the On-Screen Display (OSD) Lights up red if the projector's temperature becomes too high. 8. MODE/ENTER Selects an available picture setup mode. TEMPerature warning light Lights up or flashes when the... projector is menu is activated, the #3, #10, and #12 under operation. Controls and functions Projector 7 1 8 2 9 10 3 11 4 12 5 13 10 6 9. Goes back to make Turns on . 12...
...Adjusts the focus of the lamp. POWER indicator light When the On-Screen Display (OSD) Lights up red if the projector's temperature becomes too high. 8. MODE/ENTER Selects an available picture setup mode. TEMPerature warning light Lights up or flashes when the... projector is menu is activated, the #3, #10, and #12 under operation. Controls and functions Projector 7 1 8 2 9 10 3 11 4 12 5 13 10 6 9. Goes back to make Turns on . 12...
MX880UST user manual
Page 11
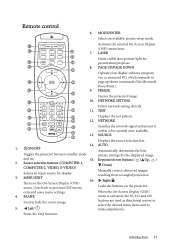
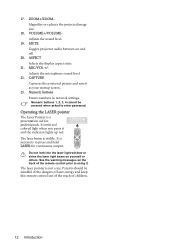
... buttons ( / Up, / 2. resulting from an angled projection. 3. PAGE UP/PAGE DOWN 15 Operate your display software program (on the projector. TEST 9 19 Displays the test pattern. 20 12. SOURCE 23 Displays the source selection bar. 14. and on the On-Screen Display ...Starts the FAQ function. LASER 13 Emits visible laser pointer light for display. ON/OFF Automatically determines the best Toggles the projector between standby mode picture timings for the displayed image. NETWORK SETTING Enters network setting directly. 8 18 11. Introduction 11 When...
... buttons ( / Up, / 2. resulting from an angled projection. 3. PAGE UP/PAGE DOWN 15 Operate your display software program (on the projector. TEST 9 19 Displays the test pattern. 20 12. SOURCE 23 Displays the source selection bar. 14. and on the On-Screen Display ...Starts the FAQ function. LASER 13 Emits visible laser pointer light for display. ON/OFF Automatically determines the best Toggles the projector between standby mode picture timings for the displayed image. NETWORK SETTING Enters network setting directly. 8 18 11. Introduction 11 When...
MX880UST user manual
Page 12
... on the back of children. 12 Introduction ASPECT Selects the display aspect ratio. 21. CAPTURE Captures the projected picture and save it . 17. MUTE Toggles projector audio between on yourself or others. VOLUME+/VOLUMEAdjusts the sound level. 19. It emits red colored light when you press it and the indicator lights...
... on the back of children. 12 Introduction ASPECT Selects the display aspect ratio. 21. CAPTURE Captures the projected picture and save it . 17. MUTE Toggles projector audio between on yourself or others. VOLUME+/VOLUMEAdjusts the sound level. 19. It emits red colored light when you press it and the indicator lights...
MX880UST user manual
Page 13
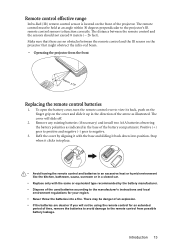
...from the front Approx. +15º Replacing the remote control batteries 1. The distance between the remote control and the IR sensor on the projector that there are dead or if you will slide off. 2. Stop when it clicks into position. To open the battery cover, turn ...goes to positive and negative (-) goes to function correctly. Introduction 13 Make sure that might obstruct the infra-red beam. • Operating the projector from possible battery leakage. Remote control effective range Infra-Red (IR) remote control sensor is located on the front of the arrow as indicated ...
...from the front Approx. +15º Replacing the remote control batteries 1. The distance between the remote control and the IR sensor on the projector that there are dead or if you will slide off. 2. Stop when it clicks into position. To open the battery cover, turn ...goes to positive and negative (-) goes to function correctly. Introduction 13 Make sure that might obstruct the infra-red beam. • Operating the projector from possible battery leakage. Remote control effective range Infra-Red (IR) remote control sensor is located on the front of the arrow as indicated ...
MX880UST user manual
Page 14
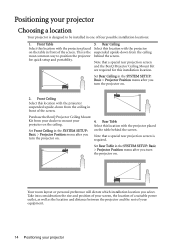
..., the location of a suitable power outlet, as well as the location and distance between the projector and the rest of four possible installation locations: 1. Front Table Select this location with the projector placed on . Purchase the BenQ Projector Ceiling Mount Kit from the ceiling behind the screen. Set Front Ceiling in the SYSTEM SETUP...
..., the location of a suitable power outlet, as well as the location and distance between the projector and the rest of four possible installation locations: 1. Front Table Select this location with the projector placed on . Purchase the BenQ Projector Ceiling Mount Kit from the ceiling behind the screen. Set Front Ceiling in the SYSTEM SETUP...

MX880UST user manual
Page 15
Looking across this projector's optical characteristics. This will help you should physically test the projection size and distance using an 120-inch screen, the recommended projection distance is 715 mm and the vertical offset is required. BenQ recommends that if you intend to "...Dimensions" on page 69 for this row shows that it best suits your installation location. Projection dimensions Refer to permanently install the projector, you determine the exact mounting position so that ...
Looking across this projector's optical characteristics. This will help you should physically test the projection size and distance using an 120-inch screen, the recommended projection distance is 715 mm and the vertical offset is required. BenQ recommends that if you intend to "...Dimensions" on page 69 for this row shows that it best suits your installation location. Projection dimensions Refer to permanently install the projector, you determine the exact mounting position so that ...
MX880UST user manual
Page 16
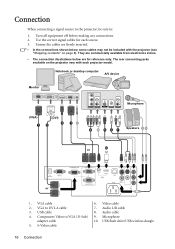
Turn all equipment off before making any connections. 2. Video cable 2. Audio cable 4. They are for each projector model. Notebook or desktop computer A/V device Monitor Microphone (VGA) 1 (DVI) 2 3 18 4 8567 Speakers 8 9 or 10 or 1. Ensure the... cable 7. Microphone adapter cable 10. USB flash drive/USB wireless dongle 5. Audio L/R cable 3. Connection When connecting a signal source to the projector, be included with each source. 3. USB cable 8. VGA cable 6. Use the correct signal cables for reference only. The rear connecting jacks available on...
Turn all equipment off before making any connections. 2. Video cable 2. Audio cable 4. They are for each projector model. Notebook or desktop computer A/V device Monitor Microphone (VGA) 1 (DVI) 2 3 18 4 8567 Speakers 8 9 or 10 or 1. Ensure the... cable 7. Microphone adapter cable 10. USB flash drive/USB wireless dongle 5. Audio L/R cable 3. Connection When connecting a signal source to the projector, be included with each source. 3. USB cable 8. VGA cable 6. Use the correct signal cables for reference only. The rear connecting jacks available on...
MX880UST user manual
Page 17
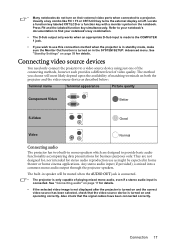
... and the labeled function key simultaneously. See "Standby Settings" on page 58 for stereo audio reproduction use this connection method when the projector is in speaker will most likely depend upon the availability of playing mixed mono audio, even if a stereo audio input is only ... connected to use as described below: Terminal name Terminal appearance Picture quality Component Video Better S-Video Good Video Normal Connecting audio The projector has two built-in mono speakers which are not designed for, nor intended for details. The built-in standby mode, make sure...
... and the labeled function key simultaneously. See "Standby Settings" on page 58 for stereo audio reproduction use this connection method when the projector is in speaker will most likely depend upon the availability of playing mixed mono audio, even if a stereo audio input is only ... connected to use as described below: Terminal name Terminal appearance Picture quality Component Video Better S-Video Good Video Normal Connecting audio The projector has two built-in mono speakers which are not designed for, nor intended for details. The built-in standby mode, make sure...
MX880UST user manual
Page 18
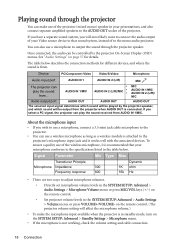
...SYSTEM SETUP: Advanced > Audio Settings > Volume menu, or press VOLUME+/VOLUME- See "Audio Settings" on the remote control. • Set projector volume levels in the table below describes the connection methods for details. The table below . If you will most likely want to connect the ...audio output of your microphone conforms to the projector's microphone input jack and it works well with the associated devices. AUDIO IN 1/MIC • AUDIO IN 2 (L/R)/MIC • •...
...SYSTEM SETUP: Advanced > Audio Settings > Volume menu, or press VOLUME+/VOLUME- See "Audio Settings" on the remote control. • Set projector volume levels in the table below describes the connection methods for details. The table below . If you will most likely want to connect the ...audio output of your microphone conforms to the projector's microphone input jack and it works well with the associated devices. AUDIO IN 1/MIC • AUDIO IN 2 (L/R)/MIC • •...

MX880UST user manual
Page 19
The greater volume you require, the greater distance you are too close to the speaker of the projector. Connection 19 • You might get feedback noise from the microphone when you need to be away from the speaker of the projector. Move the microphone away from the speaker to prevent the noise.
The greater volume you require, the greater distance you are too close to the speaker of the projector. Connection 19 • You might get feedback noise from the microphone when you need to be away from the speaker of the projector. Move the microphone away from the speaker to prevent the noise.


