

User Manual
Page 4
...30 Cleaning the projector case 30 Storing the projector 30 Transporting the projector 30 Cleaning and replacing the dust filter 30 Installing the cable connector-panel cover 32 Replacing the lamp 33 Indicators ...34... Troubleshooting 35 Specifications 36 Optical ...36 Electrical ...36 Terminals ...36 General characteristics 36 Dimensions 36 4 Table of contents Selecting a preset mode 20 2. Selecting the aspect ratio 20 3. English PE8720...
...30 Cleaning the projector case 30 Storing the projector 30 Transporting the projector 30 Cleaning and replacing the dust filter 30 Installing the cable connector-panel cover 32 Replacing the lamp 33 Indicators ...34... Troubleshooting 35 Specifications 36 Optical ...36 Electrical ...36 Terminals ...36 General characteristics 36 Dimensions 36 4 Table of contents Selecting a preset mode 20 2. Selecting the aspect ratio 20 3. English PE8720...

User Manual
Page 5
... protection against the 89/336/EEC (European Economic Community) for household purpose, this quality BenQ video projector! CLASS B: This equipment generates, uses and can radiate radio frequency energy and, if not... to human bodies and environment. • Lead, which is contained in the lamp. To prevent the projector from possible damage, do not use volatile liquids, such as it from that ...insecticide or some types of cleaner, near the projector. If cleaning with a chemically treated cloth, be sure to provide you for regulations. English PE8720-en.book Page 5 Friday, May 13, ...
... protection against the 89/336/EEC (European Economic Community) for household purpose, this quality BenQ video projector! CLASS B: This equipment generates, uses and can radiate radio frequency energy and, if not... to human bodies and environment. • Lead, which is contained in the lamp. To prevent the projector from possible damage, do not use volatile liquids, such as it from that ...insecticide or some types of cleaner, near the projector. If cleaning with a chemically treated cloth, be sure to provide you for regulations. English PE8720-en.book Page 5 Friday, May 13, ...

User Manual
Page 7
...as appropriate to break on the projector. Excessive operation of lamps beyond the rated lamp life. Do not place liquids near or on rare occasions. 12. disconnect it .. 11. operation. In areas where the mains power supply voltage may harm your situation. 7. English PE8720-en.book Page 7 Friday, ...May 13, 2005 5:19 PM Safety instructions (continued) 5. Do not block the ventilation holes whilst the 9. Do not step on the projector or place any item; - Do not cover the projector with any objects upon it from the power point and call BenQ...
...as appropriate to break on the projector. Excessive operation of lamps beyond the rated lamp life. Do not place liquids near or on rare occasions. 12. disconnect it .. 11. operation. In areas where the mains power supply voltage may harm your situation. 7. English PE8720-en.book Page 7 Friday, ...May 13, 2005 5:19 PM Safety instructions (continued) 5. Do not block the ventilation holes whilst the 9. Do not step on the projector or place any item; - Do not cover the projector with any objects upon it from the power point and call BenQ...

User Manual
Page 8
... circumstances should come into contact with live parts. English PE8720-en.book Page 8 Friday, May 13, 2005 5:19 PM Safety instructions (continued) 13. causing injury or resulting in damage. 14. There are the lamp and air filters which may cause the projector to replace the lamp assembly 16. Never attempt to fall over, unplugged...
... circumstances should come into contact with live parts. English PE8720-en.book Page 8 Friday, May 13, 2005 5:19 PM Safety instructions (continued) 13. causing injury or resulting in damage. 14. There are the lamp and air filters which may cause the projector to replace the lamp assembly 16. Never attempt to fall over, unplugged...

User Manual
Page 12
... page 25 for details. See page 23 for details. selection to memory. arrow buttons on the remote control. 5. Moves the focal point farther from the projector. PE8720-en.book Page 12 Friday, May 13, 2005 5:19 PM English Controls and functions Control panel 5 8 11 12 7. developed a problem. FOCUS-In ... the Adjusts the motorised vertical lens shift by moving the image upwards on the Lights up Adjusts the focus of the projector. LAMP indicator light RGB HD, SVIDEO) and Enter buttons on the screen in relation to standby. See pages 19, 23 and 34 for details.
... page 25 for details. See page 23 for details. selection to memory. arrow buttons on the remote control. 5. Moves the focal point farther from the projector. PE8720-en.book Page 12 Friday, May 13, 2005 5:19 PM English Controls and functions Control panel 5 8 11 12 7. developed a problem. FOCUS-In ... the Adjusts the motorised vertical lens shift by moving the image upwards on the Lights up Adjusts the focus of the projector. LAMP indicator light RGB HD, SVIDEO) and Enter buttons on the screen in relation to standby. See pages 19, 23 and 34 for details.
User Manual
Page 23
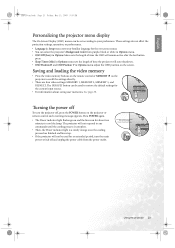
...or performance. • Language in Setup menu sets your preferences. English PE8720-en.book Page 23 Friday, May 13, 2005 5:19 PM Personalizing the projector menu display The On Screen Display (OSD) menus can select the projector's Background Color from the power outlet. Saving and loading the video memory... auto shutdown. • OSD Position H and OSD Position V in Options menu sets the length of time the projector will not be set according to cool the lamp. Press POWER again. • The Power indicator light flashes green and the fans run for the current input source. ...
...or performance. • Language in Setup menu sets your preferences. English PE8720-en.book Page 23 Friday, May 13, 2005 5:19 PM Personalizing the projector menu display The On Screen Display (OSD) menus can select the projector's Background Color from the power outlet. Saving and loading the video memory... auto shutdown. • OSD Position H and OSD Position V in Options menu sets the length of time the projector will not be set according to cool the lamp. Press POWER again. • The Power indicator light flashes green and the fans run for the current input source. ...
User Manual
Page 24
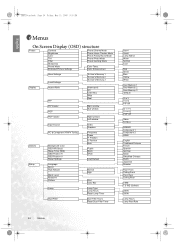
... YPBPR Tuning Background Color OSD Off (Secs) Sleep Timer (MIN) OSD Position H OSD Position V Reset Settings Frequency Phase H. Position V. PE8720-en.book Page 24 Friday, May 13, 2005 5:19 PM English Menus On Screen Display (OSD) structure Picture Contrast Brightness Color Tint Filter... Default Setup Language Mirror High Altitude Black Level Keystone Pattern Normal High Grid Color Bar Lamp Lamp Type Lamp Hours Reset Lamp Timer Dust Filter Dust Filter Hours Reset Dust Filter Timer User1 User2 Lamp Native Warm Normal Cool Red Green Blue Yellow White User Memory 1 User Memory 2...
... YPBPR Tuning Background Color OSD Off (Secs) Sleep Timer (MIN) OSD Position H OSD Position V Reset Settings Frequency Phase H. Position V. PE8720-en.book Page 24 Friday, May 13, 2005 5:19 PM English Menus On Screen Display (OSD) structure Picture Contrast Brightness Color Tint Filter... Default Setup Language Mirror High Altitude Black Level Keystone Pattern Normal High Grid Color Bar Lamp Lamp Type Lamp Hours Reset Lamp Timer Dust Filter Dust Filter Hours Reset Dust Filter Timer User1 User2 Lamp Native Warm Normal Cool Red Green Blue Yellow White User Memory 1 User Memory 2...
User Manual
Page 25
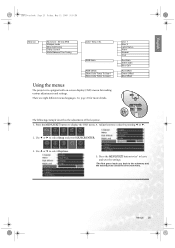
... button twice* to leave and save the settings. *The first press leads you back to select Setup and press SOURCE/ENTER. 3. User 1 User 2 Lamp Native Warm Normal Cool Red Gain Green Gain Blue Gain Red Offset Green Offset Blue Offset 2 3 1 ENTER CT The following example describes the adjustment of...25 RGB Gain RGB Offset Store Color Temp To User1 Store Color Temp To User2 Using the menus The projector is equipped with on -screen menu. Adjust keystone values by pressing e or f. 2. English PE8720-en.book Page 25 Friday, May 13, 2005 5:19 PM Advance Advanced - 30 step IRIS Whisper ...
... button twice* to leave and save the settings. *The first press leads you back to select Setup and press SOURCE/ENTER. 3. User 1 User 2 Lamp Native Warm Normal Cool Red Gain Green Gain Blue Gain Red Offset Green Offset Blue Offset 2 3 1 ENTER CT The following example describes the adjustment of...25 RGB Gain RGB Offset Store Color Temp To User1 Store Color Temp To User2 Using the menus The projector is equipped with on -screen menu. Adjust keystone values by pressing e or f. 2. English PE8720-en.book Page 25 Friday, May 13, 2005 5:19 PM Advance Advanced - 30 step IRIS Whisper ...

User Manual
Page 26
... color temperature from one of the projected image quality. iv.) To leave the OSD, press EXIT. 10. PE8720-en.book Page 26 Friday, May 13, 2005 5:19 PM English Picture menu The Picture menu allows you to... Enhancement Red: Adjusts red hues independently. Extended Picture Settings • Color Temp.: You can store up to suit your projector image set some certain values in the image. See page 29 for more vivid and brighter the color. 4. Green: ...Select Save Settings, press ENTER. Load Settings: Loads the settings from among User 1, User 2, Lamp Native, Warm, Normal, and Cool.
... color temperature from one of the projected image quality. iv.) To leave the OSD, press EXIT. 10. PE8720-en.book Page 26 Friday, May 13, 2005 5:19 PM English Picture menu The Picture menu allows you to... Enhancement Red: Adjusts red hues independently. Extended Picture Settings • Color Temp.: You can store up to suit your projector image set some certain values in the image. See page 29 for more vivid and brighter the color. 4. Green: ...Select Save Settings, press ENTER. Load Settings: Loads the settings from among User 1, User 2, Lamp Native, Warm, Normal, and Cool.
User Manual
Page 28
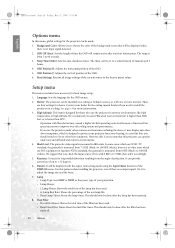
.... 1. If you need to 60 seconds. 3. Use this menu, global settings for the ceiling mount bracket if you use the projector under any and all cooling system and performance. Lamp Hours: Shows the total time of the DISPLAY menu. The range is from 7.5 IRE (black) to the factory preset values. .... This should only be displayed when there is no input signal. This should switch to Yes to solve these symptoms. However, this projector can be set to ± 12 degrees. 6. PE8720-en.book Page 28 Friday, May 13, 2005 5:19 PM English Options menu In this pattern when installing the...
.... 1. If you need to 60 seconds. 3. Use this menu, global settings for the ceiling mount bracket if you use the projector under any and all cooling system and performance. Lamp Hours: Shows the total time of the DISPLAY menu. The range is from 7.5 IRE (black) to the factory preset values. .... This should only be displayed when there is no input signal. This should switch to Yes to solve these symptoms. However, this projector can be set to ± 12 degrees. 6. PE8720-en.book Page 28 Friday, May 13, 2005 5:19 PM English Options menu In this pattern when installing the...
User Manual
Page 30
PE8720-en.book Page 30 Friday, May 13, 2005 5:19 PM English Additional information Care of the projector. Only ever use wax, alcohol, benzene, thinner or other chemical detergents. Do not attempt to clean the lens whilst the projector is switched on or is recommended that you ship the projector... with your dealer or local BenQ Customer Service Centre if the projector fails ...turn the projector off , unplug the power cable, and leave it and cause over-heating inside of the projector except the lamp or the...
PE8720-en.book Page 30 Friday, May 13, 2005 5:19 PM English Additional information Care of the projector. Only ever use wax, alcohol, benzene, thinner or other chemical detergents. Do not attempt to clean the lens whilst the projector is switched on or is recommended that you ship the projector... with your dealer or local BenQ Customer Service Centre if the projector fails ...turn the projector off , unplug the power cable, and leave it and cause over-heating inside of the projector except the lamp or the...

User Manual
Page 33
... cool for at least 45 minutes before replacing the lamp. To reduce the risk of the projector. 6. Do not place the lamp in a proper manner. 1. This lamp contains mercury. English PE8720-en.book Page 33 Friday, May 13, 2005 5:19 PM Replacing the lamp The lamp may cause the lamp to break and scatter broken glass in malfunction...
... cool for at least 45 minutes before replacing the lamp. To reduce the risk of the projector. 6. Do not place the lamp in a proper manner. 1. This lamp contains mercury. English PE8720-en.book Page 33 Friday, May 13, 2005 5:19 PM Replacing the lamp The lamp may cause the lamp to break and scatter broken glass in malfunction...
User Manual
Page 34
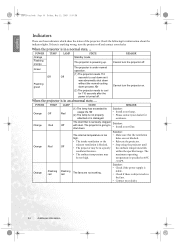
...8226; The ambient temperature may be too high. Or (2) The lamp is not properly attached or is seriously clogged with dust. The fans are not blocked. • Relocate the projector. • Stop using the projector until the ambient temperature falls within the specified range. Solution: &#...indicator lights. REMARK Solution: • Install a new lamp. • Please contact your dealer. Or (2) The projector needs to shut down process. The maximum operating temperature is turned off . Solution: • Install a new filter. English PE8720-en.book Page 34 Friday, May 13, 2005 5:...
...8226; The ambient temperature may be too high. Or (2) The lamp is not properly attached or is seriously clogged with dust. The fans are not blocked. • Relocate the projector. • Stop using the projector until the ambient temperature falls within the specified range. Solution: &#...indicator lights. REMARK Solution: • Install a new lamp. • Please contact your dealer. Or (2) The projector needs to shut down process. The maximum operating temperature is turned off . Solution: • Install a new filter. English PE8720-en.book Page 34 Friday, May 13, 2005 5:...

User Manual
Page 35
... the Source buttons on the remote control or SOURCE / ENTER on or connected correctly. The connection cables are not aligned properly. Correctly attach the lamp cover. (See page 33) Turn the video source on position. (See page 19) Wait until the cooling down process has completed. Remote control...into to the lens The batteries are too far away from the power cable. English PE8720-en.book Page 35 Friday, May 13, 2005 5:19 PM Troubleshooting Problem Cause Remedy The projector does not turn the projector on the rear of power. The input signal has not been correctly selected. No...
... the Source buttons on the remote control or SOURCE / ENTER on or connected correctly. The connection cables are not aligned properly. Correctly attach the lamp cover. (See page 33) Turn the video source on position. (See page 19) Wait until the cooling down process has completed. Remote control...into to the lens The batteries are too far away from the power cable. English PE8720-en.book Page 35 Friday, May 13, 2005 5:19 PM Troubleshooting Problem Cause Remedy The projector does not turn the projector on the rear of power. The input signal has not been correctly selected. No...
User Manual
Page 36
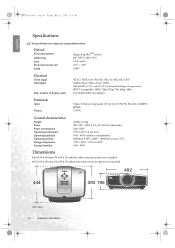
... system DMD chip Lens Projection screen size Lamp Single-chip DLPTM system. 0.8" DLP (1280 x 720) 1.35x zoom 23....5" ~ 300" 250W Electrical Video Signal Data Signal Max. number of display colors NTSC / NTSC4.43 / PAL-M / PAL-N / SECAM / DTV WXGA, XGA, SVGA, VGA, VESA, Macintosh® 16"/13" and 21"/19"(in Advanced Intelligent Compression), HDTV compatible (1080i, 720p... connector-panel cover attached 492 444 393 195 Unit: mm 36 Additional information English PE8720-en.book Page 36 Friday, May 13, 2005 5:19 PM Specifications All specifications...
... system DMD chip Lens Projection screen size Lamp Single-chip DLPTM system. 0.8" DLP (1280 x 720) 1.35x zoom 23....5" ~ 300" 250W Electrical Video Signal Data Signal Max. number of display colors NTSC / NTSC4.43 / PAL-M / PAL-N / SECAM / DTV WXGA, XGA, SVGA, VGA, VESA, Macintosh® 16"/13" and 21"/19"(in Advanced Intelligent Compression), HDTV compatible (1080i, 720p... connector-panel cover attached 492 444 393 195 Unit: mm 36 Additional information English PE8720-en.book Page 36 Friday, May 13, 2005 5:19 PM Specifications All specifications...

