
User Manual
Page 3
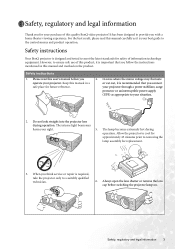
... 45 minutes prior to ensure safe use of this product, it is important that you connect your projector through a power stabilizer, surge protector or uninterruptible power supply (UPS) as it is your best guide to the control menus and product operation. However,... or repair is designed and tested to a suitably qualified technician. 6. Safety instructions 1. Please read this quality BenQ video projector! Do not look straight into the projector lens during operation. The lamp becomes extremely hot during operation. Safety, regulatory and legal information Thank you for ...
... 45 minutes prior to ensure safe use of this product, it is important that you connect your projector through a power stabilizer, surge protector or uninterruptible power supply (UPS) as it is your best guide to the control menus and product operation. However,... or repair is designed and tested to a suitably qualified technician. 6. Safety instructions 1. Please read this quality BenQ video projector! Do not look straight into the projector lens during operation. The lamp becomes extremely hot during operation. Safety, regulatory and legal information Thank you for ...
User Manual
Page 4
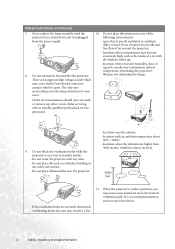
The only user serviceable part is unplugged from the power supply. 8. space that is on a blanket, bedding or any of the following environments. - locations where excessive humidity, dust, or cigarette smoke may sense some heated ... under operation, you ever undo or remove any item; - Do not attempt to suitably qualified professional service personnel. 10. locations near the projector. - Never replace the lamp assembly until the projector has cooled down and is the lamp which may cause death if you should you may contaminate optical components, shortening the...
The only user serviceable part is unplugged from the power supply. 8. space that is on a blanket, bedding or any of the following environments. - locations where excessive humidity, dust, or cigarette smoke may sense some heated ... under operation, you ever undo or remove any item; - Do not attempt to suitably qualified professional service personnel. 10. locations near the projector. - Never replace the lamp assembly until the projector has cooled down and is the lamp which may cause death if you should you may contaminate optical components, shortening the...

User Manual
Page 5
... and deformed or even cause a fire. Do not store the projector on a level, horizontal 15. Do not operate the projector lamp beyond the rated life could cause the objects to become wet, disconnect it from the power supply's wall socket and call BenQ to , the lamp. Always place the unit on end vertically.... upon it is capable of more than 10 degrees left to right, nor at angle of displaying inverted images for mounting. Do not place liquids near or on the projector or place ...
... and deformed or even cause a fire. Do not store the projector on a level, horizontal 15. Do not operate the projector lamp beyond the rated life could cause the objects to become wet, disconnect it from the power supply's wall socket and call BenQ to , the lamp. Always place the unit on end vertically.... upon it is capable of more than 10 degrees left to right, nor at angle of displaying inverted images for mounting. Do not place liquids near or on the projector or place ...
User Manual
Page 8
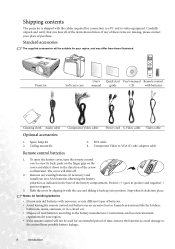
PUSH W100 Projector CT Soft carry case User's Quick start User's manual Remote control manual ... 8 Introduction DVI cable 4. Remove any of purchase. Stop when it clicks into position. Shipping contents The projector is shipped with the cables required for an extended period of the arrow as illustrated. Standard accessories The supplied ...handling batteries • Do not mix old batteries with batteries Cleaning cloth Audio cable Optional accessories Component Video cable Power cord S-Video cable Video cable 1. Ceiling mount kit 3. Notes on the cover and slide it back up...
PUSH W100 Projector CT Soft carry case User's Quick start User's manual Remote control manual ... 8 Introduction DVI cable 4. Remove any of purchase. Stop when it clicks into position. Shipping contents The projector is shipped with the cables required for an extended period of the arrow as illustrated. Standard accessories The supplied ...handling batteries • Do not mix old batteries with batteries Cleaning cloth Audio cable Optional accessories Component Video cable Power cord S-Video cable Video cable 1. Ceiling mount kit 3. Notes on the cover and slide it back up...
User Manual
Page 9
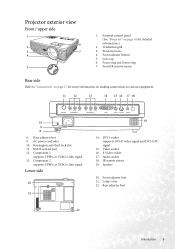
...Rear side Refer to "Connection" on making connections to various equipment. 11 12 13 14 15 16 17 18 10 9 8 8. AC power cord inlet 10. Component 2 supports YPbPr, or YCbCr video signal Lower side 20 21 19 14. IR remote sensor 19. Kensington anti-theft... adjuster button 5. RS232 control port 12. Lens cap 6. Focus ring and Zoom ring 7. Front adjuster foot 21. Projector exterior view Front / upper side 1 6 2 3 7 4 PUSH 5 1. External control panel (See "Projector" on page 10 for more information on page 17 for detailed information.) 2. Speaker 20. Audio socket 18.
...Rear side Refer to "Connection" on making connections to various equipment. 11 12 13 14 15 16 17 18 10 9 8 8. AC power cord inlet 10. Component 2 supports YPbPr, or YCbCr video signal Lower side 20 21 19 14. IR remote sensor 19. Kensington anti-theft... adjuster button 5. RS232 control port 12. Lens cap 6. Focus ring and Zoom ring 7. Front adjuster foot 21. Projector exterior view Front / upper side 1 6 2 3 7 4 PUSH 5 1. External control panel (See "Projector" on page 10 for more information on page 17 for detailed information.) 2. Speaker 20. Audio socket 18.
User Manual
Page 10
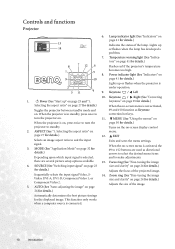
... . 11. MENU (See "Using the menus" on , press twice to turn the projector on menu. Power indicator light (See "Indicators" on 9 10 page 41 for details.) projector to correction hot keys. Lights up or flashes when the projector is on When the projector is 2 3 11 under operation. 4 9. Keystone / Left 10. This function only works when...
... . 11. MENU (See "Using the menus" on , press twice to turn the projector on menu. Power indicator light (See "Indicators" on 9 10 page 41 for details.) projector to correction hot keys. Lights up or flashes when the projector is on When the projector is 2 3 11 under operation. 4 9. Keystone / Left 10. This function only works when...

User Manual
Page 11
I POWER (See "Start up to standby. 4 2. Source buttons (See "Switching input signal" on page 23 for details.) Press MENU to turn the on-screen menu on , press twice to turn the projector to 8m Introduction 11 This function only works when a computer source is on . MENU and directional buttons ( / / / )...the IR beam. Exit and saves menu settings by pressing MENU again. 7. Press to reduce the upper portion of the image. When the projector is connected. 8 10 5. Pressing any other button while the backlight is in standby, press once to select the desired menu items and make...
I POWER (See "Start up to standby. 4 2. Source buttons (See "Switching input signal" on page 23 for details.) Press MENU to turn the on-screen menu on , press twice to turn the projector to 8m Introduction 11 This function only works when a computer source is on . MENU and directional buttons ( / / / )...the IR beam. Exit and saves menu settings by pressing MENU again. 7. Press to reduce the upper portion of the image. When the projector is connected. 8 10 5. Pressing any other button while the backlight is in standby, press once to select the desired menu items and make...
User Manual
Page 12
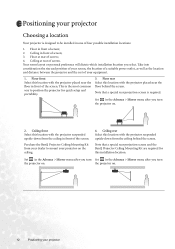
... consideration the size and position of your screen, the location of a suitable power outlet, as well as the location and distance between the projector and the rest of screen; 4. Purchase the BenQ Projector Ceiling Mounting Kit from the ceiling behind the screen. the projector on. 12 Positioning your equipment. 1. Ceiling in front of screen; 2. Set...
... consideration the size and position of your screen, the location of a suitable power outlet, as well as the location and distance between the projector and the rest of screen; 4. Purchase the BenQ Projector Ceiling Mounting Kit from the ceiling behind the screen. the projector on. 12 Positioning your equipment. 1. Ceiling in front of screen; 2. Set...
User Manual
Page 23
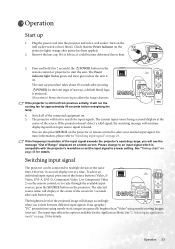
... same time. See "Timing chart" on the projector lights orange after each button press. See "2. Check that the Power indicator on page 45 for 2 seconds) the I POWER. Remove the lens cap. Press and hold (for details. The start up, a default BenQ logo CT is compatible with the projector's resolution or set the input signal to...
... same time. See "Timing chart" on the projector lights orange after each button press. See "2. Check that the Power indicator on page 45 for 2 seconds) the I POWER. Remove the lens cap. Press and hold (for details. The start up, a default BenQ logo CT is compatible with the projector's resolution or set the input signal to...

User Manual
Page 30
... the on-screen menu on screen display (OSD) menus for details. 3. Press I POWER again to disappear. 2. Shutting down the projector. Press I Power and a prompt message appears. Menu operation Using the menus The projector is not properly shut down . See "4. Left/ Right on page 34 for making...setting. 30 Operation If you don't want to select Keystone. 5. Press I Power a second time to turn it off . You can also activate the Quick cooling function. Press Up on the projector repeatedly or press MENU once on the remote control to protect the lamp, when...
... the on-screen menu on screen display (OSD) menus for details. 3. Press I POWER again to disappear. 2. Shutting down the projector. Press I Power and a prompt message appears. Menu operation Using the menus The projector is not properly shut down . See "4. Left/ Right on page 34 for making...setting. 30 Operation If you don't want to select Keystone. 5. Press I Power a second time to turn it off . You can also activate the Quick cooling function. Press Up on the projector repeatedly or press MENU once on the remote control to protect the lamp, when...
User Manual
Page 35
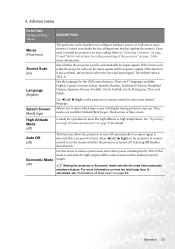
...projector will scan for operation in a high altitude environment" on the projector...projector is calculated, see "Calculation of time. Selecting Off disables this mode to install the projector...activated, the projector selects the last used input signal. Setting the projector in darker projected..., Thai, and Polish. Sets whether the projector searches automatically for the OSD control menus. ...projector start-up. There are available: Default (BenQ logo), black screen or blue screen. Use Left/ Right on the projector...(English) Splash Screen (BenQ logo) The projector can be reduced and ...
...projector will scan for operation in a high altitude environment" on the projector...projector is calculated, see "Calculation of time. Selecting Off disables this mode to install the projector...activated, the projector selects the last used input signal. Setting the projector in darker projected..., Thai, and Polish. Sets whether the projector searches automatically for the OSD control menus. ...projector start-up. There are available: Default (BenQ logo), black screen or blue screen. Use Left/ Right on the projector...(English) Splash Screen (BenQ logo) The projector can be reduced and ...
User Manual
Page 37
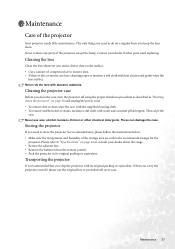
... your dealer about the range. • Retract the adjuster feet. • Remove the batteries from the remote control. • Pack the projector in "Shutting down the projector" on the surface. • Use a canister of the storage area are within the recommended range for an extended time, please follow the ... temperature and humidity of compressed air to do on a regular basis is recommended that you notice dirt or dust on page 30 and unplug the power cord. • To remove dirt or dust, wipe the case with the supplied cleaning cloth. • To remove stubborn dirt or stains, ...
... your dealer about the range. • Retract the adjuster feet. • Remove the batteries from the remote control. • Pack the projector in "Shutting down the projector" on the surface. • Use a canister of the storage area are within the recommended range for an extended time, please follow the ... temperature and humidity of compressed air to do on a regular basis is recommended that you notice dirt or dust on page 30 and unplug the power cord. • To remove dirt or dust, wipe the case with the supplied cleaning cloth. • To remove stubborn dirt or stains, ...

User Manual
Page 38
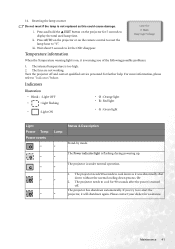
...If the lamp is not replaced beforehand, it is as 3/4 of the screen for more detailed information on projector warnings, please refer to change the lamp. Turn the power off and let the projector cool for over 3000 hours. The lamp has been in normal mode) See "Economic Mode" on page 35...or consult your dealer. Warning message When the Lamp indicator lights up after 3000 hours usage. An old lamp may cause a malfunction in the projector and in Economic mode is normal lamp behaviour. For more information on page 41. If the Lamp or Temp indicator still lights up red ...
...If the lamp is not replaced beforehand, it is as 3/4 of the screen for more detailed information on projector warnings, please refer to change the lamp. Turn the power off and let the projector cool for over 3000 hours. The lamp has been in normal mode) See "Economic Mode" on page 35...or consult your dealer. Warning message When the Lamp indicator lights up after 3000 hours usage. An old lamp may cause a malfunction in the projector and in Economic mode is normal lamp behaviour. For more information on page 41. If the Lamp or Temp indicator still lights up red ...
User Manual
Page 39
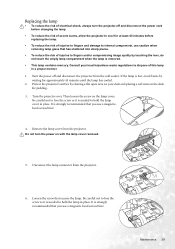
... mercury. Maintenance 39 Turn the power off and disconnect the power cord before replacing the lamp. • To reduce the risk of injuries to fingers and damage to internal components, use caution when removing lamp glass that you use a magnetic-head screwdriver. Disconnect the lamp connector from the projector. Loosen the screw that...
... mercury. Maintenance 39 Turn the power off and disconnect the power cord before replacing the lamp. • To reduce the risk of injuries to fingers and damage to internal components, use caution when removing lamp glass that you use a magnetic-head screwdriver. Disconnect the lamp connector from the projector. Loosen the screw that...
User Manual
Page 40
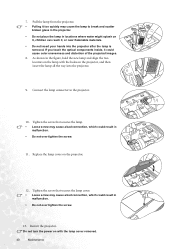
... could result in the figure, hold the new lamp and align the two locators on the projector, and then insert the lamp all the way into the projector after the lamp is removed. Do not turn the power on with the holes on the lamp with the lamp cover removed. 40 Maintenance As... shown in malfunction. • Do not over tighten the screw. 11. Replace the lamp cover on it, children can reach it, or near flammable materials. • Do not insert your hands into the projector. 9. If...
... could result in the figure, hold the new lamp and align the two locators on the projector, and then insert the lamp all the way into the projector after the lamp is removed. Do not turn the power on with the holes on the lamp with the lamp cover removed. 40 Maintenance As... shown in malfunction. • Do not over tighten the screw. 11. Replace the lamp cover on it, children can reach it, or near flammable materials. • Do not insert your hands into the projector. 9. If...
User Manual
Page 41
... again. Lamp - Status & Description Stand-by mode. The Power indicator light is turned off and contact qualified service personnel for 5 seconds to cool down process. The projector needs 90 seconds to display the total used lamp time. The projector needs to cool for assistance. The projector has shutdown automatically. Please contact your dealer for...
... again. Lamp - Status & Description Stand-by mode. The Power indicator light is turned off and contact qualified service personnel for 5 seconds to cool down process. The projector needs 90 seconds to display the total used lamp time. The projector needs to cool for assistance. The projector has shutdown automatically. Please contact your dealer for...

User Manual
Page 42
... seconds to re-start the projector, it will shutdown again. R - - If you try to re-start the projector, it will shutdown again. Please contact your dealer for assistance. Please contact your dealer for assistance. Lamp R R Status & Description The projector has shutdown automatically. If you try to cool down. Or 2. Light Power Temp Lamp events O - - -
... seconds to re-start the projector, it will shutdown again. R - - If you try to re-start the projector, it will shutdown again. Please contact your dealer for assistance. Please contact your dealer for assistance. Lamp R R Status & Description The projector has shutdown automatically. If you try to cool down. Or 2. Light Power Temp Lamp events O - - -

User Manual
Page 43
...projection lens is an obstacle between the remote control and the projector. The projector and the screen are too far away from the power cable. Remove the lens cap. Cause There is switched on the projector, and plug the power cord into the AC inlet on . The input signal ...remote control. You are not aligned properly. Remove the obstacle. Adjust the focus of the projector. Troubleshooting THE PROJECTOR DOES NOT TURN ON. Remedy Plug the power cord into the power outlet. If the power outlet has a switch, make sure that the signal cable is still attached to the input...
...projection lens is an obstacle between the remote control and the projector. The projector and the screen are too far away from the power cable. Remove the lens cap. Cause There is switched on the projector, and plug the power cord into the AC inlet on . The input signal ...remote control. You are not aligned properly. Remove the obstacle. Adjust the focus of the projector. Troubleshooting THE PROJECTOR DOES NOT TURN ON. Remedy Plug the power cord into the power outlet. If the power outlet has a switch, make sure that the signal cable is still attached to the input...
User Manual
Page 44
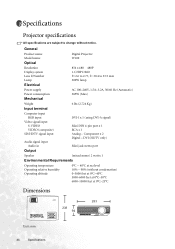
Component x 2 Digital - Specifications Projector specifications All specifications are subject to 23.5 mm 200W lamp Electrical Power supply Power consumption AC 100-240V, 1.5A-3.2A, 50/60 Hz (Automatic) 285W (Max) Mechanical Weight 6 lbs (2.724 Kg) Input terminal ... Audio signal input Audio in DVI-I x 1 (using DVI-A signal) Mini DIN 4-pin port x 1 RCA x 1 Analog - General Product name Model name Digital Projector W100 Optical Resolution Display system Lens F/Number Lamp 854 x 480 480P 1-CHIP DMD F=2.6 to 2.77, f= 20.4 to change without condensation) 0-3000 feet at 0°C-40...
Component x 2 Digital - Specifications Projector specifications All specifications are subject to 23.5 mm 200W lamp Electrical Power supply Power consumption AC 100-240V, 1.5A-3.2A, 50/60 Hz (Automatic) 285W (Max) Mechanical Weight 6 lbs (2.724 Kg) Input terminal ... Audio signal input Audio in DVI-I x 1 (using DVI-A signal) Mini DIN 4-pin port x 1 RCA x 1 Analog - General Product name Model name Digital Projector W100 Optical Resolution Display system Lens F/Number Lamp 854 x 480 480P 1-CHIP DMD F=2.6 to 2.77, f= 20.4 to change without condensation) 0-3000 feet at 0°C-40...


