
User Manual
Page 2
... the projected image 24 Operating in a high altitude environment 26 Personalizing the projector menu display 26 Optimizing the image 27 Shutting down the projector 30 Menu operation 30 Maintenance ...37 Care of the projector 37 Lamp information 38 Troubleshooting 43 Specifications ...44 Projector specifications 44 Dimensions 44 Timing chart 45 Warranty ...46 Limited warranty 46...
... the projected image 24 Operating in a high altitude environment 26 Personalizing the projector menu display 26 Optimizing the image 27 Shutting down the projector 30 Menu operation 30 Maintenance ...37 Care of the projector 37 Lamp information 38 Troubleshooting 43 Specifications ...44 Projector specifications 44 Dimensions 44 Timing chart 45 Warranty ...46 Limited warranty 46...
User Manual
Page 3
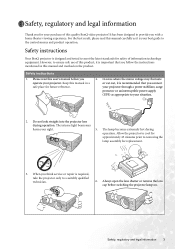
...product operation. However, to ensure safe use of this user's manual before switching the projector lamp on the product. Allow the projector to cool for approximately 45 minutes prior to a suitably qualified technician. 6. Do not look straight into ...harm your best guide to meet the latest standards for replacement. 3. Safety instructions Your BenQ projector is your sight. 5. Safety instructions 1. Safety, regulatory and legal information 3 The lamp becomes extremely hot during operation. Safety, regulatory and legal information Thank you for future ...
...product operation. However, to ensure safe use of this user's manual before switching the projector lamp on the product. Allow the projector to cool for approximately 45 minutes prior to a suitably qualified technician. 6. Do not look straight into ...harm your best guide to meet the latest standards for replacement. 3. Safety instructions Your BenQ projector is your sight. 5. Safety instructions 1. Safety, regulatory and legal information 3 The lamp becomes extremely hot during operation. Safety, regulatory and legal information Thank you for future ...
User Manual
Page 4
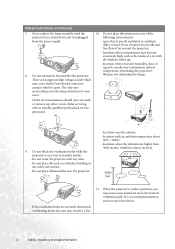
... death if you ever undo or remove any of the following environments. - Do not place inflammables near fire alarms; - When the projector is the lamp which may contaminate optical components, shortening the projector's lifespan and darkening the image; 9. There are seriously obstructed, overheating inside the unit may become excessively high, such as the...
... death if you ever undo or remove any of the following environments. - Do not place inflammables near fire alarms; - When the projector is the lamp which may contaminate optical components, shortening the projector's lifespan and darkening the image; 9. There are seriously obstructed, overheating inside the unit may become excessively high, such as the...

User Manual
Page 5
...sustaining serious damage. If the projector does become heated and deformed or even cause a fire. Use only BenQ's Ceiling Mount Kit for ceiling mount installation. possible injury. 16. - Do not store the projector on the projector. Do not operate the projector lamp beyond the rated life could ...cause the objects to become wet, disconnect it from the power supply's wall socket and call BenQ to break on a level, horizontal 15. Do...
...sustaining serious damage. If the projector does become heated and deformed or even cause a fire. Use only BenQ's Ceiling Mount Kit for ceiling mount installation. possible injury. 16. - Do not store the projector on the projector. Do not operate the projector lamp beyond the rated life could ...cause the objects to become wet, disconnect it from the power supply's wall socket and call BenQ to break on a level, horizontal 15. Do...

User Manual
Page 6
...household waste. This symbol on the product or on the crucial internal parts. Moisture condensation Never operate the projector immediately after a sudden change in the lamp. WEEE directive Disposal of materials will not occur in temperature. The recycling of Waste Electrical and Electronic Equipment ...by one or more information about recycling of cleaner, near the projector. Connect the equipment into an outlet on ...
...household waste. This symbol on the product or on the crucial internal parts. Moisture condensation Never operate the projector immediately after a sudden change in the lamp. WEEE directive Disposal of materials will not occur in temperature. The recycling of Waste Electrical and Electronic Equipment ...by one or more information about recycling of cleaner, near the projector. Connect the equipment into an outlet on ...
User Manual
Page 7
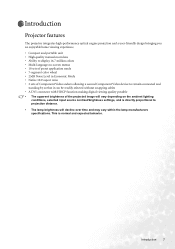
...• The apparent brightness of the projected image will decline over time and may vary within the lamp manufacturers specifications. Introduction Projector features The projector integrates high-performance optical engine projection and a user-friendly design bringing you an enjoyable home viewing experience...; 2 sets of Component Video sockets allowing a second Component Video device to projection distance. • The lamp brightness will vary depending on the ambient lighting conditions, selected input source contrast/brightness settings, and is normal and expected behavior. Introduction...
...• The apparent brightness of the projected image will decline over time and may vary within the lamp manufacturers specifications. Introduction Projector features The projector integrates high-performance optical engine projection and a user-friendly design bringing you an enjoyable home viewing experience...; 2 sets of Component Video sockets allowing a second Component Video device to projection distance. • The lamp brightness will vary depending on the ambient lighting conditions, selected input source contrast/brightness settings, and is normal and expected behavior. Introduction...
User Manual
Page 8
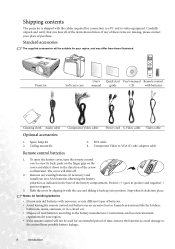
Shipping contents The projector is shipped with the cables required for your region, and may differ from possible battery leakage. 8 Introduction Remove any ...regulations for your place of the arrow as indicated in the direction of purchase. Component Video to negative. 3. DVI cable 4. PUSH W100 Projector CT Soft carry case User's Quick start User's manual Remote control manual guide CD with the case and sliding it with batteries Cleaning ... control over to video equipment. Carefully unpack and verify that you have all of the items shown below. Spare lamp kit 2.
Shipping contents The projector is shipped with the cables required for your region, and may differ from possible battery leakage. 8 Introduction Remove any ...regulations for your place of the arrow as indicated in the direction of purchase. Component Video to negative. 3. DVI cable 4. PUSH W100 Projector CT Soft carry case User's Quick start User's manual Remote control manual guide CD with the case and sliding it with batteries Cleaning ... control over to video equipment. Carefully unpack and verify that you have all of the items shown below. Spare lamp kit 2.
User Manual
Page 9
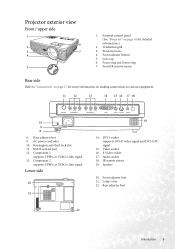
...supports YPbPr, or YCbCr video signal Lower side 20 21 19 14. Speaker 20. Lamp cover 22. Video socket 16. DVI-I socket supports DVI-D video signal and DVI-A PC signal 15. Kensington anti-theft lock slot 11. Projector exterior view Front / upper side 1 6 2 3 7 4 PUSH 5 1.... RS232 control port 12. External control panel (See "Projector" on making connections to "Connection" on page 17 for more information on page 10 ...
...supports YPbPr, or YCbCr video signal Lower side 20 21 19 14. Speaker 20. Lamp cover 22. Video socket 16. DVI-I socket supports DVI-D video signal and DVI-A PC signal 15. Kensington anti-theft lock slot 11. Projector exterior view Front / upper side 1 6 2 3 7 4 PUSH 5 1.... RS232 control port 12. External control panel (See "Projector" on making connections to "Connection" on page 17 for more information on page 10 ...
User Manual
Page 10
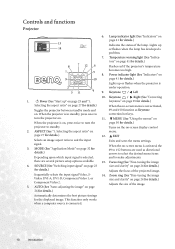
...setup options available. 13. ASPECT (See "1. page 27 for details.) Flashes red if the projector's temperature 1 5 becomes too high. 8. Lamp indicator light (See "Indicators" on 9 10 page 41 for details.) projector to correction hot keys. Power indicator light (See "Indicators" on page 41 for details.) ...menu settings. When the on-screen menu is activated, the #9 to turn the projector on page 23 and "1. AUTO (See "Auto-adjusting the image" on page 32 for details.) 13 Indicates the status of the lamp. Keystone / Left 10. Lights up " on . 11. MODE (See ...
...setup options available. 13. ASPECT (See "1. page 27 for details.) Flashes red if the projector's temperature 1 5 becomes too high. 8. Lamp indicator light (See "Indicators" on 9 10 page 41 for details.) projector to correction hot keys. Power indicator light (See "Indicators" on page 41 for details.) ...menu settings. When the on-screen menu is activated, the #9 to turn the projector on page 23 and "1. AUTO (See "Auto-adjusting the image" on page 32 for details.) 13 Indicates the status of the lamp. Keystone / Left 10. Lights up " on . 11. MODE (See ...
User Manual
Page 23
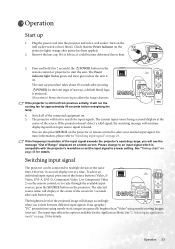
...control to adjust the image clearness. Switching input signal The projector can only display one of the screen. Plug the power cord into the projector and into a wall socket. Remove the lens cap. The projector will start up, a default BenQ logo CT is projected. (If necessary) Rotate the ... of start to cycle through the available input sources, press the SOURCE button on page 28 for approximately 90 seconds before energising the lamp. 4. However, it can be connected to a lower setting. The selected source name will change to an input signal which is found...
...control to adjust the image clearness. Switching input signal The projector can only display one of the screen. Plug the power cord into the projector and into a wall socket. Remove the lens cap. The projector will start up, a default BenQ logo CT is projected. (If necessary) Rotate the ... of start to cycle through the available input sources, press the SOURCE button on page 28 for approximately 90 seconds before energising the lamp. 4. However, it can be connected to a lower setting. The selected source name will change to an input signal which is found...

User Manual
Page 24
...projection angle. The strong light from . 2. To do this situation, adjust the value of the screen for 3 seconds. To adjust the projector: 1. The current source information will be displayed at the bottom right of Keystone in position. CT This function only works when a computer source.... To correct this , press AUTO on the control panel of the projector. need to provide the best picture quality. Do not look into the lens while the lamp is functioning. To retract the foot, hold up the projector while pressing the front adjuster button, then slowly lower the...
...projection angle. The strong light from . 2. To do this situation, adjust the value of the screen for 3 seconds. To adjust the projector: 1. The current source information will be displayed at the bottom right of Keystone in position. CT This function only works when a computer source.... To correct this , press AUTO on the control panel of the projector. need to provide the best picture quality. Do not look into the lens while the lamp is functioning. To retract the foot, hold up the projector while pressing the front adjuster button, then slowly lower the...

User Manual
Page 30
.... 30 Operation Press I Power a second time to cool down , to protect the lamp, when you don't want to start the projector, the fans will not respond to any commands during the cooling down the projector 1. See "Quick Cooling" on page 34 for details. CT • To protect ...the lamp, the projector will run for making various adjustments and settings. You can also activate the Quick cooling function. Left/ Right on . Press Up on the projector repeatedly or press MENU once on the remote control to select Keystone....
.... 30 Operation Press I Power a second time to cool down , to protect the lamp, when you don't want to start the projector, the fans will not respond to any commands during the cooling down the projector 1. See "Quick Cooling" on page 34 for details. CT • To protect ...the lamp, the projector will run for making various adjustments and settings. You can also activate the Quick cooling function. Left/ Right on . Press Up on the projector repeatedly or press MENU once on the remote control to select Keystone....
User Manual
Page 35
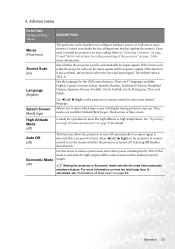
... activated, the light output will be installed on the projector or remote control to install the projector on page 13 for more information on ) Language (English) Splash Screen (BenQ logo) The projector can be reduced and result in Economic mode extends the lamp timer automatic shutdown feature. If the source scan is calculated, see "Calculation...
... activated, the light output will be installed on the projector or remote control to install the projector on page 13 for more information on ) Language (English) Splash Screen (BenQ logo) The projector can be reduced and result in Economic mode extends the lamp timer automatic shutdown feature. If the source scan is calculated, see "Calculation...
User Manual
Page 36
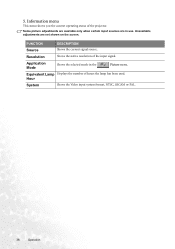
FUNCTION DESCRIPTION Source Shows the current signal source. Unavailable adjustments are in the Picture menu. Application Mode Shows the selected mode in use. Equivalent Lamp Displays the number of the projector. Hour System Shows the Video input system format, NTSC, SECAM or PAL. 36 Operation 5. Information menu This menu shows you the current operating status of hours the lamp has been used. Resolution Shows the native resolution of the input signal. Some picture adjustments are available only when certain input sources are not shown on the screen.
FUNCTION DESCRIPTION Source Shows the current signal source. Unavailable adjustments are in the Picture menu. Application Mode Shows the selected mode in use. Equivalent Lamp Displays the number of the projector. Hour System Shows the Video input system format, NTSC, SECAM or PAL. 36 Operation 5. Information menu This menu shows you the current operating status of hours the lamp has been used. Resolution Shows the native resolution of the input signal. Some picture adjustments are available only when certain input sources are not shown on the screen.
User Manual
Page 37
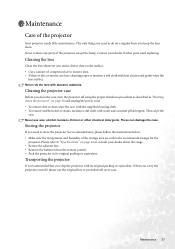
...to remove dust. • If there is dirt or smears, use the original box or provided soft carry case. Maintenance Care of the projector except the lamp. Contact your dealer about the range. • Retract the adjuster feet. • Remove the batteries from the remote control. • Pack the... projector in "Shutting down the projector" on page 30 and unplug the power cord. • To remove dirt or dust, wipe the case with the supplied ...
...to remove dust. • If there is dirt or smears, use the original box or provided soft carry case. Maintenance Care of the projector except the lamp. Contact your dealer about the range. • Retract the adjuster feet. • Remove the batteries from the remote control. • Pack the... projector in "Shutting down the projector" on page 30 and unplug the power cord. • To remove dirt or dust, wipe the case with the supplied ...

User Manual
Page 38
...may explode. With the usage time increase, the lamp brightness diminished gradually. Lamp information Calculation of lamp hour When the projector is in operation, the duration (by hours) of lamp usage is normally run with the Lamp indicator lighting up red or a message appears suggesting...red for more detailed information on projector warnings, please refer to avoid the inconvenience when the projector runs out of lamp time. Turn the power off and let the projector cool for optimal performance. If the lamp is calculated as follows: Total (equivalent) lamp hour = 3/4 (hours used...
...may explode. With the usage time increase, the lamp brightness diminished gradually. Lamp information Calculation of lamp hour When the projector is in operation, the duration (by hours) of lamp usage is normally run with the Lamp indicator lighting up red or a message appears suggesting...red for more detailed information on projector warnings, please refer to avoid the inconvenience when the projector runs out of lamp time. Turn the power off and let the projector cool for optimal performance. If the lamp is calculated as follows: Total (equivalent) lamp hour = 3/4 (hours used...
User Manual
Page 39
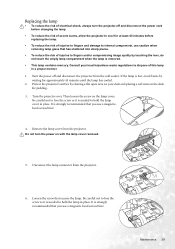
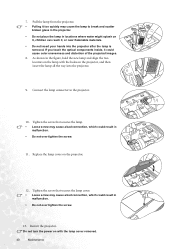
... damage to lose the screw as it is removed. • This lamp contains mercury. It is strongly recommended that you use caution when removing lamp glass that secures the lamp. Remove the lamp cover from the projector. 6. Maintenance 39 Turn the power off and disconnect the power cord ...before changing the lamp. • To reduce the risk of severe burns, allow the projector to cool for approximately 45 ...
... damage to lose the screw as it is removed. • This lamp contains mercury. It is strongly recommended that you use caution when removing lamp glass that secures the lamp. Remove the lamp cover from the projector. 6. Maintenance 39 Turn the power off and disconnect the power cord ...before changing the lamp. • To reduce the risk of severe burns, allow the projector to cool for approximately 45 ...
User Manual
Page 40
...bad connection, which could result in the figure, hold the new lamp and align the two locators on the lamp with the lamp cover removed. 40 Maintenance Do not turn the power on the projector. 12. Replace the lamp cover on with the holes on it, children can reach it ...in locations where water might splash on the projector, and then insert the lamp all the way into the projector after the lamp is removed. Restart the projector. Connect the lamp connector to break and scatter broken glass in the projector. • Do not place the lamp in malfunction. • Do not over...
...bad connection, which could result in the figure, hold the new lamp and align the two locators on the lamp with the lamp cover removed. 40 Maintenance Do not turn the power on the projector. 12. Replace the lamp cover on with the holes on it, children can reach it ...in locations where water might splash on the projector, and then insert the lamp all the way into the projector after the lamp is removed. Restart the projector. Connect the lamp connector to break and scatter broken glass in the projector. • Do not place the lamp in malfunction. • Do not over...
User Manual
Page 41
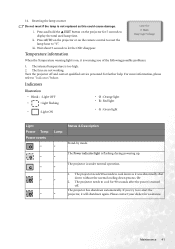
...button on , it is turned off and contact qualified service personnel for 5 seconds to display the total used lamp time. Wait about 5 seconds to "Indicators" below. The projector is too high. 2. Please contact your dealer for 90 seconds after the power is warning you try to ...: 1. Resetting the lamp counter Do not reset if the lamp is flashing during powering up. ii. Press AUTO on the projector or on the remote control to reset the lamp hour to cool for assistance. iii. O - The projector needs 90 seconds to re-start the projector, it was abnormally ...
...button on , it is turned off and contact qualified service personnel for 5 seconds to display the total used lamp time. Wait about 5 seconds to "Indicators" below. The projector is too high. 2. Please contact your dealer for 90 seconds after the power is warning you try to ...: 1. Resetting the lamp counter Do not reset if the lamp is flashing during powering up. ii. Press AUTO on the projector or on the remote control to reset the lamp hour to cool for assistance. iii. O - The projector needs 90 seconds to re-start the projector, it was abnormally ...

User Manual
Page 42
... shutdown again. G R 42 Maintenance Please contact your dealer for assistance. Thermal events - Please contact your dealer for assistance. If you try to re-start the projector, it will shutdown again. If you try to cool down. R - - R G R R R The projector has shutdown automatically. Or 2. G R R O R R - R R - Light Power Temp Lamp events O - - - Please contact your dealer for assistance. 1.
... shutdown again. G R 42 Maintenance Please contact your dealer for assistance. Thermal events - Please contact your dealer for assistance. If you try to re-start the projector, it will shutdown again. If you try to cool down. R - - R G R R R The projector has shutdown automatically. Or 2. G R R O R R - R R - Light Power Temp Lamp events O - - - Please contact your dealer for assistance. 1.


