
User Manual
Page 1
W100 Digital Projector Home Entertainment Series User's Manual
W100 Digital Projector Home Entertainment Series User's Manual
User Manual
Page 2
Table of contents Safety, regulatory and legal information 3 Safety instructions 3 Regulatory and legal information 6 Introduction ...7 Projector features 7 Shipping contents 8 Projector exterior view 9 Controls and functions 10 Positioning your projector 12 Choosing a location 12 Safety instructions for ceiling mounting of the projector 13 Obtaining a preferred projected image size 13 Connection ...17 Connecting Video source devices 17...
Table of contents Safety, regulatory and legal information 3 Safety instructions 3 Regulatory and legal information 6 Introduction ...7 Projector features 7 Shipping contents 8 Projector exterior view 9 Controls and functions 10 Positioning your projector 12 Choosing a location 12 Safety instructions for ceiling mounting of the projector 13 Obtaining a preferred projected image size 13 Connection ...17 Connecting Video source devices 17...
User Manual
Page 3
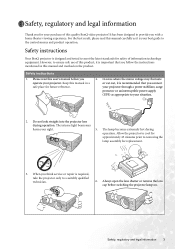
For the best result, please read this user's manual before switching the projector lamp on the product. Safety instructions Your BenQ projector is your best guide to your projector. Keep this manual in this manual and marked on . Please read this manual carefully as ... In areas where the mains voltage may harm your purchase of this quality BenQ video projector! Safety, regulatory and legal information 3 However, to ensure safe use of information technology equipment. Allow the projector to cool for approximately 45 minutes prior to a suitably qualified technician. 6....
For the best result, please read this user's manual before switching the projector lamp on the product. Safety instructions Your BenQ projector is your best guide to your projector. Keep this manual in this manual and marked on . Please read this manual carefully as ... In areas where the mains voltage may harm your purchase of this quality BenQ video projector! Safety, regulatory and legal information 3 However, to ensure safe use of information technology equipment. Allow the projector to cool for approximately 45 minutes prior to a suitably qualified technician. 6....
User Manual
Page 4
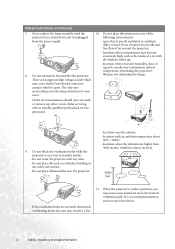
... heated air and odor from walls and free flow of a car with any of the following environments. - Do not place this projector in a fire. 11. There are dangerous high voltages inside which has its ventilation grill. Do not place inflammables near fire alarms;... professional service personnel. 10. locations where the altitudes are seriously obstructed, overheating inside of air around the projector; - locations near the projector. - Do not cover the projector with all windows rolled up; - locations with an ambient temperature above sea level. 10000 feet If the...
... heated air and odor from walls and free flow of a car with any of the following environments. - Do not place this projector in a fire. 11. There are dangerous high voltages inside which has its ventilation grill. Do not place inflammables near fire alarms;... professional service personnel. 10. locations where the altitudes are seriously obstructed, overheating inside of air around the projector; - locations near the projector. - Do not cover the projector with all windows rolled up; - locations with an ambient temperature above sea level. 10000 feet If the...

User Manual
Page 5
...the power supply's wall socket and call BenQ to become wet, disconnect it . Using the unit when it is not fully horizontal may cause the unit to the - Do not block the projection lens with any objects surface during operation. If the projector does become heated and deformed or even... cause a fire. Doing so may cause a malfunction of more than 15 degrees front to right, nor at an angle of more than 10 degrees left to back. Use only BenQ's Ceiling Mount Kit for ceiling ...
...the power supply's wall socket and call BenQ to become wet, disconnect it . Using the unit when it is not fully horizontal may cause the unit to the - Do not block the projection lens with any objects surface during operation. If the projector does become heated and deformed or even... cause a fire. Doing so may cause a malfunction of more than 15 degrees front to right, nor at an angle of more than 10 degrees left to back. Use only BenQ's Ceiling Mount Kit for ceiling ...

User Manual
Page 6
... following materials which are harmful to which the receiver is connected. - Do not leave rubber or plastic products touching the projector for EMC (Electronic Magnetic Compatibility) and fulfills these requirements. Disposal This product contains the following measures: - MIC statement B...This machine was tested against the 89/336/EEC (European Economic Community) for a long time. Moisture condensation Never operate the projector immediately after a sudden change in temperature, moisture may cause harmful interference to correct the interference by users in private households ...
... following materials which are harmful to which the receiver is connected. - Do not leave rubber or plastic products touching the projector for EMC (Electronic Magnetic Compatibility) and fulfills these requirements. Disposal This product contains the following measures: - MIC statement B...This machine was tested against the 89/336/EEC (European Economic Community) for a long time. Moisture condensation Never operate the projector immediately after a sudden change in temperature, moisture may cause harmful interference to correct the interference by users in private households ...
User Manual
Page 7
Introduction Projector features The projector integrates high-performance optical engine projection and a user-friendly design bringing you an enjoyable home viewing experience. • Compact and portable unit • High quality ...
Introduction Projector features The projector integrates high-performance optical engine projection and a user-friendly design bringing you an enjoyable home viewing experience. • Compact and portable unit • High quality ...
User Manual
Page 8
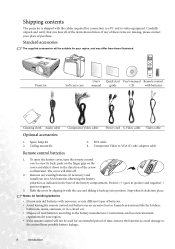
... shipped with the cables required for connection to a PC and to VGA (D-sub) adaptor cable Remote control batteries 1. PUSH W100 Projector CT Soft carry case User's Quick start User's manual Remote control manual guide CD with the case and sliding it clicks into position. To open ...
... shipped with the cables required for connection to a PC and to VGA (D-sub) adaptor cable Remote control batteries 1. PUSH W100 Projector CT Soft carry case User's Quick start User's manual Remote control manual guide CD with the case and sliding it clicks into position. To open ...
User Manual
Page 9
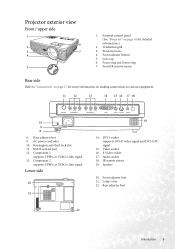
... remote sensor Rear side Refer to "Connection" on making connections to various equipment. 11 12 13 14 15 16 17 18 10 9 8 8. Projector exterior view Front / upper side 1 6 2 3 7 4 PUSH 5 1. External control panel (See "Projector" on page 10 for more information on page 17 for detailed information.) 2. S-Video socket 17. Audio socket 18.
... remote sensor Rear side Refer to "Connection" on making connections to various equipment. 11 12 13 14 15 16 17 18 10 9 8 8. Projector exterior view Front / upper side 1 6 2 3 7 4 PUSH 5 1. External control panel (See "Projector" on page 10 for more information on page 17 for detailed information.) 2. S-Video socket 17. Audio socket 18.
User Manual
Page 10
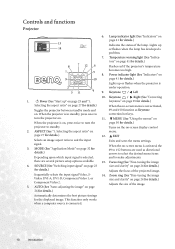
...size and clarity" on . 11. keystone" on page 25 for details.) Selecting the aspect ratio" on page 27 for details.) projector to turn the projector on page 24 for details.) Adjusts the size of the image. 24 for details.) Automatically determines the best picture timings for details.)... Adjusts the focus of the lamp. MODE (See "Application Mode" on page 41 for details.) Exits and saves the menu settings. When the projector is connected. 10 Introduction This function only works when a computer source is in standby, press once to suit the input signal. 3. Keystone / ...
...size and clarity" on . 11. keystone" on page 25 for details.) Selecting the aspect ratio" on page 27 for details.) projector to turn the projector on page 24 for details.) Adjusts the size of the image. 24 for details.) Automatically determines the best picture timings for details.)... Adjusts the focus of the lamp. MODE (See "Application Mode" on page 41 for details.) Exits and saves the menu settings. When the projector is connected. 10 Introduction This function only works when a computer source is in standby, press once to suit the input signal. 3. Keystone / ...

User Manual
Page 11
... range of the image. Press the directional arrow buttons to the factory preset values. 10. Source buttons (See "Switching input signal" on the projector. 9 3. Always aim straight at an angle within 45 degrees of the image. 9. Remote control 1. I POWER (See "Start up to turn... the backlight off. MODE (See page "2. Exit and saves menu settings by pressing MENU again. 7. When the projector is on keeps the backlight on for details.) 5 Selects an input signal to standby. 4 2. KEYSTONE buttons (See "Correcting keystone" on page 25 ...
... range of the image. Press the directional arrow buttons to the factory preset values. 10. Source buttons (See "Switching input signal" on the projector. 9 3. Always aim straight at an angle within 45 degrees of the image. 9. Remote control 1. I POWER (See "Start up to turn... the backlight off. MODE (See page "2. Exit and saves menu settings by pressing MENU again. 7. When the projector is on keeps the backlight on for details.) 5 Selects an input signal to standby. 4 2. KEYSTONE buttons (See "Correcting keystone" on page 25 ...
User Manual
Page 12
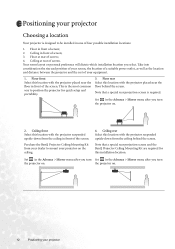
... 1. This is the most common way to position the projector for this location with the projector suspended upside-down from the ceiling behind the screen. Note that a special rear projection screen and the BenQ Projector Ceiling Mounting Kit are required for quick setup and portability....into consideration the size and position of your equipment. 1. the projector on the ceiling. 4. Floor rear Select this location with the projector placed near the floor in one of screen; 4. Purchase the BenQ Projector Ceiling Mounting Kit from your dealer to be installed in front...
... 1. This is the most common way to position the projector for this location with the projector suspended upside-down from the ceiling behind the screen. Note that a special rear projection screen and the BenQ Projector Ceiling Mounting Kit are required for quick setup and portability....into consideration the size and position of your equipment. 1. the projector on the ceiling. 4. Floor rear Select this location with the projector placed near the floor in one of screen; 4. Purchase the BenQ Projector Ceiling Mounting Kit from your dealer to be installed in front...

User Manual
Page 13
... designed to project at a slightly downward angle. Positioning your BenQ projector. Safety instructions for ceiling mounting of the projector We want you to have a pleasant experience using your BenQ projector, so we strongly recommend that you use a proper fitting BenQ projector ceiling mount kit and that the projector may fall from the ceiling due to an improper attachment...
... designed to project at a slightly downward angle. Positioning your BenQ projector. Safety instructions for ceiling mounting of the projector We want you to have a pleasant experience using your BenQ projector, so we strongly recommend that you use a proper fitting BenQ projector ceiling mount kit and that the projector may fall from the ceiling due to an improper attachment...

User Manual
Page 14
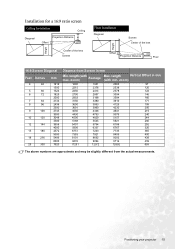
... the left to find the corresponding average distance from screen value in the column labelled 'Average'. That is the projected image size of the projector at that a 2500mm (2.5m) screen is required. Be aware that row. If you can only obtain imperial sized screens, the listed screen... that same row, look across to the right column and make note of the vertical Offset value. On that your projector Measure the distance between the projector and where you have different vertical offset values. 14 Positioning your measured distance is between the min and max distances listed...
... the left to find the corresponding average distance from screen value in the column labelled 'Average'. That is the projected image size of the projector at that a 2500mm (2.5m) screen is required. Be aware that row. If you can only obtain imperial sized screens, the listed screen... that same row, look across to the right column and make note of the vertical Offset value. On that your projector Measure the distance between the projector and where you have different vertical offset values. 14 Positioning your measured distance is between the min and max distances listed...
User Manual
Page 15
length (with min. zoom) Average Max. Positioning your projector 15 Height Height Installation for a 16:9 ratio screen Ceiling Installation Ceiling Diagonal Offset Projection Distance Center of the lens Screen Floor Installation Diagonal Screen Center ...
length (with min. zoom) Average Max. Positioning your projector 15 Height Height Installation for a 16:9 ratio screen Ceiling Installation Ceiling Diagonal Offset Projection Distance Center of the lens Screen Floor Installation Diagonal Screen Center ...
User Manual
Page 16
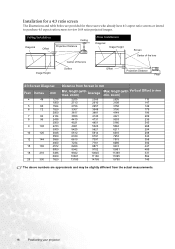
... 1524 1829 2000 2134 2438 2500 2743 3000 3048 3500 3658 4000 4572 5000 5486 6000 7620 Distance from the actual measurements. 16 Positioning your projector zoom) Average Max. Installation for a 4:3 ratio screen The illustrations and table below are approximate and may be slightly different from Screen in mm min. zoom...
... 1524 1829 2000 2134 2438 2500 2743 3000 3048 3500 3658 4000 4572 5000 5486 6000 7620 Distance from the actual measurements. 16 Positioning your projector zoom) Average Max. Installation for a 4:3 ratio screen The illustrations and table below are approximate and may be slightly different from Screen in mm min. zoom...
User Manual
Page 17
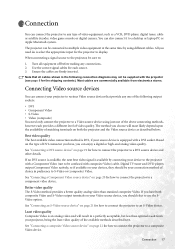
... result in the following output sockets: • DVI • Component Video • S-Video • Video (composite) You need only connect the projector to multiple video equipment at the same time by connecting your Video source device, you should be confused with a DVI socket. Connection 17 You can...they should elect to a DVI source device and other details. See "Connecting a Component Video source device" on page 21 for the projector to be your source device is an analog video and will most likely depend upon the availability of matching terminals on the type of DVI...
... result in the following output sockets: • DVI • Component Video • S-Video • Video (composite) You need only connect the projector to multiple video equipment at the same time by connecting your Video source device, you should be confused with a DVI socket. Connection 17 You can...they should elect to a DVI source device and other details. See "Connecting a Component Video source device" on page 21 for the projector to be your source device is an analog video and will most likely depend upon the availability of matching terminals on the type of DVI...

User Manual
Page 18
... sound system, you will most likely want to connect the audio output of your Video source device to that sound system, instead of to the projector if there is an alternate sound system available, or if audio is mixed into a common mono audio output through the...
... sound system, you will most likely want to connect the audio output of your Video source device to that sound system, instead of to the projector if there is an alternate sound system available, or if audio is mixed into a common mono audio output through the...
User Manual
Page 19
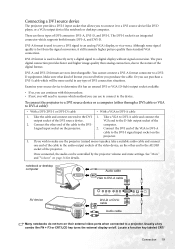
...is used to directly carry a digital signal to a digital display without signal conversion. Make sure what kind of the DVI source device. To connect the projector to a DVI source device or a computer (either through a DVI cable or VGA to DVI-A cable): • With a DVI (DVI-I or ...or a VGA output device like FN + F3 or CRT/LCD key turns the external display on/off. I signal input socket on the projector. 3. There are non-interchangeable. The pure digital connection provides faster and higher image quality than standard VGA connection. DVI-D format is an...
...is used to directly carry a digital signal to a digital display without signal conversion. Make sure what kind of the DVI source device. To connect the projector to a DVI source device or a computer (either through a DVI cable or VGA to DVI-A cable): • With a DVI (DVI-I or ...or a VGA output device like FN + F3 or CRT/LCD key turns the external display on/off. I signal input socket on the projector. 3. There are non-interchangeable. The pure digital connection provides faster and higher image quality than standard VGA connection. DVI-D format is an...

User Manual
Page 20
...if a stereo audio input is turned on the notebook. Also check that the Video source device is connected. Connecting a Component Video source device The projector is equipped with two sets of Component Video sockets in the following standards are supported: • 480i • 576i • 720p (50/... the color of the sockets; and red to a Component Video source device: 1. Press FN and the labeled function key simultaneously. To connect the projector to red. 3. Examine your notebook's key combination. LCD or a function key with this procedure. • If not, you will need to...
...if a stereo audio input is turned on the notebook. Also check that the Video source device is connected. Connecting a Component Video source device The projector is equipped with two sets of Component Video sockets in the following standards are supported: • 480i • 576i • 720p (50/... the color of the sockets; and red to a Component Video source device: 1. Press FN and the labeled function key simultaneously. To connect the projector to red. 3. Examine your notebook's key combination. LCD or a function key with this procedure. • If not, you will need to...


