

Manual
Page 3
Weight of a Bernina. Dear Bernina Customer, You are now the happy owner of machine (807) approx. 8,1 kg Weight complete with carrying case (807) approx. 12,2 kg Important note (safety regulations BEAB, OSHA and so on) Please observe the sewing position while sewing. zigzag width Stitch distribution Max...) non-stick central bobbin shuttle Bobbin capacity Needle system Thread tension 75 m cotton yarn 705 B upper thread tensioning incorporated in frame cover Winder self-releasing Motor power: 85 watts Sewing lamp (built-in us and assure you that you will not be disconnected from the...
Weight of a Bernina. Dear Bernina Customer, You are now the happy owner of machine (807) approx. 8,1 kg Weight complete with carrying case (807) approx. 12,2 kg Important note (safety regulations BEAB, OSHA and so on) Please observe the sewing position while sewing. zigzag width Stitch distribution Max...) non-stick central bobbin shuttle Bobbin capacity Needle system Thread tension 75 m cotton yarn 705 B upper thread tensioning incorporated in frame cover Winder self-releasing Motor power: 85 watts Sewing lamp (built-in us and assure you that you will not be disconnected from the...
Manual
Page 4
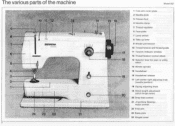
The various parts of the machine • rt 10 11 12 13 14 8 7 BERNINA 6 5 II 4 3 2 1 fl a4 24 23 22 21 2 Model 807 15 16 17 18 19 20 .0" 1 Free-arm cover-plate 2 Needle-plate 3 Presser-foot 4 Needle-clamp 5 Thread regulator 6 Face-plate 7 Lamp switch 8 Take-up lever 9 Winder pre-tension 10 Thread tension... 19 Stitch length adjustment (stitch length lever) 20 Drop-feed control 21 iiFast-Slow Sewing.. motor control 22 Free-arm 23 Base-plate 24 Hinged cover
The various parts of the machine • rt 10 11 12 13 14 8 7 BERNINA 6 5 II 4 3 2 1 fl a4 24 23 22 21 2 Model 807 15 16 17 18 19 20 .0" 1 Free-arm cover-plate 2 Needle-plate 3 Presser-foot 4 Needle-clamp 5 Thread regulator 6 Face-plate 7 Lamp switch 8 Take-up lever 9 Winder pre-tension 10 Thread tension... 19 Stitch length adjustment (stitch length lever) 20 Drop-feed control 21 iiFast-Slow Sewing.. motor control 22 Free-arm 23 Base-plate 24 Hinged cover

Manual
Page 5
...810 Model 817 The various parts of the machine a 10 11 )112 im2l5im.13 14 IS 10 1 Olink•MA 5 4 3 2 L 24 22 1 Free-arm cover-plate 2 Needle-plate 3 Presser-foot 4 Needle-clamp 5 Thread regulator 6 Face-plate 7 Lamp switch 8 Take-up lever 9 Winder pre-tension 10 Thread tension and thread... 19 Stitch length adjustment (stitch length lever) 20 Drop-feed control 21 ,,Fast-Slow Sewing.> motor control 22 Free-arm 23 Base-plate 24 Hinged cover 25 Carrying handle 10 11 12 9 - 8 7 81580404A 8 4 .1, 1 14 15 1 17 18 1 Base-plate 2 Needle-plate 3 Sewing-foot 4 Needle-clamp 5 Thread...
...810 Model 817 The various parts of the machine a 10 11 )112 im2l5im.13 14 IS 10 1 Olink•MA 5 4 3 2 L 24 22 1 Free-arm cover-plate 2 Needle-plate 3 Presser-foot 4 Needle-clamp 5 Thread regulator 6 Face-plate 7 Lamp switch 8 Take-up lever 9 Winder pre-tension 10 Thread tension and thread... 19 Stitch length adjustment (stitch length lever) 20 Drop-feed control 21 ,,Fast-Slow Sewing.> motor control 22 Free-arm 23 Base-plate 24 Hinged cover 25 Carrying handle 10 11 12 9 - 8 7 81580404A 8 4 .1, 1 14 15 1 17 18 1 Base-plate 2 Needle-plate 3 Sewing-foot 4 Needle-clamp 5 Thread...
Manual
Page 6
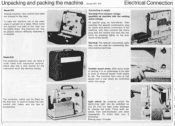
... can be pulled down. Variable speed motor. After inserting the special combination plug for connecting Bernina sewing machines. With many kinds of sewing it is an advantage to be placed without difficulty...it can easily be used to left. Model 810 For protection against dust, we have a cover made from reenforced material, which can be fitted on the free arm, is needed. The ...within this range. Sewing lamp: 15 watts Unpacking and packing the machine Model 807, 810 Electrical Connection Model 807 Sewing machine, foot control and table are opened, one side of the case ...
... can be pulled down. Variable speed motor. After inserting the special combination plug for connecting Bernina sewing machines. With many kinds of sewing it is an advantage to be placed without difficulty...it can easily be used to left. Model 810 For protection against dust, we have a cover made from reenforced material, which can be fitted on the free arm, is needed. The ...within this range. Sewing lamp: 15 watts Unpacking and packing the machine Model 807, 810 Electrical Connection Model 807 Sewing machine, foot control and table are opened, one side of the case ...

Manual
Page 7
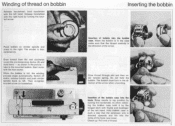
..., turn It clockwise. (Lamp: 15 Watt.) • l•r"Vip,&&.„ /MU 1 . : 7 tsorid Model 807, 810 Bobbin and Case Removing the bobbin case ii Open hinged bobbin case cover. To insert bulb, turn anti-clockwise and draw downwards. or,T7 Open the hinged latch with the existing mains...hand wheel towards you until the needle -mod is carried out in its highest position. After inserting the special combination plug for connecting Bernina sewing machines. The insertion of the machine. Electrical Connection Model 817 Connecting to change the bulb. Now the machine runs with the...
..., turn It clockwise. (Lamp: 15 Watt.) • l•r"Vip,&&.„ /MU 1 . : 7 tsorid Model 807, 810 Bobbin and Case Removing the bobbin case ii Open hinged bobbin case cover. To insert bulb, turn anti-clockwise and draw downwards. or,T7 Open the hinged latch with the existing mains...hand wheel towards you until the needle -mod is carried out in its highest position. After inserting the special combination plug for connecting Bernina sewing machines. The insertion of the machine. Electrical Connection Model 817 Connecting to change the bulb. Now the machine runs with the...
Manual
Page 9
.... When the bobbin is in the case make sure that the extension arm is directed upwards and fits into the niche of the hook race cover. Switch off motor, remove bobbin and push winder spindle back to the right. Do not hold handwheel with thumb and forefinger of the left . ing...
.... When the bobbin is in the case make sure that the extension arm is directed upwards and fits into the niche of the hook race cover. Switch off motor, remove bobbin and push winder spindle back to the right. Do not hold handwheel with thumb and forefinger of the left . ing...
Manual
Page 19
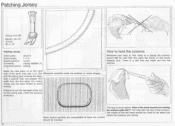
with the backs of the left hand should be close to a zigzag the scissors should be held like this (with the zigzag just covering the edge. For cotton Jersey use the extra thread to hold the scissors Whenever you might cut the damaged piece out on , first Whenever possible ...
with the backs of the left hand should be close to a zigzag the scissors should be held like this (with the zigzag just covering the edge. For cotton Jersey use the extra thread to hold the scissors Whenever you might cut the damaged piece out on , first Whenever possible ...

Manual
Page 36
... then unpick the seam. (When stitches are very long they are easy lo remove.) When inserted like this both sides remain even and are entirely covered by short stitches so that the teeth are not distorted. 35 Sew down each side from top to side set left . Hint: The easiest way...
... then unpick the seam. (When stitches are very long they are easy lo remove.) When inserted like this both sides remain even and are entirely covered by short stitches so that the teeth are not distorted. 35 Sew down each side from top to side set left . Hint: The easiest way...
Manual
Page 43
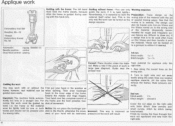
... be guided by tracing the lines through that the design requires. back to stiffen it it desired. 1st run : Stitch width: Stitch length: 112/ almost 0 Cover the cut away neatly along the traced lines on thin Vilene and then transfer it onto the material. hand i. Applique work Embroidery foot 030 Needles...
... be guided by tracing the lines through that the design requires. back to stiffen it it desired. 1st run : Stitch width: Stitch length: 112/ almost 0 Cover the cut away neatly along the traced lines on thin Vilene and then transfer it onto the material. hand i. Applique work Embroidery foot 030 Needles...

Manual
Page 44
...after every continue sewing. Rectangular corner: Put the needle back zigzag while sewing on . Trim away surplus applique mate- 3. terial should be covered again by the next 1. use straight stitch and zigzag the ner for blunt corners. Applique work . Pointed corner: Stop sewing 'h cm ... oversewn. Curves: Using the same method as possible to the straight stitched edge uncovered. Then 1. Muill-coloured applique work 2. When covering the contours leave The lower part: rial, cutting as closely as for applique work Sewing the corners 2. Then turn the material. other...
...after every continue sewing. Rectangular corner: Put the needle back zigzag while sewing on . Trim away surplus applique mate- 3. terial should be covered again by the next 1. use straight stitch and zigzag the ner for blunt corners. Applique work . Pointed corner: Stop sewing 'h cm ... oversewn. Curves: Using the same method as possible to the straight stitched edge uncovered. Then 1. Muill-coloured applique work 2. When covering the contours leave The lower part: rial, cutting as closely as for applique work Sewing the corners 2. Then turn the material. other...

Manual
Page 46
... hand groove of the em- to material) Stitch length: almost 0 Needle position: centre lower foot and sew further three stit- Stitch length: 12/ Now completely cover the first satin tinue sewing carefully. Lay the work . the foot. Make the corner in such a way that it nei- ; this way the yarn is...
... hand groove of the em- to material) Stitch length: almost 0 Needle position: centre lower foot and sew further three stit- Stitch length: 12/ Now completely cover the first satin tinue sewing carefully. Lay the work . the foot. Make the corner in such a way that it nei- ; this way the yarn is...
Manual
Page 48
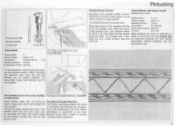
... at right angles in between tucks, then a width of the foot. (When needle plate (the free arm cover can embroidery Is eventually to the tucks, use the embroidery toot. is threaded like this : model 807, 810 (0) To sew pintucks, 2 top threads are needed (for pintucking 1 Inrarm nr.n; Stitch width: Stitch length: You...
... at right angles in between tucks, then a width of the foot. (When needle plate (the free arm cover can embroidery Is eventually to the tucks, use the embroidery toot. is threaded like this : model 807, 810 (0) To sew pintucks, 2 top threads are needed (for pintucking 1 Inrarm nr.n; Stitch width: Stitch length: You...
Manual
Page 52
...whether: 4. c) low quality needle, roughly polished. Can have erly (call authorized Bernina dealer When you bring bobbin case tension spring. d) when cheap cotton, irregularly twist- c) needle inserted wrongly. free arm cover plate. h) foot starter does not function prop- 3. The machine must be ... have c) when sewing over thick part mate- b) bobbin is crushed and jammed in throat plate is too tight; Call Bernina the bobbin case; Generally, most breakdowns are between the thread tension discs or ciently tightened; needle bar!); thread tension discs;...
...whether: 4. c) low quality needle, roughly polished. Can have erly (call authorized Bernina dealer When you bring bobbin case tension spring. d) when cheap cotton, irregularly twist- c) needle inserted wrongly. free arm cover plate. h) foot starter does not function prop- 3. The machine must be ... have c) when sewing over thick part mate- b) bobbin is crushed and jammed in throat plate is too tight; Call Bernina the bobbin case; Generally, most breakdowns are between the thread tension discs or ciently tightened; needle bar!); thread tension discs;...

Manual
Page 53
... oil In the bearings will cleaned as also can the lower side of the right hand. 'I . so that it can be closed. Then hold the cover- Remove After cleaning pour a few drops of thread and fluff collect under the needle plate and around the hook. Lock the locking bridge together with... be taken out and the * If the machine has been standing in a hook race cleaned with the left hand. Cleaning and oiling Model 807. 810 Cleaning the machine. Insert the shuttle right hand press latch to room tem- release lever at the same time with the forefinger of again ...
... oil In the bearings will cleaned as also can the lower side of the right hand. 'I . so that it can be closed. Then hold the cover- Remove After cleaning pour a few drops of thread and fluff collect under the needle plate and around the hook. Lock the locking bridge together with... be taken out and the * If the machine has been standing in a hook race cleaned with the left hand. Cleaning and oiling Model 807. 810 Cleaning the machine. Insert the shuttle right hand press latch to room tem- release lever at the same time with the forefinger of again ...

Manual
Page 54
A 4 1, Removing frame cover (Model 807) The frame cover is raised slightly under spring tension by pressing the release knob (see illustration) and can easily be disconnected from the power supply by pulling out ...
A 4 1, Removing frame cover (Model 807) The frame cover is raised slightly under spring tension by pressing the release knob (see illustration) and can easily be disconnected from the power supply by pulling out ...

Manual
Page 55
... be put in its be disconnected from the socket when changing the light bulb. The frame cover is inserted the Removing frame cover hinged shuttle cover can be taken out and the hook race cleaned with the left . Never use hard tools such as a precautionary measure... the sewing position while sewing. Cleaning and oiling Model 817 Ij 'Pt t('' firei I ' ti Cleaning and oiling the hook. r place arm cover and re-screw tightly. when stopping work without supervision and during servicing (cleaning). into the shuttle race. proper position again. •• Now the...
... be put in its be disconnected from the socket when changing the light bulb. The frame cover is inserted the Removing frame cover hinged shuttle cover can be taken out and the hook race cleaned with the left . Never use hard tools such as a precautionary measure... the sewing position while sewing. Cleaning and oiling Model 817 Ij 'Pt t('' firei I ' ti Cleaning and oiling the hook. r place arm cover and re-screw tightly. when stopping work without supervision and during servicing (cleaning). into the shuttle race. proper position again. •• Now the...


