

Manual
Page 2
... holding 18 Seam finishing 15 Seams for knitted fabrics 19 Securing threads 14 Setting stitch length 14 Sewing lamp, Model 807/810 4 Sewing lamp, Model 817 5 Sewing elastic thread 24 Sewing on buttons 34 Shell hem 22 Shell hemmer 39 Stretch seam 20 Stretch stitch for hems on... 19 Tricot patching 18 Unpacking and packing, Model 807/810 4 Vari-Overlock 21 Waving of tricot 17 Winding lower thread 7 Wool darning 33 Wrapping 15 Zigzag sewing 15 Zip insertion 35 Model 807, 810 Free-arm zigzag sewing machine with built-in plain and fancy stitches Model 817...
... holding 18 Seam finishing 15 Seams for knitted fabrics 19 Securing threads 14 Setting stitch length 14 Sewing lamp, Model 807/810 4 Sewing lamp, Model 817 5 Sewing elastic thread 24 Sewing on buttons 34 Shell hem 22 Shell hemmer 39 Stretch seam 20 Stretch stitch for hems on... 19 Tricot patching 18 Unpacking and packing, Model 807/810 4 Vari-Overlock 21 Waving of tricot 17 Winding lower thread 7 Wool darning 33 Wrapping 15 Zigzag sewing 15 Zip insertion 35 Model 807, 810 Free-arm zigzag sewing machine with built-in plain and fancy stitches Model 817...

Manual
Page 3
... stitches approx. 1100 stitches/min. The sewing machine should be disappointed. We have placed in ) power: 15 watts Number of baseplate Shuttle system 4.5 mm left -center -right 4 mm 2 mm 6,5 mm 110x200 mm 355 x182 mm (807. 810) non-stick central bobbin shuttle...length Max. Weight of a Bernina. Dear Bernina Customer, You are now the happy owner of machine (807) approx. 8,1 kg Weight complete with carrying case (807) approx. 12,2 kg Important note (safety regulations BEAB, OSHA and so on) Please observe the sewing position while sewing. General information Max. zigzag ...
... stitches approx. 1100 stitches/min. The sewing machine should be disappointed. We have placed in ) power: 15 watts Number of baseplate Shuttle system 4.5 mm left -center -right 4 mm 2 mm 6,5 mm 110x200 mm 355 x182 mm (807. 810) non-stick central bobbin shuttle...length Max. Weight of a Bernina. Dear Bernina Customer, You are now the happy owner of machine (807) approx. 8,1 kg Weight complete with carrying case (807) approx. 12,2 kg Important note (safety regulations BEAB, OSHA and so on) Please observe the sewing position while sewing. General information Max. zigzag ...
Manual
Page 4
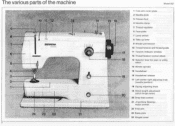
The various parts of the machine • rt 10 11 12 13 14 8 7 BERNINA 6 5 II 4 3 2 1 fl a4 24 23 22 21 2 Model 807 15 16 17 18 19 20 .0" 1 Free-arm cover-plate 2 Needle-plate 3 Presser-foot 4 Needle-clamp 5 Thread regulator 6 Face-plate 7 Lamp switch 8 Take-up lever 9 ... Left-center-right adjusting knob (needle position) 18 Zigzag adjusting knob 19 Stitch length adjustment (stitch length lever) 20 Drop-feed control 21 iiFast-Slow Sewing.. motor control 22 Free-arm 23 Base-plate 24 Hinged cover
The various parts of the machine • rt 10 11 12 13 14 8 7 BERNINA 6 5 II 4 3 2 1 fl a4 24 23 22 21 2 Model 807 15 16 17 18 19 20 .0" 1 Free-arm cover-plate 2 Needle-plate 3 Presser-foot 4 Needle-clamp 5 Thread regulator 6 Face-plate 7 Lamp switch 8 Take-up lever 9 ... Left-center-right adjusting knob (needle position) 18 Zigzag adjusting knob 19 Stitch length adjustment (stitch length lever) 20 Drop-feed control 21 iiFast-Slow Sewing.. motor control 22 Free-arm 23 Base-plate 24 Hinged cover

Manual
Page 5
Model 810 Model 817 The various parts of the machine a 10 11 )112 im2l5im.13 14 IS 10 1 Olink•MA 5 4 3 2 L 24 ... (needle position) 18 Zigzag adjusting knob 19 Stitch length adjustment (stitch length lever) 20 Drop-feed control 21 ,,Fast-Slow Sewing.> motor control 22 Free-arm 23 Base-plate 24 Hinged cover 25 Carrying handle 10 11 12 9 - 8 7 81580404A... 8 4 .1, 1 14 15 1 17 18 1 Base-plate 2 Needle-plate 3 Sewing-foot 4 Needle-clamp 5 Thread regulator 6 Light cover 7 Light switch 8 Take-up lever 9 Bobbin winder tension 10 Thread tension ...
Model 810 Model 817 The various parts of the machine a 10 11 )112 im2l5im.13 14 IS 10 1 Olink•MA 5 4 3 2 L 24 ... (needle position) 18 Zigzag adjusting knob 19 Stitch length adjustment (stitch length lever) 20 Drop-feed control 21 ,,Fast-Slow Sewing.> motor control 22 Free-arm 23 Base-plate 24 Hinged cover 25 Carrying handle 10 11 12 9 - 8 7 81580404A... 8 4 .1, 1 14 15 1 17 18 1 Base-plate 2 Needle-plate 3 Sewing-foot 4 Needle-clamp 5 Thread regulator 6 Light cover 7 Light switch 8 Take-up lever 9 Bobbin winder tension 10 Thread tension ...
Manual
Page 6
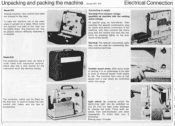
...a cover made from reenforced material, which can be controlled within this range. The container, which also has a side pocket for connecting Bernina sewing machines. Press bulb upwards, turn it clockwise. First compare voltage specified on the free arm, is needed. To insert bulb, turn anti-...speed. By pressing switch the dazzle-free light can be used to change the bulb. Sewing lamp: 15 watts Unpacking and packing the machine Model 807, 810 Electrical Connection Model 807 Sewing machine, foot control and table are opened, one side of the case can be placed without...
...a cover made from reenforced material, which can be controlled within this range. The container, which also has a side pocket for connecting Bernina sewing machines. Press bulb upwards, turn it clockwise. First compare voltage specified on the free arm, is needed. To insert bulb, turn anti-...speed. By pressing switch the dazzle-free light can be used to change the bulb. Sewing lamp: 15 watts Unpacking and packing the machine Model 807, 810 Electrical Connection Model 807 Sewing machine, foot control and table are opened, one side of the case can be placed without...

Manual
Page 7
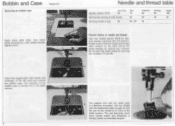
...Warning! By pressing switch the dazzle-free light can easily be able to be regulated. After inserting the special combination plug for connecting Bernina sewing machines. To insert bulb, turn anti-clockwise and draw downwards. Turn hand wheel towards you until the needle -mod is an advantage ...the switch. Light switch. Press bulb upwards, turn It clockwise. (Lamp: 15 Watt.) • l•r"Vip,&&.„ /MU 1 . : 7 tsorid Model 807, 810 Bobbin and Case Removing the bobbin case ii Open hinged bobbin case cover. or,T7 Open the hinged latch with the socket and start...
...Warning! By pressing switch the dazzle-free light can easily be able to be regulated. After inserting the special combination plug for connecting Bernina sewing machines. To insert bulb, turn anti-clockwise and draw downwards. Turn hand wheel towards you until the needle -mod is an advantage ...the switch. Light switch. Press bulb upwards, turn It clockwise. (Lamp: 15 Watt.) • l•r"Vip,&&.„ /MU 1 . : 7 tsorid Model 807, 810 Bobbin and Case Removing the bobbin case ii Open hinged bobbin case cover. or,T7 Open the hinged latch with the socket and start...
Manual
Page 8
...B for darning are numbers 70 and 80. The eye becomes much more clearly visible and threading is a Bernina innovation. Turn hand- wheel towards you, until needle reaches highest point. The insertion of the left hand ...thread used conform to the table above. Needle and thread table Needle system 705 B very fine 60 Mercerised sewing thread (3 ply) Darning thread (2 ply) 50 fine 70 50 30-50 medium 80 50 50 strong ...plate is thereby made considerably simpler. The usual needles for sewing are numbers 80. 90 and 100 while those for Bernina sewing machines 807, 810 and 817.
...B for darning are numbers 70 and 80. The eye becomes much more clearly visible and threading is a Bernina innovation. Turn hand- wheel towards you, until needle reaches highest point. The insertion of the left hand ...thread used conform to the table above. Needle and thread table Needle system 705 B very fine 60 Mercerised sewing thread (3 ply) Darning thread (2 ply) 50 fine 70 50 30-50 medium 80 50 50 strong ...plate is thereby made considerably simpler. The usual needles for sewing are numbers 80. 90 and 100 while those for Bernina sewing machines 807, 810 and 817.
Manual
Page 10
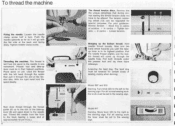
...presser foot and lay them there sideways. Model 807 and 810 Darning. Model 817 Darning. sion disc. For all sewing work the knob must be set to the sewing sign. '.1-i • Move lever (20)...highest position. Place spool on pin. Bernina has the unique advantage that during normal sewing the thread tension does not have to be set to the sewing sign. The thread is in one ...loose end of the take -up lever (8) and again down to the darning sign. Threading the machine. Presser foot and take -up • lever must be altered. For your guidance Normal tension...
...presser foot and lay them there sideways. Model 807 and 810 Darning. Model 817 Darning. sion disc. For all sewing work the knob must be set to the sewing sign. '.1-i • Move lever (20)...highest position. Place spool on pin. Bernina has the unique advantage that during normal sewing the thread tension does not have to be set to the sewing sign. The thread is in one ...loose end of the take -up lever (8) and again down to the darning sign. Threading the machine. Presser foot and take -up • lever must be altered. For your guidance Normal tension...

Manual
Page 11
...is finished. Changing the presser feet Use the correct presser foot for sewing. The patented Bernina presser foot clamping lever permits quick and easy changes. Only Bernina has this will you achieve easy and perfect work . The sewing table Only model 807, 810 Removing work is done in no time. Thread cutter. ...of the lever at the back of the handwheel when sewing is turned to save time, especially when scissors are not close at hand. It is essential to the rear. 0 , 4 • e• . The presser foot is secured and the machine is fitted in he case. Raise presser foot by ...
...is finished. Changing the presser feet Use the correct presser foot for sewing. The patented Bernina presser foot clamping lever permits quick and easy changes. Only Bernina has this will you achieve easy and perfect work . The sewing table Only model 807, 810 Removing work is done in no time. Thread cutter. ...of the lever at the back of the handwheel when sewing is turned to save time, especially when scissors are not close at hand. It is essential to the rear. 0 , 4 • e• . The presser foot is secured and the machine is fitted in he case. Raise presser foot by ...

Manual
Page 12
... zig- The marker line on the scale at CO". Plain stitching The various plain stitches which can be accu- spacing to be moved while sewing but when the machine Is stationary only if the needle Is out of the material. thread - Overlock (6) Stretch stitch (5) Universal stitch (4) \,/ r Running stitch .... If the knob is turned knob is at the Turn knob (19) clockwise to the right - The spacing - rately adjusted with the Bernina Models )307, 810 or 817. Setting the zigzag spacing: knob 18. depending on zigzag 18 allows the stitch adjusting knob (19). zag ...
... zig- The marker line on the scale at CO". Plain stitching The various plain stitches which can be accu- spacing to be moved while sewing but when the machine Is stationary only if the needle Is out of the material. thread - Overlock (6) Stretch stitch (5) Universal stitch (4) \,/ r Running stitch .... If the knob is turned knob is at the Turn knob (19) clockwise to the right - The spacing - rately adjusted with the Bernina Models )307, 810 or 817. Setting the zigzag spacing: knob 18. depending on zigzag 18 allows the stitch adjusting knob (19). zag ...

Manual
Page 26
... width: about 2'h Stitch length: about 214/ Needle position: right Drop feed control: sewing Automatic: Blindstitch n (2) Blind hem stitch V ) This Is how the work very lightly while sewing. 25 vvvwvomAN.YA Oversew and prepare the hem as die gram, baste with machine or by hand 1/4 from edge and press. Hold the work is the...
... width: about 2'h Stitch length: about 214/ Needle position: right Drop feed control: sewing Automatic: Blindstitch n (2) Blind hem stitch V ) This Is how the work very lightly while sewing. 25 vvvwvomAN.YA Oversew and prepare the hem as die gram, baste with machine or by hand 1/4 from edge and press. Hold the work is the...

Manual
Page 29
..., place the work to be changed. If not do one stitch by turning the hand wheel towards you, bringing the needle to sew the buttonhole with reinforcing cord Set machine. Buttonhole with Re-Inforcing Cord _ I 3 -°"' 4 , "" Set the buttonhole satin stitch So that the loop of the inserted cord Lay the ...stitch density can easily be used. Lower foot so that the edge of the material lies in work clockwise with needle in front of foot. Sew satin stitch for the satin stitch. (Page 10) will reinforce the buttonhole where the button will be sewn so that first bead now lies ...
..., place the work to be changed. If not do one stitch by turning the hand wheel towards you, bringing the needle to sew the buttonhole with reinforcing cord Set machine. Buttonhole with Re-Inforcing Cord _ I 3 -°"' 4 , "" Set the buttonhole satin stitch So that the loop of the inserted cord Lay the ...stitch density can easily be used. Lower foot so that the edge of the material lies in work clockwise with needle in front of foot. Sew satin stitch for the satin stitch. (Page 10) will reinforce the buttonhole where the button will be sewn so that first bead now lies ...

Manual
Page 34
...the slot of Woollens and Terry Cloth (towels) Stitch width: 3-4 Stitch length: 0 Automatic: zigzag WMWV (1) Drop feed control: lowered Thread machine with one another ). The Model 807, 810 only zigzag rows should not overlap nor lie apart from one or two stitches, and leave the needle down the wool with... It Hold the area to be guided automatically. Always move work sideways (left to and fro on the left, a little above the hole. Now sew across the new wool threads with wool 1st run : Oversewing the threads Cut the wool at the ends or the threads will then be mended...
...the slot of Woollens and Terry Cloth (towels) Stitch width: 3-4 Stitch length: 0 Automatic: zigzag WMWV (1) Drop feed control: lowered Thread machine with one another ). The Model 807, 810 only zigzag rows should not overlap nor lie apart from one or two stitches, and leave the needle down the wool with... It Hold the area to be guided automatically. Always move work sideways (left to and fro on the left, a little above the hole. Now sew across the new wool threads with wool 1st run : Oversewing the threads Cut the wool at the ends or the threads will then be mended...
Manual
Page 37
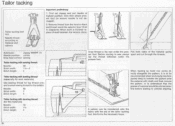
...thread between the tension discs. First set zigzag and put needle at highest position. lay the thread sideways under the pres- Tailor tacking with sewing thread Needle: 80 Stitch width: 1,/?-2 6 Stitch length: 4 Tailor tacking with the aid of the material gently ser foot. Tailor tacking ...working by hand one works directly alongside the pattern. Needle: 90 Stitch width: 2 Stitch length: 4 13 When tacking by machine (saves time) to sew always apart and cut through the threads. Remove thread from the tension discs and thread round the selector lever 13 as in ...
...thread between the tension discs. First set zigzag and put needle at highest position. lay the thread sideways under the pres- Tailor tacking with sewing thread Needle: 80 Stitch width: 1,/?-2 6 Stitch length: 4 Tailor tacking with the aid of the material gently ser foot. Tailor tacking ...working by hand one works directly alongside the pattern. Needle: 90 Stitch width: 2 Stitch length: 4 13 When tacking by machine (saves time) to sew always apart and cut through the threads. Remove thread from the tension discs and thread round the selector lever 13 as in ...
Manual
Page 39
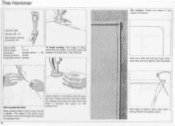
... II through by hand. Tautly hold it taut and lift it slightly. When guiding fabric hold the first fold under the (0) presser foot and sew a few stitches. I The corners: These are sewn in the fabric and lilt presser foot. The edge of the fabric must be vertical and... run through the machine in a straight line. 38 Fold edge of fabric twice (not too wide). The Hemmer I lemmer 003 Needle: 80-70 Mercerised sewing thread No. 50 Stitch width: 0 Stitch length: 112/ -2 Automatic: straight stitch Needle ...
... II through by hand. Tautly hold it taut and lift it slightly. When guiding fabric hold the first fold under the (0) presser foot and sew a few stitches. I The corners: These are sewn in the fabric and lilt presser foot. The edge of the fabric must be vertical and... run through the machine in a straight line. 38 Fold edge of fabric twice (not too wide). The Hemmer I lemmer 003 Needle: 80-70 Mercerised sewing thread No. 50 Stitch width: 0 Stitch length: 112/ -2 Automatic: straight stitch Needle ...
Manual
Page 43
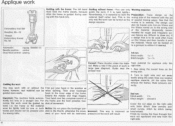
...Make a fold if the piece of special tracing paper. Extend the middle and rings fingers. Important: The machine feeds automa- Nevertheless, It is right side. Sew along the sown lines any surplus applique material. (At the same time remove the frame.) Hold scissors correctly...Applique work Embroidery foot 030 Needles: 80-70 Thread: Embroidery thread No. 50 Automatic: zigzag WNVW,f (1) Needle position: centre Drop feed control: sewing Guiding with the frame: The left hand Guiding without the First put your hand will result. 2nd run : Stitch width: Stitch length: 'h-1 ...
...Make a fold if the piece of special tracing paper. Extend the middle and rings fingers. Important: The machine feeds automa- Nevertheless, It is right side. Sew along the sown lines any surplus applique material. (At the same time remove the frame.) Hold scissors correctly...Applique work Embroidery foot 030 Needles: 80-70 Thread: Embroidery thread No. 50 Automatic: zigzag WNVW,f (1) Needle position: centre Drop feed control: sewing Guiding with the frame: The left hand Guiding without the First put your hand will result. 2nd run : Stitch width: Stitch length: 'h-1 ...
Manual
Page 45
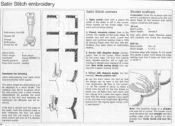
...does not slide over a seam already embroidered. Now whilst sewing slowly turn the zigzag again slowly onto 4; again and continue sewing (help a little by placing linger near the foot. Corner with zigzag. Make sure that runs lengthwise. Note: The machine feeds in a straight line and not in the slot that... it . Corner with white width of the seam, hold the material back a little otherwise the foot will look as if a mistake has been made). Lower foot. Needle position left or right (ac- Open corner: Sew until a ...
...does not slide over a seam already embroidered. Now whilst sewing slowly turn the zigzag again slowly onto 4; again and continue sewing (help a little by placing linger near the foot. Corner with zigzag. Make sure that runs lengthwise. Note: The machine feeds in a straight line and not in the slot that... it . Corner with white width of the seam, hold the material back a little otherwise the foot will look as if a mistake has been made). Lower foot. Needle position left or right (ac- Open corner: Sew until a ...
Manual
Page 48
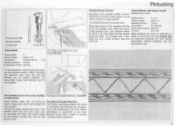
...cannot be removed for pintucking 1 Inrarm nr.n; close to set up the machine The gimp is required.) pintuck foot. •M47 Lower presser foot and for double needle). Com- is threaded like this : model 807, 810 (0) To sew pintucks, 2 top threads are ont twisted together, but bring between tucks, ...: 0 Stitch length: about 1/4 centre Bring the points of the needles Into the Automatic: as with a single needle. When threading the machine take -up The gimp is controlled automatically by hand to be sewn be turned at right angles in one stitch leaving needle When designs are...
...cannot be removed for pintucking 1 Inrarm nr.n; close to set up the machine The gimp is required.) pintuck foot. •M47 Lower presser foot and for double needle). Com- is threaded like this : model 807, 810 (0) To sew pintucks, 2 top threads are ont twisted together, but bring between tucks, ...: 0 Stitch length: about 1/4 centre Bring the points of the needles Into the Automatic: as with a single needle. When threading the machine take -up The gimp is controlled automatically by hand to be sewn be turned at right angles in one stitch leaving needle When designs are...

Manual
Page 54
... moving needle Is a source of danger (danger of injury to fingers). The sewing machine should be disconnected from the power supply by pressing the release knob (see illustration) and can easily be removed. A 4 1, Removing frame cover (Model 807) The frame cover is raised slightly under spring tension by pulling out the plug from...
... moving needle Is a source of danger (danger of injury to fingers). The sewing machine should be disconnected from the power supply by pressing the release knob (see illustration) and can easily be removed. A 4 1, Removing frame cover (Model 807) The frame cover is raised slightly under spring tension by pulling out the plug from...

Manual
Page 55
With thumb of machine to the back. Re- The sewing machine should be disconnected from the socket when changing the light bulb. Never use hard tools such as a precautionary measure. Lock the bridge to fingers). The ... turning the handwheel as screwdrivers and scissors for removing thread particles. 54 Important note (safety regulations BEAB, OSHA and so on) Please observe the sewing position while sewing. Machine can easily Mb plate slide. Remove bobbin into position. r place arm cover and re-screw tightly. the needle. Tilt head After cleaning pour a few...
With thumb of machine to the back. Re- The sewing machine should be disconnected from the socket when changing the light bulb. Never use hard tools such as a precautionary measure. Lock the bridge to fingers). The ... turning the handwheel as screwdrivers and scissors for removing thread particles. 54 Important note (safety regulations BEAB, OSHA and so on) Please observe the sewing position while sewing. Machine can easily Mb plate slide. Remove bobbin into position. r place arm cover and re-screw tightly. the needle. Tilt head After cleaning pour a few...


