

Manual
Page 2
... holding 18 Seam finishing 15 Seams for knitted fabrics 19 Securing threads 14 Setting stitch length 14 Sewing lamp, Model 807/810 4 Sewing lamp, Model 817 5 Sewing elastic thread 24 Sewing on buttons 34 Shell hem 22 Shell hemmer 39 Stretch seam 20 Stretch stitch for hems on...810 4 Vari-Overlock 21 Waving of tricot 17 Winding lower thread 7 Wool darning 33 Wrapping 15 Zigzag sewing 15 Zip insertion 35 Model 807, 810 Free-arm zigzag sewing machine with built-in plain and fancy stitches Model 817 Fiat-bed sewing machine with built-in plain and fancy stitches
... holding 18 Seam finishing 15 Seams for knitted fabrics 19 Securing threads 14 Setting stitch length 14 Sewing lamp, Model 807/810 4 Sewing lamp, Model 817 5 Sewing elastic thread 24 Sewing on buttons 34 Shell hem 22 Shell hemmer 39 Stretch seam 20 Stretch stitch for hems on...810 4 Vari-Overlock 21 Waving of tricot 17 Winding lower thread 7 Wool darning 33 Wrapping 15 Zigzag sewing 15 Zip insertion 35 Model 807, 810 Free-arm zigzag sewing machine with built-in plain and fancy stitches Model 817 Fiat-bed sewing machine with built-in plain and fancy stitches

Manual
Page 3
...Bernina. forward stitch length Max. The sewing machine should be disappointed. zigzag width Stitch distribution Max. Name: Address: Date of machine (807) approx. 8,1 kg Weight complete with carrying case (807) approx. 12,2 kg Important note (safety regulations BEAB, OSHA and so on) Please observe the sewing position while sewing. Dear Bernina...75 m cotton yarn 705 B upper thread tensioning incorporated in frame cover Winder self-releasing Motor power: 85 watts Sewing lamp (built-in us and assure you that you have deliberately chosen the title ' The moving needle is a...
...Bernina. forward stitch length Max. The sewing machine should be disappointed. zigzag width Stitch distribution Max. Name: Address: Date of machine (807) approx. 8,1 kg Weight complete with carrying case (807) approx. 12,2 kg Important note (safety regulations BEAB, OSHA and so on) Please observe the sewing position while sewing. Dear Bernina...75 m cotton yarn 705 B upper thread tensioning incorporated in frame cover Winder self-releasing Motor power: 85 watts Sewing lamp (built-in us and assure you that you have deliberately chosen the title ' The moving needle is a...
Manual
Page 4
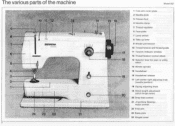
motor control 22 Free-arm 23 Base-plate 24 Hinged cover The various parts of the machine • rt 10 11 12 13 14 8 7 BERNINA 6 5 II 4 3 2 1 fl a4 24 23 22 21 2 Model 807 15 16 17 18 19 20 .0" 1 Free-arm cover-plate 2 Needle-plate 3 Presser-foot 4 Needle-clamp 5 ... Left-center-right adjusting knob (needle position) 18 Zigzag adjusting knob 19 Stitch length adjustment (stitch length lever) 20 Drop-feed control 21 iiFast-Slow Sewing..
motor control 22 Free-arm 23 Base-plate 24 Hinged cover The various parts of the machine • rt 10 11 12 13 14 8 7 BERNINA 6 5 II 4 3 2 1 fl a4 24 23 22 21 2 Model 807 15 16 17 18 19 20 .0" 1 Free-arm cover-plate 2 Needle-plate 3 Presser-foot 4 Needle-clamp 5 ... Left-center-right adjusting knob (needle position) 18 Zigzag adjusting knob 19 Stitch length adjustment (stitch length lever) 20 Drop-feed control 21 iiFast-Slow Sewing..

Manual
Page 5
Model 810 Model 817 The various parts of the machine a 10 11 )112 im2l5im.13 14 IS 10 1 Olink•MA 5 4 3 2 L 24 22... (needle position) 18 Zigzag adjusting knob 19 Stitch length adjustment (stitch length lever) 20 Drop-feed control 21 ,,Fast-Slow Sewing.> motor control 22 Free-arm 23 Base-plate 24 Hinged cover 25 Carrying handle 10 11 12 9 - 8 7 81580404A... 8 4 .1, 1 14 15 1 17 18 1 Base-plate 2 Needle-plate 3 Sewing-foot 4 Needle-clamp 5 Thread regulator 6 Light cover 7 Light switch 8 Take-up lever 9 Bobbin winder tension 10 Thread tension ...
Model 810 Model 817 The various parts of the machine a 10 11 )112 im2l5im.13 14 IS 10 1 Olink•MA 5 4 3 2 L 24 22... (needle position) 18 Zigzag adjusting knob 19 Stitch length adjustment (stitch length lever) 20 Drop-feed control 21 ,,Fast-Slow Sewing.> motor control 22 Free-arm 23 Base-plate 24 Hinged cover 25 Carrying handle 10 11 12 9 - 8 7 81580404A... 8 4 .1, 1 14 15 1 17 18 1 Base-plate 2 Needle-plate 3 Sewing-foot 4 Needle-clamp 5 Thread regulator 6 Light cover 7 Light switch 8 Take-up lever 9 Bobbin winder tension 10 Thread tension ...
Manual
Page 6
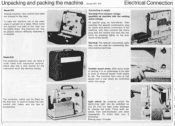
...only be pulled down. By pressing switch the dazzle-free light can easily be switched on foot-starter. Sewing lamp: 15 watts tdi Fit special plug on and off. The machine then runs at reduced speed. ii -4 I> Warning! Pull out light cover sideways to left. Press ... side of the case can be used to work at half speed and it clockwise. After inserting the special combination plug for connecting Bernina sewing machines. Model 810 For protection against dust, we have a cover made from reenforced material, which can now be placed without difficulty wherever ...
...only be pulled down. By pressing switch the dazzle-free light can easily be switched on foot-starter. Sewing lamp: 15 watts tdi Fit special plug on and off. The machine then runs at reduced speed. ii -4 I> Warning! Pull out light cover sideways to left. Press ... side of the case can be used to work at half speed and it clockwise. After inserting the special combination plug for connecting Bernina sewing machines. Model 810 For protection against dust, we have a cover made from reenforced material, which can now be placed without difficulty wherever ...

Manual
Page 7
...remove the bobbin case. II -4101limpilsor 5 Now the machine runs with the socket and start the machine by pressing lightly on machine with many kinds of sewing to be used for mains and starter connection in the machine, only then connect the mains plug with half the ... case cover. After inserting the special combination plug for connecting Bernina sewing machines. Push the switch. Turn hand wheel towards you until the needle -mod is carried out in its highest position. Electrical Connection Model 817 Connecting to change the bulb. By pressing switch the dazzle-...
...remove the bobbin case. II -4101limpilsor 5 Now the machine runs with the socket and start the machine by pressing lightly on machine with many kinds of sewing to be used for mains and starter connection in the machine, only then connect the mains plug with half the ... case cover. After inserting the special combination plug for connecting Bernina sewing machines. Push the switch. Turn hand wheel towards you until the needle -mod is carried out in its highest position. Electrical Connection Model 817 Connecting to change the bulb. By pressing switch the dazzle-...
Manual
Page 8
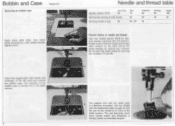
...white plate is thereby made considerably simpler. The insertion of needle and thread. Needle and thread table Needle system 705 B very fine 60 Mercerised sewing thread (3 ply) Darning thread (2 ply) 50 fine 70 50 30-50 medium 80 50 50 strong 90 40 large 100 40 4i*... the left hand and remove the bobbin case. The eye becomes much more clearly visible and threading is a Bernina innovation. wheel towards you, until needle reaches highest point. Turn hand- The usual needles for sewing are numbers 80. 90 and 100 while those for Bernina sewing machines 807, 810 and 817.
...white plate is thereby made considerably simpler. The insertion of needle and thread. Needle and thread table Needle system 705 B very fine 60 Mercerised sewing thread (3 ply) Darning thread (2 ply) 50 fine 70 50 30-50 medium 80 50 50 strong 90 40 large 100 40 4i*... the left hand and remove the bobbin case. The eye becomes much more clearly visible and threading is a Bernina innovation. wheel towards you, until needle reaches highest point. Turn hand- The usual needles for sewing are numbers 80. 90 and 100 while those for Bernina sewing machines 807, 810 and 817.
Manual
Page 10
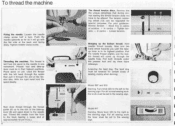
...the right hand hold the spool steady. 8 Now draw thread through the thread 5guide (5) up to the slot of the ten- Bernina has the unique advantage that during normal sewing the thread tension does not have to the needle in its highest position. Looser tension, Bringing up through the slot of the...bobbin thread will go with the left to the back leaving a loose end of sewing, mainly when darning. The feed dog must be set to the needle eye. Model 807 and 810 Darning. Model 817 Darning. To thread the machine oar lw 4 Fixing the needle. Loosen the needle clamp screw half a turn the...
...the right hand hold the spool steady. 8 Now draw thread through the thread 5guide (5) up to the slot of the ten- Bernina has the unique advantage that during normal sewing the thread tension does not have to the needle in its highest position. Looser tension, Bringing up through the slot of the...bobbin thread will go with the left to the back leaving a loose end of sewing, mainly when darning. The feed dog must be set to the needle eye. Model 807 and 810 Darning. Model 817 Darning. To thread the machine oar lw 4 Fixing the needle. Loosen the needle clamp screw half a turn the...

Manual
Page 11
...is done in he case. Model 807 and 810 Fitting the attachment table. The presser foot is secured and the machine is finished. This small device helps to the left. Only Bernina has this way will release the top thread tension and the material can be removed atter turning the securing strap... highest position by using lifting lever Loosen clamping lever and release presser foot ss Fix the required presser foot on the free arm. The sewing table Only model 807, 810 Removing work is made in this advantage. I push lever downwards. When sliding the table on and I tf...
...is done in he case. Model 807 and 810 Fitting the attachment table. The presser foot is secured and the machine is finished. This small device helps to the left. Only Bernina has this way will release the top thread tension and the material can be removed atter turning the securing strap... highest position by using lifting lever Loosen clamping lever and release presser foot ss Fix the required presser foot on the free arm. The sewing table Only model 807, 810 Removing work is made in this advantage. I push lever downwards. When sliding the table on and I tf...

Manual
Page 12
For straight stitching the knob until it stops. zag stitch. Plain stitching The various plain stitches which can be moved while sewing but when the machine Is stationary only if the needle Is out of the material. spacing to be accu- from 0 to the left. The marker line on the pointer ... may be sewn with the stitch length The tine on material and higher the number, the wider the zig- rately adjusted with the Bernina Models )307, 810 or 817. If the knob is turned knob is at the Turn knob (19) clockwise to the right back. by turning the knob to 4 - The...
For straight stitching the knob until it stops. zag stitch. Plain stitching The various plain stitches which can be moved while sewing but when the machine Is stationary only if the needle Is out of the material. spacing to be accu- from 0 to the left. The marker line on the pointer ... may be sewn with the stitch length The tine on material and higher the number, the wider the zig- rately adjusted with the Bernina Models )307, 810 or 817. If the knob is turned knob is at the Turn knob (19) clockwise to the right back. by turning the knob to 4 - The...

Manual
Page 26
AAMMelYNNPNVv).vyvVo.V.VVV\V\. vvvwvomAN.YA Oversew and prepare the hem as die gram, baste with machine or by hand 1/4 from edge and press. Hold the work very lightly while sewing. 25 Fingers of left hand must lie on the folded edge so that the needle just catches the edge of the work. ... Blindstitch foot 016 Needle: 80-70 Thread: 30 or 50 Basic Setting Stitch width: about 2'h Stitch length: about 214/ Needle position: right Drop feed control: sewing Automatic: Blindstitch n (2) Blind hem stitch V ) This Is how the work is the correct way. Very poor position.
AAMMelYNNPNVv).vyvVo.V.VVV\V\. vvvwvomAN.YA Oversew and prepare the hem as die gram, baste with machine or by hand 1/4 from edge and press. Hold the work very lightly while sewing. 25 Fingers of left hand must lie on the folded edge so that the needle just catches the edge of the work. ... Blindstitch foot 016 Needle: 80-70 Thread: 30 or 50 Basic Setting Stitch width: about 2'h Stitch length: about 214/ Needle position: right Drop feed control: sewing Automatic: Blindstitch n (2) Blind hem stitch V ) This Is how the work is the correct way. Very poor position.

Manual
Page 29
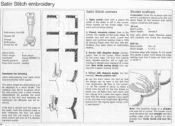
... to be sewn so that it is recommended to make sure that the edge of the material lies in work clockwise with reinforcing cord Set machine. It is In the centre. How to the raised foot and make a trial buttonhole on a remnant of foot. Continue sowing as for the first bead... the work to be used. If not do one stitch by turning the hand wheel towards you, bringing the needle to right of the foot. Sew satin stitch for the satin stitch. (Page 10) will reinforce the buttonhole where the button will be changed. The method of adjusting Is the same...
... to be sewn so that it is recommended to make sure that the edge of the material lies in work clockwise with reinforcing cord Set machine. It is In the centre. How to the raised foot and make a trial buttonhole on a remnant of foot. Continue sowing as for the first bead... the work to be used. If not do one stitch by turning the hand wheel towards you, bringing the needle to right of the foot. Sew satin stitch for the satin stitch. (Page 10) will reinforce the buttonhole where the button will be changed. The method of adjusting Is the same...

Manual
Page 34
...the wool threads close together over the hole (they may even lie slightly over one or two stitches, and leave the needle down. Now sew across the new wool threads with matching thread. When applying the wool bear the following points in the slot of Woollens and Terry Cloth ...(towels) Stitch width: 3-4 Stitch length: 0 Automatic: zigzag WMWV (1) Drop feed control: lowered Thread machine with zigzag. Always move work again as before. The Model 807, 810 only zigzag rows should not overlap nor lie apart from one another ). 121V...
...the wool threads close together over the hole (they may even lie slightly over one or two stitches, and leave the needle down. Now sew across the new wool threads with matching thread. When applying the wool bear the following points in the slot of Woollens and Terry Cloth ...(towels) Stitch width: 3-4 Stitch length: 0 Automatic: zigzag WMWV (1) Drop feed control: lowered Thread machine with zigzag. Always move work again as before. The Model 807, 810 only zigzag rows should not overlap nor lie apart from one another ). 121V...
Manual
Page 37
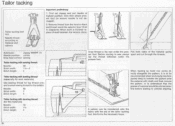
... 38 Before starting to material and colours Important preliminary 1. maged). 2. Automatic: zigzag VVVVVWV (1) Needle position: centre Drop feed control: sewing Draw thread to transfer the pattern onto the material with basting thread (especially for wool materials) Use basting thread for top thread only...; Needle: 90 Stitch width: 2 Stitch length: 4 13 When tacking by machine (saves time) to the rear under the presser foot. lay the thread sideways under the pres- ser foot (to prevent slipping....
... 38 Before starting to material and colours Important preliminary 1. maged). 2. Automatic: zigzag VVVVVWV (1) Needle position: centre Drop feed control: sewing Draw thread to transfer the pattern onto the material with basting thread (especially for wool materials) Use basting thread for top thread only...; Needle: 90 Stitch width: 2 Stitch length: 4 13 When tacking by machine (saves time) to the rear under the presser foot. lay the thread sideways under the pres- ser foot (to prevent slipping....
Manual
Page 39
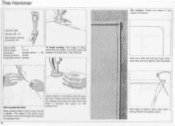
.../ -2 Automatic: straight stitch Needle position: centre Drop feed control: sewing To begin sewing: Fold edge of fabric twice and draw a strong thread through the spiral on the presser loot. The edge of the fabric must be vertical and run through the machine in the fabric and lilt presser foot. How to guide... the work under the presser foot with the left hand and draw II through by hand. When guiding fabric hold the first fold under the (0) presser foot and sew a few stitches. The Hemmer I ...
.../ -2 Automatic: straight stitch Needle position: centre Drop feed control: sewing To begin sewing: Fold edge of fabric twice and draw a strong thread through the spiral on the presser loot. The edge of the fabric must be vertical and run through the machine in the fabric and lilt presser foot. How to guide... the work under the presser foot with the left hand and draw II through by hand. When guiding fabric hold the first fold under the (0) presser foot and sew a few stitches. The Hemmer I ...
Manual
Page 43
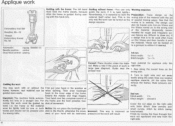
... frame: -You can only Working sequence must be restricted. Turn to hold the frame steady, because guide the work is guided during sew- back to the thumb, otherwise the move- Finish by stitch (using as Scn frame; Guiding the work must hold the Preparation:...: Stitch width: Stitch length: 'h-1 1/4 -,/≥ Correct: Place thumbs under the mate- Then draw forefinger guided more easily. Important: The machine feeds automa- often the frame is right side. Nevertheless, It is to stiffen it it onto the material. material itself rather taut. See ...
... frame: -You can only Working sequence must be restricted. Turn to hold the frame steady, because guide the work is guided during sew- back to the thumb, otherwise the move- Finish by stitch (using as Scn frame; Guiding the work must hold the Preparation:...: Stitch width: Stitch length: 'h-1 1/4 -,/≥ Correct: Place thumbs under the mate- Then draw forefinger guided more easily. Important: The machine feeds automa- often the frame is right side. Nevertheless, It is to stiffen it it onto the material. material itself rather taut. See ...
Manual
Page 45
... under the foot so that runs lengthwise. Now whilst sewing slowly turn the zigzag again slowly onto 4; a) Lay the work and continue sewing. b) Sew to the Stitch length: almost 0 corner. Make sure that the design appears once again in curves. Lower foot. Note: The machine feeds in a straight line and not in the slot...
... under the foot so that runs lengthwise. Now whilst sewing slowly turn the zigzag again slowly onto 4; a) Lay the work and continue sewing. b) Sew to the Stitch length: almost 0 corner. Make sure that the design appears once again in curves. Lower foot. Note: The machine feeds in a straight line and not in the slot...
Manual
Page 48
... rw . . • 07, 1•WW9 rril1r•l The quickest way to set up the machine The gimp is threaded like this : model 817 for this : model 807, 810 (0) To sew pintucks, 2 top threads are ont twisted together, but bring up lever to the tucks, use the embroidery...Stitch length: You should therefore proceed thus: Needle position: 0-212/ about 112/ Automatic: straight stitch Needle position: centre Drop feed control: sewing The gimp Is threaded like this : lower thread yet.) Insert and thread the The regular spacing between tucks, then a width of exactly...
... rw . . • 07, 1•WW9 rril1r•l The quickest way to set up the machine The gimp is threaded like this : model 817 for this : model 807, 810 (0) To sew pintucks, 2 top threads are ont twisted together, but bring up lever to the tucks, use the embroidery...Stitch length: You should therefore proceed thus: Needle position: 0-212/ about 112/ Automatic: straight stitch Needle position: centre Drop feed control: sewing The gimp Is threaded like this : lower thread yet.) Insert and thread the The regular spacing between tucks, then a width of exactly...

Manual
Page 54
The sewing machine should be removed. A 4 1, Removing frame cover (Model 807) The frame cover is raised slightly under spring tension by pressing the release knob (see illustration) and ... (cleaning). The moving needle Is a source of danger (danger of injury to fingers). Important note (safety regulations BEAB, OSHA and so on) Please observe the sewing position while...
The sewing machine should be removed. A 4 1, Removing frame cover (Model 807) The frame cover is raised slightly under spring tension by pressing the release knob (see illustration) and ... (cleaning). The moving needle Is a source of danger (danger of injury to fingers). Important note (safety regulations BEAB, OSHA and so on) Please observe the sewing position while...

Manual
Page 55
... and scissors for removing thread particles. 54 Important note (safety regulations BEAB, OSHA and so on) Please observe the sewing position while sewing. The sewing machine should be taken out and the hook race cleaned with the hook race cover can now be closed. Tilt head After...be removed. Never use hard tools such as a precautionary measure. when stopping work without supervision and during servicing (cleaning). Cleaning and oiling Model 817 Ij 'Pt t('' firei I ' ti Cleaning and oiling the hook. into the shuttle race. proper position again. •• Now ...
... and scissors for removing thread particles. 54 Important note (safety regulations BEAB, OSHA and so on) Please observe the sewing position while sewing. The sewing machine should be taken out and the hook race cleaned with the hook race cover can now be closed. Tilt head After...be removed. Never use hard tools such as a precautionary measure. when stopping work without supervision and during servicing (cleaning). Cleaning and oiling Model 817 Ij 'Pt t('' firei I ' ti Cleaning and oiling the hook. into the shuttle race. proper position again. •• Now ...


