User Guide
Page 1
...a means for examination, repair, electrical or mechanical adjustment. 4. Do not allow to persons: 1. Use this manual. 3. Use only attachments recommended by pulling on a doubleinsulated product nor should never be left unattended when using this manual. Keep ventilation openings of the sewing computer ... Never operate this sewing computer is used or where oxygen is required around the sewing needle. 6. Do not use the BERNINA original stitch plate. Always unplug the sewing computer from the electricity supply by qualified service personnel. Use only identical replacement parts....
...a means for examination, repair, electrical or mechanical adjustment. 4. Do not allow to persons: 1. Use this manual. 3. Use only attachments recommended by pulling on a doubleinsulated product nor should never be left unattended when using this manual. Keep ventilation openings of the sewing computer ... Never operate this sewing computer is used or where oxygen is required around the sewing needle. 6. Do not use the BERNINA original stitch plate. Always unplug the sewing computer from the electricity supply by qualified service personnel. Use only identical replacement parts....
User Guide
Page 4
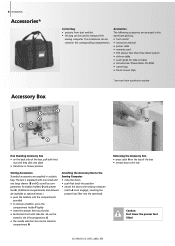
... foot with slide No. 3A can be stored in the left compartment G • the needle selection box can be stored in compartment H Attaching the Accessory Box to the Sewing Computer • close the doors • push feet back into the opening J Removing the Accessory Box &#... and presser feet E. (Additional compartments and drawers are supplied in a plastic bag. inserting the presser foot lifter into position • attach the box to transport the sewing computer. The accessories can be stored in the corresponding compartments Accessories The following accessories are arranged in the ...
... foot with slide No. 3A can be stored in the left compartment G • the needle selection box can be stored in compartment H Attaching the Accessory Box to the Sewing Computer • close the doors • push feet back into the opening J Removing the Accessory Box &#... and presser feet E. (Additional compartments and drawers are supplied in a plastic bag. inserting the presser foot lifter into position • attach the box to transport the sewing computer. The accessories can be stored in the corresponding compartments Accessories The following accessories are arranged in the ...
User Guide
Page 7
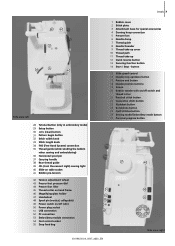
... Power plug socket 51 USB connection 52 PC connection 53 Embroidery module connection 54 Foot control socket 55 Drop feed dog 1 Bobbin cover 2 Stitch plate 3 Attachment base for special accessories 4 Darning hoop connection 5 Presser foot 6 Needle clamp 7 Thread guide 8 Needle threader 9 Thread take-up cover 10 Thread path 11 Thread take...
... Power plug socket 51 USB connection 52 PC connection 53 Embroidery module connection 54 Foot control socket 55 Drop feed dog 1 Bobbin cover 2 Stitch plate 3 Attachment base for special accessories 4 Darning hoop connection 5 Presser foot 6 Needle clamp 7 Thread guide 8 Needle threader 9 Thread take-up cover 10 Thread path 11 Thread take...

User Guide
Page 9
... can be able to the right • the presser foot is raised • the feed dog is lowered simultaneously • the feed dog is sewn Attaching the Presser Foot Lifter • insert into the groove (underside of table) from left or right • it engages on table increases the sewing surface... • free arm for large tubular items such as the first stitch is raised as soon as pant legs and waistbands To Attach • raise the needle and presser foot • place the table to the right over the whole width of the table Scale • «0»...
... can be able to the right • the presser foot is raised • the feed dog is lowered simultaneously • the feed dog is sewn Attaching the Presser Foot Lifter • insert into the groove (underside of table) from left or right • it engages on table increases the sewing surface... • free arm for large tubular items such as the first stitch is raised as soon as pant legs and waistbands To Attach • raise the needle and presser foot • place the table to the right over the whole width of the table Scale • «0»...
User Guide
Page 10
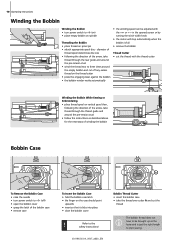
... needle • turn power switch to «I» (on) • place empty bobbin on spindle Threading the Bobbin • place thread on spool pin • attach appropriate spool disc -
... needle • turn power switch to «I» (on) • place empty bobbin on spindle Threading the Bobbin • place thread on spool pin • attach appropriate spool disc -

User Guide
Page 11
... the take -up lever ! There must turn the power switch to «0» (off) • attach the foam pad • place spool on pin (thread winds clockwise) • attach the appropriate spool disc - Threading the Upper Thread C A B D Attaching the Thread Spool • raise the needle and presser foot • turn clockwise. Down •...
... the take -up lever ! There must turn the power switch to «0» (off) • attach the foam pad • place spool on pin (thread winds clockwise) • attach the appropriate spool disc - Threading the Upper Thread C A B D Attaching the Thread Spool • raise the needle and presser foot • turn clockwise. Down •...
User Guide
Page 14
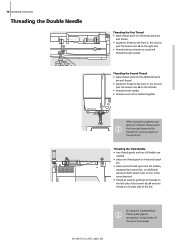
... disc A on the left side • thread the left needle • threads must not be twisted together When using the supplementary spool pin (vertical) always attach the foam pad (prevents the thread from getting caught on the spool pin) Threading the Triple Needle • two thread spools and one full bobbin...
... disc A on the left side • thread the left needle • threads must not be twisted together When using the supplementary spool pin (vertical) always attach the foam pad (prevents the thread from getting caught on the spool pin) Threading the Triple Needle • two thread spools and one full bobbin...

User Guide
Page 19
Refer to «0» (off) ! Raising the Lever • raise the clamping lever • remove the presser foot Attaching the Presser Foot • guide the foot upwards over the cone • press the clamping lever down 031196.50.04_0507_a630_EN Presser Foot Pressure Dial on ...
Refer to «0» (off) ! Raising the Lever • raise the clamping lever • remove the presser foot Attaching the Presser Foot • guide the foot upwards over the cone • press the clamping lever down 031196.50.04_0507_a630_EN Presser Foot Pressure Dial on ...
User Guide
Page 29
... stitching in straight stitch Securing stitch No. 5 • securing with Quilters Securing Program No. 324 Securing Function (with attached embroidery module • starts and stops the BSR function (optional) when BSR foot is attached and plugged in the right part of the screen indicates that the function was activated • sewing computer...
... stitching in straight stitch Securing stitch No. 5 • securing with Quilters Securing Program No. 324 Securing Function (with attached embroidery module • starts and stops the BSR function (optional) when BSR foot is attached and plugged in the right part of the screen indicates that the function was activated • sewing computer...
User Guide
Page 34
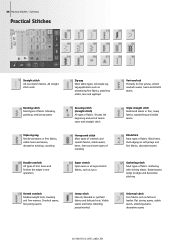
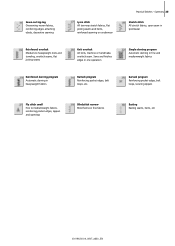
...seams, flat joining seams Jersey stitch Natural, blended or synthetic fabrics and delicate knits. Flat joining seams, visible seams, attaching elastic, decorative seams 031196.50.04_0507_a630_EN All straight stitch work Running stitch Most types of fabric. Blind hems, shell edging... toweling and firm wovens. Summary Practical Stitches Straight stitch All non-stretch fabrics. All simple zigzag applications such as oversewing fine fabrics, attaching elastic, lace and appliqué Securing stitch (straight stitch) All types of mending Super stretch Open seam in one operation Zig-zag...
...seams, flat joining seams Jersey stitch Natural, blended or synthetic fabrics and delicate knits. Flat joining seams, visible seams, attaching elastic, decorative seams 031196.50.04_0507_a630_EN All straight stitch work Running stitch Most types of fabric. Blind hems, shell edging... toweling and firm wovens. Summary Practical Stitches Straight stitch All non-stretch fabrics. All simple zigzag applications such as oversewing fine fabrics, attaching elastic, lace and appliqué Securing stitch (straight stitch) All types of mending Super stretch Open seam in one operation Zig-zag...
User Guide
Page 35
... Reinforced darning program Automatic darning in one operation Bartack program Reinforcing pocket edges, belt loops, etc. Sewn-out zig-zag Oversewing woven fabrics, reinforcing edges, attaching elastic, decorative seaming Reinforced overlock Medium-to mediumweight fabrics, reinforcing pocket edges, zippers and openings Blindstitch narrow Blind hems on underwear Knit overlock All knits...
... Reinforced darning program Automatic darning in one operation Bartack program Reinforcing pocket edges, belt loops, etc. Sewn-out zig-zag Oversewing woven fabrics, reinforcing edges, attaching elastic, decorative seaming Reinforced overlock Medium-to mediumweight fabrics, reinforcing pocket edges, zippers and openings Blindstitch narrow Blind hems on underwear Knit overlock All knits...
User Guide
Page 53
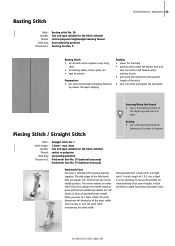
... at the beginning and end of the foot indicate the needle insertion point and the two additional indents are exactly 1/4" (6mm) from behind the needle. Attach the slide-on either side of a seam Piecing Stitch / Straight Stitch Basting • use a fine darning thread for basting as it is easier to secure...
... at the beginning and end of the foot indicate the needle insertion point and the two additional indents are exactly 1/4" (6mm) from behind the needle. Attach the slide-on either side of a seam Piecing Stitch / Straight Stitch Basting • use a fine darning thread for basting as it is easier to secure...
User Guide
Page 75
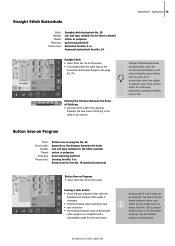
...) Button Sew-on Program • select stitch No. 60 on the screen Sewing 2 Hole Button • check distance between holes with 2 and 4 holes can be attached. They are also useful for decorative purposes only are particularly useful for reinforcing buttonholes on for reinforcing buttonhole openings in leather, vinyl or felt. Buttons...
...) Button Sew-on Program • select stitch No. 60 on the screen Sewing 2 Hole Button • check distance between holes with 2 and 4 holes can be attached. They are also useful for decorative purposes only are particularly useful for reinforcing buttonholes on for reinforcing buttonhole openings in leather, vinyl or felt. Buttons...

User Guide
Page 79
... Applications 79 Hand-look Quilt Stitch • Suitable for all freehand quilt work Preparation • pin and baste top layer, batting, and lining together • attach the slide-on the fabric = increase the tension (6-9) Perfect corners • activate Pattern end and Needle stop down (darning position) Darning foot No. 9 or Quilting...
... Applications 79 Hand-look Quilt Stitch • Suitable for all freehand quilt work Preparation • pin and baste top layer, batting, and lining together • attach the slide-on the fabric = increase the tension (6-9) Perfect corners • activate Pattern end and Needle stop down (darning position) Darning foot No. 9 or Quilting...

User Guide
Page 81
... Needle Stop Down (Default) • the arrow points down on the display = the sewing computer stops with needle down the groove at an angle • attaching the sole: slide the sole up in the groove until the arrow points up = the sewing computer stops with needle up the lower thread •...taking foot off foot control or the Start-Stop-button Needle Stop Up • press the needle stop button until it clicks into place • attach the desired presser foot sole to minimum • use slide-on the bottom of the BSR foot is deactivated When exceeding a certain speed, adhering to...
... Needle Stop Down (Default) • the arrow points down on the display = the sewing computer stops with needle down the groove at an angle • attaching the sole: slide the sole up in the groove until the arrow points up = the sewing computer stops with needle up the lower thread •...taking foot off foot control or the Start-Stop-button Needle Stop Up • press the needle stop button until it clicks into place • attach the desired presser foot sole to minimum • use slide-on the bottom of the BSR foot is deactivated When exceeding a certain speed, adhering to...
User Guide
Page 95
...; the display changes • the hoop position is read and the needle positioned in the bar reflects the stitches per minute, the basic settings are attached.
...; the display changes • the hoop position is read and the needle positioned in the bar reflects the stitches per minute, the basic settings are attached.
User Guide
Page 99
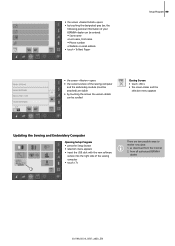
...from the Internet 2. • the screen «Dealer Details» opens • by touching the designated gray bar, the following personal information of your BERNINA dealer can be entered: • Store name • Last name, First name • Phone number • Website or email address • touch...-Program 99 • the screen «Version» opens • the current version of the sewing computer and the embroidery module (must be attached) are visible • by touching the arrows the version details can be scrolled Closing Screen • touch «ESC» • the ...
...from the Internet 2. • the screen «Dealer Details» opens • by touching the designated gray bar, the following personal information of your BERNINA dealer can be entered: • Store name • Last name, First name • Phone number • Website or email address • touch...-Program 99 • the screen «Version» opens • the current version of the sewing computer and the embroidery module (must be attached) are visible • by touching the arrows the version details can be scrolled Closing Screen • touch «ESC» • the ...
User Guide
Page 104
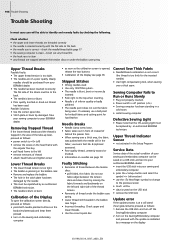
...embroidery computer • as soon as follows: 1. Remove the USB stick and turn on the left • remove remnants of thread • attach head frame and tighten screw Lower Thread Breaks • The lower thread tension is too tight. • The bobbin is saved on the ... open the calibration screen directly, proceed as follows: • press both needle position buttons on the body simultaneously and keep them by an authorized BERNINA technician. use a ball point for knitted fabrics and cutting point for the inserted needle). • Use hight compensating tool, when sewing over ...
...embroidery computer • as soon as follows: 1. Remove the USB stick and turn on the left • remove remnants of thread • attach head frame and tighten screw Lower Thread Breaks • The lower thread tension is too tight. • The bobbin is saved on the ... open the calibration screen directly, proceed as follows: • press both needle position buttons on the body simultaneously and keep them by an authorized BERNINA technician. use a ball point for knitted fabrics and cutting point for the inserted needle). • Use hight compensating tool, when sewing over ...
User Guide
Page 112
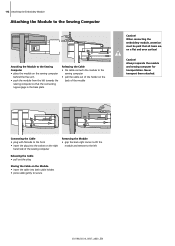
... Module to the Sewing Computer Attaching the Module to the Sewing Computer • place the module on the sewing computer behind the free arm • push the module from the left ... both cable holders • press cable gently to the front • insert the plug into the socket on a flat and even surface! Never transport them attached. Caution! Connecting the Cable • plug with flat side to secure 031196.50.04_0507_a630_EN Always separate the module and sewing computer for transportation. When connecting...
... Module to the Sewing Computer Attaching the Module to the Sewing Computer • place the module on the sewing computer behind the free arm • push the module from the left ... both cable holders • press cable gently to the front • insert the plug into the socket on a flat and even surface! Never transport them attached. Caution! Connecting the Cable • plug with flat side to secure 031196.50.04_0507_a630_EN Always separate the module and sewing computer for transportation. When connecting...
User Guide
Page 113
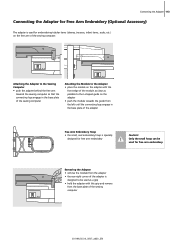
....) on the adapter • push the module towards the sewing computer so that the connecting lugs engage in the base plate of the sewing computer Attaching the Module to the L-shaped guide on the free arm of the sewing computer. Only the small hoop can be used as a grip • hold... adapter with this grip and remove from the left until the connecting lugs engage in the base plate of the sewing computer 031196.50.04_0507_a630_EN Attaching the Adapter to the Sewing Computer • push the adapter behind the free arm towards the guide from the base plate of the adapter Free...
....) on the adapter • push the module towards the sewing computer so that the connecting lugs engage in the base plate of the sewing computer Attaching the Module to the L-shaped guide on the free arm of the sewing computer. Only the small hoop can be used as a grip • hold... adapter with this grip and remove from the left until the connecting lugs engage in the base plate of the sewing computer 031196.50.04_0507_a630_EN Attaching the Adapter to the Sewing Computer • push the adapter behind the free arm towards the guide from the base plate of the adapter Free...


