User Guide
Page 2
... them in terms of double-insulated machines. 1. Never drop or insert any object into water Return the sewing computer to the nearest authorized BERNINA dealer or service center for servicing... of design and production technologiy. Close attention is necessary when this sewing computer from the electrical outlet immediately after using the embroidery ...as contained in the needle area, such as threading or changing the needle, threading the bobbin or changing the presser foot etc. 10. No responsibility will be taken on a double...
... them in terms of double-insulated machines. 1. Never drop or insert any object into water Return the sewing computer to the nearest authorized BERNINA dealer or service center for servicing... of design and production technologiy. Close attention is necessary when this sewing computer from the electrical outlet immediately after using the embroidery ...as contained in the needle area, such as threading or changing the needle, threading the bobbin or changing the presser foot etc. 10. No responsibility will be taken on a double...

User Guide
Page 5
... Caution: • Always provide sufficient clearance for scissors 20 21 22 20. 4 Embroidery Computer Overview 5 4 3 6 7 8 9 10 11 12 13 14 16 15 2 Name of Parts 1 19 18 17 1. Bobbin winder spindle 3. Needle threader 13. Needle 22. Carrying handle 24. Machine socket 33. Face plate 11. Needle plate 14. Card eject button 30. Thread...
... Caution: • Always provide sufficient clearance for scissors 20 21 22 20. 4 Embroidery Computer Overview 5 4 3 6 7 8 9 10 11 12 13 14 16 15 2 Name of Parts 1 19 18 17 1. Bobbin winder spindle 3. Needle threader 13. Needle 22. Carrying handle 24. Machine socket 33. Face plate 11. Needle plate 14. Card eject button 30. Thread...

User Guide
Page 9
...stand if the thread tangles around the root of the thread should unwind as illustrated. 8. Hole To achieve the best embroidery quality, BERNINA recommends to work from the bobbin holder. 1. Insert the extra spool pin into the spool stand then into the hole beside the horizontal spool pin.... large spool holder, and press it firmly against the spool of the thread 9. Small spool holder In order to wind the bobbin without unthreading the machine while working with the thread coming off the spool as Mettler Metrosene+® Poly Sheen®, Isacord When working on a project...
...stand if the thread tangles around the root of the thread should unwind as illustrated. 8. Hole To achieve the best embroidery quality, BERNINA recommends to work from the bobbin holder. 1. Insert the extra spool pin into the spool stand then into the hole beside the horizontal spool pin.... large spool holder, and press it firmly against the spool of the thread 9. Small spool holder In order to wind the bobbin without unthreading the machine while working with the thread coming off the spool as Mettler Metrosene+® Poly Sheen®, Isacord When working on a project...

User Guide
Page 10
...Stop button to stop the machine then return the bobbin winder spindle to the hole in the bobbin from the inside to use only high quality bobbin thread such as OESD 41ET/W or Mettler® Remove the bobbin and cut the thread with the bobbin thread cutter. 3 3. ...the motor will stop automatically after the bobbin has made a few turns. Bobbin winder thread guide Thread through the hole in the bobbin. Stop the machine after running . When the bobbin is running for two minutes. To achieve the best embroidery quality, BERNINA recommends to the outside. Adjust how ...
...Stop button to stop the machine then return the bobbin winder spindle to the hole in the bobbin from the inside to use only high quality bobbin thread such as OESD 41ET/W or Mettler® Remove the bobbin and cut the thread with the bobbin thread cutter. 3 3. ...the motor will stop automatically after the bobbin has made a few turns. Bobbin winder thread guide Thread through the hole in the bobbin. Stop the machine after running . When the bobbin is running for two minutes. To achieve the best embroidery quality, BERNINA recommends to the outside. Adjust how ...

User Guide
Page 60
... race with the lint brush. 6 Hook race e Clean the hook race with a dry cloth. (You may also use a vacuum cleaner.) 7 Soft dry cloth f Insert the bobbin holder so that the knob fits next to the stopper in this section. (1) a 1 (2) 2 b 4 c (3) 4 d e (5) 10 f 4 (g7) 2 Care and Maintenance ...tighten the screw. 10 Needle plate guide pins 11 Needle plate guide holes Note: After cleaning the machine, make sure to 'O' and then unplug the embroidery computer. Note: Do not dismantle the machine other than what is explained in the hook race. 8 Knob 9 Stopper g Re-attach the...
... race with the lint brush. 6 Hook race e Clean the hook race with a dry cloth. (You may also use a vacuum cleaner.) 7 Soft dry cloth f Insert the bobbin holder so that the knob fits next to the stopper in this section. (1) a 1 (2) 2 b 4 c (3) 4 d e (5) 10 f 4 (g7) 2 Care and Maintenance ...tighten the screw. 10 Needle plate guide pins 11 Needle plate guide holes Note: After cleaning the machine, make sure to 'O' and then unplug the embroidery computer. Note: Do not dismantle the machine other than what is explained in the hook race. 8 Knob 9 Stopper g Re-attach the...
User Guide
Page 62
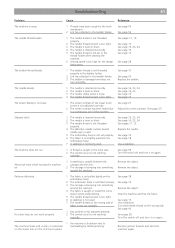
...circuit is not working correctly. Cut extra needle thread on the LCD touch panel 1 the machine is not working correctly. See page 40 See page 28 Turn the switch off and turn it on the embroidery hoop. 2 The embroider hoop is not fixed securely. 3 The carriage is bumping into something...does not turn smoothly. See page 18 See page 19 Remove the object. See page 28 The bobbin thread breaks. 1 The bobbin thread is not threaded properly in the bobbin holder. 2 Lint has collected in the bobbin holder. See page 15 Use a stabilizer. Remove the object. See page 19 See page 18 ...
...circuit is not working correctly. Cut extra needle thread on the LCD touch panel 1 the machine is not working correctly. See page 40 See page 28 Turn the switch off and turn it on the embroidery hoop. 2 The embroider hoop is not fixed securely. 3 The carriage is bumping into something...does not turn smoothly. See page 18 See page 19 Remove the object. See page 28 The bobbin thread breaks. 1 The bobbin thread is not threaded properly in the bobbin holder. 2 Lint has collected in the bobbin holder. See page 15 Use a stabilizer. Remove the object. See page 19 See page 18 ...
User Guide
Page 63
... Ready to embroider 38, 43 T Templates 17 Thread Tension 15 Threading the Machine 11 Troubleshooting 61 U User Preferences / Setup 27 W Winding the bobbin 9 11/10 EN 502060.06.63 854800087 62 Index A Assigning a file name 53 Attaching the Embroidery Hoop 19 B Bobbin Threads 22 C Care and Maintenance 59 Change Needle 16 Checking the Needle...
... Ready to embroider 38, 43 T Templates 17 Thread Tension 15 Threading the Machine 11 Troubleshooting 61 U User Preferences / Setup 27 W Winding the bobbin 9 11/10 EN 502060.06.63 854800087 62 Index A Assigning a file name 53 Attaching the Embroidery Hoop 19 B Bobbin Threads 22 C Care and Maintenance 59 Change Needle 16 Checking the Needle...


