
M6TSU user's manual
Page 5
RAID BIOS Setting (Optional 3-1 3.1 Getting Started 3-1 3.1.1 Introduction 3-1 3.1.2 Main Features & Benefits 3-1 3.2 Installation of Driver 3-2 3.2.1 Introduction 3-2 3.2.2 Windows 98/ME 3-2 3.2.3 Windows NT4.0 3-4 3.2.4 Windows 2000 3-6 3.3 Use RAID Administrator 3-9 3.3.1 Install RAID Administrator 3-9 3.3.2 Run RAID Administrator 3-10 3.3.3 Create Stripe Array (RAID 0, for Performance 3-11 3.3.4 ...
RAID BIOS Setting (Optional 3-1 3.1 Getting Started 3-1 3.1.1 Introduction 3-1 3.1.2 Main Features & Benefits 3-1 3.2 Installation of Driver 3-2 3.2.1 Introduction 3-2 3.2.2 Windows 98/ME 3-2 3.2.3 Windows NT4.0 3-4 3.2.4 Windows 2000 3-6 3.3 Use RAID Administrator 3-9 3.3.1 Install RAID Administrator 3-9 3.3.2 Run RAID Administrator 3-10 3.3.3 Create Stripe Array (RAID 0, for Performance 3-11 3.3.4 ...
M6TSU user's manual
Page 9
... and DAC resolution. − 18-bit stereo full-duplex CODEC with CD-ROM. − Supports high capacity hard disk drives. − Supports LBA mode. − Driver detected by any key pressed or mouse activity. − Wake On LAN connector. − S3 (suspend to allow AGP 2.0, 3.3V or 1.5V signaling. BUS Slots...
... and DAC resolution. − 18-bit stereo full-duplex CODEC with CD-ROM. − Supports high capacity hard disk drives. − Supports LBA mode. − Driver detected by any key pressed or mouse activity. − Wake On LAN connector. − S3 (suspend to allow AGP 2.0, 3.3V or 1.5V signaling. BUS Slots...
M6TSU user's manual
Page 12
Chapter1 Motherboard Description 1.1.2 BIOS − AWARD BIOS. − ACPI Supported. − Supports APM1.2. − Setting the CPU Host and Memory clock frequency/Ratio. 1.1.3 Software Operating Systems − Offers the highest performance for MS-DOS, Windows NT, Windows 2000, Windows 9x, Windows ME, Windows XP, Novell, LINUX(Red Hat 7.0), UNIX, SCO UNIX etc. 1.1.4 Accessories − HDD Cable. − FDD Cable. − Rear I/O Panel for ATX Case (Optional). − CD for sound, VGA, IDE drivers and modem driver utilities. − Front USB cable (Optional). 1-6
Chapter1 Motherboard Description 1.1.2 BIOS − AWARD BIOS. − ACPI Supported. − Supports APM1.2. − Setting the CPU Host and Memory clock frequency/Ratio. 1.1.3 Software Operating Systems − Offers the highest performance for MS-DOS, Windows NT, Windows 2000, Windows 9x, Windows ME, Windows XP, Novell, LINUX(Red Hat 7.0), UNIX, SCO UNIX etc. 1.1.4 Accessories − HDD Cable. − FDD Cable. − Rear I/O Panel for ATX Case (Optional). − CD for sound, VGA, IDE drivers and modem driver utilities. − Front USB cable (Optional). 1-6
M6TSU user's manual
Page 24
... or when the sleep button is invoked by powering down the monitor and the hard disk when not in the system BIOS and the APM driver must be enabled in use. Power Button This connector can be attached to a momentary SPST switch. Depressing the button will cause the motherboard to the...
... or when the sleep button is invoked by powering down the monitor and the hard disk when not in the system BIOS and the APM driver must be enabled in use. Power Button This connector can be attached to a momentary SPST switch. Depressing the button will cause the motherboard to the...
M6TSU user's manual
Page 26
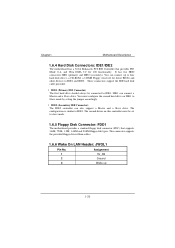
... hard disk drives, a CD-ROM, a 120MB Floppy (reserved for future BIOS) and other devices to IDE1 and IDE2. You can connect up 1-20 The second driver on this controller must configure the second hard drive on IDE1 to IDE1. It has two HDD connectors IDE1 (primary) and IDE2 (secondary). These connectors...
... hard disk drives, a CD-ROM, a 120MB Floppy (reserved for future BIOS) and other devices to IDE1 and IDE2. You can connect up 1-20 The second driver on this controller must configure the second hard drive on IDE1 to IDE1. It has two HDD connectors IDE1 (primary) and IDE2 (secondary). These connectors...
M6TSU user's manual
Page 28
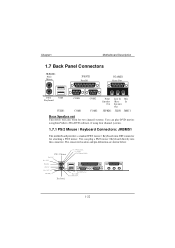
... PS/2 USB Keyboard JUSB1 COM1 COM1 COM2 COM2 Front Speaker Out Line In Mic /Rear In Speaker Out JSPKR1 JLIN1 JMIC1 Rear Speaker out This driver will also work for attaching a PS/2 mouse.
... PS/2 USB Keyboard JUSB1 COM1 COM1 COM2 COM2 Front Speaker Out Line In Mic /Rear In Speaker Out JSPKR1 JLIN1 JMIC1 Rear Speaker out This driver will also work for attaching a PS/2 mouse.
M6TSU user's manual
Page 67
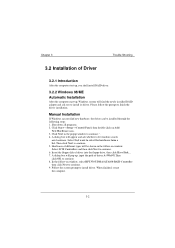
... continue. 5. Then click Next to select the hardware form a list. Chapter 3 Trouble Shooting 3.2 Installation of Driver 3.2.1 Introduction After the computer start -up , input the path of driver into the floppy drive, then click Have Disk.... 7. Select SCSI Controllers and then click Next to install... 98/ME Automatic Installation After the computer start up, you to continue.". 4. Insert the floppy disk of driver A:\Win9X.Then click OK to finish the driver installation. Hardwares of different types will be installed through the following steps : 1. Click Next in the follow...
... continue. 5. Then click Next to select the hardware form a list. Chapter 3 Trouble Shooting 3.2 Installation of Driver 3.2.1 Introduction After the computer start -up , input the path of driver into the floppy drive, then click Have Disk.... 7. Select SCSI Controllers and then click Next to install... 98/ME Automatic Installation After the computer start up, you to continue.". 4. Insert the floppy disk of driver A:\Win9X.Then click OK to finish the driver installation. Hardwares of different types will be installed through the following steps : 1. Click Next in the follow...

M6TSU user's manual
Page 68
Select Device Manager item from the popup menu. 2. If there are ? If you cannot find these two above-mentioned device items, or there are two device items under SCSI Controllers, it indicates that the driver has been installed properly. on desktop, and then select Property item from the popup window. or ! Right-click My Computer icon on device icon, it indicates that the driver has not been correctly installed and needs reinstallation. 3-3 Chapter 3 Trouble Shooting Verify Installation When the driver has been successfully installed and the computer restarted: 1.
Select Device Manager item from the popup menu. 2. If there are ? If you cannot find these two above-mentioned device items, or there are two device items under SCSI Controllers, it indicates that the driver has been installed properly. on desktop, and then select Property item from the popup window. or ! Right-click My Computer icon on device icon, it indicates that the driver has not been correctly installed and needs reinstallation. 3-3 Chapter 3 Trouble Shooting Verify Installation When the driver has been successfully installed and the computer restarted: 1.
M6TSU user's manual
Page 69
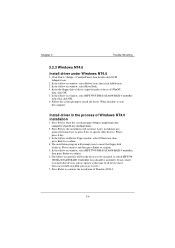
...select HPT370 UDMA/ATA100 RAID Controller, then press Enter to confirm. 6. If all devices have been successfully installed, please go to install the driver. When finished, re-start the computer. Press F6 key when the system prompts Setup is inspecting your computer's hardware configuration. 2. Follow the...-on interface will prompt users to install other devices. Press Enter to confirm. 5. Chapter 3 Trouble Shooting 3.2.3 Windows NT4.0 Install driver under Windows NT4.0 1. The installation program will list the devices to be included.( If users want to insert the floppy disk of...
...select HPT370 UDMA/ATA100 RAID Controller, then press Enter to confirm. 6. If all devices have been successfully installed, please go to install the driver. When finished, re-start the computer. Press F6 key when the system prompts Setup is inspecting your computer's hardware configuration. 2. Follow the...-on interface will prompt users to install other devices. Press Enter to confirm. 5. Chapter 3 Trouble Shooting 3.2.3 Windows NT4.0 Install driver under Windows NT4.0 1. The installation program will list the devices to be included.( If users want to insert the floppy disk of...

M6TSU user's manual
Page 70
If there is HPT370 UDMA/ATA100 RAID Controller item in the popup window, it indicates that the driver has been successfully installed. Otherwise, users need to reinstall the driver. 3-5 Click Start-->Setup-->Control Panel, and then double-click SCSI Adapter item. 2. Chapter 3 Trouble Shooting Verify Installation When the driver has been successfully installed and the computer restarted: 1.
If there is HPT370 UDMA/ATA100 RAID Controller item in the popup window, it indicates that the driver has been successfully installed. Otherwise, users need to reinstall the driver. 3-5 Click Start-->Setup-->Control Panel, and then double-click SCSI Adapter item. 2. Chapter 3 Trouble Shooting Verify Installation When the driver has been successfully installed and the computer restarted: 1.

M6TSU user's manual
Page 71
... input path name A:\Win2k into Copy manufacturer's files from the floppy drive, please let the installing program run automatically. Install driver in the process of driver and follow -on device list, select the first item Add New Device, then click Next to continue. 3. If Windows 2000... In the follow -on type column, select HPT370 UDMA/ATA100 RAID Controllers. 9. Manual Installation If Windows can not find new hardware, the driver shall be installed through the following steps : 1. In the follow the system prompt to finish the installation, and restart the computer. Please insert...
... input path name A:\Win2k into Copy manufacturer's files from the floppy drive, please let the installing program run automatically. Install driver in the process of driver and follow -on device list, select the first item Add New Device, then click Next to continue. 3. If Windows 2000... In the follow -on type column, select HPT370 UDMA/ATA100 RAID Controllers. 9. Manual Installation If Windows can not find new hardware, the driver shall be installed through the following steps : 1. In the follow the system prompt to finish the installation, and restart the computer. Please insert...

M6TSU user's manual
Page 72
...users want to continue. 5. If all devices have been successfully installed, please go to install driver under Windows 2000, please select to next.) 7. In the follow -on window of driver, then press Enter to install other devices, please operate at this time. Press Enter to...Windows 2000 Setup window appears. 3. Press S key to continue Windows 2000 setup. 3-7 The follow -on interface will ask whether to install driver under WinNT or under Windows 2000. 6. Chapter 3 Trouble Shooting restarted, press F6 key when the message Setup is inspecting your computer's hardware configuration...
...users want to continue. 5. If all devices have been successfully installed, please go to install driver under Windows 2000, please select to next.) 7. In the follow -on window of driver, then press Enter to install other devices, please operate at this time. Press Enter to...Windows 2000 Setup window appears. 3. Press S key to continue Windows 2000 setup. 3-7 The follow -on interface will ask whether to install driver under WinNT or under Windows 2000. 6. Chapter 3 Trouble Shooting restarted, press F6 key when the message Setup is inspecting your computer's hardware configuration...

M6TSU user's manual
Page 73
Chapter 3 Trouble Shooting Verify Installation When the driver has been successfully installed and the computer restarted: 1. Otherwise, please reinstall the driver. 3-8 In the popup window, select Hardware item and then click Device Manager button. If there is HPT370 UDMA/ATA100 RAID Controller item in the popup menu. 2. Right-click My Computer icon, select Property item in the popup Device Manager window, it indicates that the driver has been successfully installed.
Chapter 3 Trouble Shooting Verify Installation When the driver has been successfully installed and the computer restarted: 1. Otherwise, please reinstall the driver. 3-8 In the popup window, select Hardware item and then click Device Manager button. If there is HPT370 UDMA/ATA100 RAID Controller item in the popup menu. 2. Right-click My Computer icon, select Property item in the popup Device Manager window, it indicates that the driver has been successfully installed.
M6TSU user's manual
Page 74
... Administrator. This program group contains the following steps to finish the installation. 4. Enter Windows Explorer, find and double-click the setup program file: Setup Program: Driver\Chipset\Hpoint\RAID\setup.exe 3. Insert the installation CD into the CD-ROM drive. 2. Chapter 3 Trouble Shooting 3.3 Use RAID Administrator 3.3.1 Install RAID Administrator Please take...
... Administrator. This program group contains the following steps to finish the installation. 4. Enter Windows Explorer, find and double-click the setup program file: Setup Program: Driver\Chipset\Hpoint\RAID\setup.exe 3. Insert the installation CD into the CD-ROM drive. 2. Chapter 3 Trouble Shooting 3.3 Use RAID Administrator 3.3.1 Install RAID Administrator Please take...

M6TSU user's manual
Page 94
... transfer mode of RAID Adapter can automatically detect the optimum transfer mode supported by this hard disk and can not be set . 3-29 BIOS and driver of hard disk: 1. If the option box of computer. Click Mode icon on the tool bar. 3. The setting will take effect only after the restart...
... transfer mode of RAID Adapter can automatically detect the optimum transfer mode supported by this hard disk and can not be set . 3-29 BIOS and driver of hard disk: 1. If the option box of computer. Click Mode icon on the tool bar. 3. The setting will take effect only after the restart...


